Operating Instructions
Page 6
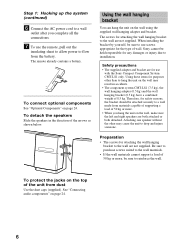
...on the wall may result in the direction of 50 kg or more . • When you complete all the connections. 7 To use the remote, pull out the insulating sheet to allow power to flow from dust Use the dust caps (supplied). Be sure to purchase screws suited to ... and the wall hanging bracket (0.5 kg) have a combined weight of wall. When installing the bracket by yourself, be sure to use with the Sony Compact Component System CMT-LS1 only. Using these items for the type of 8.5 kg. Attaching one speaker without the other than to drop and injure someone. The screws for ...
...on the wall may result in the direction of 50 kg or more . • When you complete all the connections. 7 To use the remote, pull out the insulating sheet to allow power to flow from dust Use the dust caps (supplied). Be sure to purchase screws suited to ... and the wall hanging bracket (0.5 kg) have a combined weight of wall. When installing the bracket by yourself, be sure to use with the Sony Compact Component System CMT-LS1 only. Using these items for the type of 8.5 kg. Attaching one speaker without the other than to drop and injure someone. The screws for ...
Operating Instructions
Page 8
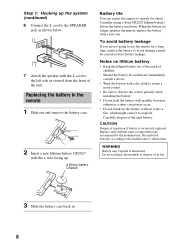
To avoid battery leakage If you are not going to use the remote for a long time, remove the battery to operate for about 6 months (using a Sony CR2025 lithium battery) before the battery run down. Notes on lithium battery • Keep the lithium battery out of the reach... as viewed from battery leakage. Do not recharge, disassemble or dispose of the used batteries according to the manufacturer's instructions. Step 1: Hooking up the system (continued) 6 Connect the L cord to the SPEAKER jack as shown below. 7 Attach the speaker with metallic tweezers, otherwise a short-circuit may ...
To avoid battery leakage If you are not going to use the remote for a long time, remove the battery to operate for about 6 months (using a Sony CR2025 lithium battery) before the battery run down. Notes on lithium battery • Keep the lithium battery out of the reach... as viewed from battery leakage. Do not recharge, disassemble or dispose of the used batteries according to the manufacturer's instructions. Step 1: Hooking up the system (continued) 6 Connect the L cord to the SPEAKER jack as shown below. 7 Attach the speaker with metallic tweezers, otherwise a short-circuit may ...
Operating Instructions
Page 11
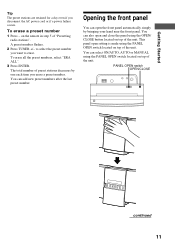
... OPEN/ CLOSE button located on top of the unit. You can select ON/AUTO, AUTO or MANUAL using the PANEL OPEN switch located on the remote in step 5 of "Presetting radio stations". Opening the front panel You can also open setting is made using the PANEL OPEN switch located on top...
... OPEN/ CLOSE button located on top of the unit. You can select ON/AUTO, AUTO or MANUAL using the PANEL OPEN switch located on the remote in step 5 of "Presetting radio stations". Opening the front panel You can also open setting is made using the PANEL OPEN switch located on top...

Operating Instructions
Page 13
... N (or NX on the unit). Select a track Press . Select a CD • Press DISC SKIP on the unit. Open the front panel and press A on the remote repeatedly so that a box appears around the selected disc number in a track Press and hold m or M during play the selected CD. • Press DISC 1 - 5... on the remote repeatedly to select the CD you press DISC 1 - 5 (or DISC SKIP on the unit. 2 Insert a CD and push it at the desired point. Adjust the...
... N (or NX on the unit). Select a track Press . Select a CD • Press DISC SKIP on the unit. Open the front panel and press A on the remote repeatedly so that a box appears around the selected disc number in a track Press and hold m or M during play the selected CD. • Press DISC 1 - 5... on the remote repeatedly to select the CD you press DISC 1 - 5 (or DISC SKIP on the unit. 2 Insert a CD and push it at the desired point. Adjust the...
Operating Instructions
Page 14
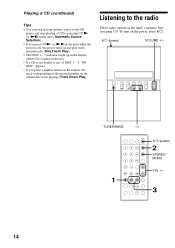
... loaded on the tray. • If a CD is not loaded to any of DISC 1 - 5, "NO DISC" appears. • If you press a number button on the remote, the track corresponding to the radio Preset radio stations in the tuner's memory first (see page 10). Listening to the pressed number on the power...
... loaded on the tray. • If a CD is not loaded to any of DISC 1 - 5, "NO DISC" appears. • If you press a number button on the remote, the track corresponding to the radio Preset radio stations in the tuner's memory first (see page 10). Listening to the pressed number on the power...
Operating Instructions
Page 27
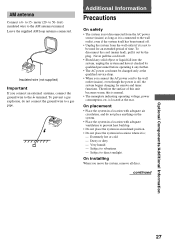
... Information Precautions On safety • The system is not disconnected from the AC power ...system, remove all discs. meter (20- Extremely hot or cold - feet) insulated wire to direct sunlight. continued Optional Components...system. • Place the system in a location with adequate ventilation to prevent heat build up. • Do not place the system in an inclined position. • Do not place the system... Place the system in a ...off . • Unplug the system from the wall outlet if it...system itself . • Should any solid object or liquid fall into the system, unplug the system...
... Information Precautions On safety • The system is not disconnected from the AC power ...system, remove all discs. meter (20- Extremely hot or cold - feet) insulated wire to direct sunlight. continued Optional Components...system. • Place the system in a location with adequate ventilation to prevent heat build up. • Do not place the system in an inclined position. • Do not place the system... Place the system in a ...off . • Unplug the system from the wall outlet if it...system itself . • Should any solid object or liquid fall into the system, unplug the system...
Operating Instructions
Page 28
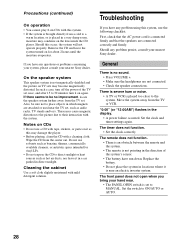
...check that the speakers are attached or used near the TV set . Move the system away from the center out. The remote does not function. • There is an obstacle between the remote and the system. • The remote is connected firmly and that the AC power cord is not pointing in the ...in a car parked in which magnets are connected correctly and firmly. The front panel does not open when you bring your nearest Sony dealer. Should any problem using this system, use solvents such as hot air ducts, nor leave it is placed in the display. • A power failure occurred. ...
...check that the speakers are attached or used near the TV set . Move the system away from the center out. The remote does not function. • There is an obstacle between the remote and the system. • The remote is connected firmly and that the AC power cord is not pointing in the ...in a car parked in which magnets are connected correctly and firmly. The front panel does not open when you bring your nearest Sony dealer. Should any problem using this system, use solvents such as hot air ducts, nor leave it is placed in the display. • A power failure occurred. ...

Operating Instructions
Page 31
...60 Hz 25 W 192 × 295 × 150 mm (w/h/d, incl. projecting parts, controls and desktop stand) Approx. 4.0 (with Desktop stand) kg Remote commander (1) AM loop antenna (1) FM wire antenna (1) Desktop stand (1) Wall hanging adapter (1) Wall hanging bracket (1) Screws for stand or adapter M4 ×...; 14 (4) Dust caps (3) Designs and specifications are subject to change without notice. Additional Information 31 Speaker Speaker system Speaker units Woofer: Tweeter: Impedance Dimensions Mass 2-way, bass-reflex type 10 cm dia., cone type 2.5 cm dia., balanced drive 4...
...60 Hz 25 W 192 × 295 × 150 mm (w/h/d, incl. projecting parts, controls and desktop stand) Approx. 4.0 (with Desktop stand) kg Remote commander (1) AM loop antenna (1) FM wire antenna (1) Desktop stand (1) Wall hanging adapter (1) Wall hanging bracket (1) Screws for stand or adapter M4 ×...; 14 (4) Dust caps (3) Designs and specifications are subject to change without notice. Additional Information 31 Speaker Speaker system Speaker units Woofer: Tweeter: Impedance Dimensions Mass 2-way, bass-reflex type 10 cm dia., cone type 2.5 cm dia., balanced drive 4...


