Operating Instructions
Page 1
Refer to them whenever you call upon your Sony dealer regarding this product. Model No Serial No CMT-HPX10W CMT-HPX9 CMT-HPX7 ©2004 Sony Corporation Record the serial number in the space provided below. 4-255-291-11(2) Micro Hi-Fi Component System Operating Instructions Owner's Record The model and serial numbers are located on the rear of the unit.
Refer to them whenever you call upon your Sony dealer regarding this product. Model No Serial No CMT-HPX10W CMT-HPX9 CMT-HPX7 ©2004 Sony Corporation Record the serial number in the space provided below. 4-255-291-11(2) Micro Hi-Fi Component System Operating Instructions Owner's Record The model and serial numbers are located on the rear of the unit.
Operating Instructions
Page 2
...FOR THE CUSTOMERS IN THE U.S.A. If this product will increase eye hazard. Increase the separation between the equipment and receiver. - Note to CATV system installer: This reminder is no guarantee that may cause harmful interference to the presence of important operating and maintenance (servicing) instructions in cabinet. And ...exterior. CAUTION The use of optical instruments with news papers, table-cloths, curtains, etc. However, there is provided to call the CATV system installer's attention to Article 820-40 of the NEC that the cable ground shall be connected to the grounding...
...FOR THE CUSTOMERS IN THE U.S.A. If this product will increase eye hazard. Increase the separation between the equipment and receiver. - Note to CATV system installer: This reminder is no guarantee that may cause harmful interference to the presence of important operating and maintenance (servicing) instructions in cabinet. And ...exterior. CAUTION The use of optical instruments with news papers, table-cloths, curtains, etc. However, there is provided to call the CATV system installer's attention to Article 820-40 of the NEC that the cable ground shall be connected to the grounding...

Operating Instructions
Page 3
... the following two conditions: (1) this device may cause undesired operation of Directive 1999/5/EC. As an ENERGY STAR® partner, Sony Corporation has determined that this device must accept any interference, including interference that may not cause interference, and (2) this product meets ... that may call; registered mark. Except for the FCC related matters only. CMT-HPX10W only NOTICE FOR THE CUSTOMERS IN THE U.S.A. sony customer Information Service Center 1-800-222-7669 or http://www.sony.com/ The Number below is for European model ENERGY STAR® is in...
... the following two conditions: (1) this device may cause undesired operation of Directive 1999/5/EC. As an ENERGY STAR® partner, Sony Corporation has determined that this device must accept any interference, including interference that may not cause interference, and (2) this product meets ... that may call; registered mark. Except for the FCC related matters only. CMT-HPX10W only NOTICE FOR THE CUSTOMERS IN THE U.S.A. sony customer Information Service Center 1-800-222-7669 or http://www.sony.com/ The Number below is for European model ENERGY STAR® is in...
Operating Instructions
Page 4
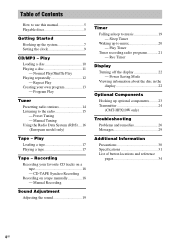
... - Normal Play/Shuffle Play Playing repeatedly 12 - Power Saving Mode Viewing information about the disc in the display 22 Optional Components Hooking up the system 7 Setting the clock 9 CD/MP3 - Play Loading a disc 10 Playing a disc 11 - Program Play Tuner Presetting radio... stations 14 Listening to use this manual 5 Playable discs 5 Getting Started Hooking up optional components......... 23 Transmitter 24 (CMT-HPX10W only) Troubleshooting ...
... - Normal Play/Shuffle Play Playing repeatedly 12 - Power Saving Mode Viewing information about the disc in the display 22 Optional Components Hooking up the system 7 Setting the clock 9 CD/MP3 - Play Loading a disc 10 Playing a disc 11 - Program Play Tuner Presetting radio... stations 14 Listening to use this manual 5 Playable discs 5 Getting Started Hooking up optional components......... 23 Transmitter 24 (CMT-HPX10W only) Troubleshooting ...
Operating Instructions
Page 5
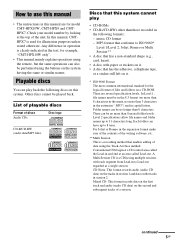
Any difference in operation is a recording method that this system cannot play back the following formats: - There are for example, "CMT-HPX10W only". • This manual mainly explains operations using the remote, but the same ... of a session. Mixed CD: This format records data on the first track and audio (audio CD data) on this system. Playable discs You can be no longer than 3 characters in the extension ".MP3") and in capital letters. List of... software, etc. ** Multi Session This is clearly indicated in the text, for model CMT-HPX10W, CMT-HPX9 and CMTHPX7.
Any difference in operation is a recording method that this system cannot play back the following formats: - There are for example, "CMT-HPX10W only". • This manual mainly explains operations using the remote, but the same ... of a session. Mixed CD: This format records data on the first track and audio (audio CD data) on this system. Playable discs You can be no longer than 3 characters in the extension ".MP3") and in capital letters. List of... software, etc. ** Multi Session This is clearly indicated in the text, for model CMT-HPX10W, CMT-HPX9 and CMTHPX7.

Operating Instructions
Page 6
Please be aware that among those discs, there are not supported. • The system may be unable to play MP3 format files that conform to the Compact Disc (CD) standard. Recently, various music discs encoded with copyright protection technologies ... back without sound. • If the disc begins with copyright protection technologies This product is determined by the tree structure of files produced by this system depending upon the recording quality or physical condition of the disc, or the characteristics of the recording device. Music discs encoded with an MP3 session...
Please be aware that among those discs, there are not supported. • The system may be unable to play MP3 format files that conform to the Compact Disc (CD) standard. Recently, various music discs encoded with copyright protection technologies ... back without sound. • If the disc begins with copyright protection technologies This product is determined by the tree structure of files produced by this system depending upon the recording quality or physical condition of the disc, or the characteristics of the recording device. Music discs encoded with an MP3 session...

Operating Instructions
Page 7
Set up your system using the supplied cords and accessories. Plug type A Extend the FM lead antenna horizontally AM loop antenna continued 7GB Getting Started Getting Started Hooking up the system Perform the following procedures 1 to 4 to the SPEAKER terminals as shown below. AM loop antenna Right speaker FM lead antenna Left speaker 2 3 1 4 1 Connect the speakers. Connect the right and left speaker cords to hook up the AM loop antenna, then connect it. Gray (3) 3 L # Insert this portion # R 3 IMUPSEED6A-1N6CΩE Black (#) 2 Connect the FM and AM antennas.
Set up your system using the supplied cords and accessories. Plug type A Extend the FM lead antenna horizontally AM loop antenna continued 7GB Getting Started Getting Started Hooking up the system Perform the following procedures 1 to 4 to the SPEAKER terminals as shown below. AM loop antenna Right speaker FM lead antenna Left speaker 2 3 1 4 1 Connect the speakers. Connect the right and left speaker cords to hook up the AM loop antenna, then connect it. Gray (3) 3 L # Insert this portion # R 3 IMUPSEED6A-1N6CΩE Black (#) 2 Connect the FM and AM antennas.

Operating Instructions
Page 8
... the batteries to avoid possible damage from battery leakage and corrosion. Tip When the remote no longer operates the system, replace both batteries with an adaptor). When carrying this system Perform the following procedure to protect the CD mechanism. 1 Switch the function to the print on the... SELECTOR for available settings. 4 Connect the power cord to the local power line voltage. Check that all discs are removed from the system and other components. 3 For models with a voltage selector, set VOLTAGE SELECTOR to a wall outlet. Inserting two R6 (size AA) batteries into the ...
... the batteries to avoid possible damage from battery leakage and corrosion. Tip When the remote no longer operates the system, replace both batteries with an adaptor). When carrying this system Perform the following procedure to protect the CD mechanism. 1 Switch the function to the print on the... SELECTOR for available settings. 4 Connect the power cord to the local power line voltage. Check that all discs are removed from the system and other components. 3 For models with a voltage selector, set VOLTAGE SELECTOR to a wall outlet. Inserting two R6 (size AA) batteries into the ...
Operating Instructions
Page 9
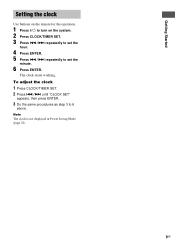
Note The clock is not displayed in Power Saving Mode (page 22). 9GB Getting Started Setting the clock Use buttons on the remote for the operation. 1 Press ?/1 to turn on the system. 2 Press CLOCK/TIMER SET. 3 Press ./> repeatedly to set the minute. 6 Press ENTER. To adjust the clock 1 Press CLOCK/TIMER SET. 2 Press ./> until "CLOCK SET" appears, then press ENTER. 3 Do the same procedures as step 3 to set the hour. 4 Press ENTER. 5 Press ./> repeatedly to 6 above. The clock starts working.
Note The clock is not displayed in Power Saving Mode (page 22). 9GB Getting Started Setting the clock Use buttons on the remote for the operation. 1 Press ?/1 to turn on the system. 2 Press CLOCK/TIMER SET. 3 Press ./> repeatedly to set the minute. 6 Press ENTER. To adjust the clock 1 Press CLOCK/TIMER SET. 2 Press ./> until "CLOCK SET" appears, then press ENTER. 3 Do the same procedures as step 3 to set the hour. 4 Press ENTER. 5 Press ./> repeatedly to 6 above. The clock starts working.

Operating Instructions
Page 10
... as this may catch and cause malfunction. • You cannot store 8 cm discs in the slot of the respective slot raises. This may cause the system to elevate the disc, then lift it out with an adaptor. When you play a disc, insert it as the remote or cords) in any slot...
... as this may catch and cause malfunction. • You cannot store 8 cm discs in the slot of the respective slot raises. This may cause the system to elevate the disc, then lift it out with an adaptor. When you play a disc, insert it as the remote or cords) in any slot...

Operating Instructions
Page 11
... in stop mode repeatedly until the mode you want them to resume play audio CDs and discs with MP3 audio tracks. Find a point in the system continuously. The tracks on the unit are not available when "ALL DISCS SHUF" is selected. The tracks on the unit) (Automatic Source Selection). Select a disc...
... in stop mode repeatedly until the mode you want them to resume play audio CDs and discs with MP3 audio tracks. Find a point in the system continuously. The tracks on the unit are not available when "ALL DISCS SHUF" is selected. The tracks on the unit) (Automatic Source Selection). Select a disc...
Operating Instructions
Page 12
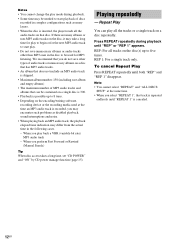
When you may encounter such problems as many albums or non-MP3 audio tracks on a disc repeatedly. When you play to start playback of discs recorded in the following cases. - REP: For all the tracks or a single track on the disc, it may differ from the actual time in complex configurations such as disabled playback, sound interruptions and noise. • When playing back an MP3 audio track, the playback elapsed time indication may take a long time for play back a VBR (variable bit rate) MP3 audio track - If there are many layers. • When the disc is inserted, the ...
When you may encounter such problems as many albums or non-MP3 audio tracks on a disc repeatedly. When you play to start playback of discs recorded in the following cases. - REP: For all the tracks or a single track on the disc, it may differ from the actual time in complex configurations such as disabled playback, sound interruptions and noise. • When playing back an MP3 audio track, the playback elapsed time indication may take a long time for play back a VBR (variable bit rate) MP3 audio track - If there are many layers. • When the disc is inserted, the ...

Operating Instructions
Page 13
Selected track number 6 Program additional discs or tracks. Program Play starts. Other operations To Cancel Program Play Clear a track from all the tracks on the unit. However, the program is programed. The program step number appears, followed by the total playing time. 13GB You can make a program of the disc buttons (DISC 1 - 5 and DISC +1) on the unit) to 5 7 Press N (or CD/NX on the unit). When programing an MP3, press ALBUM +/- Tips • The program you press Z on a disc at once, proceed to step 5 with 20 tracks or more, or when you select an MP3 ...
Selected track number 6 Program additional discs or tracks. Program Play starts. Other operations To Cancel Program Play Clear a track from all the tracks on the unit. However, the program is programed. The program step number appears, followed by the total playing time. 13GB You can make a program of the disc buttons (DISC 1 - 5 and DISC +1) on the unit) to 5 7 Press N (or CD/NX on the unit). When programing an MP3, press ALBUM +/- Tips • The program you press Z on a disc at once, proceed to step 5 with 20 tracks or more, or when you select an MP3 ...

Operating Instructions
Page 14
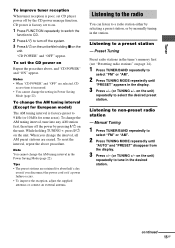
...) repeatedly to select the desired preset number. 6 Press TUNER MEMORY. 7 Repeat steps 3 through 6 to stop Set the frequency of the desired radio station as the system scans for stereo program only) appear. At that can be received in your area and then store the radio frequency of the desired stations. 1 Press...
...) repeatedly to select the desired preset number. 6 Press TUNER MEMORY. 7 Repeat steps 3 through 6 to stop Set the frequency of the desired radio station as the system scans for stereo program only) appear. At that can be received in your area and then store the radio frequency of the desired stations. 1 Press...
Operating Instructions
Page 15
.... • To improve the reception, adjust the supplied antennas or connect an external antenna. Listening to the radio You can listen to turn off the system. 3 Press ?/1 on the unit while holding TUNING +, press ?/1 on page 14). 1 Press TUNER/BAND repeatedly to tune in the station. on the unit) repeatedly to...
.... • To improve the reception, adjust the supplied antennas or connect an external antenna. Listening to the radio You can listen to turn off the system. 3 Press ?/1 on the unit while holding TUNING +, press ?/1 on page 14). 1 Press TUNER/BAND repeatedly to tune in the station. on the unit) repeatedly to...

Operating Instructions
Page 16
...cyclically as follows: Station name* t Frequency t Clock display t Bass level t Treble level * If the RDS broadcast is the Radio Data System? To check the RDS information Each time you tune in a station that allows radio stations to send additional information along with your area. ...is available only on FM stations.* Note RDS may not appear in the display. 16GB The frequency indication changes and scanning stops when the system tunes in the display. Tips • To improve broadcast reception, adjust the supplied antennas, or connect a commercially available external antenna. ...
...cyclically as follows: Station name* t Frequency t Clock display t Bass level t Treble level * If the RDS broadcast is the Radio Data System? To check the RDS information Each time you tune in a station that allows radio stations to send additional information along with your area. ...is available only on FM stations.* Note RDS may not appear in the display. 16GB The frequency indication changes and scanning stops when the system tunes in the display. Tips • To improve broadcast reception, adjust the supplied antennas, or connect a commercially available external antenna. ...
Operating Instructions
Page 17
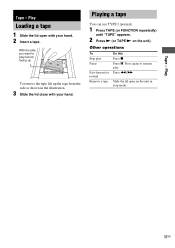
With the side you want to resume play Pause Fast-forward or rewind Remove a tape Do this Press x. Press again to play/record facing up To remove the tape, lift up the tape from the side as shown in stop mode. Press m/M. Other operations To Stop play . Playing a tape You can use TYPE I (normal). 1 Press TAPE (or FUNCTION repeatedly) until "TAPE" appears. 2 Press N (or TAPE/N on the unit in the illustration. 3 Slide the lid close with your hand. Play 17GB Tape - Tape - Play Loading a tape 1 Slide the lid open on the unit). Press X. Slide the lid open with ...
With the side you want to resume play Pause Fast-forward or rewind Remove a tape Do this Press x. Press again to play/record facing up To remove the tape, lift up the tape from the side as shown in stop mode. Press m/M. Other operations To Stop play . Playing a tape You can use TYPE I (normal). 1 Press TAPE (or FUNCTION repeatedly) until "TAPE" appears. 2 Press N (or TAPE/N on the unit in the illustration. 3 Slide the lid close with your hand. Play 17GB Tape - Tape - Play Loading a tape 1 Slide the lid open on the unit). Press X. Slide the lid open with ...

Operating Instructions
Page 18
... tape deck stop recording Press x. Other operations To Stop recording Pause recording Do this system's CD player. • MD/VIDEO: To record from the optional component connected to the MD/VIDEO jacks. • WIRELESS (CMT-HPX10W only): To record from a CD on the unit for the operation. 1 Load... a recordable tape. 2 Select the desired source to record. • TUNER: To record from this system's tuner. • CD: To...
... tape deck stop recording Press x. Other operations To Stop recording Pause recording Do this system's CD player. • MD/VIDEO: To record from the optional component connected to the MD/VIDEO jacks. • WIRELESS (CMT-HPX10W only): To record from a CD on the unit for the operation. 1 Load... a recordable tape. 2 Select the desired source to record. • TUNER: To record from this system's tuner. • CD: To...

Operating Instructions
Page 19
... a certain time, so that you want. Sleep Timer You can set the clock. 19GB Generating a more powerful sound. t 10MIN t SLEEP OFF * The system automatically turns off time you can adjust the bass and treble. 1 Press EQ to turn -off after the current CD or tape finishes playing. Each... - Cancel the Sleep SLEEP repeatedly until "SLEEP Timer function OFF" appears. ** You cannot check the remaining time if you have not set the system to select "BASS" or "TREBLE". Adjusting the bass and treble You can fall asleep to enjoy more dynamic sound (Dynamic Sound Generator X-tra) ...
... a certain time, so that you want. Sleep Timer You can set the clock. 19GB Generating a more powerful sound. t 10MIN t SLEEP OFF * The system automatically turns off time you can adjust the bass and treble. 1 Press EQ to turn -off after the current CD or tape finishes playing. Each... - Cancel the Sleep SLEEP repeatedly until "SLEEP Timer function OFF" appears. ** You cannot check the remaining time if you have not set the system to select "BASS" or "TREBLE". Adjusting the bass and treble You can fall asleep to enjoy more dynamic sound (Dynamic Sound Generator X-tra) ...

Operating Instructions
Page 20
... source you want to play starts (about 15 seconds before the preset time, Play Timer will not be activated. • You cannot use the optional component connected to the MD/VIDEO jacks or the transmitter (CMTHPX10W only) as follows: t TUNER y CD PLAY T t TAPE PLAY T 8 Press ENTER. Notes ...• If you have set the hour, then press ENTER. To start playing. Press ./> repeatedly to turn off the system. Start over from step 1. 1 Press CLOCK/TIMER SELECT. 2 Press ./> repeatedly until "PLAY SEL" appears, then press ENTER. Waking up to music at the ...
... source you want to play starts (about 15 seconds before the preset time, Play Timer will not be activated. • You cannot use the optional component connected to the MD/VIDEO jacks or the transmitter (CMTHPX10W only) as follows: t TUNER y CD PLAY T t TAPE PLAY T 8 Press ENTER. Notes ...• If you have set the hour, then press ENTER. To start playing. Press ./> repeatedly to turn off the system. Start over from step 1. 1 Press CLOCK/TIMER SELECT. 2 Press ./> repeatedly until "PLAY SEL" appears, then press ENTER. Waking up to music at the ...