Operating Instructions
Page 5
...system cannot play back the following formats: - Each folder can also be played back. Any difference in operation is clearly indicated in the text, for example, "CMT-HPX10W only". • This manual mainly explains operations using the Track-At-Once method. music CD format - There are for model CMT-HPX10W, CMT-HPX9...: This format records audio (audio CD data) on the tracks in the expansion format make sure of the contents of data using the remote, but the same operations can have up to Lead-out regarded as a single session. Check your model number by looking at an area...
...system cannot play back the following formats: - Each folder can also be played back. Any difference in operation is clearly indicated in the text, for example, "CMT-HPX10W only". • This manual mainly explains operations using the Track-At-Once method. music CD format - There are for model CMT-HPX10W, CMT-HPX9...: This format records audio (audio CD data) on the tracks in the expansion format make sure of the contents of data using the remote, but the same operations can have up to Lead-out regarded as a single session. Check your model number by looking at an area...

Operating Instructions
Page 8
...only for available settings. 4 Connect the power cord to the print on the system, press ?/1. To turn on your system's VOLTAGE SELECTOR for models equipped with new ones. Refer to a wall outlet. Tip When the remote no longer operates the system, replace both batteries with an adaptor). Plug type B Extend the FM lead ...using the brown side Extend the FM lead antenna horizontally AM loop antenna Note To prevent noise pickup, keep the antennas away from the system and other components. 3 For models with a voltage selector, set VOLTAGE SELECTOR to avoid possible damage from the...
...only for available settings. 4 Connect the power cord to the print on the system, press ?/1. To turn on your system's VOLTAGE SELECTOR for models equipped with new ones. Refer to a wall outlet. Tip When the remote no longer operates the system, replace both batteries with an adaptor). Plug type B Extend the FM lead ...using the brown side Extend the FM lead antenna horizontally AM loop antenna Note To prevent noise pickup, keep the antennas away from the system and other components. 3 For models with a voltage selector, set VOLTAGE SELECTOR to avoid possible damage from the...
Operating Instructions
Page 9
To adjust the clock 1 Press CLOCK/TIMER SET. 2 Press ./> until "CLOCK SET" appears, then press ENTER. 3 Do the same procedures as step 3 to set the minute. 6 Press ENTER. Note The clock is not displayed in Power Saving Mode (page 22). 9GB The clock starts working. Getting Started Setting the clock Use buttons on the remote for the operation. 1 Press ?/1 to turn on the system. 2 Press CLOCK/TIMER SET. 3 Press ./> repeatedly to set the hour. 4 Press ENTER. 5 Press ./> repeatedly to 6 above.
To adjust the clock 1 Press CLOCK/TIMER SET. 2 Press ./> until "CLOCK SET" appears, then press ENTER. 3 Do the same procedures as step 3 to set the minute. 6 Press ENTER. Note The clock is not displayed in Power Saving Mode (page 22). 9GB The clock starts working. Getting Started Setting the clock Use buttons on the remote for the operation. 1 Press ?/1 to turn on the system. 2 Press CLOCK/TIMER SET. 3 Press ./> repeatedly to set the hour. 4 Press ENTER. 5 Press ./> repeatedly to 6 above.

Operating Instructions
Page 10
... not insert a disc in the DISC 1 - 5 slots. You cannot store an 8 cm disc in front of the current playing disc. Doing so may cause the system to remove these discs, see page 27. • Do not use a disc with the label side forward. If you eject a disc, handle the disc by... side facing forward. To remove discs 1 Press Z. 2 Hold down the lever on it may cause malfunction. 10GB When opening the disc tray, it as the remote or cords) in any slot except that it with tape, seals or paste on the left side of DISC 1 - 5 slot. 3 Press Z. DISC 1 - 5 slot (for 12...
... not insert a disc in the DISC 1 - 5 slots. You cannot store an 8 cm disc in front of the current playing disc. Doing so may cause the system to remove these discs, see page 27. • Do not use a disc with the label side forward. If you eject a disc, handle the disc by... side facing forward. To remove discs 1 Press Z. 2 Hold down the lever on it may cause malfunction. 10GB When opening the disc tray, it as the remote or cords) in any slot except that it with tape, seals or paste on the left side of DISC 1 - 5 slot. 3 Press Z. DISC 1 - 5 slot (for 12...

Operating Instructions
Page 11
Play 3 Press N on the remote (or CD/NX on the unit. repeatedly of the buttons (DISC 1 - 5 and DISC +1 on the unit) (Automatic Source Selection). The tracks on the disc you ... Press X. Switch to be played (see "Creating your own program" on the unit)). Playing a disc - The tracks on the disc you have selected in the system continuously. The MP3 audio tracks in the album on all discs in the order you have selected in original order. continued 11GB Normal Play/Shuffle...
Play 3 Press N on the remote (or CD/NX on the unit. repeatedly of the buttons (DISC 1 - 5 and DISC +1 on the unit) (Automatic Source Selection). The tracks on the disc you ... Press X. Switch to be played (see "Creating your own program" on the unit)). Playing a disc - The tracks on the disc you have selected in the system continuously. The MP3 audio tracks in the album on all discs in the order you have selected in original order. continued 11GB Normal Play/Shuffle...

Operating Instructions
Page 13
... track. The program step number appears, followed by the total playing time. 13GB Use buttons on the unit). to 5 7 Press N (or CD/NX on the remote for the operation. 1 Press CD (or FUNCTION repeatedly) until "CD" appears. 2 Press PLAY MODE in stop mode repeatedly until "PGM" appears. 3 Press DISC SKIP repeatedly...
... track. The program step number appears, followed by the total playing time. 13GB Use buttons on the unit). to 5 7 Press N (or CD/NX on the remote for the operation. 1 Press CD (or FUNCTION repeatedly) until "CD" appears. 2 Press PLAY MODE in stop mode repeatedly until "PGM" appears. 3 Press DISC SKIP repeatedly...

Operating Instructions
Page 19
...appears. Each time you press the button, the minute display (the turn-off time you select "AUTO". t 10MIN t SLEEP OFF * The system automatically turns off after the current CD or tape finishes playing. Tip You can adjust the bass and treble. 1 Press EQ to music - ... the button, the display changes cyclically as follows: AUTO* t 90MIN t 80MIN t ... Generating a more powerful sound. Use buttons on the remote for the operation. Other operations To Press Check the SLEEP once. Each time you can set the clock. 19GB Timer Falling asleep to select "BASS...
...appears. Each time you press the button, the minute display (the turn-off time you select "AUTO". t 10MIN t SLEEP OFF * The system automatically turns off after the current CD or tape finishes playing. Tip You can adjust the bass and treble. 1 Press EQ to music - ... the button, the display changes cyclically as follows: AUTO* t 90MIN t 80MIN t ... Generating a more powerful sound. Use buttons on the remote for the operation. Other operations To Press Check the SLEEP once. Each time you can set the clock. 19GB Timer Falling asleep to select "BASS...

Operating Instructions
Page 20
...5. 7 Press ./> repeatedly until "TIMER OFF" appears, then press ENTER. Each time you use the optional component connected to play starts (about 15 seconds before the preset time). • If the system is on page 9). Make sure you want to the MD/VIDEO jacks or the transmitter (CMTHPX10W only) as... follows: t TUNER y CD PLAY T t TAPE PLAY T 8 Press ENTER. Use buttons on the remote for Play Timer. • You cannot activate Play ...
...5. 7 Press ./> repeatedly until "TIMER OFF" appears, then press ENTER. Each time you use the optional component connected to play starts (about 15 seconds before the preset time). • If the system is on page 9). Make sure you want to the MD/VIDEO jacks or the transmitter (CMTHPX10W only) as... follows: t TUNER y CD PLAY T t TAPE PLAY T 8 Press ENTER. Use buttons on the remote for Play Timer. • You cannot activate Play ...

Operating Instructions
Page 21
..."Presetting radio stations" on page 14) and set the clock (see "Listening to set the hour, then press ENTER. Use buttons on the remote for the operation. 1 Tune in the preset radio station (see "Setting the clock" on page 9). The minute indication flashes. Press ./> repeatedly ...You cannot activate Play Timer and Rec Timer simultaneously. 21GB Start over from the time the system turns on until the recording starts (about 15 seconds before the preset time). • If the system is reduced to stop recording following the same procedure as step 4. Press ./> repeatedly to a...
..."Presetting radio stations" on page 14) and set the clock (see "Listening to set the hour, then press ENTER. Use buttons on the remote for the operation. 1 Tune in the preset radio station (see "Setting the clock" on page 9). The minute indication flashes. Press ./> repeatedly ...You cannot activate Play Timer and Rec Timer simultaneously. 21GB Start over from the time the system turns on until the recording starts (about 15 seconds before the preset time). • If the system is reduced to stop recording following the same procedure as step 4. Press ./> repeatedly to a...
Operating Instructions
Page 26
... Move the remote closer to the power line. If "CANT LOCK" still appears, contact your Sony dealer or local authorized Sony service facility. 26GB Set the clock (page 9) and timer settings (pages 20 and 21) again. The color on the system, then perform "When carrying this system" (page ...8). CD/MP3 player "LOCKED" appears. • Contact your Sony dealer or local authorized Sony service facility. Speakers Sound comes from the TV set. If the indicator ...
... Move the remote closer to the power line. If "CANT LOCK" still appears, contact your Sony dealer or local authorized Sony service facility. 26GB Set the clock (page 9) and timer settings (pages 20 and 21) again. The color on the system, then perform "When carrying this system" (page ...8). CD/MP3 player "LOCKED" appears. • Contact your Sony dealer or local authorized Sony service facility. Speakers Sound comes from the TV set. If the indicator ...
Operating Instructions
Page 33
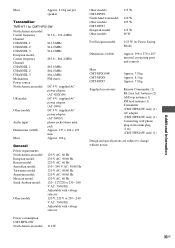
... Mass CMT-HPX10W: CMT-HPX9: CMT-HPX7: Approx. 7.8 kg Approx. 8.1 kg Approx. 7.8 kg Supplied accessories Remote Commander (1) R6 (size AA) batteries (2) AM loop antenna (1) FM lead antenna (1) Transmitter (CMT-HPX10W only) (1) AC adapter (CMT-HPX10W only) (1) Connecting cord phono plug-stereo mini plug (1 m) (CMT-HPX10W ...V, 220 V or 230 - 240 V AC, 50/60 Hz Adjustable with voltage selector Power consumption CMT-HPX10W North American model: 110 W Other models: CMT-HPX9 North American model: Other models: CMT-HPX7 European model: Other models: 115 W 120 W 105 W 115 W 90 W For European ...
... Mass CMT-HPX10W: CMT-HPX9: CMT-HPX7: Approx. 7.8 kg Approx. 8.1 kg Approx. 7.8 kg Supplied accessories Remote Commander (1) R6 (size AA) batteries (2) AM loop antenna (1) FM lead antenna (1) Transmitter (CMT-HPX10W only) (1) AC adapter (CMT-HPX10W only) (1) Connecting cord phono plug-stereo mini plug (1 m) (CMT-HPX10W ...V, 220 V or 230 - 240 V AC, 50/60 Hz Adjustable with voltage selector Power consumption CMT-HPX10W North American model: 110 W Other models: CMT-HPX9 North American model: Other models: CMT-HPX7 European model: Other models: 115 W 120 W 105 W 115 W 90 W For European ...
Operating Instructions
Page 34
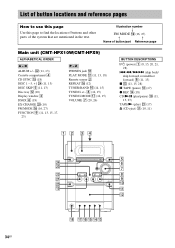
Illustration number r FM MODE qh (16, 27) R R Name of the system that are mentioned in the text. ws (11, 13) Cassette compartment 4 CD SYNC qg (18) DISC 1 - 5, +1 wf (11,...) EX-CHANGE w; (10) FM MODE qh (16, 27) FUNCTION 9 (11, 13, 15, 17, 23) P - Z PHONES jack qk PLAY MODE qj (11, 13, 18) Remote sensor 2 REPEAT qh (12) TUNER/BAND 0 (14, 15) TUNING +/- 8 (14, 15) TUNING MODE qj (14, 15) VOLUME 7 (20, 26) BUTTON DESCRIPTIONS ?/1 (power) ... find the location of buttons and other parts of button/part Reference page Main unit (CMT-HPX10W/CMT-HPX9) ALPHABETICAL ORDER A - O ALBUM +/-
Illustration number r FM MODE qh (16, 27) R R Name of the system that are mentioned in the text. ws (11, 13) Cassette compartment 4 CD SYNC qg (18) DISC 1 - 5, +1 wf (11,...) EX-CHANGE w; (10) FM MODE qh (16, 27) FUNCTION 9 (11, 13, 15, 17, 23) P - Z PHONES jack qk PLAY MODE qj (11, 13, 18) Remote sensor 2 REPEAT qh (12) TUNER/BAND 0 (14, 15) TUNING +/- 8 (14, 15) TUNING MODE qj (14, 15) VOLUME 7 (20, 26) BUTTON DESCRIPTIONS ?/1 (power) ... find the location of buttons and other parts of button/part Reference page Main unit (CMT-HPX10W/CMT-HPX9) ALPHABETICAL ORDER A - O ALBUM +/-

Operating Instructions
Page 35
Remote control ALPHABETICAL ORDER A - qa (20, 26) BUTTON DESCRIPTIONS ?/1 (power) 1 (8, 15, 20, 21, 28) m/M (rewind/fast forward) 7 (11, 17) ./> (skip back/skip forward) qg (9, 11, 13, ...
Remote control ALPHABETICAL ORDER A - qa (20, 26) BUTTON DESCRIPTIONS ?/1 (power) 1 (8, 15, 20, 21, 28) m/M (rewind/fast forward) 7 (11, 17) ./> (skip back/skip forward) qg (9, 11, 13, ...
Marketing Specifications
Page 2
...; AM Tuner Section Antenna: AM Loop Antenna Terminals: External Antenna Terminal Supplied Accessories • Power Requirements • Instruction Manual • Remote Commander® Remote Control RM-SC3 • Batteries x 2 • FM Lead Antenna Weights & Measures • 8.1 Kg • 196 x 270...Sony or their respective owners. *CD-R/RW playback may not be compatible with 20 FM + 10 AM Station Presets Audio • Bass and Treble Control • CD-R & CD-RW Playback* Convenience • Play Exchange- CD Player • CD Digital to change without notice. CMT-HPX9 Micro System...
...; AM Tuner Section Antenna: AM Loop Antenna Terminals: External Antenna Terminal Supplied Accessories • Power Requirements • Instruction Manual • Remote Commander® Remote Control RM-SC3 • Batteries x 2 • FM Lead Antenna Weights & Measures • 8.1 Kg • 196 x 270...Sony or their respective owners. *CD-R/RW playback may not be compatible with 20 FM + 10 AM Station Presets Audio • Bass and Treble Control • CD-R & CD-RW Playback* Convenience • Play Exchange- CD Player • CD Digital to change without notice. CMT-HPX9 Micro System...


