
Operating Instructions
Page 1
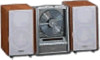
Model No. Serial No. Refer to them whenever you call upon your Sony dealer regarding this product. CMT-EX100 © 2001 Sony Corporation Record the serial number in the space provided below. 4-236-291-11(1) Micro Hi-Fi Component System Operating Instructions Owner's Record The model and serial numbers are located on the rear panel of the unit.
Model No. Serial No. Refer to them whenever you call upon your Sony dealer regarding this product. CMT-EX100 © 2001 Sony Corporation Record the serial number in the space provided below. 4-236-291-11(1) Micro Hi-Fi Component System Operating Instructions Owner's Record The model and serial numbers are located on the rear panel of the unit.
Operating Instructions
Page 2
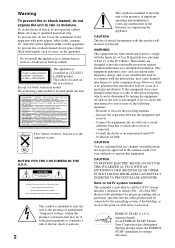
...this manual could void your authority to provide reasonable protection against harmful interference in a particular installation. As an ENERGY STAR® Partner, Sony Corporation has determined that the cable ground shall be of sufficient magnitude to constitute a risk of electric shock to persons. 2 This symbol ... encouraged to try to rain or moisture. CAUTION The use of optical instruments with the instructions, may be connected to the grounding system of cable entry as close to which can radiate radio frequency energy and, if not installed and used in a confined space, ...
...this manual could void your authority to provide reasonable protection against harmful interference in a particular installation. As an ENERGY STAR® Partner, Sony Corporation has determined that the cable ground shall be of sufficient magnitude to constitute a risk of electric shock to persons. 2 This symbol ... encouraged to try to rain or moisture. CAUTION The use of optical instruments with the instructions, may be connected to the grounding system of cable entry as close to which can radiate radio frequency energy and, if not installed and used in a confined space, ...

Operating Instructions
Page 3
Preset Tuning 13 Using the Radio Data System (RDS)* .... 14 Sound Adjustment Adjusting the sound - DSG 14 Timer Falling asleep to the radio - Daily Timer 15 Optional Components Hooking up to music - Program Play 11 Using the CD display 12 Tuner Presetting radio stations... 12 Listening to music - Sleep Timer 15 Waking up the optional components ..... 16 Additional Information Precautions 17 Troubleshooting 18 Messages 20 Specifications 21 * European model only 3 Table of Contents Parts Identification Main ...
Preset Tuning 13 Using the Radio Data System (RDS)* .... 14 Sound Adjustment Adjusting the sound - DSG 14 Timer Falling asleep to the radio - Daily Timer 15 Optional Components Hooking up to music - Program Play 11 Using the CD display 12 Tuner Presetting radio stations... 12 Listening to music - Sleep Timer 15 Waking up the optional components ..... 16 Additional Information Precautions 17 Troubleshooting 18 Messages 20 Specifications 21 * European model only 3 Table of Contents Parts Identification Main ...
Operating Instructions
Page 4
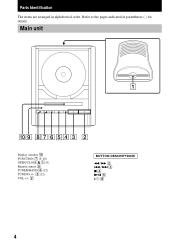
Main unit Display window 0 FUNCTION 7 (9, 16) OPEN/CLOSE Z 1 (9) Remote sensor 9 TUNER/BAND 6 (12) TUNING +/- 3 (12) VOL +/- 2 BUTTON DESCRIPTIONS m/M 3 ./> 3 x 4 NX 5 ?/1 8 4 Refer to the pages indicated in alphabetical order. Parts Identification The items are arranged in parentheses ( ) for details.
Main unit Display window 0 FUNCTION 7 (9, 16) OPEN/CLOSE Z 1 (9) Remote sensor 9 TUNER/BAND 6 (12) TUNING +/- 3 (12) VOL +/- 2 BUTTON DESCRIPTIONS m/M 3 ./> 3 x 4 NX 5 ?/1 8 4 Refer to the pages indicated in alphabetical order. Parts Identification The items are arranged in parentheses ( ) for details.

Operating Instructions
Page 5
qf (14) TUNER BAND qj (12) TUNING MODE wa (12) VOL +/- qa > qa X qk x qk m ql M ql 5 qa . qs BUTTON DESCRIPTIONS @/1 4 +/- qg (14) CD N qk (9) CLOCK/TIMER SELECT 6 (16) CLOCK/TIMER SET 7 (8, 15) DISPLAY 5 (8, 12, 14) DSG qd (14) ENTER 8 (8, 11, 12, 15) FM MODE 3 (13) FUNCTION ws (9, 16) MEMORY 9 (12) Number buttons w; (10) OPEN/CLOSE Z 1 (9) PC/TAPE q; (16) PLAY MODE wa (9, 11) REPEAT 3 (10) SLEEP 2 (15) SURROUND qh (14) TREBLE +/- Parts Identification Remote Control 12 34 ws 5 wa 6 w; 7 8 9 0 ql qa qk qs qj qh qd qg qf BASS +/-
qf (14) TUNER BAND qj (12) TUNING MODE wa (12) VOL +/- qa > qa X qk x qk m ql M ql 5 qa . qs BUTTON DESCRIPTIONS @/1 4 +/- qg (14) CD N qk (9) CLOCK/TIMER SELECT 6 (16) CLOCK/TIMER SET 7 (8, 15) DISPLAY 5 (8, 12, 14) DSG qd (14) ENTER 8 (8, 11, 12, 15) FM MODE 3 (13) FUNCTION ws (9, 16) MEMORY 9 (12) Number buttons w; (10) OPEN/CLOSE Z 1 (9) PC/TAPE q; (16) PLAY MODE wa (9, 11) REPEAT 3 (10) SLEEP 2 (15) SURROUND qh (14) TREBLE +/- Parts Identification Remote Control 12 34 ws 5 wa 6 w; 7 8 9 0 ql qa qk qs qj qh qd qg qf BASS +/-

Operating Instructions
Page 6
Connect the speaker cords to handle this portion Lined Clear 6 Push in on the tabs and pull up your system using the supplied cords and accessories. Rear cover 14 Right speaker AM loop antenna Left speaker 3 5 2 1 Remove the rear cover. 2 Connect the speakers. Getting Started Hooking up the system Perform the following procedure 1 to 6 to hook up the cover Insert this system carefully. Please remember to the SPEAKER terminals as shown below. The front cover is made of tempered glass.
Connect the speaker cords to handle this portion Lined Clear 6 Push in on the tabs and pull up your system using the supplied cords and accessories. Rear cover 14 Right speaker AM loop antenna Left speaker 3 5 2 1 Remove the rear cover. 2 Connect the speakers. Getting Started Hooking up the system Perform the following procedure 1 to 6 to hook up the cover Insert this system carefully. Please remember to the SPEAKER terminals as shown below. The front cover is made of tempered glass.

Operating Instructions
Page 7
... the wall outlet after you complete all the connections. 7 This glass, however, may shatter if it receives a sharp blow or if it . To connect optional components See "Optional Components" on the glass cover of CD player The CD player cover is made of the rear cover. Getting Started 3 Connect the AM antenna.
... the wall outlet after you complete all the connections. 7 This glass, however, may shatter if it receives a sharp blow or if it . To connect optional components See "Optional Components" on the glass cover of CD player The CD player cover is made of the rear cover. Getting Started 3 Connect the AM antenna.

Operating Instructions
Page 8
...• If you made a mistake or want to set the minute, then press ENTER on the remote. Setting the time 1 Turn on the system. 2 Press CLOCK/TIMER SET on the remote again. To turn off the display. 8 or > repeatedly to the manufacturer's instructions. Replacing the battery...is incorrectly replaced. The day indication flashes. 4 Press . The hour indication flashes. 5 Press . Tip When the remote no longer operates the system, replace the battery with the same or equivalent type recommend by the manufacturer. Replace only with a new one. Do not recharge, disassemble or dispose...
...• If you made a mistake or want to set the minute, then press ENTER on the remote. Setting the time 1 Turn on the system. 2 Press CLOCK/TIMER SET on the remote again. To turn off the display. 8 or > repeatedly to the manufacturer's instructions. Replacing the battery...is incorrectly replaced. The day indication flashes. 4 Press . The hour indication flashes. 5 Press . Tip When the remote no longer operates the system, replace the battery with the same or equivalent type recommend by the manufacturer. Replace only with a new one. Do not recharge, disassemble or dispose...

Operating Instructions
Page 9
... load prematurely. 9 Playing a CD - SHUF (Shuffle Play) All the tracks in different play the CD in random order. Normal Play/Shuffle Play/Repeat Play This system lets you play modes. With the label side facing front. Select To play a CD single (8 cm CD), use the optional adaptor. PGM (Program Play) All...
... load prematurely. 9 Playing a CD - SHUF (Shuffle Play) All the tracks in different play the CD in random order. Normal Play/Shuffle Play/Repeat Play This system lets you play modes. With the label side facing front. Select To play a CD single (8 cm CD), use the optional adaptor. PGM (Program Play) All...

Operating Instructions
Page 10
Keep pressing m or M during play until "REP" or "REP 1" appears. To enter 0, press 10/0 instead. Playing a CD (continued) Other Operations To Stop play Pause Select a track Find a point in a track Remove a CD Play repeatedly (Repeat Play) Do this may cause CD player trouble. Press NX (or X on the remote). Touch OPEN/CLOSE Z (or press OPEN/CLOSE Z on the remote). To enter track number 10 or over on the CD. Example: To enter track number 30, press >10, then 3 and 10/0. Touch OPEN/ CLOSE Z with your finger, as this Press x. Press REPEAT on the remote, the track ...
Keep pressing m or M during play until "REP" or "REP 1" appears. To enter 0, press 10/0 instead. Playing a CD (continued) Other Operations To Stop play Pause Select a track Find a point in a track Remove a CD Play repeatedly (Repeat Play) Do this may cause CD player trouble. Press NX (or X on the remote). Touch OPEN/CLOSE Z (or press OPEN/CLOSE Z on the remote). To enter track number 10 or over on the CD. Example: To enter track number 30, press >10, then 3 and 10/0. Touch OPEN/ CLOSE Z with your finger, as this Press x. Press REPEAT on the remote, the track ...
Operating Instructions
Page 11
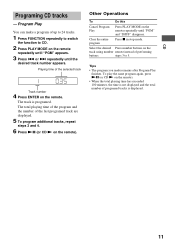
CD Programing CD tracks - To play the same program again, press NX (or CD N on the remote). • When the total playing time has exceeded 100 minutes, the time is not displayed and the total number of the selected track Track number 4 Press ENTER on the remote). Playing time of programed tracks is programed. Clear the entire program Press x in stop mode. The track is displayed. 11 The total playing time of the program and the number of up to 24 tracks. 1 Press FUNCTION repeatedly to switch the function to 5. Other Operations To Do this Cancel Program Play Press PLAY ...
CD Programing CD tracks - To play the same program again, press NX (or CD N on the remote). • When the total playing time has exceeded 100 minutes, the time is not displayed and the total number of the selected track Track number 4 Press ENTER on the remote). Playing time of programed tracks is programed. Clear the entire program Press x in stop mode. The track is displayed. 11 The total playing time of the program and the number of up to 24 tracks. 1 Press FUNCTION repeatedly to switch the function to 5. Other Operations To Do this Cancel Program Play Press PLAY ...

Operating Instructions
Page 12
... that has no title is loaded, nothing appears. or + (or - "TUNED" and "STEREO" (for more than 16 seconds, the preset number disappears and the system returns to select "FM" or "AM". 2 Press TUNING MODE on the remote repeatedly. When a CD TEXT disc is not displayed from step 3. 5 Press .... the information recorded on the remote. Using the CD display Press DISPLAY on the remote repeatedly until "AUTO" appears. 3 Press TUNING - If the system is not operated for a stereo program) appear. 4 Press MEMORY on the disc, such as follows: During normal play Track number and elapsed playing ...
... that has no title is loaded, nothing appears. or + (or - "TUNED" and "STEREO" (for more than 16 seconds, the preset number disappears and the system returns to select "FM" or "AM". 2 Press TUNING MODE on the remote repeatedly. When a CD TEXT disc is not displayed from step 3. 5 Press .... the information recorded on the remote. Using the CD display Press DISPLAY on the remote repeatedly until "AUTO" appears. 3 Press TUNING - If the system is not operated for a stereo program) appear. 4 Press MEMORY on the disc, such as follows: During normal play Track number and elapsed playing ...

Operating Instructions
Page 13
...desired preset station (or RDS station name*). * European model only Listening to 9 kHz (10 kHz in any AM station first, then turn the system back on the remote). Tips • If noise is erased. Then press TUNING - To change the interval, all the AM preset stations are ...the AM tuning interval, tune in some areas). Tips • The preset stations are erased. The frequency indication changes and the scanning stops when the system tunes in a station with a weak signal Press TUNING MODE on the remote repeatedly until "MONO" appears. or + on the remote) repeatedly to ...
...desired preset station (or RDS station name*). * European model only Listening to 9 kHz (10 kHz in any AM station first, then turn the system back on the remote). Tips • If noise is erased. Then press TUNING - To change the interval, all the AM preset stations are ...the AM tuning interval, tune in some areas). Tips • The preset stations are erased. The frequency indication changes and the scanning stops when the system tunes in a station with a weak signal Press TUNING MODE on the remote repeatedly until "MONO" appears. or + on the remote) repeatedly to ...

Operating Instructions
Page 14
...press DISPLAY on the remote, the display changes cyclically as follows: DSG 1 t DSG 2 t DSG OFF When DSG is the Radio Data System? Sound Adjustment Adjusting the sound Generating a more powerful sound. Selecting the surround effect Press SURROUND on RDS services in is not transmitting the RDS... name may not appear. Receiving RDS broadcasts Simply select a station from the FM band. "SURR" appears in the display. Using the Radio Data System (RDS) (European model only) What is on, "DSG" lights up. Each time you tune in a station that allows radio stations to cancel...
...press DISPLAY on the remote, the display changes cyclically as follows: DSG 1 t DSG 2 t DSG OFF When DSG is the Radio Data System? Sound Adjustment Adjusting the sound Generating a more powerful sound. Selecting the surround effect Press SURROUND on RDS services in is not transmitting the RDS... name may not appear. Receiving RDS broadcasts Simply select a station from the FM band. "SURR" appears in the display. Using the Radio Data System (RDS) (European model only) What is on, "DSG" lights up. Each time you tune in a station that allows radio stations to cancel...

Operating Instructions
Page 15
... program (see "Programing CD tracks" on page 11). • Radio: Tune in a station (see "Setting the time" on the timer of the component connected to the PC/TAPE jacks. 2 Press VOL - or > repeatedly to stop playing following the procedure in 100 minutes. continued 15 or > repeatedly... until "OFF" appears. The minute indication flashes. t 10MIN t OFF * The system automatically turns off select the time you cannot use the Daily Timer. Daily Timer You can fall asleep to music - Cancel the Sleep SLEEP ...
... program (see "Programing CD tracks" on page 11). • Radio: Tune in a station (see "Setting the time" on the timer of the component connected to the PC/TAPE jacks. 2 Press VOL - or > repeatedly to stop playing following the procedure in 100 minutes. continued 15 or > repeatedly... until "OFF" appears. The minute indication flashes. t 10MIN t OFF * The system automatically turns off select the time you cannot use the Daily Timer. Daily Timer You can fall asleep to music - Cancel the Sleep SLEEP ...

Operating Instructions
Page 16
...time, and the sound source appear in turn off the system. "DAILY" lights up the optional components You can connect a digital or an analog component to the Press FUNCTION repeatedly connected optional until "PC/TAPE" appears (or component press PC/TAPE on the remote repeatedly until the play starts... (about 30 seconds before the original display returns. Start over from the time the system turns on about 30 seconds before the preset time). • Once you set the Daily Timer, it . Optional Components Hooking up . 9 Press ?/1 to the PC/TAPE jacks as the sound source. ...
...time, and the sound source appear in turn off the system. "DAILY" lights up the optional components You can connect a digital or an analog component to the Press FUNCTION repeatedly connected optional until "PC/TAPE" appears (or component press PC/TAPE on the remote repeatedly until the play starts... (about 30 seconds before the original display returns. Start over from the time the system turns on about 30 seconds before the preset time). • Once you set the Daily Timer, it . Optional Components Hooking up . 9 Press ?/1 to the PC/TAPE jacks as the sound source. ...

Operating Instructions
Page 17
...nearest Sony dealer. Very humid - Although the system heats up - Should this system at the qualified service shop. • When you connect the power cord to bear more shock resistant and able to a wall outlet, even if the power is located on the bottom exterior. Timer/Optional Components/...Additional Information Additional Information Precautions The nameplate is off . • Unplug the system from the wall outlet if it is connected to prevent heat build up in the...
...nearest Sony dealer. Very humid - Although the system heats up - Should this system at the qualified service shop. • When you connect the power cord to bear more shock resistant and able to a wall outlet, even if the power is located on the bottom exterior. Timer/Optional Components/...Additional Information Additional Information Precautions The nameplate is off . • Unplug the system from the wall outlet if it is connected to prevent heat build up in the...

Operating Instructions
Page 18
...not connected. • Check the speaker connections (see page 6). • Place the speakers as symmetrically as TV, VCR, etc. • Connect the system to a different wall outlet. • Install a noise filter (commercially available) to the power line. Wipe the CD from the source of noise such ...may cause magnetic distortion to the picture due to their interaction with a cleaning cloth. Troubleshooting If you have any problem persist, consult your nearest Sony dealer. "0:00" (for the European model) or "12:00 AM" (for other models) flashes in which magnets are attached or used near...
...not connected. • Check the speaker connections (see page 6). • Place the speakers as symmetrically as TV, VCR, etc. • Connect the system to a different wall outlet. • Install a noise filter (commercially available) to the power line. Wipe the CD from the source of noise such ...may cause magnetic distortion to the picture due to their interaction with a cleaning cloth. Troubleshooting If you have any problem persist, consult your nearest Sony dealer. "0:00" (for the European model) or "12:00 AM" (for other models) flashes in which magnets are attached or used near...

Operating Instructions
Page 19
... repeatedly until the moisture evaporates. • Press NX (or CD N on the remote) to start play . The CD does not eject. • Consult your nearest Sony dealer. if the cords are firmly inserted all the way. • Turn on the remote. continued 19 CD Player The CD tray does not lower.... Play does not start playing. The sound is no sound." on page 18 and check the condition of the system. • Connect the component properly (see page 18). • Replace the CD. • Place the CD vertically in the tray. • Place the CD in the tray with the ...
... repeatedly until the moisture evaporates. • Press NX (or CD N on the remote) to start play . The CD does not eject. • Consult your nearest Sony dealer. if the cords are firmly inserted all the way. • Turn on the remote. continued 19 CD Player The CD tray does not lower.... Play does not start playing. The sound is no sound." on page 18 and check the condition of the system. • Connect the component properly (see page 18). • Replace the CD. • Place the CD vertically in the tray. • Place the CD in the tray with the ...

Operating Instructions
Page 20
...7). • Find a place and an orientation that provide good reception, then set again. 20 If the system still does not operate properly after performing the above measures, reset the system as the preset stations, clock, and timer are cleared and must be set up the antenna again. All the... settings you connect a commercially available external antenna. • Locate the antennas as far away from the speaker cords as possible. • Consult your nearest Sony dealer if...
...7). • Find a place and an orientation that provide good reception, then set again. 20 If the system still does not operate properly after performing the above measures, reset the system as the preset stations, clock, and timer are cleared and must be set up the antenna again. All the... settings you connect a commercially available external antenna. • Locate the antennas as far away from the speaker cords as possible. • Consult your nearest Sony dealer if...