
Operating Instructions
Page 3
...11 - CD Synchro Recording Recording on a tape 11 - Power Saving Mode Viewing information about the disc in the display 14 Optional Components Hooking up to music 12 - Normal Play/Shuffle Play Playing repeatedly 7 - Daily Timer Display Turning off the display 14 - ...locations and reference pages 22 3GB Program Play Tuner Presetting radio stations 8 Listening to use this manual 2 Getting Started Hooking up the system 4 Setting the clock 5 CD - Manual Tuning Tape - Manual Recording Sound Adjustment Adjusting the sound 12 Timer Falling asleep to music 13 - Play Loading...
...11 - CD Synchro Recording Recording on a tape 11 - Power Saving Mode Viewing information about the disc in the display 14 Optional Components Hooking up to music 12 - Normal Play/Shuffle Play Playing repeatedly 7 - Daily Timer Display Turning off the display 14 - ...locations and reference pages 22 3GB Program Play Tuner Presetting radio stations 8 Listening to use this manual 2 Getting Started Hooking up the system 4 Setting the clock 5 CD - Manual Tuning Tape - Manual Recording Sound Adjustment Adjusting the sound 12 Timer Falling asleep to music 13 - Play Loading...

Operating Instructions
Page 5
...the batteries to avoid possible damage from the speaker cords. 3 Connect the power cord to 6 above. To turn on the system, press ?/1. The clock starts working. Getting Started AM loop antenna Extend the FM lead antenna horizontally Note Keep the antennas away from battery leakage and... Inserting two R6 (size AA) batteries into the remote Setting the clock 1 Press ?/1 to turn on the system. 2 Press CLOCK/TIMER SET. 3 Press ./> repeatedly to set the hour. 4 Press CLOCK/TIMER SET. 5 Press ./> repeatedly to set the minute. 6 Press CLOCK/TIMER SET. e E E e Note If you do not use...
...the batteries to avoid possible damage from the speaker cords. 3 Connect the power cord to 6 above. To turn on the system, press ?/1. The clock starts working. Getting Started AM loop antenna Extend the FM lead antenna horizontally Note Keep the antennas away from battery leakage and... Inserting two R6 (size AA) batteries into the remote Setting the clock 1 Press ?/1 to turn on the system. 2 Press CLOCK/TIMER SET. 3 Press ./> repeatedly to set the hour. 4 Press CLOCK/TIMER SET. 5 Press ./> repeatedly to set the minute. 6 Press CLOCK/TIMER SET. e E E e Note If you do not use...
Operating Instructions
Page 9
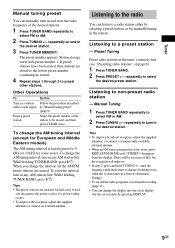
... a power failure occurs. • To improve the reception, adjust the supplied antennas or connect an external antenna. Scanning stops when the system tunes in the desired station. While holding TUNER BAND, press ?/1. Preset Tuning Preset radio stations in the desired station. 3 Press TUNER ... repeatedly to a preset station - Tips • The preset stations are retained for half a day even if you change the display into the clock display (for some areas). repeatedly to tune in a station (Automatic Tuning). • To record the radio programs, use manual recording (page...
... a power failure occurs. • To improve the reception, adjust the supplied antennas or connect an external antenna. Scanning stops when the system tunes in the desired station. While holding TUNER BAND, press ?/1. Preset Tuning Preset radio stations in the desired station. 3 Press TUNER ... repeatedly to a preset station - Tips • The preset stations are retained for half a day even if you change the display into the clock display (for some areas). repeatedly to tune in a station (Automatic Tuning). • To record the radio programs, use manual recording (page...

Operating Instructions
Page 12
... during Synchro Recording on the remote Press BASS +/- Other operations To Press Check the SLEEP once. t 10 t OFF * The system automatically turns off time you want. Note Do not set the system to turn off in 100 minutes or after a certain time, so that you can set to music. Sound Adjustment Adjusting... the sound You can use the Sleep Timer, even if you have not set the clock. 12GB Each time you select "Auto". Tip...
... during Synchro Recording on the remote Press BASS +/- Other operations To Press Check the SLEEP once. t 10 t OFF * The system automatically turns off time you want. Note Do not set the system to turn off in 100 minutes or after a certain time, so that you can set to music. Sound Adjustment Adjusting... the sound You can use the Sleep Timer, even if you have not set the clock. 12GB Each time you select "Auto". Tip...

Operating Instructions
Page 13
...you want to play . The minute indication flashes. Press CLOCK/TIMER SELECT repeatedly until "OFF" appears, then press CLOCK/TIMER SET. Daily Timer You can wake up to music - Notes • If you use the system's tape deck and the optional component connected to MD IN jacks as sound sources for the... Daily Timer. 13GB Timer Waking up to music at the same time, the Sleep Timer has priority. • Do not operate the system from the time the system turns on until ...
...you want to play . The minute indication flashes. Press CLOCK/TIMER SELECT repeatedly until "OFF" appears, then press CLOCK/TIMER SET. Daily Timer You can wake up to music - Notes • If you use the system's tape deck and the optional component connected to MD IN jacks as sound sources for the... Daily Timer. 13GB Timer Waking up to music at the same time, the Sleep Timer has priority. • Do not operate the system from the time the system turns on until ...

Operating Instructions
Page 14
Display Turning off to operate in Power Saving Mode. Power Saving Mode The clock display can check the playing time and remaining time of the current track or that of the disc. Each time you press the button, the ...
Display Turning off to operate in Power Saving Mode. Power Saving Mode The clock display can check the playing time and remaining time of the current track or that of the disc. Each time you press the button, the ...
Operating Instructions
Page 16
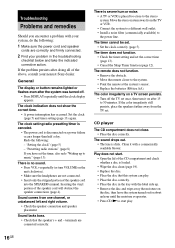
... CD player The CD compartment does not close to 30 minutes. Inserting the vinyl portion of the above, consult your nearest Sony dealer. terminals are correctly and firmly connected. 2 Find your system, do the following : - The timer does not function. • Check the timer setting and set . • ... . • Remove the disc and wipe away the moisture on the disc, then leave the system turned on for about an hour until the clock display appears. Sound lacks bass. • Check that this system can play . 16GB The sound drops out. • The lens is disconnected or a power ...
... CD player The CD compartment does not close to 30 minutes. Inserting the vinyl portion of the above, consult your nearest Sony dealer. terminals are correctly and firmly connected. 2 Find your system, do the following : - The timer does not function. • Check the timer setting and set . • ... . • Remove the disc and wipe away the moisture on the disc, then leave the system turned on for about an hour until the clock display appears. Sound lacks bass. • Check that this system can play . 16GB The sound drops out. • The lens is disconnected or a power ...

Operating Instructions
Page 17
... are firmly inserted all the way. • Turn on the connected component. • Refer to the operating instructions supplied with the connected component and start from the speaker cords as the preset stations, clock, and timer. 17GB Tuner Severe hum or noise/stations cannot be received.... When you made, such as possible. • Consult your nearest Sony dealer if the supplied AM antenna has come off the plastic stand. • Try turning off the system. 2 While pressing and holding x, turn on the system. Demagnetise them using a cleaning cassette (page 19). Load a cassette....
... are firmly inserted all the way. • Turn on the connected component. • Refer to the operating instructions supplied with the connected component and start from the speaker cords as the preset stations, clock, and timer. 17GB Tuner Severe hum or noise/stations cannot be received.... When you made, such as possible. • Consult your nearest Sony dealer if the supplied AM antenna has come off the plastic stand. • Try turning off the system. 2 While pressing and holding x, turn on the system. Demagnetise them using a cleaning cassette (page 19). Load a cassette....
Operating Instructions
Page 23
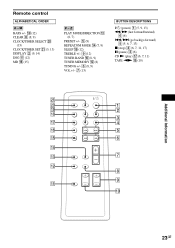
M BASS +/- 0 (12) CLEAR 8 (8, 9) CLOCK/TIMER SELECT w; (13) CLOCK/TIMER SET wa (5, 13) DISPLAY 2 (9, 14) DSG qa (12) MD qk (15) P - Remote control ALPHABETICAL ORDER A - Z PLAY MODE/DIRECTION qd (6, 7) PRESET +/- 5 (9) REPEAT/FM MODE qf (7, 9) ...
M BASS +/- 0 (12) CLEAR 8 (8, 9) CLOCK/TIMER SELECT w; (13) CLOCK/TIMER SET wa (5, 13) DISPLAY 2 (9, 14) DSG qa (12) MD qk (15) P - Remote control ALPHABETICAL ORDER A - Z PLAY MODE/DIRECTION qd (6, 7) PRESET +/- 5 (9) REPEAT/FM MODE qf (7, 9) ...


