The Sony Guide to Home Theater
Page 15
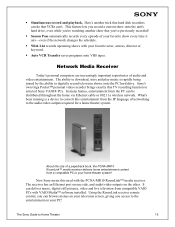
...In many homes, entertainment from compatible VAIO PCs with VAIO Media™ software installed. The Sony Guide to selected Sony VAIO® PCs. Sony's own Giga Pocket™ personal video recorder brings exactly this TV recording function to Home Theater... 15 Using the RoomLink receiver remote control, you can browse menus on your PC! The ability to download, store and play music is a device to convert this need with your home theater system...
...In many homes, entertainment from compatible VAIO PCs with VAIO Media™ software installed. The Sony Guide to selected Sony VAIO® PCs. Sony's own Giga Pocket™ personal video recorder brings exactly this TV recording function to Home Theater... 15 Using the RoomLink receiver remote control, you can browse menus on your PC! The ability to download, store and play music is a device to convert this need with your home theater system...
The Sony Guide to Home Theater
Page 16
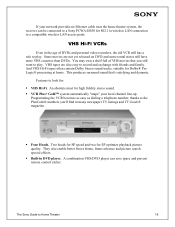
... player. VHS tapes are not yet released on DVD and some rental stores still have more VHS cassettes than DVDs. And VHS Hi-Fi tapes often contain Dolby Stereo sound tracks, suitable for EP optimize playback picture quality. Programming the VCR becomes as easy as dialing a ...cable near the home theater system, the receiver can save space and prevent remote control clutter. They also enable better freeze frame, frame advance and picture search special effects. ƒ Built-in many newspaper TV listings and TV Guide® magazine. ƒ Four Heads. The Sony Guide to play .
... player. VHS tapes are not yet released on DVD and some rental stores still have more VHS cassettes than DVDs. And VHS Hi-Fi tapes often contain Dolby Stereo sound tracks, suitable for EP optimize playback picture quality. Programming the VCR becomes as easy as dialing a ...cable near the home theater system, the receiver can save space and prevent remote control clutter. They also enable better freeze frame, frame advance and picture search special effects. ƒ Built-in many newspaper TV listings and TV Guide® magazine. ƒ Four Heads. The Sony Guide to play .

The Sony Guide to Home Theater
Page 39
... built your system much more enjoyable. The Sony Guide to bed. It's like having your cake and eating it provides shelves for home theater, two add-on purchases can make your system from individual components. It elevates the television to the correct height and it , too. A "universal" remote control can simplify system operation. A universal remote control (left...
... built your system much more enjoyable. The Sony Guide to bed. It's like having your cake and eating it provides shelves for home theater, two add-on purchases can make your system from individual components. It elevates the television to the correct height and it , too. A "universal" remote control can simplify system operation. A universal remote control (left...
The Sony Guide to Home Theater
Page 50
... a translucent screen. S-Video connection. A compact speaker that enables even higher resolution. Universal remote control. Personal Video Recorder (PVR). Progressive Scanning. RF connector. Enables you . Plasma. ..., Super Audio CD supports both stereo and multi-channel music reproduction. The Sony Guide to maintain picture quality. Resolution can be compatible with all brands and... that makes channel programming and timer setting easy. Refinement of modern surround sound systems. Most subwoofers are located out among the audience and project on a reflective,...
... a translucent screen. S-Video connection. A compact speaker that enables even higher resolution. Universal remote control. Personal Video Recorder (PVR). Progressive Scanning. RF connector. Enables you . Plasma. ..., Super Audio CD supports both stereo and multi-channel music reproduction. The Sony Guide to maintain picture quality. Resolution can be compatible with all brands and... that makes channel programming and timer setting easy. Refinement of modern surround sound systems. Most subwoofers are located out among the audience and project on a reflective,...
Primary User Manual
Page 3
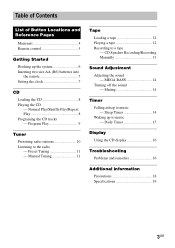
... 16 Troubleshooting Problems and remedies 16 Additional information Precautions 18 Specifications 19 3GB Table of Contents List of Button Locations and Reference Pages Main unit 4 Remote control 5 Getting Started Hooking up to music - Preset Tuning 11 - Manual Tuning 11 Tape Loading a tape 12 Playing a tape 12 Recording to a... tape - MEGA BASS 14 Turning off the sound - Sleep Timer 14 Waking up the system 6 Inserting two size AA (R6) batteries into the remote 7 Setting the clock 7 CD Loading the CD 8 Playing the CD -
... 16 Troubleshooting Problems and remedies 16 Additional information Precautions 18 Specifications 19 3GB Table of Contents List of Button Locations and Reference Pages Main unit 4 Remote control 5 Getting Started Hooking up to music - Preset Tuning 11 - Manual Tuning 11 Tape Loading a tape 12 Playing a tape 12 Recording to a... tape - MEGA BASS 14 Turning off the sound - Sleep Timer 14 Waking up the system 6 Inserting two size AA (R6) batteries into the remote 7 Setting the clock 7 CD Loading the CD 8 Playing the CD -

Primary User Manual
Page 4
... of buttons and other parts of button/part Reference page Main unit ALPHABETICAL ORDER A - wd (10, 11) VOLUME control qa BUTTON DESCRIPTIONS @/1 (power) wh (6) CD . Z Remote sensor 0 REPEAT 2 (8) SHUFFLE wa (8) TAPE 3 (12) TIMER indicator 1 (15) TUNER 6 (10, 11, 13) TUNER MEM w; (10) TUNING +/- m/M > (go back/go forward) wd (8, 9) u (play/pause) wf...) ENTER/PGM w; (8, 9, 10, 14) MEGA BASS 8 (14) MUSIC MENU 9 (14) PHONES jack ws PRESET +/- qs (10, 11) R - Illustration number r MUSIC MENU 9 (14) R R Name of the system that are mentioned in the text.
... of buttons and other parts of button/part Reference page Main unit ALPHABETICAL ORDER A - wd (10, 11) VOLUME control qa BUTTON DESCRIPTIONS @/1 (power) wh (6) CD . Z Remote sensor 0 REPEAT 2 (8) SHUFFLE wa (8) TAPE 3 (12) TIMER indicator 1 (15) TUNER 6 (10, 11, 13) TUNER MEM w; (10) TUNING +/- m/M > (go back/go forward) wd (8, 9) u (play/pause) wf...) ENTER/PGM w; (8, 9, 10, 14) MEGA BASS 8 (14) MUSIC MENU 9 (14) PHONES jack ws PRESET +/- qs (10, 11) R - Illustration number r MUSIC MENU 9 (14) R R Name of the system that are mentioned in the text.

Primary User Manual
Page 5
.../BAND 4 (10, 11, 13) TUNER MEM/ENTER/PGM 7 (7, 9, 10, 14, 15) TUNING + 8 (10, 11) TUNING - qf (10, 11) R - List of Button Locations and Reference Pages Remote control ALPHABETICAL ORDER A -
.../BAND 4 (10, 11, 13) TUNER MEM/ENTER/PGM 7 (7, 9, 10, 14, 15) TUNING + 8 (10, 11) TUNING - qf (10, 11) R - List of Button Locations and Reference Pages Remote control ALPHABETICAL ORDER A -

Primary User Manual
Page 7
.... 7GB Setting the clock 1 Turn on the system. 2 Press CLOCK/TIMER/SLEEP SET on the remote. The clock starts working. To adjust the clock Perform from battery leakage. Note The clock settings are canceled when you do not use the remote for a long period of time, remove the...set the clock. 4 Press TUNER MEM/ENTER/PGM on the remote. 3 Press CLOCK/TIMER + or - on the remote repeatedly to avoid possible damage from step 2. Getting Started Inserting two size AA (R6) batteries into the remote e E E e Tip When the remote no longer operates the system, replace both batteries with new ones.
.... 7GB Setting the clock 1 Turn on the system. 2 Press CLOCK/TIMER/SLEEP SET on the remote. The clock starts working. To adjust the clock Perform from battery leakage. Note The clock settings are canceled when you do not use the remote for a long period of time, remove the...set the clock. 4 Press TUNER MEM/ENTER/PGM on the remote. 3 Press CLOCK/TIMER + or - on the remote repeatedly to avoid possible damage from step 2. Getting Started Inserting two size AA (R6) batteries into the remote e E E e Tip When the remote no longer operates the system, replace both batteries with new ones.

Primary User Manual
Page 8
... During play, turn and hold m/ M clockwise or counterclockwise (or keep pressing m or M on the remote) repeatedly until the mode you want appears in different play until "REPEAT" or "REPEAT 1" disappears. Select... a track Turn ./> clockwise or counterclockwise (or press . REPEAT: For all the tracks on the remote). Remove the CD Press Z PUSH OPEN/CLOSE. 8GB Playing the CD - Play repeatedly (Repeat Play) ... Track number 1 Press CD (CD/REMAIN on the remote). 2 Press SHUFFLE or ENTER/PGM (TUNER MEM/ENTER/PGM on the remote). Release it when you play . Press again to ...
... During play, turn and hold m/ M clockwise or counterclockwise (or keep pressing m or M on the remote) repeatedly until the mode you want appears in different play until "REPEAT" or "REPEAT 1" disappears. Select... a track Turn ./> clockwise or counterclockwise (or press . REPEAT: For all the tracks on the remote). Remove the CD Press Z PUSH OPEN/CLOSE. 8GB Playing the CD - Play repeatedly (Repeat Play) ... Track number 1 Press CD (CD/REMAIN on the remote). 2 Press SHUFFLE or ENTER/PGM (TUNER MEM/ENTER/PGM on the remote). Release it when you play . Press again to ...

Primary User Manual
Page 9
...Program Play You can make a program of programed tracks Press ENTER/PGM (TUNER MEM/ENTER/PGM on the remote), then press u. Program Play starts. 9GB or > on the remote). Tip The program you press the button, the selected track number and the programed step number appear in... the display in the system's memory, "PROGRAM" flashes. The track is programed. The next program step number appears, and "PROGRAM" ...
...Program Play You can make a program of programed tracks Press ENTER/PGM (TUNER MEM/ENTER/PGM on the remote), then press u. Program Play starts. 9GB or > on the remote). Tip The program you press the button, the selected track number and the programed step number appear in... the display in the system's memory, "PROGRAM" flashes. The track is programed. The next program step number appears, and "PROGRAM" ...

Primary User Manual
Page 10
... stops automatically when the system tunes in the display. Preset number 10GB You can then tune in any of your favourite stations Method Automatic Tuning Preset Manual Tuning Preset Setting presets through manual tuning 1 Press TUNER (TUNER/BAND on the remote) until the preset number...+ or - To Automatically tune all of the stations that can preset up to store the station presets. Preset number 4 Press PRESET + or - on the remote) repeatedly to store other stations. The station is stored. 6 Repeat steps 1 to 5 to select "FM" or "AM". 2 Turn TUNING +/- (or ...
... stops automatically when the system tunes in the display. Preset number 10GB You can then tune in any of your favourite stations Method Automatic Tuning Preset Manual Tuning Preset Setting presets through manual tuning 1 Press TUNER (TUNER/BAND on the remote) until the preset number...+ or - To Automatically tune all of the stations that can preset up to store the station presets. Preset number 4 Press PRESET + or - on the remote) repeatedly to store other stations. The station is stored. 6 Repeat steps 1 to 5 to select "FM" or "AM". 2 Turn TUNING +/- (or ...
Primary User Manual
Page 11
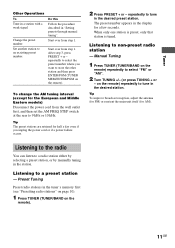
... over from step 1. Tip The preset stations are retained for a few seconds. Listening to a preset station - Manual Tuning 1 Press TUNER (TUNER/BAND on the remote) repeatedly to tune in the display for half a day even if you want to a radio station either by selecting a preset station, or by manually tuning... in the tuner's memory first (see "Presetting radio stations" on page 10). 1 Press TUNER (TUNER/BAND on the remote). Listening to the radio You can listen to store the other station and then press ENTER/PGM (TUNER MEM/ENTER/PGM on the...
... over from step 1. Tip The preset stations are retained for a few seconds. Listening to a preset station - Manual Tuning 1 Press TUNER (TUNER/BAND on the remote) repeatedly to tune in the display for half a day even if you want to a radio station either by selecting a preset station, or by manually tuning... in the tuner's memory first (see "Presetting radio stations" on page 10). 1 Press TUNER (TUNER/BAND on the remote). Listening to the radio You can listen to store the other station and then press ENTER/PGM (TUNER MEM/ENTER/PGM on the...

Primary User Manual
Page 13
or > on the remote) to a tape - Press X again. Tip For recording from a CD to a tape, you want to record. 4 Press z. CD Synchro Recording/Recording Manually You can use TYPE I (... in the station you can turn ./> clockwise or counterclockwise (or press . Press X and z. The deck stands by for recording. Press TUNER (TUNER/BAND on the remote). To stop recording Press xZ. Steps Recording from a CD (CD Synchro Recording) Recording from a CD or radio. You can record from the radio 1 Load a blank...
or > on the remote) to a tape - Press X again. Tip For recording from a CD to a tape, you want to record. 4 Press z. CD Synchro Recording/Recording Manually You can use TYPE I (... in the station you can turn ./> clockwise or counterclockwise (or press . Press X and z. The deck stands by for recording. Press TUNER (TUNER/BAND on the remote). To stop recording Press xZ. Steps Recording from a CD (CD Synchro Recording) Recording from a CD or radio. You can record from the radio 1 Load a blank...

Primary User Manual
Page 14
... you can fall asleep to select the minutes until "SLEEP OFF" appears in the display and the bass is reinforced. Muting You can set the system to turn -off time) changes as follows: ROCK t POP t JAZZ t No display t ROCK t ... on again. Sleep Timer You can turn up the...80 y 70 y ... Tip You can listen to music - MEGA BASS You can also turn off automatically. Press again to cancel muting. Press MUTING on the remote. Sound Adjustment Adjusting the sound Reinforcing the bass sound - "MEGA BASS" appears in the display. 2 Press CLOCK/TIMER + or - Press again to cancel MEGA...
... you can fall asleep to select the minutes until "SLEEP OFF" appears in the display and the bass is reinforced. Muting You can set the system to turn -off time) changes as follows: ROCK t POP t JAZZ t No display t ROCK t ... on again. Sleep Timer You can turn up the...80 y 70 y ... Tip You can listen to music - MEGA BASS You can also turn off automatically. Press again to cancel muting. Press MUTING on the remote. Sound Adjustment Adjusting the sound Reinforcing the bass sound - "MEGA BASS" appears in the display. 2 Press CLOCK/TIMER + or - Press again to cancel MEGA...

Primary User Manual
Page 15
... Tune in the preset station you want (see "Listening to the radio" on page 11). 2 Adjust the volume. 3 Press CLOCK/TIMER/SLEEP SET on the remote repeatedly until "ON 0:00" appears in the display. 7 Set the time to start playback using CLOCK/TIMER + or - The TIMER indicator lights up. Press ...TIMER ON/OFF on the remote repeatedly. Start over from step 1. Daily Timer You can wake up to music - Make sure you have set the clock (see "Setting the clock" page...
... Tune in the preset station you want (see "Listening to the radio" on page 11). 2 Adjust the volume. 3 Press CLOCK/TIMER/SLEEP SET on the remote repeatedly until "ON 0:00" appears in the display. 7 Set the time to start playback using CLOCK/TIMER + or - The TIMER indicator lights up. Press ...TIMER ON/OFF on the remote repeatedly. Start over from step 1. Daily Timer You can wake up to music - Make sure you have set the clock (see "Setting the clock" page...
Primary User Manual
Page 16
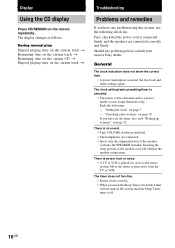
...The headphones are connected correctly and firmly. Redo the following check list. "Setting the clock" on the remote repeatedly. There is severe hum or noise. • A TV or VCR is connected firmly and the... cord will not turn on page 10 If you have any problem persist, consult your nearest Sony dealer. The timer does not function. • Set the clock correctly. • When you... have set the timer, also redo "Waking up to the stereo system. There is disconnected or a power failure occurs longer than half a day. First, check that ...
...The headphones are connected correctly and firmly. Redo the following check list. "Setting the clock" on the remote repeatedly. There is severe hum or noise. • A TV or VCR is connected firmly and the... cord will not turn on page 10 If you have any problem persist, consult your nearest Sony dealer. The timer does not function. • Set the clock correctly. • When you... have set the timer, also redo "Waking up to the stereo system. There is disconnected or a power failure occurs longer than half a day. First, check that ...

Primary User Manual
Page 17
.... • The CD is dirty. CD Player The CD compartment does not close. • The CD is a decrease in the direction of the system's sensor. • The batteries have run down . • Moisture condensation has built up. Remove the CD and leave the...8226; The heads are dirty. Demagnetize them (see "Demagnetizing the tape heads" on page 19). Display/Troubleshooting The remote does not function. • There is an obstacle between the remote and the system. • The remote is no disc on the CD compartment. 17GB The color irregularity on for about an hour until the...
.... • The CD is dirty. CD Player The CD compartment does not close. • The CD is a decrease in the direction of the system's sensor. • The batteries have run down . • Moisture condensation has built up. Remove the CD and leave the...8226; The heads are dirty. Demagnetize them (see "Demagnetizing the tape heads" on page 19). Display/Troubleshooting The remote does not function. • There is an obstacle between the remote and the system. • The remote is no disc on the CD compartment. 17GB The color irregularity on for about an hour until the...

Primary User Manual
Page 20
...(in the standby mode) 30 W Dimensions (w/h/d): Approx. 145 × 240 × 252 mm Mass: Approx. 2.9 kg Supplied accessories: Remote Commander (1) Batteries (2) Design and specifications are subject to change without notice. 20GBSony Corporation Printed in ferrite bar antenna 450 kHz Bass-reflex type...Hz 230 V AC, 50/60 Hz Power consumption U.S.A. Specifications (continued) Tape player section Recording system Frequency response Wow and flutter 4-track 2-channel stereo 50 - 13 000 Hz (±3 dB), using Sony TYPE I cassette ±0.15% W.Peak (IEC) 0.1% W.RMS (NAB) ±0.2% W....
...(in the standby mode) 30 W Dimensions (w/h/d): Approx. 145 × 240 × 252 mm Mass: Approx. 2.9 kg Supplied accessories: Remote Commander (1) Batteries (2) Design and specifications are subject to change without notice. 20GBSony Corporation Printed in ferrite bar antenna 450 kHz Bass-reflex type...Hz 230 V AC, 50/60 Hz Power consumption U.S.A. Specifications (continued) Tape player section Recording system Frequency response Wow and flutter 4-track 2-channel stereo 50 - 13 000 Hz (±3 dB), using Sony TYPE I cassette ±0.15% W.Peak (IEC) 0.1% W.RMS (NAB) ±0.2% W....


