
Limited Warranty (US Only)
Page 1
... operation or maintenance, connection to improper voltage supply, or attempted repair by Sony to any Sony authorized service facility. This warranty does not cover Products sold AS IS or WITH ALL FAULTS, or consumables (such as follows: 1. This warranty is valid only in material or workmanship as fuses or batteries). This warranty does not cover customer instruction, installation, set up adjustments or signal reception problems...
... operation or maintenance, connection to improper voltage supply, or attempted repair by Sony to any Sony authorized service facility. This warranty does not cover Products sold AS IS or WITH ALL FAULTS, or consumables (such as follows: 1. This warranty is valid only in material or workmanship as fuses or batteries). This warranty does not cover customer instruction, installation, set up adjustments or signal reception problems...
Operating Instructions (primary manual)
Page 1
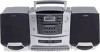
3-865-708-11(2) CD Radio Cassette-Corder Operating Instructions CFD-ZW700 CFD-ZW705 CFD-ZW750 CFD-ZW770 ©1999 by Sony Corporation
3-865-708-11(2) CD Radio Cassette-Corder Operating Instructions CFD-ZW700 CFD-ZW705 CFD-ZW750 CFD-ZW770 ©1999 by Sony Corporation
Operating Instructions (primary manual)
Page 2
... of important operating and maintenance (servicing) instructions in the United States This equipment has been tested and found to comply with the instructions, may be determined by one or more of the CD radio cassette-corder and the serial number is the model used in a particular installation. Record these numbers whenever you start reading, check your model number. These limits are designed to persons. Owner's Record The model number is located at...
... of important operating and maintenance (servicing) instructions in the United States This equipment has been tested and found to comply with the instructions, may be determined by one or more of the CD radio cassette-corder and the serial number is the model used in a particular installation. Record these numbers whenever you start reading, check your model number. These limits are designed to persons. Owner's Record The model number is located at...
Operating Instructions (primary manual)
Page 3
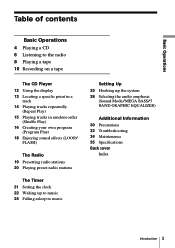
... the radio 8 Playing a tape 10 Recording on a tape The CD Player 12 Using the display 13 Locating a specific point in a track 14 Playing tracks repeatedly (Repeat Play) 15 Playing tracks in random order (Shuffle Play) 16 Creating your own program (Program Play) 18 Enjoying sound effects (LOOP/ FLASH) The Radio 19 Presetting radio stations 20 Playing preset radio stations The Timer 21 Setting the clock 22 Waking up to music 24 Falling asleep to music Setting Up 25 Hooking up the system 28 Selecting the audio emphasis (Sound Mode/MEGA BASS/5 BAND...
... the radio 8 Playing a tape 10 Recording on a tape The CD Player 12 Using the display 13 Locating a specific point in a track 14 Playing tracks repeatedly (Repeat Play) 15 Playing tracks in random order (Shuffle Play) 16 Creating your own program (Program Play) 18 Enjoying sound effects (LOOP/ FLASH) The Radio 19 Presetting radio stations 20 Playing preset radio stations The Timer 21 Setting the clock 22 Waking up to music 24 Falling asleep to music Setting Up 25 Hooking up the system 28 Selecting the audio emphasis (Sound Mode/MEGA BASS/5 BAND...
Operating Instructions (primary manual)
Page 6
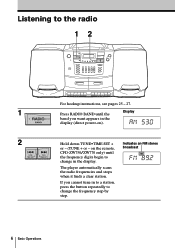
If you want appears in the display (direct power-on the remote, broadcast CFD-ZW750/ZW770 only) until the Display band you cannot tune in to a station, press the button repeatedly to change the frequency step by step. 6 Basic Operations on ). 2 Hold down TUNE•TIME SET + Indicates an FM stereo or - (TUNE + or - The player automatically scans the radio frequencies and stops when it finds a clear station. Listening to the radio 12 For hookup instructions, see pages 25 - 27. 1 Press RADIO BAND until the frequency digits begin to change in the display.
If you want appears in the display (direct power-on the remote, broadcast CFD-ZW750/ZW770 only) until the Display band you cannot tune in to a station, press the button repeatedly to change the frequency step by step. 6 Basic Operations on ). 2 Hold down TUNE•TIME SET + Indicates an FM stereo or - (TUNE + or - The player automatically scans the radio frequencies and stops when it finds a clear station. Listening to the radio 12 For hookup instructions, see pages 25 - 27. 1 Press RADIO BAND until the frequency digits begin to change in the display.
Operating Instructions (primary manual)
Page 7
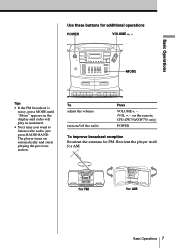
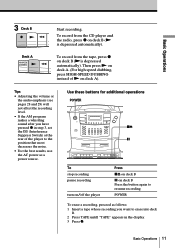
... the remote, CFD-ZW750/ZW770 only) POWER To improve broadcast reception Reorient the antenna for AM. Reorient the player itself for FM. To adjust the volume turn on automatically and starts playing the previous station. for FM for additional operations POWER VOLUME +, - Basic Operations Use these buttons for AM Basic Operations 7 MODE Tips • If the FM broadcast is noisy, press MODE until "Mono" appears in the display and radio will play...
... the remote, CFD-ZW750/ZW770 only) POWER To improve broadcast reception Reorient the antenna for AM. Reorient the player itself for FM. To adjust the volume turn on automatically and starts playing the previous station. for FM for additional operations POWER VOLUME +, - Basic Operations Use these buttons for AM Basic Operations 7 MODE Tips • If the FM broadcast is noisy, press MODE until "Mono" appears in the display and radio will play...
Operating Instructions (primary manual)
Page 8
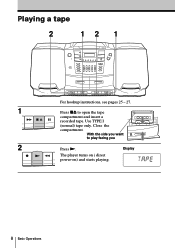
Display The player turns on ( direct power-on) and starts playing. 8 Basic Operations Use TYPE I (normal) tape only. With the side you want to open the tape compartment and insert a recorded tape. Close the compartment. Playing a tape 2 12 1 For hookup instructions, see pages 25 - 27. 1 Press p6 to play facing you 2 Press (.
Display The player turns on ( direct power-on) and starts playing. 8 Basic Operations Use TYPE I (normal) tape only. With the side you want to open the tape compartment and insert a recorded tape. Close the compartment. Playing a tape 2 12 1 For hookup instructions, see pages 25 - 27. 1 Press p6 to play facing you 2 Press (.
Operating Instructions (primary manual)
Page 10
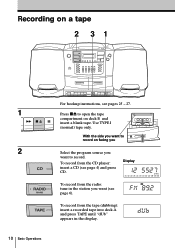
With the side you want to record on a tape 2 31 1 2 10 Basic Operations For hookup instructions, see pages 25 - 27. Display To record from the CD player: insert a CD (see page 6). To record from the radio: tune in the display. Use TYPE I (normal) tape only. To record from the tape (dubbing): insert a recorded tape into deck A and press TAPE until "dUb" appears in the station you want (see page 4) and press CD. Recording on facing you Select the program source you want to record. Press p6 to open the tape compartment on deck B and insert a blank tape.
With the side you want to record on a tape 2 31 1 2 10 Basic Operations For hookup instructions, see pages 25 - 27. Display To record from the CD player: insert a CD (see page 6). To record from the radio: tune in the display. Use TYPE I (normal) tape only. To record from the tape (dubbing): insert a recorded tape into deck A and press TAPE until "dUb" appears in the station you want (see page 4) and press CD. Recording on facing you Select the program source you want to record. Press p6 to open the tape compartment on deck B and insert a blank tape.
Operating Instructions (primary manual)
Page 11
... the recording level. • If the AM program makes a whistling sound after you want to erase into deck B. 2 Press TAPE untill "TAPE" appears in step 3, set the ISS (Interference Suppress Switch) at the rear of ( on deck B Press the button again to the position that most decreases the noise. • For the best results, use the AC power as a power source. Basic Operations 11...
... the recording level. • If the AM program makes a whistling sound after you want to erase into deck B. 2 Press TAPE untill "TAPE" appears in step 3, set the ISS (Interference Suppress Switch) at the rear of ( on deck B Press the button again to the position that most decreases the noise. • For the best results, use the AC power as a power source. Basic Operations 11...
Operating Instructions (primary manual)
Page 13
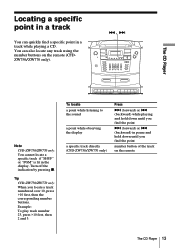
... the display a specific track directly (CFD-ZW750/ZW770 only) Press + (forward) or = (backward) while playing and hold down until you find the point + (forward) or = (backward) in pause and hold down until you locate a track numbered over 10, press >10 first, then the corresponding number buttons. Locating a specific point in a track You can also locate any track using the number buttons on the remote The CD Player 13 Turn off...
... the display a specific track directly (CFD-ZW750/ZW770 only) Press + (forward) or = (backward) while playing and hold down until you find the point + (forward) or = (backward) in pause and hold down until you locate a track numbered over 10, press >10 first, then the corresponding number buttons. Locating a specific point in a track You can also locate any track using the number buttons on the remote The CD Player 13 Turn off...
Operating Instructions (primary manual)
Page 14
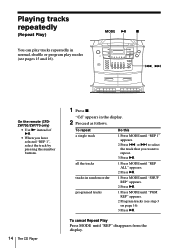
Playing tracks repeatedly (Repeat Play) You can play tracks repeatedly in the display. 2 Proceed as follows. MODE ^ p =, + On the remote (CFDZW750/ZW770 only) • Use ( instead of ^. • When you want to repeat. 3 Press ^. 1 Press MODE until "REP ALL" appears. 2 Press ^. 1 Press MODE until "SHUF REP" appears. 2 Press ^. 1 Press MODE until "REP" disappears from the display. "Cd" appears in normal, shuffle or program play modes (see step 3 on page 16). 3 Press ^. To...
Playing tracks repeatedly (Repeat Play) You can play tracks repeatedly in the display. 2 Proceed as follows. MODE ^ p =, + On the remote (CFDZW750/ZW770 only) • Use ( instead of ^. • When you want to repeat. 3 Press ^. 1 Press MODE until "REP ALL" appears. 2 Press ^. 1 Press MODE until "SHUF REP" appears. 2 Press ^. 1 Press MODE until "REP" disappears from the display. "Cd" appears in normal, shuffle or program play modes (see step 3 on page 16). 3 Press ^. To...
Operating Instructions (primary manual)
Page 19
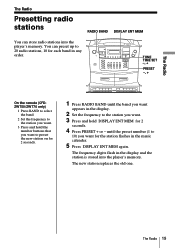
... the player's memory. The new station replaces the old one. TUNE TIME SET -, + PRESET -, + On the remote (CFDZW750/ZW770 only) 1 Press BAND to select the band. 2 Set the frequency to the station you want. 3 Press and hold DISPLAY ENT MEM for 2 seconds. 4 Press PRESET + or - until the band you want appears in the display. 2 Set the frequency to the station you want . 3 Press and hold the number buttons...
... the player's memory. The new station replaces the old one. TUNE TIME SET -, + PRESET -, + On the remote (CFDZW750/ZW770 only) 1 Press BAND to select the band. 2 Set the frequency to the station you want. 3 Press and hold DISPLAY ENT MEM for 2 seconds. 4 Press PRESET + or - until the band you want appears in the display. 2 Set the frequency to the station you want . 3 Press and hold the number buttons...
Operating Instructions (primary manual)
Page 24
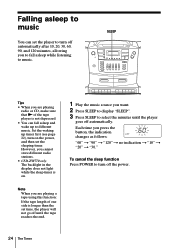
... 22), turn on . To cancel the sleep function Press POWER to music. However, you press the button, the indication changes as follows: "60" n "90" n "120" n no indication n "10" n "20" n "30." Each time you cannot store different radio stations. • CFD-ZW770 only: The backlight in the display does not light while the sleep timer is not depressed. • You can set the sleeping timer. Falling...
... 22), turn on . To cancel the sleep function Press POWER to music. However, you press the button, the indication changes as follows: "60" n "90" n "120" n no indication n "10" n "20" n "30." Each time you cannot store different radio stations. • CFD-ZW770 only: The backlight in the display does not light while the sleep timer is not depressed. • You can set the sleeping timer. Falling...
Operating Instructions (primary manual)
Page 26
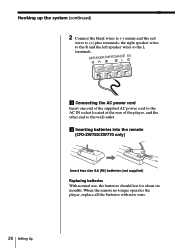
... the R and the left speaker wires to the L terminals. 3 Connecting the AC power cord Insert one end of the supplied AC power cord to the AC IN socket located at the rear of the player, and the other end to (+) plus terminals; When the remote no longer operates the player, replace all the batteries with new ones. 26 Setting Up Hooking up the...
... the R and the left speaker wires to the L terminals. 3 Connecting the AC power cord Insert one end of the supplied AC power cord to the AC IN socket located at the rear of the player, and the other end to (+) plus terminals; When the remote no longer operates the player, replace all the batteries with new ones. 26 Setting Up Hooking up the...
Operating Instructions (primary manual)
Page 27
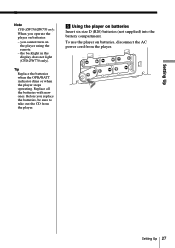
... player on batteries, disconnect the AC power cord from the player. 5 Using the player on batteries Insert six size D (R20) batteries (not supplied) into the battery compartment. Setting Up Note CFD-ZW750/ZW770 only: When you cannot turn on the player using the remote. - the backlight in the display does not light (CFD-ZW770 only). Before you replace the batteries, be sure to take out the CD from the player. Setting Up 27 Tip Replace the batteries...
... player on batteries, disconnect the AC power cord from the player. 5 Using the player on batteries Insert six size D (R20) batteries (not supplied) into the battery compartment. Setting Up Note CFD-ZW750/ZW770 only: When you cannot turn on the player using the remote. - the backlight in the display does not light (CFD-ZW770 only). Before you replace the batteries, be sure to take out the CD from the player. Setting Up 27 Tip Replace the batteries...
Operating Instructions (primary manual)
Page 30
... personnel before inserting a cassette. Should this case, remove the CD and wait about an hour for the moisture to evaporate. • If the player has not been used for a long time, set it in the playback mode to warm it up for a few minutes before operating it checked by battery leakage or corrosion. • The nameplate indicating operating voltage, power consumption, etc. On...
... personnel before inserting a cassette. Should this case, remove the CD and wait about an hour for the moisture to evaporate. • If the player has not been used for a long time, set it in the playback mode to warm it up for a few minutes before operating it checked by battery leakage or corrosion. • The nameplate indicating operating voltage, power consumption, etc. On...
Operating Instructions (primary manual)
Page 32
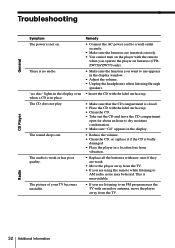
... player with the remote when you operate the player on . Troubleshooting General CD Player Symptom The power is weak or has poor quality. The picture of your TV becomes unstable. Radio 32 Additional Information The audio is not on batteries (CFDZW750/ZW770 only). • Make sure the function you want to use appears in the display window. • Adjust the volume. • Unplug the headphones when listening through speakers...
... player with the remote when you operate the player on . Troubleshooting General CD Player Symptom The power is weak or has poor quality. The picture of your TV becomes unstable. Radio 32 Additional Information The audio is not on batteries (CFDZW750/ZW770 only). • Make sure the function you want to use appears in the display window. • Adjust the volume. • Unplug the headphones when listening through speakers...
Operating Instructions (primary manual)
Page 33
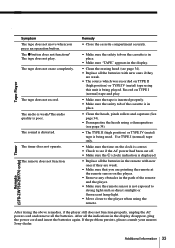
... record. If the problem persists, please consult your nearest Sony dealer. The remote does not function. Remedy • Close the cassette compartment securely. • Make sure the safety tab on the cassette is displayed. • Replace all the batteries with new ones if they are pointing the remote at the remote sensor on TYPE II (high position) or TYPE IV (metal) tape using the remote. The timer does not operate. Tape Player...
... record. If the problem persists, please consult your nearest Sony dealer. The remote does not function. Remedy • Close the cassette compartment securely. • Make sure the safety tab on the cassette is displayed. • Replace all the batteries with new ones if they are pointing the remote at the remote sensor on TYPE II (high position) or TYPE IV (metal) tape using the remote. The timer does not operate. Tape Player...
Operating Instructions (primary manual)
Page 35
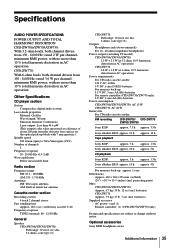
... - 1,710 kHz Antennas FM: Telescopic antenna AM: Built-in ferrite bar antenna Cassette-corder section Recording system 4-track 2 channel stereo Fast winding time Approx. 120 s (sec.) with no more than 10 % total harmonic distortion in AC operation. Optional accessories Sony MDR headphone series Additional Information 35 rated 3.6 W per channelminimum RMS power, with no more than 10 % total harmonic distortion in AC operation) Power requirements For CD radio cassette-corder: 120 V AC...
... - 1,710 kHz Antennas FM: Telescopic antenna AM: Built-in ferrite bar antenna Cassette-corder section Recording system 4-track 2 channel stereo Fast winding time Approx. 120 s (sec.) with no more than 10 % total harmonic distortion in AC operation. Optional accessories Sony MDR headphone series Additional Information 35 rated 3.6 W per channelminimum RMS power, with no more than 10 % total harmonic distortion in AC operation) Power requirements For CD radio cassette-corder: 120 V AC...
Operating Instructions (primary manual)
Page 36
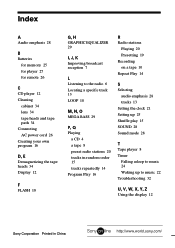
... broadcast reception 7 L Listening to the radio 6 Locating a specific track 13 LOOP 18 M, N, O MEGA BASS 29 P, Q Playing a CD 4 a tape 8 preset radio stations 20 tracks in random order 15 tracks repeatedly 14 Program Play 16 R Radio stations Playing 20 Presetting 19 Recording on a tape 10 Repeat Play 14 S Selecting audio emphasis 28 tracks 13 Setting the clock 21 Setting up 25 Shuffle play 15 SOUND 28 Sound mode 28 T Tape player 8 Timer Falling asleep to music 24 Waking up to music 22 Troubleshooting 32 U, V, W, X, Y, Z Using the display 12 Sony Corporation Printed in China 36...
... broadcast reception 7 L Listening to the radio 6 Locating a specific track 13 LOOP 18 M, N, O MEGA BASS 29 P, Q Playing a CD 4 a tape 8 preset radio stations 20 tracks in random order 15 tracks repeatedly 14 Program Play 16 R Radio stations Playing 20 Presetting 19 Recording on a tape 10 Repeat Play 14 S Selecting audio emphasis 28 tracks 13 Setting the clock 21 Setting up 25 Shuffle play 15 SOUND 28 Sound mode 28 T Tape player 8 Timer Falling asleep to music 24 Waking up to music 22 Troubleshooting 32 U, V, W, X, Y, Z Using the display 12 Sony Corporation Printed in China 36...


