Operating Instructions
Page 4
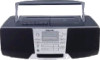
The player turns on (direct power-on the CD compartment. Display Track number Playing time With the label side up 3 CD 4 Basic Operations Press ^. Close the lid of the CD compartment. Basic Operations Playing a CD 3 1,2 1 PUSH OPEN/CLOSE 2 PUSH OPEN/CLOSE Connect the supplied AC power cord (see page 25). Press 6 PUSH OPEN/CLOSE down to open the CD compartment and place the CD on ) and plays all the tracks once.
The player turns on (direct power-on the CD compartment. Display Track number Playing time With the label side up 3 CD 4 Basic Operations Press ^. Close the lid of the CD compartment. Basic Operations Playing a CD 3 1,2 1 PUSH OPEN/CLOSE 2 PUSH OPEN/CLOSE Connect the supplied AC power cord (see page 25). Press 6 PUSH OPEN/CLOSE down to open the CD compartment and place the CD on ) and plays all the tracks once.
Operating Instructions
Page 6
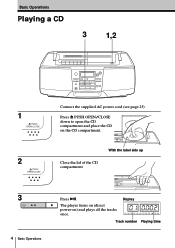
... band you can't tune in a station, press the button repeatedly to change in the display (direct power-on the remote, CFD-S38 only) until the frequency digits begin to the radio 1 2 1 RADIO BAND PRESET Connect the supplied AC power cord (see page 25). on ). Listening to change the frequency step by step. Display 2 TIME SET TUNE...
... band you can't tune in a station, press the button repeatedly to change in the display (direct power-on the remote, CFD-S38 only) until the frequency digits begin to the radio 1 2 1 RADIO BAND PRESET Connect the supplied AC power cord (see page 25). on ). Listening to change the frequency step by step. Display 2 TIME SET TUNE...

Operating Instructions
Page 8
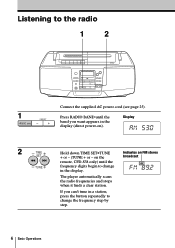
Playing a tape 21 1 STOP/EJECT Connect the supplied AC power cord (see page 25). Press p6 to play facing upward 2 PLAY Press (. Use TYPE I (normal) tape only. With the side you want to open the tape compartment and insert a recorded tape. Display 8 Basic Operations The player turns on (direct power-on) and starts playing. Close the compartment.
Playing a tape 21 1 STOP/EJECT Connect the supplied AC power cord (see page 25). Press p6 to play facing upward 2 PLAY Press (. Use TYPE I (normal) tape only. With the side you want to open the tape compartment and insert a recorded tape. Display 8 Basic Operations The player turns on (direct power-on) and starts playing. Close the compartment.
Operating Instructions
Page 10
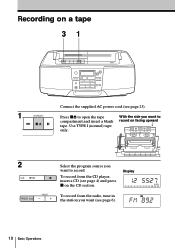
Press p6 to record on the CD section. Use TYPE I (normal) tape only. To record from the radio, tune in the station you want to record. Display To record from the CD player, insert a CD (see page 25). Recording on a tape 31 1 STOP/EJECT Connect the supplied AC power cord (see page 4) and press p on facing upward 2 CD RADIO BAND PRESET Select the program source you want (see page 6). 10 Basic Operations With the side you want to open the tape compartment and insert a blank tape.
Press p6 to record on the CD section. Use TYPE I (normal) tape only. To record from the radio, tune in the station you want to record. Display To record from the CD player, insert a CD (see page 25). Recording on a tape 31 1 STOP/EJECT Connect the supplied AC power cord (see page 4) and press p on facing upward 2 CD RADIO BAND PRESET Select the program source you want (see page 6). 10 Basic Operations With the side you want to open the tape compartment and insert a blank tape.
Operating Instructions
Page 21
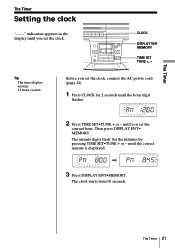
... you set the current hour. The minute digits flash. Tip The time display system: 12-hour system Before you set the clock, connect the AC power cord (page 24). 1 Press CLOCK for 2 seconds until the correct minute is displayed. / 3 Press DISPLAY ENT•MEMORY. Then press DISPLAY ENT• MEMORY. CLOCK DISPLAY...
... you set the current hour. The minute digits flash. Tip The time display system: 12-hour system Before you set the clock, connect the AC power cord (page 24). 1 Press CLOCK for 2 seconds until the correct minute is displayed. / 3 Press DISPLAY ENT•MEMORY. Then press DISPLAY ENT• MEMORY. CLOCK DISPLAY...
Operating Instructions
Page 25
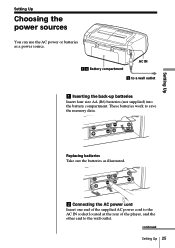
continued Setting Up 25 Setting Up Replacing batteries Take out the batteries as a power source. 14 Battery compartment AC IN 2 to the wall outlet. Setting Up Choosing the power sources You can use the AC power or batteries as illustrated. 2 Connecting the AC power cord Insert one end of the supplied AC power cord to the AC IN socket located at the rear of the player, and the other end to a wall outlet 1 Inserting the back-up batteries Insert four size AA (R6) batteries (not supplied) into the battery compartment. These batteries work to save the memory data.
continued Setting Up 25 Setting Up Replacing batteries Take out the batteries as a power source. 14 Battery compartment AC IN 2 to the wall outlet. Setting Up Choosing the power sources You can use the AC power or batteries as illustrated. 2 Connecting the AC power cord Insert one end of the supplied AC power cord to the AC IN socket located at the rear of the player, and the other end to a wall outlet 1 Inserting the back-up batteries Insert four size AA (R6) batteries (not supplied) into the battery compartment. These batteries work to save the memory data.

Operating Instructions
Page 26
..., replace all the batteries with new ones. 4 Using the player on batteries Insert six size D (R20) batteries (not supplied) into the remote (CFD-S38 only) Note CFD-S38 only: When you operate the player on batteries, you replace the batteries, be sure to take out the... CD from the player. 26 Setting Up Tip Replace the batteries when the OPR/BATT indicator dims or when the player stops operating. Choosing the power sources (continued) 3 Inserting batteries into the battery compartment. Before you cannot turn on batteries, disconnect the AC power cord from the player....
..., replace all the batteries with new ones. 4 Using the player on batteries Insert six size D (R20) batteries (not supplied) into the remote (CFD-S38 only) Note CFD-S38 only: When you operate the player on batteries, you replace the batteries, be sure to take out the... CD from the player. 26 Setting Up Tip Replace the batteries when the OPR/BATT indicator dims or when the player stops operating. Choosing the power sources (continued) 3 Inserting batteries into the battery compartment. Before you cannot turn on batteries, disconnect the AC power cord from the player....

Operating Instructions
Page 28
...the player on the lens inside the CD player section. In this occur, the player will not be caused by qualified personnel before inserting a cassette. On operation • If the ...period of time. • For battery operation, use the supplied AC power cord; Should this case, remove the CD and wait about an hour for the moisture to evaporate. •... If the player has not been used for a long time, set it in the playback mode to warm it any questions or problems concerning your player, please consult your nearest Sony...
...the player on the lens inside the CD player section. In this occur, the player will not be caused by qualified personnel before inserting a cassette. On operation • If the ...period of time. • For battery operation, use the supplied AC power cord; Should this case, remove the CD and wait about an hour for the moisture to evaporate. •... If the player has not been used for a long time, set it in the playback mode to warm it any questions or problems concerning your player, please consult your nearest Sony...
Operating Instructions
Page 30
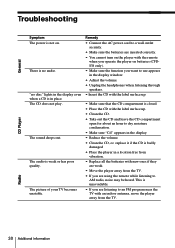
Remedy • Connect the AC power cord to AM radio, noise may be heard. The CD does not play. The picture of your TV becomes unstable. This is badly damaged • Place the player in a location free from vibration. • Replace ... the label surface up. • Clean the CD. • Take out the CD and leave the CD compartment open for about an hour to dry moisture condensation. • Make sure "Cd" appears in place. The sound drops out. Radio 30 Additional Information Troubleshooting General CD Player Symptom The power is weak or has poor quality. "no audio...
Remedy • Connect the AC power cord to AM radio, noise may be heard. The CD does not play. The picture of your TV becomes unstable. This is badly damaged • Place the player in a location free from vibration. • Replace ... the label surface up. • Clean the CD. • Take out the CD and leave the CD compartment open for about an hour to dry moisture condensation. • Make sure "Cd" appears in place. The sound drops out. Radio 30 Additional Information Troubleshooting General CD Player Symptom The power is weak or has poor quality. "no audio...
Operating Instructions
Page 31
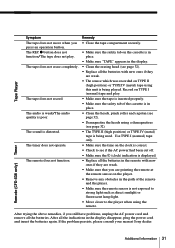
...in the display disappear, plug the power cord and insert the batteries again. The tape does not erase completely. The sound is poor. Record on the cassette is not exposed to strong light... (see page 32). • Demagnetize the heads using this unit is being played. Remote (CFD-S38 only) Timer After trying the above remedies, if you press an operation button. Additional Information... TYPE I (normal) tape and play . If the problem persists, please consult your nearest Sony dealer. The timer does not operate. The tape does not record. After all the indications ...
...in the display disappear, plug the power cord and insert the batteries again. The tape does not erase completely. The sound is poor. Record on the cassette is not exposed to strong light... (see page 32). • Demagnetize the heads using this unit is being played. Remote (CFD-S38 only) Timer After trying the above remedies, if you press an operation button. Additional Information... TYPE I (normal) tape and play . If the problem persists, please consult your nearest Sony dealer. The timer does not operate. The tape does not record. After all the indications ...
Operating Instructions
Page 33
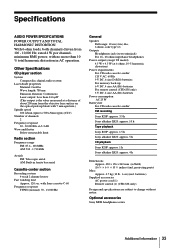
... Below measurable limit Radio section Frequency range FM: 87.6 - 108 MHz AM: 530 - 1,710 kHz Aerials FM: Telescopic aerial AM: Built-in AC operation. batteries) Supplied accessories AC power cord (1) Remote control (1) (CFD-S38 only) Design...batteries For remote control (CFD-S38 only): 3 V DC, 2 size AA (R6) batteries Power consumption AC 25 W Battery life For CD radio cassette-corder: FM recording Sony R20P: approx. 3.5 h Sony alkaline LR20: approx. 10 h Tape playback Sony R20P: approx. 1.5 h Sony alkaline LR20: approx. 5 h CD playback Sony R20P: approx. 1 h Sony alkaline LR20: approx. 4...
... Below measurable limit Radio section Frequency range FM: 87.6 - 108 MHz AM: 530 - 1,710 kHz Aerials FM: Telescopic aerial AM: Built-in AC operation. batteries) Supplied accessories AC power cord (1) Remote control (1) (CFD-S38 only) Design...batteries For remote control (CFD-S38 only): 3 V DC, 2 size AA (R6) batteries Power consumption AC 25 W Battery life For CD radio cassette-corder: FM recording Sony R20P: approx. 3.5 h Sony alkaline LR20: approx. 10 h Tape playback Sony R20P: approx. 1.5 h Sony alkaline LR20: approx. 5 h CD playback Sony R20P: approx. 1 h Sony alkaline LR20: approx. 4...
Operating Instructions
Page 34
... Connecting AC power cord 25 Creating your own program 16 D, E Demagnetizing the tape heads 32 Display 12 F, G, H FLASH 18 I, J, K Improving broadcast reception 7 L Listening to the radio 6 Locating a specific point 13 LOOP 18 M, N, O MEGA BASS 27 P, Q Playing a CD 4 a tape 8 preset radio stations 20 tracks repeatedly 14 Power sources 25 Presetting radio stations 19 Program Play 16 R Radio stations playing...
... Connecting AC power cord 25 Creating your own program 16 D, E Demagnetizing the tape heads 32 Display 12 F, G, H FLASH 18 I, J, K Improving broadcast reception 7 L Listening to the radio 6 Locating a specific point 13 LOOP 18 M, N, O MEGA BASS 27 P, Q Playing a CD 4 a tape 8 preset radio stations 20 tracks repeatedly 14 Power sources 25 Presetting radio stations 19 Program Play 16 R Radio stations playing...


