Warranty Card
Page 1
... or workmanship as fuses or batteries). This warranty gives you specific legal rights, and you . 4-557-147-22 Tape Cassette Player/Recorder/CD Player/Mini Disc ® DAT/Radio/Head Phone/Speaker/MIC/Personals Portable Audio LIMITED WARRANTY Sony Electronics Inc. ("Sony") warrants this Product is within 90 days of the date of protection, to obtain warranty service. This warranty is invalid if the factory applied serial number has been altered...
... or workmanship as fuses or batteries). This warranty gives you specific legal rights, and you . 4-557-147-22 Tape Cassette Player/Recorder/CD Player/Mini Disc ® DAT/Radio/Head Phone/Speaker/MIC/Personals Portable Audio LIMITED WARRANTY Sony Electronics Inc. ("Sony") warrants this Product is within 90 days of the date of protection, to obtain warranty service. This warranty is invalid if the factory applied serial number has been altered...
Operating Instructions
Page 2
... alert the user to the presence of important operating and maintenance (servicing) instructions in the literature accompanying the appliance. Model No. This equipment generates, uses and can be of sufficient magnitude to constitute a risk of electric shock to which can radiate radio frequency energy and, if not installed and used in accordance with the instructions, may be determined by turning the...
... alert the user to the presence of important operating and maintenance (servicing) instructions in the literature accompanying the appliance. Model No. This equipment generates, uses and can be of sufficient magnitude to constitute a risk of electric shock to which can radiate radio frequency energy and, if not installed and used in accordance with the instructions, may be determined by turning the...

Operating Instructions
Page 3
... Operations Basic Operations Playing a CD 4 Listening to the radio 6 Playing a tape 8 Recording on a tape 10 The CD Player Using the display 12 Locating a specific point in a track 12 Playing tracks repeatedly (Repeat Play 13 Playing tracks in random order (Shuffle Play 14 Creating your own program (Program Play 14 The Radio Presetting radio stations 16 Playing preset radio stations 17 The Audio Emphasis Selecting the audio emphasis (MEGA BASS 18 The Timer Setting the clock 19 Waking up to music 20 Falling asleep to music 21 Setting Up Choosing the power sources 23 Changing...
... Operations Basic Operations Playing a CD 4 Listening to the radio 6 Playing a tape 8 Recording on a tape 10 The CD Player Using the display 12 Locating a specific point in a track 12 Playing tracks repeatedly (Repeat Play 13 Playing tracks in random order (Shuffle Play 14 Creating your own program (Program Play 14 The Radio Presetting radio stations 16 Playing preset radio stations 17 The Audio Emphasis Selecting the audio emphasis (MEGA BASS 18 The Timer Setting the clock 19 Waking up to music 20 Falling asleep to music 21 Setting Up Choosing the power sources 23 Changing...
Operating Instructions
Page 4
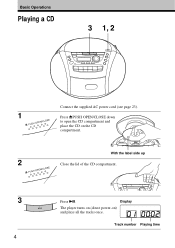
Press ZPUSH OPEN/CLOSE down to open the CD compartment and place the CD on ) and plays all the tracks once. Display The player turns on (direct power-on the CD compartment. Track number Playing time Basic Operations Playing a CD 3 1, 2 1 2 3 4 Connect the supplied AC power cord (see page 23). Press u. With the label side up Close the lid of the CD compartment.
Press ZPUSH OPEN/CLOSE down to open the CD compartment and place the CD on ) and plays all the tracks once. Display The player turns on (direct power-on the CD compartment. Track number Playing time Basic Operations Playing a CD 3 1, 2 1 2 3 4 Connect the supplied AC power cord (see page 23). Press u. With the label side up Close the lid of the CD compartment.
Operating Instructions
Page 6
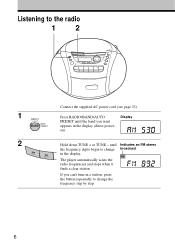
on). 2 Hold down TUNE + or TUNE - The player automatically scans the radio frequencies and stops when it finds a clear station. If you want appears in a station, press the button repeatedly to change the frequency step by step. 6 Listening to the radio 1 2 Connect the supplied AC power cord (see page 23). 1 Press RADIO•BAND•AUTO Display PRESET until Indicates an FM stereo the frequency digits begin to change broadcast in the display. until the band you can't tune in the display (direct power-
on). 2 Hold down TUNE + or TUNE - The player automatically scans the radio frequencies and stops when it finds a clear station. If you want appears in a station, press the button repeatedly to change the frequency step by step. 6 Listening to the radio 1 2 Connect the supplied AC power cord (see page 23). 1 Press RADIO•BAND•AUTO Display PRESET until Indicates an FM stereo the frequency digits begin to change broadcast in the display. until the band you can't tune in the display (direct power-
Operating Instructions
Page 7
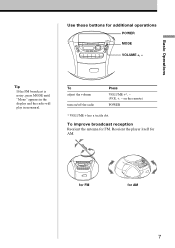
Basic Operations Use these buttons for AM 7 on /off the radio Press VOLUME +*, - (VOL +, - for FM for additional operations POWER MODE VOLUME +, - To improve broadcast reception Reorient the antenna for AM. Tip If the FM broadcast is noisy, press MODE until "Mono" appears in the display and the radio will play in monaural. To adjust the volume turn on the remote) POWER * VOLUME + has a tactile dot. Reorient the player itself for FM.
Basic Operations Use these buttons for AM 7 on /off the radio Press VOLUME +*, - (VOL +, - for FM for additional operations POWER MODE VOLUME +, - To improve broadcast reception Reorient the antenna for AM. Tip If the FM broadcast is noisy, press MODE until "Mono" appears in the display and the radio will play in monaural. To adjust the volume turn on the remote) POWER * VOLUME + has a tactile dot. Reorient the player itself for FM.
Operating Instructions
Page 8
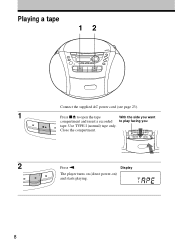
Display The player turns on (direct power-on) and starts playing. 8 Close the compartment. 2 Press n. Playing a tape 12 Connect the supplied AC power cord (see page 23). 1 Press xZ to open the tape With the side you want compartment and insert a recorded to play facing you tape. Use TYPE I (normal) tape only.
Display The player turns on (direct power-on) and starts playing. 8 Close the compartment. 2 Press n. Playing a tape 12 Connect the supplied AC power cord (see page 23). 1 Press xZ to open the tape With the side you want compartment and insert a recorded to play facing you tape. Use TYPE I (normal) tape only.

Operating Instructions
Page 10
record on the CD section. Select the program source you Use TYPE I (normal) tape only. To record from the radio, tune in the station you want to open the tape With the side you want to record. Press xZ to compartment and insert a blank tape. Display To record from the CD player, insert a CD (see page 23). Recording on a tape 13 1 2 10 Connect the supplied AC power cord (see page 4) and press x on facing you want (see page 6).
record on the CD section. Select the program source you Use TYPE I (normal) tape only. To record from the radio, tune in the station you want to open the tape With the side you want to record. Press xZ to compartment and insert a blank tape. Display To record from the CD player, insert a CD (see page 23). Recording on a tape 13 1 2 10 Connect the supplied AC power cord (see page 4) and press x on facing you want (see page 6).

Operating Instructions
Page 11
... pause recording turn on the remote repeatedly until "TAPE" appears. 3 Press z. 11 Basic Operations Use these buttons for additional operations POWER MODE n xZ X Tips • Adjusting the volume or the audio emphasis (see page To stop recording Press xZ 18) will not affect the recording level. • If the AM program makes a whistling sound after you want to erase. 2 Press FUNCTION on /off the player X Press the button again to start recording (n is...
... pause recording turn on the remote repeatedly until "TAPE" appears. 3 Press z. 11 Basic Operations Use these buttons for additional operations POWER MODE n xZ X Tips • Adjusting the volume or the audio emphasis (see page To stop recording Press xZ 18) will not affect the recording level. • If the AM program makes a whistling sound after you want to erase. 2 Press FUNCTION on /off the player X Press the button again to start recording (n is...
Operating Instructions
Page 13
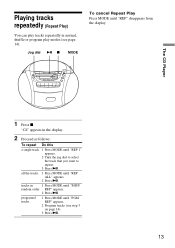
.... 2 Press u. "Cd" appears in normal, shuffle or program play modes (see step 3 on page 14). 3 Press u. 13 Playing tracks repeatedly (Repeat Play) You can play tracks repeatedly in the display. 2 Proceed as follows: To repeat Do this a single track 1 Press MODE until "REP 1" appears. 2 Turn the jog dial to select the track that you want to repeat. 3 Press u. all the tracks 1 Press MODE until "REP" disappears from the display. programed tracks 1 Press MODE until "SHUF...
.... 2 Press u. "Cd" appears in normal, shuffle or program play modes (see step 3 on page 14). 3 Press u. 13 Playing tracks repeatedly (Repeat Play) You can play tracks repeatedly in the display. 2 Proceed as follows: To repeat Do this a single track 1 Press MODE until "REP 1" appears. 2 Turn the jog dial to select the track that you want to repeat. 3 Press u. all the tracks 1 Press MODE until "REP" disappears from the display. programed tracks 1 Press MODE until "SHUF...
Operating Instructions
Page 20
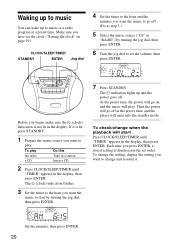
... set the volume, then press ENTER. The indication lights up to music or a radio program at the preset time, and the player will start by turning the jog dial, then press ENTER. 6 Turn the jog dial to start Press CLOCK/SLEEP/TIMER until "TIMER" appears in a station. To change when the playback will enter into the standby mode. Make sure you want the music to set the clock ("Setting the clock" on , and the music...
... set the volume, then press ENTER. The indication lights up to music or a radio program at the preset time, and the player will start by turning the jog dial, then press ENTER. 6 Turn the jog dial to start Press CLOCK/SLEEP/TIMER until "TIMER" appears in a station. To change when the playback will enter into the standby mode. Make sure you want the music to set the clock ("Setting the clock" on , and the music...
Operating Instructions
Page 22
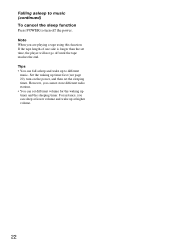
Note When you are playing a tape using this function: If the tape length of one side is longer than the set time, the player will not go off the power. For instance, you cannot store different radio stations. • You can sleep at lower volume and wake up timer and the sleeping timer. However, you can set different volume for the waking up at higher volume. 22 Tips...
Note When you are playing a tape using this function: If the tape length of one side is longer than the set time, the player will not go off the power. For instance, you cannot store different radio stations. • You can sleep at lower volume and wake up timer and the sleeping timer. However, you can set different volume for the waking up at higher volume. 22 Tips...
Operating Instructions
Page 24
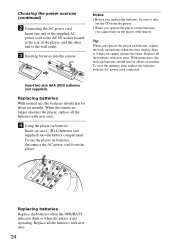
... Replace all the batteries with the AC power cord connected. Insert two size AAA (R03) batteries (not supplied). With normal use the player on batteries, disconnect the AC power cord from the player. • When you operate the player on batteries Insert six size C (R14) batteries (not supplied) into the remote Notes • Before you replace the batteries, be sure to take out the CD from the player. To save the memory data, replace the batteries...
... Replace all the batteries with the AC power cord connected. Insert two size AAA (R03) batteries (not supplied). With normal use the player on batteries, disconnect the AC power cord from the player. • When you operate the player on batteries Insert six size C (R14) batteries (not supplied) into the remote Notes • Before you replace the batteries, be sure to take out the CD from the player. To save the memory data, replace the batteries...
Operating Instructions
Page 26
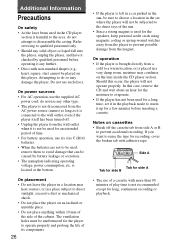
Attempting to do not attempt to disassemble the casing. do not use any further. • Discs with adhesive tape. is brought directly from the wall outlet when it up for an extended period of time. • For battery operation, use the supplied AC power cord; The ventilation holes must be unobstructed for the player to operate properly and prolong the life of its components. 26...
Attempting to do not attempt to disassemble the casing. do not use any further. • Discs with adhesive tape. is brought directly from the wall outlet when it up for an extended period of time. • For battery operation, use the supplied AC power cord; The ventilation holes must be unobstructed for the player to operate properly and prolong the life of its components. 26...
Operating Instructions
Page 27
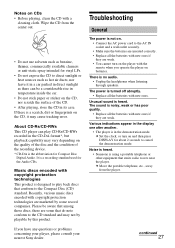
... record companies. The power is turned off abruptly. • Replace all the batteries with copyright protection technologies are weak. c Set the clock, or turn on the player with the remote when you have any questions or problems concerning your player, please consult your nearest Sony dealer. If you operate the player on the quality of the disc and the condition of the CD. • After playing, store the CD...
... record companies. The power is turned off abruptly. • Replace all the batteries with copyright protection technologies are weak. c Set the clock, or turn on the player with the remote when you have any questions or problems concerning your player, please consult your nearest Sony dealer. If you operate the player on the quality of the disc and the condition of the CD. • After playing, store the CD...

Operating Instructions
Page 28
.... Use TYPE I (normal) tape and play. This is weak. The audio is unavoidable. The sound drops out. Timer The timer does not operate. • Make sure the time on TYPE II (high position) or TYPE IV (metal) tape using poor quality CD-Rs/CDRWs or if there is a problem with the quality of the cassette is being played. The picture of the CD compartment. • Place the player on TYPE I (normal) tape only. Radio...
.... Use TYPE I (normal) tape and play. This is weak. The audio is unavoidable. The sound drops out. Timer The timer does not operate. • Make sure the time on TYPE II (high position) or TYPE IV (metal) tape using poor quality CD-Rs/CDRWs or if there is a problem with the quality of the cassette is being played. The picture of the CD compartment. • Place the player on TYPE I (normal) tape only. Radio...
Operating Instructions
Page 31
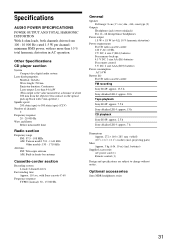
Optional accessories Sony MDR headphones series 31 with 7 mm aperture.) Spindle speed 200 r/min (rpm) to change without notice. Other Specifications CD player section System Compact disc digital audio system Laser diode properties Material: GaAlAs Wave length: 780 nm Emission duration: Continuous Laser output: Less than 10 % total harmonic distortion in AC operation. projecting parts) Mass Approx. 3 kg (6 lb. 10 oz) (incl. batteries) Supplied accessories AC power cord (1) Remote control (1) Design and specifications are subject...
Optional accessories Sony MDR headphones series 31 with 7 mm aperture.) Spindle speed 200 r/min (rpm) to change without notice. Other Specifications CD player section System Compact disc digital audio system Laser diode properties Material: GaAlAs Wave length: 780 nm Emission duration: Continuous Laser output: Less than 10 % total harmonic distortion in AC operation. projecting parts) Mass Approx. 3 kg (6 lb. 10 oz) (incl. batteries) Supplied accessories AC power cord (1) Remote control (1) Design and specifications are subject...
Operating Instructions
Page 32
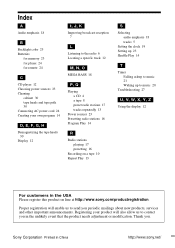
... that the product needs adjustment or modification. Thank you periodic mailings about new products, services and other important announcements. Registering your own program 14 D, E, F, G, H Demagnetizing the tape heads 30 Display 12 I, J, K Improving broadcast reception 7 L Listening to the radio 6 Locating a specific track 12 M, N, O MEGA BASS 18 P, Q Playing a CD 4 a tape 8 preset radio stations 17 tracks repeatedly 13 Power sources 23 Presetting radio stations 16 Program Play 14 R Radio stations playing 17 presetting 16 Recording on line at http://www.sony.com/productregistration.
... that the product needs adjustment or modification. Thank you periodic mailings about new products, services and other important announcements. Registering your own program 14 D, E, F, G, H Demagnetizing the tape heads 30 Display 12 I, J, K Improving broadcast reception 7 L Listening to the radio 6 Locating a specific track 12 M, N, O MEGA BASS 18 P, Q Playing a CD 4 a tape 8 preset radio stations 17 tracks repeatedly 13 Power sources 23 Presetting radio stations 16 Program Play 14 R Radio stations playing 17 presetting 16 Recording on line at http://www.sony.com/productregistration.
Marketing Specifications
Page 1
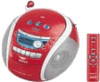
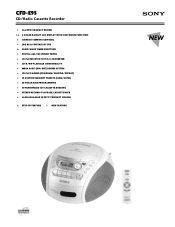
CFD-E95 CD/Radio Cassette Recorder • ALL NEW COMPACT DESIGN ◗v 3-COLOR BACKLIT LCD DISPLAY WITH CUSTOMIZE FUNCTION ◗ COMPACT REMOTE CONTROL • JOG DIAL FOR EASE OF USE v SLEEP/WAKE TIMER FUNCTION • DIGITAL AM/FM STEREO TUNER • CD PLAYER WITH 1 BIT D/A CONVERTER • CD-R/RW PLAYBACK COMPATIBILITY • MEGA BASS® (ON/OFF) SOUND SYSTEM • CD PLAY MODES (PROGRAM/SHUFFLE/REPEAT) • 30 STATION MEMORY PRESETS (10AM/20FM) • 20 TRACK RMS PROGRAMMING • SYNCHRONIZED CD/CASSETTE DUBBING • STEREO RECORD/PLAYBACK CASSETTE DECK •...
CFD-E95 CD/Radio Cassette Recorder • ALL NEW COMPACT DESIGN ◗v 3-COLOR BACKLIT LCD DISPLAY WITH CUSTOMIZE FUNCTION ◗ COMPACT REMOTE CONTROL • JOG DIAL FOR EASE OF USE v SLEEP/WAKE TIMER FUNCTION • DIGITAL AM/FM STEREO TUNER • CD PLAYER WITH 1 BIT D/A CONVERTER • CD-R/RW PLAYBACK COMPATIBILITY • MEGA BASS® (ON/OFF) SOUND SYSTEM • CD PLAY MODES (PROGRAM/SHUFFLE/REPEAT) • 30 STATION MEMORY PRESETS (10AM/20FM) • 20 TRACK RMS PROGRAMMING • SYNCHRONIZED CD/CASSETTE DUBBING • STEREO RECORD/PLAYBACK CASSETTE DECK •...
Marketing Specifications
Page 2
... RANGE: AM: 530-1710kHz FM: 87.6-108MHz POWER OUTPUT: JEITA 2.3W/Channel ANTENNA SYSTEM: AM: Built-in Ferrite Bar Antenna FM: Telescopic Antenna TAPE SYSTEM: 4 Track, 2 Channel Stereo Cassette SPEAKERS: 4" (10cm) x 2 OUTPUTS: Headphone (stereo mini jack) POWER REQUIREMENTS: "C" x 6 Batteries (optional) AC 120V, 60Hz "AAA" x 2 for remote (optional), "AA" x 3 for clock, memory (optional) BATTERY LIFE (APPROX.): 20 Hours FM Radio, 15 Hours Cassette Playback, 7 Hours CD play (at 80% volume) w/Sony Alkaline Batteries COLOR: White DIMENSIONS (WHD): 16 1⁄2" x 6 1⁄2" x 10...
... RANGE: AM: 530-1710kHz FM: 87.6-108MHz POWER OUTPUT: JEITA 2.3W/Channel ANTENNA SYSTEM: AM: Built-in Ferrite Bar Antenna FM: Telescopic Antenna TAPE SYSTEM: 4 Track, 2 Channel Stereo Cassette SPEAKERS: 4" (10cm) x 2 OUTPUTS: Headphone (stereo mini jack) POWER REQUIREMENTS: "C" x 6 Batteries (optional) AC 120V, 60Hz "AAA" x 2 for remote (optional), "AA" x 3 for clock, memory (optional) BATTERY LIFE (APPROX.): 20 Hours FM Radio, 15 Hours Cassette Playback, 7 Hours CD play (at 80% volume) w/Sony Alkaline Batteries COLOR: White DIMENSIONS (WHD): 16 1⁄2" x 6 1⁄2" x 10...


