Sony CDX-MP30 - Fm/am Compact Disc Player Research
Related Manual Pages


Similar Questions

Sony Cdx L600x Faceplate - Fm Am Compact Disc Player?
Good day. Do you sell the Sony CDX L600X Faceplate - Fm am Compact Disc Player?
Good day. Do you sell the Sony CDX L600X Faceplate - Fm am Compact Disc Player?
(Posted by nstatham 7 years ago)

How To Install Sony Car Stereo Wiring Cdx-gt550ui
(Posted by sfitisaed 10 years ago)

Installation And Wiring Diagram For Fm/am Disc Player Cdx-gt710 Sony
Wiring and installation manual or diagram
Wiring and installation manual or diagram
(Posted by toddsmith 10 years ago)

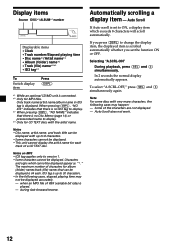
How To Turn Off Automatic Scrolling With No Mode Chosen.
When the unit is off, instead of clock being on, after a few seconds, clock goes off and automatic s...
When the unit is off, instead of clock being on, after a few seconds, clock goes off and automatic s...
(Posted by rcstewart 12 years ago)
Related Terms
The following terms were also used when searching for Sony CDX-MP30 - Fm/am Compact Disc Player Research:- sony cdx mp30
- sony cdx-mp30
- sony cdx m30 marine
- cdx m30 marine
- sony cdx mp30 cd
- xplod cdx mp30
- cdx mp30 wiring
- sony cdx mp30 wiring
- cdx mp30 manual
- cdx mp30 cd
- cdx mp30 sony
- cdx-mp30 manual
- cdx mp30 aux input
- cdx mp30 car stereo
- cdx mp30 cd receiver
- cdx mp30 faceplate
- cdx mp30 install
- cdx mp30 instructions
- cdx mp30 wiring diagram
- cdx mp30 xplod
- autoradio cdx-mp30
- autoradio sony cdx-mp30
- cdx m30
- cdx m30 cd player
- cdx m30 cdx-m30
- cdx m30 faceplate
- cdx m30 faceplate only
- cdx m30 installation
- cdx m30 marine radio
- cdx m30 radio
- cdx m30 sony
- cdx mp30
- cdx mp30 adapter
- cdx mp30 car cd player
- cdx mp30 cd player
- cdx mp30 harness
- cdx mp30 installation
- cdx mp30 installation manual
- cdx mp30 ipod
- cdx mp30 manual download
- cdx mp30 mp3 player
- cdx mp30 pdf
- cdx mp30 price
- cdx mp30 remote
- cdx mp30 schematic
- cdx mp30 service manual
- cdx mp30 spec
- cdx mp30 specs
- cdx mp30 user manual
- cdx mp30 wire harness
- cdx mp40
- cdx mp40 manual
- cdx mp40 wiring diagram
- cdx mp70
- cdx-m30 marine
- cdx-mp30
- cdx-mp30 aux
- cdx-mp30 bus in
- cdx-mp30 car cd player
- cdx-mp30 diagram
- cdx-mp30 faceplate
- cdx-mp30 input
- cdx-mp30 installation
- cdx-mp30 installation manual
- cdx-mp30 instructions
- cdx-mp30 ipod
- cdx-mp30 manual download
- cdx-mp30 pdf
- cdx-mp30 price
- cdx-mp30 remote
- cdx-mp30 service manual
- cdx-mp30 sony
- cdx-mp30 sony pdf
- cdx-mp30 specs
- cdx-mp30 user manual
- cdx-mp30 wiring
- cdx-mp30 wiring diagram
- cdx-mp30 wiring harness
- cdx-mp30 xplod
- cdxm30 sony
- radio sony xplod cdx-mp30
- radio xplod cdx-mp30
- sony cdx m30
- sony cdx m30 cd player
- sony cdx m30 cdx-m30
- sony cdx m30 faceplate
- sony cdx m30 faceplate only
- sony cdx m30 installation
- sony cdx m30 marine radio
- sony cdx m30 radio
- sony cdx mp30 adapter
- sony cdx mp30 aux input
- sony cdx mp30 car cd player
- sony cdx mp30 car stereo
- sony cdx mp30 cd player
- sony cdx mp30 cd receiver
- sony cdx mp30 faceplate
- sony cdx mp30 harness
- sony cdx mp30 installation manual
- sony cdx mp30 instructions
- sony cdx mp30 ipod
- sony cdx mp30 manual
- sony cdx mp30 manual download
- sony cdx mp30 mp3 player
- sony cdx mp30 price
- sony cdx mp30 service manual
- sony cdx mp30 spec
- sony cdx mp30 wire harness
- sony cdx mp30 wiring diagram
- sony cdx mp30 xplod
- sony cdx mp40
- sony cdx mp40 manual
- sony cdx mp40 wiring diagram
- sony cdx mp70
- sony cdx-m30
- sony cdx-m30 marine
- sony cdx-mp30 aux
- sony cdx-mp30 bus in
- sony cdx-mp30 car cd player
- sony cdx-mp30 diagram
- sony cdx-mp30 faceplate
- sony cdx-mp30 input
- sony cdx-mp30 installation manual
- sony cdx-mp30 ipod
- sony cdx-mp30 manual
- sony cdx-mp30 manual download
- sony cdx-mp30 price
- sony cdx-mp30 service manual
- sony cdx-mp30 specs
- sony cdx-mp30 wiring
- sony cdx-mp30 wiring diagram
- sony cdx-mp30 xplod
- sony explode cdx-mp30
- sony xplod cdx mp30
- sony xplod cdx-mp30
- sony xplod cdx-mp30 manual
- sony xplod cdx-mp30 wiring diagram
- xplod cdx-mp30
- xplod cdx-mp30 manual
- xplod cdx-mp30 wiring diagram