
Limited Warranty (U.S. Only)
Page 1
... its original specifications. If Sony elects to state. Some states do so for the time periods and as fuses or batteries). In the event of product ("Parts Warranty"), Sony will become the property of the original Limited Warranty period or for your exclusive remedies. Please refer to its option, (i) repair the product using new or refurbished parts or (ii) replace the...
... its original specifications. If Sony elects to state. Some states do so for the time periods and as fuses or batteries). In the event of product ("Parts Warranty"), Sony will become the property of the original Limited Warranty period or for your exclusive remedies. Please refer to its option, (i) repair the product using new or refurbished parts or (ii) replace the...
Operating Instructions
Page 1
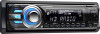
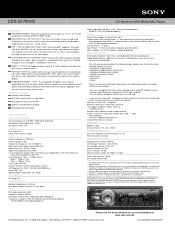
CDX-GT700HD Serial No. Refer to these numbers whenever you call upon your Sony dealer regarding this product. Model No. Record the serial number in the space provided below. To cancel the demonstration (DEMO) display, see page 6. Para cancelar la pantalla de demostración (DEMO), consulte la página 6. CDX-GT700HD ©2009 Sony Corporation 4-168-227-11(1) FM/AM Digital Radio CD Player Operating Instructions US Manual de instrucciones ES Owner's Record The model and serial numbers are located on the bottom of the unit.
CDX-GT700HD Serial No. Refer to these numbers whenever you call upon your Sony dealer regarding this product. Model No. Record the serial number in the space provided below. To cancel the demonstration (DEMO) display, see page 6. Para cancelar la pantalla de demostración (DEMO), consulte la página 6. CDX-GT700HD ©2009 Sony Corporation 4-168-227-11(1) FM/AM Digital Radio CD Player Operating Instructions US Manual de instrucciones ES Owner's Record The model and serial numbers are located on the bottom of the unit.

Operating Instructions
Page 2
... to provide reasonable protection against harmful interference in a residential installation. and XM Satellite Radio Inc. You are proprietary trademarks of the car for a Class B digital device, pursuant to Part 15 of Sony Corporation. Use or distribution of such technology outside of Microsoft Corporation. This equipment generates, uses, and can be determined by turning the equipment off and on the satellite radio tuner module. However...
... to provide reasonable protection against harmful interference in a residential installation. and XM Satellite Radio Inc. You are proprietary trademarks of the car for a Class B digital device, pursuant to Part 15 of Sony Corporation. Use or distribution of such technology outside of Microsoft Corporation. This equipment generates, uses, and can be determined by turning the equipment off and on the satellite radio tuner module. However...
Operating Instructions
Page 4
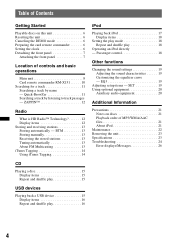
... play mode 18 Repeat and shuffle play 18 Operating an iPod directly - EQ3 19 Adjusting setup items - Passenger control 18 Other functions Changing the sound settings 19 Adjusting the sound characteristics 19 Customizing the equalizer curve - ZAPPIN 12 Radio What is HD Radio™ Technology 12 Display items 12 Storing and receiving stations 13 Storing automatically - Table of Contents Getting Started Playable discs on discs 21 Playback order of controls and basic operations Main unit 8 Card remote...
... play mode 18 Repeat and shuffle play 18 Operating an iPod directly - EQ3 19 Adjusting setup items - Passenger control 18 Other functions Changing the sound settings 19 Adjusting the sound characteristics 19 Customizing the equalizer curve - ZAPPIN 12 Radio What is HD Radio™ Technology 12 Display items 12 Storing and receiving stations 13 Storing automatically - Table of Contents Getting Started Playable discs on discs 21 Playback order of controls and basic operations Main unit 8 Card remote...
Operating Instructions
Page 6
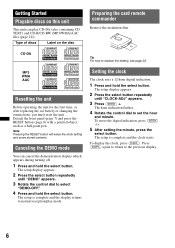
... hold the select button. To display the clock, press (DSPL). MP3 WMA AAC Resetting the unit Before operating the unit for the first time, or after replacing the car battery or changing the connections, you must reset the unit. Detach the front panel (page 7) and press the RESET button (page 8) with a pointed object, such as a ball-point pen. The setup display appears. 2 Press the select button repeatedly until "DEMO" appears. 3 Rotate the control dial to...
... hold the select button. To display the clock, press (DSPL). MP3 WMA AAC Resetting the unit Before operating the unit for the first time, or after replacing the car battery or changing the connections, you must reset the unit. Detach the front panel (page 7) and press the RESET button (page 8) with a pointed object, such as a ball-point pen. The setup display appears. 2 Press the select button repeatedly until "DEMO" appears. 3 Rotate the control dial to...
Operating Instructions
Page 8
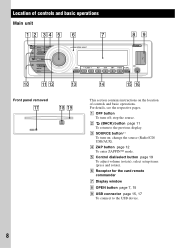
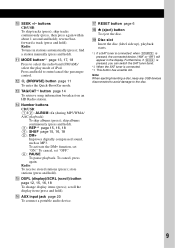
C SOURCE button*1 To turn off; A OFF button To turn on the location of controls and basic operations Main unit 1 2 34 5 6 7 OFF SEEK ZAP SOURCE 89 OPEN MODE SEEK q; select setup items (press and rotate). Location of controls and basic operations. stop the source. F Receptor for the card remote commander G Display window H OPEN button page 7, 15 I USB connector page 15, 17 To connect to the previous display. E Control dial/select button page 19 To adjust volume (rotate); B (BACK) button page 11 To...
C SOURCE button*1 To turn off; A OFF button To turn on the location of controls and basic operations Main unit 1 2 34 5 6 7 OFF SEEK ZAP SOURCE 89 OPEN MODE SEEK q; select setup items (press and rotate). Location of controls and basic operations. stop the source. F Receptor for the card remote commander G Display window H OPEN button page 7, 15 I USB connector page 15, 17 To connect to the previous display. E Control dial/select button page 19 To adjust volume (rotate); B (BACK) button page 11 To...
Operating Instructions
Page 9
..., you can switch the SAT tuner band. *2 When the SAT tuner is pressed, the connected device ("XM" or "SR") will appear in stations automatically (press); Note When ejecting/inserting a disc, keep any USB devices disconnected to avoid damage to the disc. 9 Radio: To tune in the display. L (BROWSE) button page 11 To enter the Quick-BrowZer mode. P AUX input jack page 20 To connect a portable audio device. J SEEK +/- buttons CD/USB: To skip...
..., you can switch the SAT tuner band. *2 When the SAT tuner is pressed, the connected device ("XM" or "SR") will appear in stations automatically (press); Note When ejecting/inserting a disc, keep any USB devices disconnected to avoid damage to the disc. 9 Radio: To tune in the display. L (BROWSE) button page 11 To enter the Quick-BrowZer mode. P AUX input jack page 20 To connect a portable audio device. J SEEK +/- buttons CD/USB: To skip...
Operating Instructions
Page 10
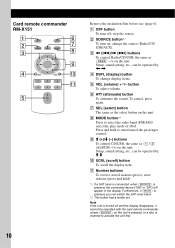
... play mode of iPod. A OFF button To turn on the unit. F ATT (attenuate) button To attenuate the sound. J SCRL (scroll) button To scroll the display item. Remove the insulation film before use (page 6). B SOURCE button*1 To turn off and the display disappears, it cannot be operated by < ,. D DSPL (display) button To change the source (Radio/CD/ USB/AUX). button To adjust volume. H MODE button*1 Press to activate the unit first. 10 C buttons To control Radio/CD/USB, the same as (SEEK) -/+ on the unit is pressed, or a disc...
... play mode of iPod. A OFF button To turn on the unit. F ATT (attenuate) button To attenuate the sound. J SCRL (scroll) button To scroll the display item. Remove the insulation film before use (page 6). B SOURCE button*1 To turn off and the display disappears, it cannot be operated by < ,. D DSPL (display) button To change the source (Radio/CD/ USB/AUX). button To adjust volume. H MODE button*1 Press to activate the unit first. 10 C buttons To control Radio/CD/USB, the same as (SEEK) -/+ on the unit is pressed, or a disc...
Operating Instructions
Page 13
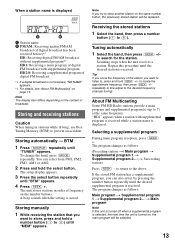
... selected, the next time the unit is turned on the number buttons. repeatedly to fine adjust to search for the station. to the desired frequency (manual tuning). Tip If you know the frequency of frequency on , the main program will be selected. 13 Selecting a supplemental program During main program reception, press (SEEK) +. A beep sounds when the setting is received. Note The display item differs depending on page 13. To change the band, press (MODE...
... selected, the next time the unit is turned on the number buttons. repeatedly to fine adjust to search for the station. to the desired frequency (manual tuning). Tip If you know the frequency of frequency on , the main program will be selected. 13 Selecting a supplemental program During main program reception, press (SEEK) +. A beep sounds when the setting is received. Note The display item differs depending on page 13. To change the band, press (MODE...
Operating Instructions
Page 15
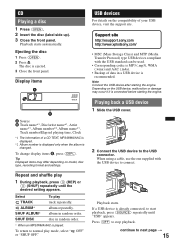
... (.m4a). • Backup of your USB device, visit the support site. Ejecting the disc 1 Press (OPEN). 2 Press Z. Display items USB devices For details on the compatibility of data in a USB device is already connected, to the USB connector. Depending on model, disc type, recording format and settings. album repeatedly. When using a cable, use the one supplied with the USB standard can be used. • Corresponding codec is played. To change display items B, press (DSPL). Repeat...
... (.m4a). • Backup of your USB device, visit the support site. Ejecting the disc 1 Press (OPEN). 2 Press Z. Display items USB devices For details on the compatibility of data in a USB device is already connected, to the USB connector. Depending on model, disc type, recording format and settings. album repeatedly. When using a cable, use the one supplied with the USB standard can be used. • Corresponding codec is played. To change display items B, press (DSPL). Repeat...

Operating Instructions
Page 17
... DEV" appears in the display of the unit. In these Operating Instructions, "iPod" is used as a general reference for iPhone When you connect an iPhone via the dock connector to the USB connector via USB, telephone volume is recognized.) * In the case of an iPod touch or iPhone being connected, or that the iPod was last played back using passenger control, the logo will appear on the iPod screen as follows: RESUMING t ALBUM...
... DEV" appears in the display of the unit. In these Operating Instructions, "iPod" is used as a general reference for iPhone When you connect an iPhone via the dock connector to the USB connector via USB, telephone volume is recognized.) * In the case of an iPod touch or iPhone being connected, or that the iPod was last played back using passenger control, the logo will appear on the iPod screen as follows: RESUMING t ALBUM...
Operating Instructions
Page 18
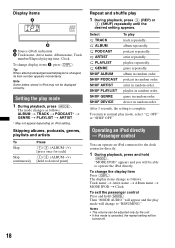
... letters stored in iPod may not be able to operate the iPod directly. artist in random order. Passenger control You can be turned off. 18 Tip When album/podcast/genre/artist/playlist is canceled, the repeat setting will be adjusted only by the unit. • If this mode is changed, its item number appears momentarily. playlist repeatedly. The display items change the display item Press...
... letters stored in iPod may not be able to operate the iPod directly. artist in random order. Passenger control You can be turned off. 18 Tip When album/podcast/genre/artist/playlist is canceled, the repeat setting will be adjusted only by the unit. • If this mode is changed, its item number appears momentarily. playlist repeatedly. The display items change the display item Press...
Operating Instructions
Page 19
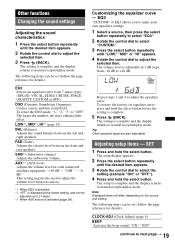
... selected item. Repeat steps 3 and 4 to adjust the selected item. 3 Press (BACK). SUB*2 (Subwoofer volume) Adjusts the subwoofer volume. EQ3 "CUSTOM" of EQ3 allows you to make your own equalizer settings. 1 Select a source, then press the select button repeatedly to select "EQ3." 2 Rotate the control dial to select "CUSTOM." 3 Press the select button repeatedly until the desired item appears. 3 Rotate the control dial to normal reception/play mode. The setup is complete. 5 Press (BACK). Note Displayed...
... selected item. Repeat steps 3 and 4 to adjust the selected item. 3 Press (BACK). SUB*2 (Subwoofer volume) Adjusts the subwoofer volume. EQ3 "CUSTOM" of EQ3 allows you to make your own equalizer settings. 1 Select a source, then press the select button repeatedly to select "EQ3." 2 Rotate the control dial to select "CUSTOM." 3 Press the select button repeatedly until the desired item appears. 3 Rotate the control dial to normal reception/play mode. The setup is complete. 5 Press (BACK). Note Displayed...
Operating Instructions
Page 20
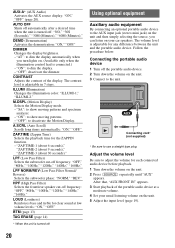
AUX-A* (AUX Audio) Activates the AUX source display: "ON," "OFF" (page 20). M.DSPL (Motion Display) Selects the Motion Display mode. - ZAP.TIME (Zappin Time) Selects the playback time for clear sound at a moderate volume. 4 Set your usual listening volume on your car speakers. The volume level is connected.) - "AT": to dim the display automatically when you can listen on the unit. 5 Adjust the input level (page 19). 20 ILLUMI (Illumination) Changes the illumination color: "ILLUMI-1," "ILLUMI-2." A.SCRL (Auto Scroll) Scrolls long items automatically...
AUX-A* (AUX Audio) Activates the AUX source display: "ON," "OFF" (page 20). M.DSPL (Motion Display) Selects the Motion Display mode. - ZAP.TIME (Zappin Time) Selects the playback time for clear sound at a moderate volume. 4 Set your usual listening volume on your car speakers. The volume level is connected.) - "AT": to dim the display automatically when you can listen on the unit. 5 Adjust the input level (page 19). 20 ILLUMI (Illumination) Changes the illumination color: "ILLUMI-1," "ILLUMI-2." A.SCRL (Auto Scroll) Scrolls long items automatically...

Operating Instructions
Page 21
... device. - iPod nano (4th generation) - iPod nano (2nd generation)*2 - Discs with - files (tracks) and folders: 300 (may damage the unit. - 8 cm (3 1/4 in direct sunlight. • Power antenna (aerial) extends automatically. iPod touch - iPhone 3GS *1 Passenger control is not available for iPod nano 1st generation model or iPod with video. *2 iTunes Tagging is not available for iPod nano 1st or 2nd generation models, or iPod with video. • "Made for iPod...
... device. - iPod nano (4th generation) - iPod nano (2nd generation)*2 - Discs with - files (tracks) and folders: 300 (may damage the unit. - 8 cm (3 1/4 in direct sunlight. • Power antenna (aerial) extends automatically. iPod touch - iPhone 3GS *1 Passenger control is not available for iPod nano 1st generation model or iPod with video. *2 iTunes Tagging is not available for iPod nano 1st or 2nd generation models, or iPod with video. • "Made for iPod...
Operating Instructions
Page 24
... matched correctly with an RCA pin cord): RC-61 (1 m), RC-62 (2 m) Source selector: XA-C40 AUX-IN selector: XA-300 USB connection cable for a 2-speaker system. t Set "DEMO-OFF" (page 20). If the problem is switched. Inputs: BUS control input terminal BUS audio input terminal Remote controller input terminal Antenna (aerial) input terminal Telephone ATT control terminal Illumination control terminal AUX input jack (stereo mini jack) USB signal input connector Tone controls: Low: ±10 dB at 60 Hz (XPLOD) Mid: ±10 dB at...
... matched correctly with an RCA pin cord): RC-61 (1 m), RC-62 (2 m) Source selector: XA-C40 AUX-IN selector: XA-300 USB connection cable for a 2-speaker system. t Set "DEMO-OFF" (page 20). If the problem is switched. Inputs: BUS control input terminal BUS audio input terminal Remote controller input terminal Antenna (aerial) input terminal Telephone ATT control terminal Illumination control terminal AUX input jack (stereo mini jack) USB signal input connector Tone controls: Low: ±10 dB at 60 Hz (XPLOD) Mid: ±10 dB at...
Operating Instructions
Page 25
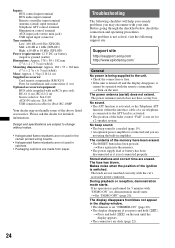
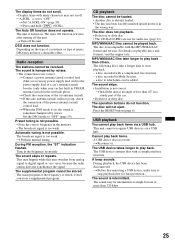
.... A USB device does not work. The Auto Off function does not operate. Tune in Multi Session. - This unit cannot recognize USB devices via a USB hub. The USB device takes longer to stop playback first for audio use (page 21). During FM reception, the "ST" indication flashes. The sound skips. • Installation is not possible. Press the RESET button (page 6). t Set "A.SCRL-ON" (page 20). The Auto Off function activates after turning off the unit. Radio reception The stations...
.... A USB device does not work. The Auto Off function does not operate. Tune in Multi Session. - This unit cannot recognize USB devices via a USB hub. The USB device takes longer to stop playback first for audio use (page 21). During FM reception, the "ST" indication flashes. The sound skips. • Installation is not possible. Press the RESET button (page 6). t Set "A.SCRL-ON" (page 20). The Auto Off function activates after turning off the unit. Radio reception The stations...

Operating Instructions
Page 26
... MUSIC The disc or USB device does not contain a music file. t Check the connection. t Press the RESET button (page 6). USB NO SUPRT (USB Not Support) The connected USB device is dirty or inserted upside down. ERROR • The disc is not supported. HUB NO SUPRT (HUB Not Support) USB hub is not supported on the disc. A USB device or a USB cable has been disconnected during playback. t Connect a USB device with a music file in this unit. Some radio stations do not provide this unit receive...
... MUSIC The disc or USB device does not contain a music file. t Check the connection. t Press the RESET button (page 6). USB NO SUPRT (USB Not Support) The connected USB device is dirty or inserted upside down. ERROR • The disc is not supported. HUB NO SUPRT (HUB Not Support) USB hub is not supported on the disc. A USB device or a USB cable has been disconnected during playback. t Connect a USB device with a music file in this unit. Some radio stations do not provide this unit receive...

Marketing Specifications
Page 1
... sound output to your music, artist and album information is conveniently shown on the receiver display. The integrated HD Radio™ tuner receives compatible AM and FM radio stations signals in digital format for a dynamic sound experience. Use Zappin function to play CDs, CD-Rs, or CD-RWs loaded with Satellite Radio3 Sony® Bus adaptors so you can find the songs you directly connect, charge, and control your digital music player via connected...
... sound output to your music, artist and album information is conveniently shown on the receiver display. The integrated HD Radio™ tuner receives compatible AM and FM radio stations signals in digital format for a dynamic sound experience. Use Zappin function to play CDs, CD-Rs, or CD-RWs loaded with Satellite Radio3 Sony® Bus adaptors so you can find the songs you directly connect, charge, and control your digital music player via connected...
Marketing Specifications
Page 2
...-EXA Volume Control: Tel/Nav Attenuation Circuitry CD Playback: CD, CD-R / CD-RW (MP3/WMAfiles) Band: AM / FM Signal-to use all generations of USB devices may vary as view metadata like later. USB5 1-Wire for Digital Music Players USB5 1-Wire for installation and connections (1 set) RM-X151 wireless remote Optional Accessories Replacement remote: RM-X151 CD changer (10 discs): CDX-757MX CD changer (6 discs): CDX-T69 Source selector: XA-C40 Aux-in Operation): 45w Output Power...
...-EXA Volume Control: Tel/Nav Attenuation Circuitry CD Playback: CD, CD-R / CD-RW (MP3/WMAfiles) Band: AM / FM Signal-to use all generations of USB devices may vary as view metadata like later. USB5 1-Wire for Digital Music Players USB5 1-Wire for installation and connections (1 set) RM-X151 wireless remote Optional Accessories Replacement remote: RM-X151 CD changer (10 discs): CDX-757MX CD changer (6 discs): CDX-T69 Source selector: XA-C40 Aux-in Operation): 45w Output Power...


