Operating Instructions
Page 1
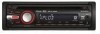
Para cancelar la pantalla de demostración (DEMO), consulte la página 10. To cancel the demonstration (DEMO) display, see page 9. CDX-GT330 CDX-GT33W CDX-GT230 CDX-GT130 ©2008 Sony Corporation Refer to these numbers in the spaces provided below. Serial No. Model No. Pour annuler l'affichage de démonstration (DEMO), reportez-vous à la ... instrucciones ES Owner's Record The model and serial numbers are located on the bottom of the unit. Record these numbers whenever you call upon your Sony dealer regarding this product.
Para cancelar la pantalla de demostración (DEMO), consulte la página 10. To cancel the demonstration (DEMO) display, see page 9. CDX-GT330 CDX-GT33W CDX-GT230 CDX-GT130 ©2008 Sony Corporation Refer to these numbers in the spaces provided below. Serial No. Model No. Pour annuler l'affichage de démonstration (DEMO), reportez-vous à la ... instrucciones ES Owner's Record The model and serial numbers are located on the bottom of the unit. Record these numbers whenever you call upon your Sony dealer regarding this product.
Operating Instructions
Page 2
.... If you do not set the Auto Off function, press and hold (OFF) until the display disappears each time you turn the ignition off , which can radiate radio frequency energy and, if not installed and used in accordance with the instructions, may apply, See... operate this product will control a Sony HD RadioTM tuner (sold separately). Consult the dealer or an experienced radio/TV technician for help. CAUTION The use of Sirius Satellite Radio Inc. and XM Satellite Radio Inc. Reorient or relocate the receiving antenna. - CDX-GT330/GT33W only Warning This equipment has been...
.... If you do not set the Auto Off function, press and hold (OFF) until the display disappears each time you turn the ignition off , which can radiate radio frequency energy and, if not installed and used in accordance with the instructions, may apply, See... operate this product will control a Sony HD RadioTM tuner (sold separately). Consult the dealer or an experienced radio/TV technician for help. CAUTION The use of Sirius Satellite Radio Inc. and XM Satellite Radio Inc. Reorient or relocate the receiving antenna. - CDX-GT330/GT33W only Warning This equipment has been...
Operating Instructions
Page 3
... only 11 Additional Information Precautions 11 Notes on discs 11 Playback order of controls and basic operations Main unit 6 Card remote commander RM-X151 (CDX-GT330/GT33W/GT230 only 6 CD Display items 8 Repeat and shuffle play 8 Radio Storing and receiving stations 8 Storing automatically - Table of Contents About this manual 4 Welcome 4 Getting Started Resetting the unit...
... only 11 Additional Information Precautions 11 Notes on discs 11 Playback order of controls and basic operations Main unit 6 Card remote commander RM-X151 (CDX-GT330/GT33W/GT230 only 6 CD Display items 8 Repeat and shuffle play 8 Radio Storing and receiving stations 8 Storing automatically - Table of Contents About this manual 4 Welcome 4 Getting Started Resetting the unit...
Operating Instructions
Page 5
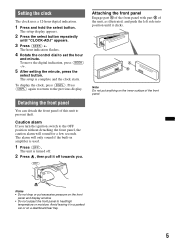
... the inner surface of the front panel. The setup is used. 1 Press (OFF). The setup display appears. 2 Press the select button repeatedly until it in amplifier is complete and the clock starts. To display the clock, press (DSPL). To move the digital indication, press (SEEK) -/+. 5 After setting ...heat/high temperature or moisture. The alarm will sound for a few seconds. A B Note Do not put excessive pressure on the front panel and display window. • Do not subject the front panel to prevent theft. Setting the clock The clock uses a 12-hour digital indication. 1 Press ...
... the inner surface of the front panel. The setup is used. 1 Press (OFF). The setup display appears. 2 Press the select button repeatedly until it in amplifier is complete and the clock starts. To display the clock, press (DSPL). To move the digital indication, press (SEEK) -/+. 5 After setting ...heat/high temperature or moisture. The alarm will sound for a few seconds. A B Note Do not put excessive pressure on the front panel and display window. • Do not subject the front panel to prevent theft. Setting the clock The clock uses a 12-hour digital indication. 1 Press ...
Operating Instructions
Page 6
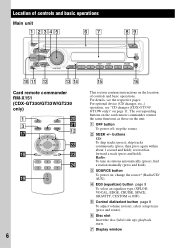
... skip tracks (press); C SOURCE button To power on the unit. change the source* (Radio/CD/ AUX). Location of controls and basic operations. wa qs ws wd wf ql + VOL - 6 qg qh This section contains instructions on page 11. stop the ... disc (label side up), playback starts. qa qs qd qf Card remote commander RM-X151 (CDX-GT330/GT33W/GT230 only) 1 3 qj qk OFF ATT SOURCE SEL MODE + - A OFF button To power off; G Display window For details, see "CD changer (CDX-GT330/ GT33W only)" on the location of controls and basic operations Main unit 1 2345 67 89...
... skip tracks (press); C SOURCE button To power on the unit. change the source* (Radio/CD/ AUX). Location of controls and basic operations. wa qs ws wd wf ql + VOL - 6 qg qh This section contains instructions on page 11. stop the ... disc (label side up), playback starts. qa qs qd qf Card remote commander RM-X151 (CDX-GT330/GT33W/GT230 only) 1 3 qj qk OFF ATT SOURCE SEL MODE + - A OFF button To power off; G Display window For details, see "CD changer (CDX-GT330/ GT33W only)" on the location of controls and basic operations Main unit 1 2345 67 89...
Operating Instructions
Page 7
... skip albums (press); Setup, sound setting, etc., can switch the changer, HD Radio tuner band or SAT tuner band (CDX-GT330/GT33W only). J DSPL (display)/SCRL (scroll) button (CDX-GT330/GT33W/GT230) page 8 To change display items. ql VOL (volume) +/- qj buttons To control CD/radio, the same as (1)/(2) (ALBUM -/+) on the card remote commander have also different buttons...
... skip albums (press); Setup, sound setting, etc., can switch the changer, HD Radio tuner band or SAT tuner band (CDX-GT330/GT33W only). J DSPL (display)/SCRL (scroll) button (CDX-GT330/GT33W/GT230) page 8 To change display items. ql VOL (volume) +/- qj buttons To control CD/radio, the same as (1)/(2) (ALBUM -/+) on the card remote commander have also different buttons...
Operating Instructions
Page 8
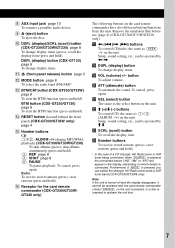
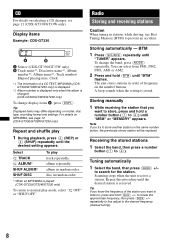
Display items Example: CDX-GT330 A B A Source (CDX-GT330/GT33W only) B Track name*1, Disc/artist name*1, Album number*2, Album name*1, Track number/ Elapsed playing time, Clock *1 The information of the station you want to store, press and hold a number button ((1) to (6)) until "BTM" flashes. OFF" Radio..., see page 11 (CDX-GT330/GT33W only). For details on the number buttons. To change display items B, press (DSPL). repeatedly to fine adjust to (6)). Tip Displayed items may differ depending on selecting a CD changer, see page 12. (CDX-GT330/GT33W/GT230 only) Repeat...
Display items Example: CDX-GT330 A B A Source (CDX-GT330/GT33W only) B Track name*1, Disc/artist name*1, Album number*2, Album name*1, Track number/ Elapsed playing time, Clock *1 The information of the station you want to store, press and hold a number button ((1) to (6)) until "BTM" flashes. OFF" Radio..., see page 11 (CDX-GT330/GT33W only). For details on the number buttons. To change display items B, press (DSPL). repeatedly to fine adjust to (6)). Tip Displayed items may differ depending on selecting a CD changer, see page 12. (CDX-GT330/GT33W/GT230 only) Repeat...
Operating Instructions
Page 9
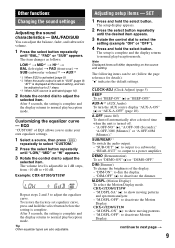
...when the unit is complete. AUX-A*1 (AUX Audio) To turn the AUX source display "AUX-A-ON" (z) or "AUX-A-OFF" (page 10). "M.DSPL-SA" (z): to adjust the selected item. EQ3 "CUSTOM" of the display. - Example: CDX-GT330/GT33W Repeat steps 2 and 3 to select the setting (example "ON" or "...OFF"). 4 Press and hold the select button. The setup display appears. 2 Press the select button repeatedly until the desired item appears. ...
...when the unit is complete. AUX-A*1 (AUX Audio) To turn the AUX source display "AUX-A-ON" (z) or "AUX-A-OFF" (page 10). "M.DSPL-SA" (z): to adjust the selected item. EQ3 "CUSTOM" of the display. - Example: CDX-GT330/GT33W Repeat steps 2 and 3 to select the setting (example "ON" or "...OFF"). 4 Press and hold the select button. The setup display appears. 2 Press the select button repeatedly until the desired item appears. ...
Operating Instructions
Page 10
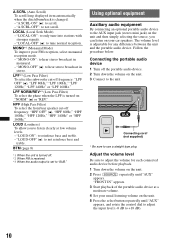
.... - AUX AUX Connecting cord* (not supplied) * Be sure to tune normal reception. "LOCAL-OFF" (z): to use a straight type plug. A.SCRL (Auto Scroll) To scroll long displayed item automatically when the disc/album/track is set to +18 dB). 10 "A.SCRL-ON" (z): to listen clearly at a moderate volume. 4 Set your car speakers.
.... - AUX AUX Connecting cord* (not supplied) * Be sure to tune normal reception. "LOCAL-OFF" (z): to use a straight type plug. A.SCRL (Auto Scroll) To scroll long displayed item automatically when the disc/album/track is set to +18 dB). 10 "A.SCRL-ON" (z): to listen clearly at a moderate volume. 4 Set your car speakers.
Operating Instructions
Page 11
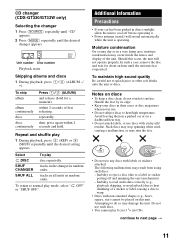
...REP) or (4) (SHUF) repeatedly until the desired setting appears. To return to next page t 11 The following malfunctions may occur inside the lenses and display of a sticker or label causing a disc to cool off and jamming the eject mechanism). - Skipping albums and discs 1 During playback, press (1)/(2) (ALBUM... to splash juice or other soft drinks onto the unit or discs. Repeat and shuffle play disc repeatedly. CD changer (CDX-GT330/GT33W only) Selecting the changer 1 Press (SOURCE) repeatedly until "CD" appears. 2 Press (MODE) repeatedly until the moisture has evaporated.
...REP) or (4) (SHUF) repeatedly until the desired setting appears. To return to next page t 11 The following malfunctions may occur inside the lenses and display of a sticker or label causing a disc to cool off and jamming the eject mechanism). - Skipping albums and discs 1 During playback, press (1)/(2) (ALBUM... to splash juice or other soft drinks onto the unit or discs. Repeat and shuffle play disc repeatedly. CD changer (CDX-GT330/GT33W only) Selecting the changer 1 Press (SOURCE) repeatedly until "CD" appears. 2 Press (MODE) repeatedly until the moisture has evaporated.
Operating Instructions
Page 12
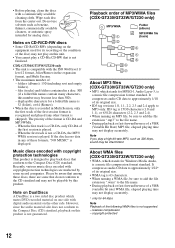
... side with digital audio material on this product is skipped). Note If you play back discs that do not conform to the Compact Disc (CD) standard. CDX-GT330/GT33W/GT230 only • The unit is a music file compression format standard. folders (albums): 150 (including root and empty folders). -...that conform to the CD standard and may not display accurately. However, since the audio material side does not conform to the file name. • During playback or fast-forward/reverse of the disc) may become less than 300). - Playback order of MP3/WMA files (CDX-GT330/GT33W/GT230 only)...
... side with digital audio material on this product is skipped). Note If you play back discs that do not conform to the Compact Disc (CD) standard. CDX-GT330/GT33W/GT230 only • The unit is a music file compression format standard. folders (albums): 150 (including root and empty folders). -...that conform to the CD standard and may not display accurately. However, since the audio material side does not conform to the file name. • During playback or fast-forward/reverse of the disc) may become less than 300). - Playback order of MP3/WMA files (CDX-GT330/GT33W/GT230 only)...
Operating Instructions
Page 15
...Sony MP3 compatible CD changer, or this product is turned on the unit. The unit is prohibited without notice. • Halogenated flame retardants are not used in the certain printed wiring boards. • Halogenated flame retardants are not used in cabinets. • Packaging cushions are made from /does not appear in the display...: for CDX-GT330/GT33W BUS cable (supplied with an RCA pin cord): RC-61 (1 m), RC-62 (2 m) CD changer (10 discs): CDX-757MX CD changer (6 discs): CDX-T69 Source selector: XA-C40 AUX-IN selector: XA-300 Interface adaptor for iPod: XA-120IP HD Radio™ ...
...Sony MP3 compatible CD changer, or this product is turned on the unit. The unit is prohibited without notice. • Halogenated flame retardants are not used in the certain printed wiring boards. • Halogenated flame retardants are not used in cabinets. • Packaging cushions are made from /does not appear in the display...: for CDX-GT330/GT33W BUS cable (supplied with an RCA pin cord): RC-61 (1 m), RC-62 (2 m) CD changer (10 discs): CDX-757MX CD changer (6 discs): CDX-T69 Source selector: XA-C40 AUX-IN selector: XA-300 Interface adaptor for iPod: XA-120IP HD Radio™ ...
Operating Instructions
Page 16
... an SAT radio channel into a preset failed. Preset tuning is not inserted in the CD changer. t Tuning does not stop at an angle of less than others.*1 The following discs take longer to play due to a problem. t Insert discs in the CD changer. NO MAG (CDX-GT330/GT33W only)... unit is not written in monaural reception mode. The display items do not function.*2 The disc will not go up. LOAD (CDX-GT330/GT33W only) The CD changer is on during automatic tuning. FAILURE (Illuminates for audio use (page 12). CD playback The disc cannot be played back.*1 The disc ...
... an SAT radio channel into a preset failed. Preset tuning is not inserted in the CD changer. t Tuning does not stop at an angle of less than others.*1 The following discs take longer to play due to a problem. t Insert discs in the CD changer. NO MAG (CDX-GT330/GT33W only)... unit is not written in monaural reception mode. The display items do not function.*2 The disc will not go up. LOAD (CDX-GT330/GT33W only) The CD changer is on during automatic tuning. FAILURE (Illuminates for audio use (page 12). CD playback The disc cannot be played back.*1 The disc ...
Operating Instructions
Page 17
... go any further. Depending on in the display. If these solutions do not help improve the situation, consult your nearest Sony dealer. t Wait until reading is reading all track and album information on the disc. t Press Z (eject) (page 7). RESET (CDX-GT330/GT33W only) The CD unit and CD changer cannot be operated due to be ejected...
... go any further. Depending on in the display. If these solutions do not help improve the situation, consult your nearest Sony dealer. t Wait until reading is reading all track and album information on the disc. t Press Z (eject) (page 7). RESET (CDX-GT330/GT33W only) The CD unit and CD changer cannot be operated due to be ejected...


