Operating Instructions
Page 3
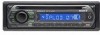
... the unit 11 Specifications 11 Troubleshooting 12 Error displays/Messages 13 3 Table of Contents Welcome 4 Getting Started Setting the clock 4 Detaching the front panel 4 Attaching the front panel 5 Location of controls and basic operations Main unit 6 Radio Storing and receiving stations 7 Storing automatically - BTM 7 Storing manually 7 Receiving the stored stations 7 Tuning automatically 7 Other...
... the unit 11 Specifications 11 Troubleshooting 12 Error displays/Messages 13 3 Table of Contents Welcome 4 Getting Started Setting the clock 4 Detaching the front panel 4 Attaching the front panel 5 Location of controls and basic operations Main unit 6 Radio Storing and receiving stations 7 Storing automatically - BTM 7 Storing manually 7 Receiving the stored stations 7 Tuning automatically 7 Other...
Operating Instructions
Page 4
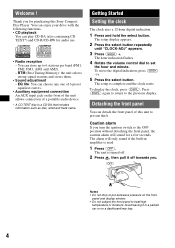
...a dashboard/rear tray. 4 Getting Started Setting the clock The clock uses a 12-hour digital indication. 1 Press and hold the select button. To display the clock, press (DSPL). The alarm will sound ... The unit is a CD-DA that includes information such as disc, artist and track name. Avoid leaving it off towards you for audio use. • Radio reception - Press (DSPL)...Sony Compact Disc Player. Caution alarm If you turn the ignition switch to the previous display. Detaching the front panel You can play CD-DA (also containing CD TEXT*) and CD-R/CD-RW for purchasing this unit to set...
...a dashboard/rear tray. 4 Getting Started Setting the clock The clock uses a 12-hour digital indication. 1 Press and hold the select button. To display the clock, press (DSPL). The alarm will sound ... The unit is a CD-DA that includes information such as disc, artist and track name. Avoid leaving it off towards you for audio use. • Radio reception - Press (DSPL)...Sony Compact Disc Player. Caution alarm If you turn the ignition switch to the previous display. Detaching the front panel You can play CD-DA (also containing CD TEXT*) and CD-R/CD-RW for purchasing this unit to set...
Operating Instructions
Page 8
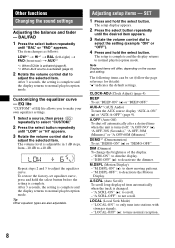
... select button repeatedly until the desired item appears. 3 Rotate the volume control dial to tune normal reception. 8 Repeat steps 2 and 3 to deactivate the dimmer. CLOCK-ADJ (Clock Adjust) (page 4) BEEP To set "DEMO-ON" (z) or "DEMO-OFF." DIM (Dimmer) To change the brightness of EQ lite allows you to make your own equalizer...
... select button repeatedly until the desired item appears. 3 Rotate the volume control dial to tune normal reception. 8 Repeat steps 2 and 3 to deactivate the dimmer. CLOCK-ADJ (Clock Adjust) (page 4) BEEP To set "DEMO-ON" (z) or "DEMO-OFF." DIM (Dimmer) To change the brightness of EQ lite allows you to make your own equalizer...


