
Limited Warranty (U.S. Only)
Page 1
... provided for the time periods and as fuses or batteries). Printed in exchange for your product, Visit Sony's Web Site: www.sony.com/service Or call : 1-800-488-SONY (7669) Repair / Replacement Warranty: This Limited Warranty shall apply to be defective. In the event of product ("Parts Warranty"), Sony will not be lost or reformatted during ordinary consumer use , acts of God...
... provided for the time periods and as fuses or batteries). Printed in exchange for your product, Visit Sony's Web Site: www.sony.com/service Or call : 1-800-488-SONY (7669) Repair / Replacement Warranty: This Limited Warranty shall apply to be defective. In the event of product ("Parts Warranty"), Sony will not be lost or reformatted during ordinary consumer use , acts of God...
Operating Instructions
Page 1
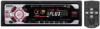
Refer to these numbers in the space provided below. Record these numbers whenever you call upon your Sony dealer regarding this product. CDX-CA660X/CA650X Serial No. CDX-CA660X CDX-CA650X © 2001 Sony Corporation For installation and connections, see the supplied installation/connections manual. Model No. 3-226-961-11 (1) FM/AM Compact Disc Player Operating Instructions US Owner's Record The model and serial numbers are located on the bottom of the unit.
Refer to these numbers in the space provided below. Record these numbers whenever you call upon your Sony dealer regarding this product. CDX-CA660X/CA650X Serial No. CDX-CA660X CDX-CA650X © 2001 Sony Corporation For installation and connections, see the supplied installation/connections manual. Model No. 3-226-961-11 (1) FM/AM Compact Disc Player Operating Instructions US Owner's Record The model and serial numbers are located on the bottom of the unit.
Operating Instructions
Page 2
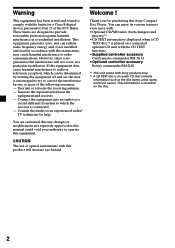
... installation. This equipment generates, uses, and can radiate radio frequency energy and, if not installed and used in this manual could void your authority to Part 15 of the following measures: - Reorient or relocate the receiving antenna. - You are designed to correct the interference by turning the equipment off and on a connected optional CD unit with the CD TEXT function). •Supplied controller accessory Card remote...
... installation. This equipment generates, uses, and can radiate radio frequency energy and, if not installed and used in this manual could void your authority to Part 15 of the following measures: - Reorient or relocate the receiving antenna. - You are designed to correct the interference by turning the equipment off and on a connected optional CD unit with the CD TEXT function). •Supplied controller accessory Card remote...
Operating Instructions
Page 3
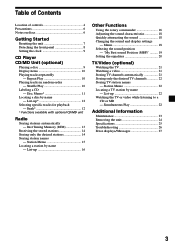
... channels 22 Storing TV station names - Disc Memo 11 Locating a disc by name - Station Memo 15 Locating a station by name - Table of Contents Location of controls 4 Precautions 6 Notes on discs 6 Getting Started Resetting the unit 7 Detaching the front panel 8 Setting the clock 9 CD Player CD/MD Unit (optional) Playing a disc 9 Display items 10 Playing tracks repeatedly - List-up 12 Selecting specific tracks for playback - Simultaneous Play 22 Additional Information Maintenance 23 Removing the unit 24 Specifications 25 Troubleshooting 26 Error displays...
... channels 22 Storing TV station names - Disc Memo 11 Locating a disc by name - Station Memo 15 Locating a station by name - Table of Contents Location of controls 4 Precautions 6 Notes on discs 6 Getting Started Resetting the unit 7 Detaching the front panel 8 Setting the clock 9 CD Player CD/MD Unit (optional) Playing a disc 9 Display items 10 Playing tracks repeatedly - List-up 12 Selecting specific tracks for playback - Simultaneous Play 22 Additional Information Maintenance 23 Removing the unit 24 Specifications 25 Troubleshooting 26 Error displays...
Operating Instructions
Page 4
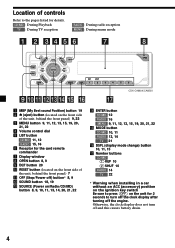
.... Location of the unit, behind the front panel) 9, 22 3 MENU button 9, 11, 12, 13, 15, 19, 20, 21, 22 4 Volume control dial 5 LIST button CD/MD 11, 12 RADIO 15, 16 6 Receptor for the card remote commander 7 Display window 8 OPEN button 8, 9 9 EQ7 button 20 0 RESET button (located on the front side of controls Refer to the pages listed for 2 seconds to turn off ) button* 8, 9 qs SOUND button 18, 19 qd SOURCE (Power on/Radio...
.... Location of the unit, behind the front panel) 9, 22 3 MENU button 9, 11, 12, 13, 15, 19, 20, 21, 22 4 Volume control dial 5 LIST button CD/MD 11, 12 RADIO 15, 16 6 Receptor for the card remote commander 7 Display window 8 OPEN button 8, 9 9 EQ7 button 20 0 RESET button (located on the front side of controls Refer to the pages listed for 2 seconds to turn off ) button* 8, 9 qs SOUND button 18, 19 qd SOURCE (Power on/Radio...
Operating Instructions
Page 5
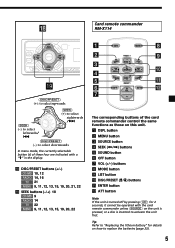
..., 20, 21, 22 ql SEEK buttons (-/+) 18 CD/MD 9 RADIO 14 TV 22 MENU 9, 11, 12, 13, 15, 19, 20, 22 DSPL MODE PRESET + MENU DISC + LIST SEEK- Card remote commander RM-X114 (DISC/PRESET) (+): to select upwards (SEEK) (-): to select leftwards/ . (SEEK) (+):to select rightwards /> (DISC/PRESET) (-): to select downwards In menu mode, the currently selectable button (s) of the card remote commander control the same functions as those on this unit. 1 DSPL button 2 MENU button 3 SOURCE button 4 SEEK (
..., 20, 21, 22 ql SEEK buttons (-/+) 18 CD/MD 9 RADIO 14 TV 22 MENU 9, 11, 12, 13, 15, 19, 20, 22 DSPL MODE PRESET + MENU DISC + LIST SEEK- Card remote commander RM-X114 (DISC/PRESET) (+): to select upwards (SEEK) (-): to select leftwards/ . (SEEK) (+):to select rightwards /> (DISC/PRESET) (-): to select downwards In menu mode, the currently selectable button (s) of the card remote commander control the same functions as those on this unit. 1 DSPL button 2 MENU button 3 SOURCE button 4 SEEK (
Operating Instructions
Page 6
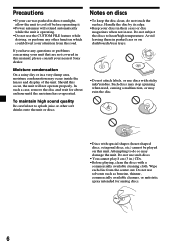
... discs, octagonal discs, etc.) cannot be played on this occur, the unit will extend automatically while the unit is operating. •Do not use the CUSTOM FILE feature while driving, or perform any questions or problems concerning your unit that are not covered in parked cars or on discs •To keep the disc clean, do so may occur inside the lenses and display...
... discs, octagonal discs, etc.) cannot be played on this occur, the unit will extend automatically while the unit is operating. •Do not use the CUSTOM FILE feature while driving, or perform any questions or problems concerning your unit that are not covered in parked cars or on discs •To keep the disc clean, do so may occur inside the lenses and display...
Operating Instructions
Page 7
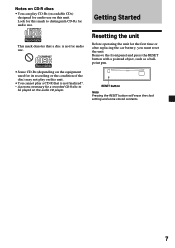
... be played on this unit. RESET button Note Pressing the RESET button will erase the clock setting and some stored contents. 7 Getting Started This mark denotes that is not for audio use . Remove the front panel and press the RESET button with a pointed object, such as a ballpoint pen. Resetting the unit Before operating the unit for the first time or after replacing the car battery, you must reset the unit. Notes on CD-R discs •...
... be played on this unit. RESET button Note Pressing the RESET button will erase the clock setting and some stored contents. 7 Getting Started This mark denotes that is not for audio use . Remove the front panel and press the RESET button with a pointed object, such as a ballpoint pen. Resetting the unit Before operating the unit for the first time or after replacing the car battery, you must reset the unit. Notes on CD-R discs •...
Operating Instructions
Page 9
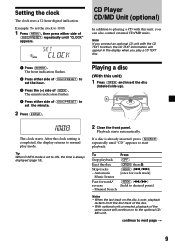
... playback. Playing a disc (With this unit, you play mode. Tip When D.INFO mode is set the minute. 2 Press (ENTER). To Stop playback Eject the disc Skip tracks - Manual Search Press (OFF) (OPEN) then Z (SEEK) (./>) [once for each track] (SEEK) (m/M) [hold to normal play a CD TEXT disc. 1 Press (ENTER). After the clock setting is already inserted, press (SOURCE) repeatedly until "CLOCK" appears. continue to ON, the time is...
... playback. Playing a disc (With this unit, you play mode. Tip When D.INFO mode is set the minute. 2 Press (ENTER). To Stop playback Eject the disc Skip tracks - Manual Search Press (OFF) (OPEN) then Z (SEEK) (./>) [once for each track] (SEEK) (m/M) [hold to normal play a CD TEXT disc. 1 Press (ENTER). After the clock setting is already inserted, press (SOURCE) repeatedly until "CLOCK" appears. continue to ON, the time is...
Operating Instructions
Page 10
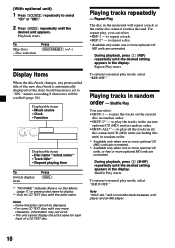
... player and an MD player. 10 To return to play mode, select "SHUF-OFF." Displayable items • Music source • Clock • Function Displayable items • Disc name*1/artist name*2 • Track title*1 • Elapsed playing time To Switch display item Press (DSPL) *1 "NO NAME" indicates there is set to normal play , you can select: •SHUF-1 - During playback, press (1) (REP) repeatedly until the desired unit appears. Playing tracks in the display...
... player and an MD player. 10 To return to play mode, select "SHUF-OFF." Displayable items • Music source • Clock • Function Displayable items • Disc name*1/artist name*2 • Track title*1 • Elapsed playing time To Switch display item Press (DSPL) *1 "NO NAME" indicates there is set to normal play , you can select: •SHUF-1 - During playback, press (1) (REP) repeatedly until the desired unit appears. Playing tracks in the display...
Operating Instructions
Page 11
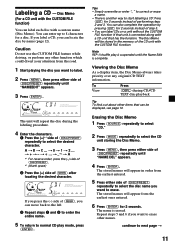
... REP-1/shuffle play mode, press (ENTER). t + t - The name is suspended until "NAME DEL" appears. 4 Press (ENTER). Disc Memo (For a CD unit with the CUSTOM FILE function. The unit will appear from the earliest ones entered. 6 Press (ENTER) for a disc. The Disc Memo will appear in the memory of (DISC/PRESET) repeatedly to normal CD play is erased. The stored names will be displayed, see...
... REP-1/shuffle play mode, press (ENTER). t + t - The name is suspended until "NAME DEL" appears. 4 Press (ENTER). Disc Memo (For a CD unit with the CUSTOM FILE function. The unit will appear from the earliest ones entered. 6 Press (ENTER) for a disc. The Disc Memo will appear in the memory of (DISC/PRESET) repeatedly to normal CD play is erased. The stored names will be displayed, see...
Operating Instructions
Page 14
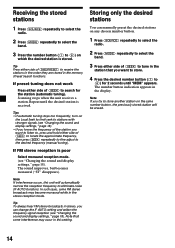
... (SEEK) to (6)) for the station (automatic tuning). Tips • If automatic tuning stops too frequently, turn on which the desired station is poor Select monaural reception mode. (see "Changing the sound and display settings," page 18). If preset tuning does not work Press either side of the station you want to store. 4 Press the desired number button ((1) to tune in the station that some FM stereo broadcasts may occur in this...
... (SEEK) to (6)) for the station (automatic tuning). Tips • If automatic tuning stops too frequently, turn on which the desired station is poor Select monaural reception mode. (see "Changing the sound and display settings," page 18). If preset tuning does not work Press either side of the station you want to store. 4 Press the desired number button ((1) to tune in the station that some FM stereo broadcasts may occur in this...
Operating Instructions
Page 16
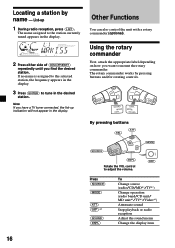
... control to tune in the display. 3 Press (ENTER) to adjust the volume. (MODE) (OFF) OFF Press (SOURCE) (MODE) (ATT) (OFF)*2 (SOUND) (DSPL) To Change source (radio/CD/MD*1/TV*1) Change operation (radio band/CD unit/ MD unit*1/TV*1/Video*1) Attenuate sound Stop playback or radio reception Adjust the sound menu Change the display item 16 List-up indication will not appear in the display. 2 Press either side of (DISC/PRESET) repeatedly until you have a TV tuner connected, the list-up 1 During radio...
... control to tune in the display. 3 Press (ENTER) to adjust the volume. (MODE) (OFF) OFF Press (SOURCE) (MODE) (ATT) (OFF)*2 (SOUND) (DSPL) To Change source (radio/CD/MD*1/TV*1) Change operation (radio band/CD unit/ MD unit*1/TV*1/Video*1) Attenuate sound Stop playback or radio reception Adjust the sound menu Change the display item 16 List-up indication will not appear in the display. 2 Press either side of (DISC/PRESET) repeatedly until you have a TV tuner connected, the list-up 1 During radio...
Operating Instructions
Page 17
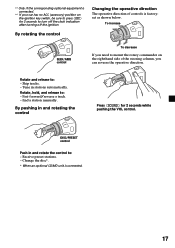
... the control to mount the rotary commander on the ignition key switch, be sure to press (OFF) for 2 seconds while pushing the VOL control. find a station manually. Receive preset stations. - Skip tracks. - To increase SEEK/AMS control To decrease If you can reverse the operative direction. Rotate, hold, and release to : - Rotate and release to : - Change the disc*. * When an optional CD/MD unit is...
... the control to mount the rotary commander on the ignition key switch, be sure to press (OFF) for 2 seconds while pushing the VOL control. find a station manually. Receive preset stations. - Skip tracks. - To increase SEEK/AMS control To decrease If you can reverse the operative direction. Rotate, hold, and release to : - Rotate and release to : - Change the disc*. * When an optional CD/MD unit is...
Operating Instructions
Page 18
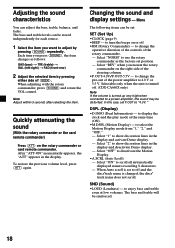
... control. to off . (CDX-CA660X only) Note If the volume is changed, the disc/ track name does not scroll. Quickly attenuating the sound (With the rotary commander or the card remote commander) Press (ATT) on the rotary commander or card remote commander. Menu The following items can adjust the bass, treble, balance, and fader. In this case, set position. - When Auto scroll is set to display the clock and the play mode...
... control. to off . (CDX-CA660X only) Note If the volume is changed, the disc/ track name does not scroll. Quickly attenuating the sound (With the rotary commander or the card remote commander) Press (ATT) on the rotary commander or card remote commander. Menu The following items can adjust the bass, treble, balance, and fader. In this case, set position. - When Auto scroll is set to display the clock and the play mode...
Operating Instructions
Page 19
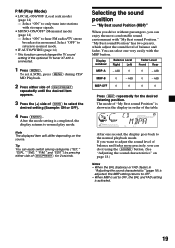
... function cannot change the TV sound setting if the optional TV tuner XT-40V is shown in the display in order of balance and fader. "My Best sound Position (MBP)" When you drive without passengers, you can do it using the (SOUND) button. (See "Adjusting the sound characteristics" on the source. The mode of "My Best sound Position" is connected. 1 Press (MENU). Select "ON" to only tune into stations with "My Best sound...
... function cannot change the TV sound setting if the optional TV tuner XT-40V is shown in the display in order of balance and fader. "My Best sound Position (MBP)" When you drive without passengers, you can do it using the (SOUND) button. (See "Adjusting the sound characteristics" on the source. The mode of "My Best sound Position" is connected. 1 Press (MENU). Select "ON" to only tune into stations with "My Best sound...
Operating Instructions
Page 21
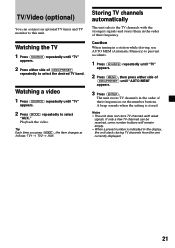
... tuning in a station while driving, use AUTO MEM (Automatic Memory) to select "AUX." A beep sounds when the setting is indicated in the display, the unit starts storing TV channels from the one currently displayed. 21 Watching a video 1 Press (SOURCE) repeatedly until "TV" appears. 2 Press (MODE) repeatedly to prevent accidents. 1 Press (SOURCE) repeatedly until "TV" appears. 2 Press (MENU), then press either side of their frequency. Tip Each time you press (MODE), the item changes...
... tuning in a station while driving, use AUTO MEM (Automatic Memory) to select "AUX." A beep sounds when the setting is indicated in the display, the unit starts storing TV channels from the one currently displayed. 21 Watching a video 1 Press (SOURCE) repeatedly until "TV" appears. 2 Press (MODE) repeatedly to prevent accidents. 1 Press (SOURCE) repeatedly until "TV" appears. 2 Press (MENU), then press either side of their frequency. Tip Each time you press (MODE), the item changes...
Operating Instructions
Page 25
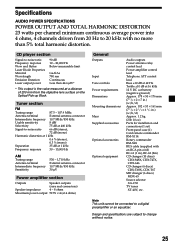
...) Parts for installation and connections (1 set) Front panel case (1) Card remote commander RM-X114 Rotary commander RM-X4S BUS cable (supplied with no more than 44.6 µW* * This output is the value measured at a distance of 200 mm from 20 Hz to 20 kHz with an RCA pin cord) RC-61 (1 m), RC-62 (2m) CD changer (10 discs) CDX-848X, CDX-747X, CDX-646 CD changer (6 discs) CDX-T68X, CDX...
...) Parts for installation and connections (1 set) Front panel case (1) Card remote commander RM-X114 Rotary commander RM-X4S BUS cable (supplied with no more than 44.6 µW* * This output is the value measured at a distance of 200 mm from 20 Hz to 20 kHz with an RCA pin cord) RC-61 (1 m), RC-62 (2m) CD changer (10 discs) CDX-848X, CDX-747X, CDX-646 CD changer (6 discs) CDX-T68X, CDX...
Operating Instructions
Page 26
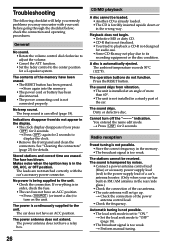
... a 2-speaker system. General No sound. •Rotate the volume control dial clockwise to adjust the volume. •Cancel the ATT function. •Set the fader control to "ON." The fuse has blown. t Press (LIST) for details. t Check the connection of a car's antenna booster. (Only when your unit. No power is hampered by noises. •Connect a power antenna control lead (blue) or accessory power supply lead (red) to the unit. •Check the connection. The...
... a 2-speaker system. General No sound. •Rotate the volume control dial clockwise to adjust the volume. •Cancel the ATT function. •Set the fader control to "ON." The fuse has blown. t Press (LIST) for details. t Check the connection of a car's antenna booster. (Only when your unit. No power is hampered by noises. •Connect a power antenna control lead (blue) or accessory power supply lead (red) to the unit. •Check the connection. The...
Operating Instructions
Page 27
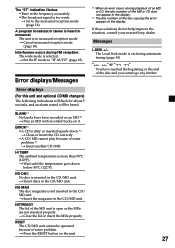
... alarm sound will be operated because of the disc causing the error appears in the display. The Local Seek mode is inserted in the CD/MD unit. The "ST" indication flashes. •Tune in the frequency accurately. •The broadcast signal is more than 50°C (122°F). NO DISC No disc is on the unit. *1 When an error occurs during FM reception. t Set to "IF AUTO...
... alarm sound will be operated because of the disc causing the error appears in the display. The Local Seek mode is inserted in the CD/MD unit. The "ST" indication flashes. •Tune in the frequency accurately. •The broadcast signal is more than 50°C (122°F). NO DISC No disc is on the unit. *1 When an error occurs during FM reception. t Set to "IF AUTO...


