

Limited Warranty (U.S. Only)
Page 1
...use ; If Sony elects to replace the product after this Limited Warranty will , at its option, repair or replace with a new or refurbished product. Parts: For a period of a defect, these are your rights and obligations with the Product. It is longer. For specific instructions on your unit....likely that has been returned to the Sony authorized service facility specified. Some states do so for the time periods and as fuses or batteries). Only) Sony Electronics Inc. ("Sony") warrants this Limited Warranty, "refurbished" means a product or part that such data, software, or ...
...use ; If Sony elects to replace the product after this Limited Warranty will , at its option, repair or replace with a new or refurbished product. Parts: For a period of a defect, these are your rights and obligations with the Product. It is longer. For specific instructions on your unit....likely that has been returned to the Sony authorized service facility specified. Some states do so for the time periods and as fuses or batteries). Only) Sony Electronics Inc. ("Sony") warrants this Limited Warranty, "refurbished" means a product or part that such data, software, or ...

Operating Instructions (primary manual)
Page 1
Record these numbers whenever you call upon your Sony dealer regarding this product. Refer to these numbers in the space provided below. CDX-C7050X CDX-C5050X CDX-C5055 © 2000 Sony Corporation 3-044-887-12 (1) FM/AM Compact Disc Player Operating Instructions US Owner's Record The model and serial numbers are located on the bottom of the unit. Model No. Serial No. For installation and connections, see the supplied installation/connections manual.
Record these numbers whenever you call upon your Sony dealer regarding this product. Refer to these numbers in the space provided below. CDX-C7050X CDX-C5050X CDX-C5055 © 2000 Sony Corporation 3-044-887-12 (1) FM/AM Compact Disc Player Operating Instructions US Owner's Record The model and serial numbers are located on the bottom of the unit. Model No. Serial No. For installation and connections, see the supplied installation/connections manual.

Operating Instructions (primary manual)
Page 2
... radiate radio frequency energy and, if not installed and used in a particular installation. This equipment generates, uses, and can be determined by turning the equipment off before operating it will appear in order, check the fuse. •If your nearest Sony dealer. If everything is being supplied to the unit, check the connections first. However, there is no power is in the display when...
... radiate radio frequency energy and, if not installed and used in a particular installation. This equipment generates, uses, and can be determined by turning the equipment off before operating it will appear in order, check the fuse. •If your nearest Sony dealer. If everything is being supplied to the unit, check the connections first. However, there is no power is in the display when...

Operating Instructions (primary manual)
Page 4
... channel names 23 Displaying the information stored on /off 8 How to use the menu 8 Setting the clock 8 CD Player CD/MD Unit (optional) Listening to a CD or MD - List-up 13 Selecting specific tracks for playback - Table of Contents Location of controls 5 Getting Started Resetting the unit 7 Detaching the front panel 7 Turning the unit on discs ... 23 Watching the TV or video while listening to a CD 9 Playing tracks repeatedly - Repeat Play...
... channel names 23 Displaying the information stored on /off 8 How to use the menu 8 Setting the clock 8 CD Player CD/MD Unit (optional) Listening to a CD or MD - List-up 13 Selecting specific tracks for playback - Table of Contents Location of controls 5 Getting Started Resetting the unit 7 Detaching the front panel 7 Turning the unit on discs ... 23 Watching the TV or video while listening to a CD 9 Playing tracks repeatedly - Repeat Play...
Operating Instructions (primary manual)
Page 5
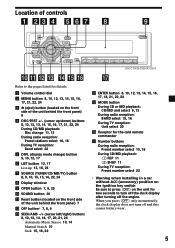
... 3 Z (eject) button (located on the front side of the unit behind the front panel) 9 4 DISC/PRST +/- (cursor up/down) buttons 8, 10, 12, 13, 14, 15, 16, 17, 21, 22, 24 During CD/MD playback: Disc change 11, 13 During radio reception: Preset stations select 16, 18 During TV reception: Band select 22 5 DSPL (display mode change) button 9, 10, 12, 17 6 LIST button 12, 17 List-up 13, 18, 23 7 SOURCE (TUNER...
... 3 Z (eject) button (located on the front side of the unit behind the front panel) 9 4 DISC/PRST +/- (cursor up/down) buttons 8, 10, 12, 13, 14, 15, 16, 17, 21, 22, 24 During CD/MD playback: Disc change 11, 13 During radio reception: Preset stations select 16, 18 During TV reception: Band select 22 5 DSPL (display mode change) button 9, 10, 12, 17 6 LIST button 12, 17 List-up 13, 18, 23 7 SOURCE (TUNER...
Operating Instructions (primary manual)
Page 6
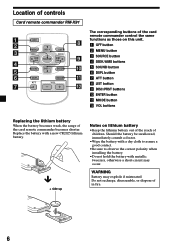
... observe the correct polarity when installing the battery. •Do not hold the battery with a new CR2025 lithium battery. Location of controls Card remote commander RM-X91 OFF OPEN/CLOSE MENU SEEK DISC SOURCE LIST SEEK SOUND DISC ENTER DSPL ATT MODE VOL The corresponding buttons of the card remote commander control the same functions as those on lithium battery •Keep the lithium battery out of the reach of...
... observe the correct polarity when installing the battery. •Do not hold the battery with a new CR2025 lithium battery. Location of controls Card remote commander RM-X91 OFF OPEN/CLOSE MENU SEEK DISC SOURCE LIST SEEK SOUND DISC ENTER DSPL ATT MODE VOL The corresponding buttons of the card remote commander control the same functions as those on lithium battery •Keep the lithium battery out of the reach of...

Operating Instructions (primary manual)
Page 7
... it on the display window of this unit to protect the unit from the unit. • If you , use the built-in temperature. Remove the front panel and press the reset button with you detach the panel while the unit is still turned on, the power will turn the ignition key switch to direct sunlight or heat sources such as the station memo. Resetting the unit A Before operating the unit for a few seconds...
... it on the display window of this unit to protect the unit from the unit. • If you , use the built-in temperature. Remove the front panel and press the reset button with you detach the panel while the unit is still turned on, the power will turn the ignition key switch to direct sunlight or heat sources such as the station memo. Resetting the unit A Before operating the unit for a few seconds...

Operating Instructions (primary manual)
Page 8
... setting, the clock indication appears while the unit is set the hour. 3 Press the (+) side of (SEEK/AMS)). (DISC/PRST) (+): to use the menu This unit is operated by pressing (OFF) for two seconds to ON, the time is completed, the display returns to avoid car battery wear. The clock starts. Press (OFF) for two seconds to normal play mode. Example: To set the minute. (-): to select leftwards SOURCE...
... setting, the clock indication appears while the unit is set the hour. 3 Press the (+) side of (SEEK/AMS)). (DISC/PRST) (+): to use the menu This unit is operated by pressing (OFF) for two seconds to ON, the time is completed, the display returns to avoid car battery wear. The clock starts. Press (OFF) for two seconds to normal play mode. Example: To set the minute. (-): to select leftwards SOURCE...

Operating Instructions (primary manual)
Page 10
... or the end of the disc and you have found the desired point. Locating a specific track - To cancel Auto Scroll, select "A.SCRL-OFF" in a track - To locate preceding tracks SOURCE To locate succeeding tracks Locating a specific point in step 3. Tip The Motion Display mode can be turned off . 1 During playback, press (MENU). 2 Press either side of (SEEK/AMS). Automatic Music Sensor (AMS) During playback, press...
... or the end of the disc and you have found the desired point. Locating a specific track - To cancel Auto Scroll, select "A.SCRL-OFF" in a track - To locate preceding tracks SOURCE To locate succeeding tracks Locating a specific point in step 3. Tip The Motion Display mode can be turned off . 1 During playback, press (MENU). 2 Press either side of (SEEK/AMS). Automatic Music Sensor (AMS) During playback, press...

Operating Instructions (primary manual)
Page 12
... playing the disc you play mode, press (ENTER). The next character flashes. *1 While an optional CD unit is connected. *2 If you connect an optional CD unit with the custom file function) You can locate the disc by pressing (LIST) for two seconds instead of step 5. You can enter up to select the...use the Custom file feature while driving, or perform any other function which could divert your attention from the road. Displaying the disc memo Press (DSPL) during CD or CD TEXT disc playback, the item changes as follows: V Disc number*1/Track number/ Elapsed playback time V Disc...
... playing the disc you play mode, press (ENTER). The next character flashes. *1 While an optional CD unit is connected. *2 If you connect an optional CD unit with the custom file function) You can locate the disc by pressing (LIST) for two seconds instead of step 5. You can enter up to select the...use the Custom file feature while driving, or perform any other function which could divert your attention from the road. Displaying the disc memo Press (DSPL) during CD or CD TEXT disc playback, the item changes as follows: V Disc number*1/Track number/ Elapsed playback time V Disc...

Operating Instructions (primary manual)
Page 13
... unit) You can use this function for two seconds. When you assign a disc memo name to a CD TEXT disc, it takes priority over the original CD TEXT information. 2 Press either side of (DISC/PRST) repeatedly to select the disc name you want to erase other names. 7 Press (MENU) twice. Locating a disc by name - Erasing the disc memo 1 Press (SOURCE) repeatedly to select "CD." 2 Press (MODE...
... unit) You can use this function for two seconds. When you assign a disc memo name to a CD TEXT disc, it takes priority over the original CD TEXT information. 2 Press either side of (DISC/PRST) repeatedly to select the disc name you want to erase other names. 7 Press (MENU) twice. Locating a disc by name - Erasing the disc memo 1 Press (SOURCE) repeatedly to select "CD." 2 Press (MODE...

Operating Instructions (primary manual)
Page 15
... source changes as follows: B FM1 B FM2 B FM3 AM2 b AM1b 3 Press (MENU), then press either side of (DISC/PRST) repeatedly until "MEM" appears. A beep sounds when the setting is not connected, these items will retain their former setting. • When a number is indicated in the display, the unit starts storing stations from the one currently displayed. • If a CD is not in stations while driving, use Best Tuning Memory...
... source changes as follows: B FM1 B FM2 B FM3 AM2 b AM1b 3 Press (MENU), then press either side of (DISC/PRST) repeatedly until "MEM" appears. A beep sounds when the setting is not connected, these items will retain their former setting. • When a number is indicated in the display, the unit starts storing stations from the one currently displayed. • If a CD is not in stations while driving, use Best Tuning Memory...

Operating Instructions (primary manual)
Page 16
... displayed. Only the stations with relatively strong signals will automatically avoid noise and narrow the reception frequency. Automatical reception frequency adjustment - IF AUTO function If interference occurs, the "IF AUTO" function of (DISC/PRST) repeatedly until "WIDE"" appears. 3 Press (ENTER). Press (ENTER). Monaural Mode 1 During radio reception, press (MENU), then press either side of this unit will be tuned in step 2. To return to normal mode, select...
... displayed. Only the stations with relatively strong signals will automatically avoid noise and narrow the reception frequency. Automatical reception frequency adjustment - IF AUTO function If interference occurs, the "IF AUTO" function of (DISC/PRST) repeatedly until "WIDE"" appears. 3 Press (ENTER). Press (ENTER). Monaural Mode 1 During radio reception, press (MENU), then press either side of this unit will be tuned in step 2. To return to normal mode, select...

Operating Instructions (primary manual)
Page 20
... remote commander. Other operations Rotate the VOL control to attenuate the sound. You can also change the operative direction of controls is connected to adjust the volume and sound menu. To increase Adjusting the sound characteristics You can reverse the operative direction. Tip When the interface cable of (SEEK/AMS). Press (SOUND) to the ATT lead, the unit decreases the volume automatically when a telephone call comes in (Telephone ATT function). Each time you can adjust the bass, treble, balance...
... remote commander. Other operations Rotate the VOL control to attenuate the sound. You can also change the operative direction of controls is connected to adjust the volume and sound menu. To increase Adjusting the sound characteristics You can reverse the operative direction. Tip When the interface cable of (SEEK/AMS). Press (SOUND) to the ATT lead, the unit decreases the volume automatically when a telephone call comes in (Telephone ATT function). Each time you can adjust the bass, treble, balance...

Operating Instructions (primary manual)
Page 21
... switch among categories ("SET", "DIS", "P/M" (play mode), and "EDT" (edit mode)) by pressing either side of (SEEK/AMS) repeatedly to select the frequency (Example: off frequency of (DISC/PRST), the item changes as the factory-set : SET (setting) •CLOCK (page 8) •BEEP - to normal play mode at low volumes. Each time you press the (-) side of the subwoofer output. •LOUD (Loudness) - Select "REV" when you connect an optional power amplifier and do not use...
... switch among categories ("SET", "DIS", "P/M" (play mode), and "EDT" (edit mode)) by pressing either side of (SEEK/AMS) repeatedly to select the frequency (Example: off frequency of (DISC/PRST), the item changes as the factory-set : SET (setting) •CLOCK (page 8) •BEEP - to normal play mode at low volumes. Each time you press the (-) side of the subwoofer output. •LOUD (Loudness) - Select "REV" when you connect an optional power amplifier and do not use...

Operating Instructions (primary manual)
Page 22
... channel on the number buttons. Watching the TV 1 Press (SOURCE) repeatedly until you try to select the desired TV band. Caution When tuning in a station while driving, use Best Tuning Memory to prevent accidents. 1 Press (SOURCE) repeatedly until "TV" appears. 2 Press (MENU), then press either side of (DISC/PRST) until "TV" appears. 2 Press (MODE) repeatedly to store on the number buttons in the display. If only a few TV channels...
... channel on the number buttons. Watching the TV 1 Press (SOURCE) repeatedly until you try to select the desired TV band. Caution When tuning in a station while driving, use Best Tuning Memory to prevent accidents. 1 Press (SOURCE) repeatedly until "TV" appears. 2 Press (MENU), then press either side of (DISC/PRST) until "TV" appears. 2 Press (MODE) repeatedly to store on the number buttons in the display. If only a few TV channels...

Operating Instructions (primary manual)
Page 26
... car battery (negative ground) Approx. 178 × 50 × 183 mm (7 1/8 × 2 × 7 1/4 in.) (w/h/d) Approx. 182 × 53 × 162 mm (7 1/4 × 2 1/8 × 6 1/2 in.) (w/h/d) Approx. 1.2 kg (2 lb. 10 oz.) Parts for installation and connections (1 set) Front panel case (1) Card remote commander RM-X91 Rotary commander RM-X4S BUS cable (supplied with an RCA pin cord) RC-61 (1 m), RC-62 (2 m) CD changer (10 discs) CDX-838, CDX...
... car battery (negative ground) Approx. 178 × 50 × 183 mm (7 1/8 × 2 × 7 1/4 in.) (w/h/d) Approx. 182 × 53 × 162 mm (7 1/4 × 2 1/8 × 6 1/2 in.) (w/h/d) Approx. 1.2 kg (2 lb. 10 oz.) Parts for installation and connections (1 set) Front panel case (1) Card remote commander RM-X91 Rotary commander RM-X4S BUS cable (supplied with an RCA pin cord) RC-61 (1 m), RC-62 (2 m) CD changer (10 discs) CDX-838, CDX...

Operating Instructions (primary manual)
Page 27
... the car. See display. "Cleaning the connectors" (page 25) for two-speaker system. •Rotate the dial clockwise to adjust the volume. CD will not be loaded. The operation buttons do not use the built- Cause/Solution •Another CD is already loaded. •The CD is not installed in the wrong way. t Press the reset button. Troubleshooting guide The following checklist will help you...
... the car. See display. "Cleaning the connectors" (page 25) for two-speaker system. •Rotate the dial clockwise to adjust the volume. CD will not be loaded. The operation buttons do not use the built- Cause/Solution •Another CD is already loaded. •The CD is not installed in the wrong way. t Press the reset button. Troubleshooting guide The following checklist will help you...

Operating Instructions (primary manual)
Page 28
...;F). *1 When an error occurs during FM The WIDE mode is connected) The following indications will flash for about five seconds, and an alarm sound will be received. Play an MD with recorded tracks on the unit. Press the reset button on it. t Set the IF mode to the MONO mode (page 16). NO DISC No disc is too weak. The stations cannot be heard. Connect a power antenna control lead (blue) or accessory...
...;F). *1 When an error occurs during FM The WIDE mode is connected) The following indications will flash for about five seconds, and an alarm sound will be received. Play an MD with recorded tracks on the unit. Press the reset button on it. t Set the IF mode to the MONO mode (page 16). NO DISC No disc is too weak. The stations cannot be heard. Connect a power antenna control lead (blue) or accessory...

Product Guide / Specifications
Page 1
2000 MOBILE ES PRODUCT GUIDE CD Players CDX-C5050X CD Receiver • X-tal Lock SSIR-EXA Tuner, Station Memo • 18FM & 12AM Memory Presets • 8X Oversampling, 1-Bit D/A Active Servo Control • CD TEXT Disc/Track Title Display • Multi-color LCD, Active Display w/Demo Mode • CD/MD/TV Control, Custom File™ + Memory • 4 Volt F/R Preout,
2000 MOBILE ES PRODUCT GUIDE CD Players CDX-C5050X CD Receiver • X-tal Lock SSIR-EXA Tuner, Station Memo • 18FM & 12AM Memory Presets • 8X Oversampling, 1-Bit D/A Active Servo Control • CD TEXT Disc/Track Title Display • Multi-color LCD, Active Display w/Demo Mode • CD/MD/TV Control, Custom File™ + Memory • 4 Volt F/R Preout,


