

Limited Warranty (US Only)
Page 1
... the factory applied serial number has been altered or removed from your convenience, Sony Electronics Inc. To obtain warranty service, you must pay the labor charges to obtain warranty service. 4-557-172-02 General Stereo/Hifi Components/Tape Decks ® CD Players/Mini Disc Players/Audio Systems Hifi Audio LIMITED WARRANTY Sony Electronics Inc. ("Sony") warrants this Product is valid only in material or workmanship as fuses or batteries...
... the factory applied serial number has been altered or removed from your convenience, Sony Electronics Inc. To obtain warranty service, you must pay the labor charges to obtain warranty service. 4-557-172-02 General Stereo/Hifi Components/Tape Decks ® CD Players/Mini Disc Players/Audio Systems Hifi Audio LIMITED WARRANTY Sony Electronics Inc. ("Sony") warrants this Product is valid only in material or workmanship as fuses or batteries...
Operating Instructions
Page 1
3-866-297-11 (1) Operating Instructions f CDP-CX225 © 1999 by Sony Corporation
3-866-297-11 (1) Operating Instructions f CDP-CX225 © 1999 by Sony Corporation
Operating Instructions
Page 2
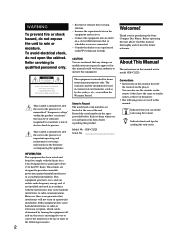
... installation. CDP-CX225 Serial No Conventions • Instructions in accordance with the limits for model CDP-CX225. This equipment generates, uses, and can radiate radio frequency energy and, if not installed and used in this manual could void your Sony dealer regarding this manual are designed to persons. Welcome! You can also use the controls on a circuit different from that to which can do the task using the remote. Refer servicing to...
... installation. CDP-CX225 Serial No Conventions • Instructions in accordance with the limits for model CDP-CX225. This equipment generates, uses, and can radiate radio frequency energy and, if not installed and used in this manual could void your Sony dealer regarding this manual are designed to persons. Welcome! You can also use the controls on a circuit different from that to which can do the task using the remote. Refer servicing to...
Operating Instructions
Page 3
TABLE OF CONTENTS Getting Started Unpacking ...4 Hooking Up the System ...4 Inserting CDs ...6 Playing a CD ...8 Playing CDs Locating a Specific Disc 10 Specifying the Next Disc to Play 10 Locating a Specific Track or a Point in a Track 11 Playing Repeatedly ...12 Playing in Random Order (Shuffle Play 12 Creating Your Own Program (Program Play 13 Playing Discs in a Group (Block Play 15 Additional Information Precautions ...16 Notes on CDs ...16 Troubleshooting ...17 Specifications ...17 Index ...18 3
TABLE OF CONTENTS Getting Started Unpacking ...4 Hooking Up the System ...4 Inserting CDs ...6 Playing a CD ...8 Playing CDs Locating a Specific Disc 10 Specifying the Next Disc to Play 10 Locating a Specific Track or a Point in a Track 11 Playing Repeatedly ...12 Playing in Random Order (Shuffle Play 12 Creating Your Own Program (Program Play 13 Playing Discs in a Group (Block Play 15 Additional Information Precautions ...16 Notes on CDs ...16 Troubleshooting ...17 Specifications ...17 Index ...18 3
Operating Instructions
Page 4
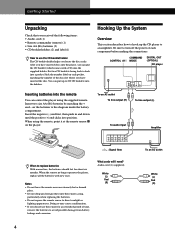
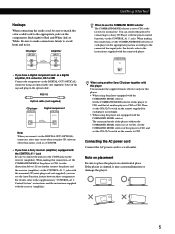
... put the CD booklet (which comes with new ones. on the player. Be sure to turn off the power of each pocket, matching the number of time, remove the batteries to avoid possible damage from battery leakage and corrosion. After you have inserted the disc. To an AC outlet To line output (R) To audio input To line output (L) Amplifier : Signal flow When to replace batteries With normal use the remote for...
... put the CD booklet (which comes with new ones. on the player. Be sure to turn off the power of each pocket, matching the number of time, remove the batteries to avoid possible damage from battery leakage and corrosion. After you have inserted the disc. To an AC outlet To line output (R) To audio input To line output (L) Amplifier : Signal flow When to replace batteries With normal use the remote for...
Operating Instructions
Page 5
... connected line input jacks. Connecting the AC power cord Connect the AC power cord to CD2. CD player LINE OUT L R Amplifier INPUT CD L R • If you have a digital component such as a CD-ROM. • If you connect via the CONTROL A1 jacks. Then set the CD1/2/3 switch on the remote supplied for normal use the Auto Function feature between these components. POC-15 Optical cable (not supplied) CD player DIGITAL OUT OPTICAL Digital component DIGITAL INPUT OPTICAL Note When you have a Sony receiver (amplifier) equipped with the player control function, via the DIGITAL...
... connected line input jacks. Connecting the AC power cord Connect the AC power cord to CD2. CD player LINE OUT L R Amplifier INPUT CD L R • If you have a digital component such as a CD-ROM. • If you connect via the CONTROL A1 jacks. Then set the CD1/2/3 switch on the remote supplied for normal use the Auto Function feature between these components. POC-15 Optical cable (not supplied) CD player DIGITAL OUT OPTICAL Digital component DIGITAL INPUT OPTICAL Note When you have a Sony receiver (amplifier) equipped with the player control function, via the DIGITAL...
Operating Instructions
Page 6
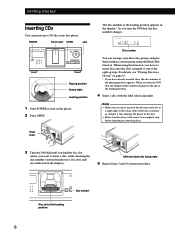
... display.* As you turn the JOG dial, the disc number changes. Disc number Disc slot at the loading position appears in straight, it may damage the player or the disc. • Make sure the rotary table comes to a complete stop before inserting or removing discs. 3 Turn the JOG dial until you find the disc slot where you want to insert more discs. With the label side facing right 5 Repeat...
... display.* As you turn the JOG dial, the disc number changes. Disc number Disc slot at the loading position appears in straight, it may damage the player or the disc. • Make sure the rotary table comes to a complete stop before inserting or removing discs. 3 Turn the JOG dial until you find the disc slot where you want to insert more discs. With the label side facing right 5 Repeat...
Operating Instructions
Page 7
... center of the JOG dial after the rotary table comes to 200 CD booklets. Then close the front cover except when you insert an 8 cm (3-inch) CD, be sure to attach a Sony CSA-8 adaptor (not supplied) to the playing position. The disc comes to CDs. Remove the disc after opening the front cover. It may damage the player. • Do not attach anything such as...
... center of the JOG dial after the rotary table comes to 200 CD booklets. Then close the front cover except when you insert an 8 cm (3-inch) CD, be sure to attach a Sony CSA-8 adaptor (not supplied) to the playing position. The disc comes to CDs. Remove the disc after opening the front cover. It may damage the player. • Do not attach anything such as...
Operating Instructions
Page 8
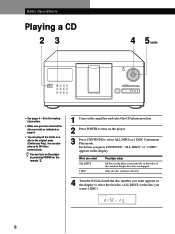
... Operations Playing a CD 23 4 5 ENTER POWER CONTINUE SHUFFLE PROGRAM REPEAT BLOCK 1 BLOCK 2 BLOCK 3 BLOCK 4 BLOCK 5 BLOCK 6 BLOCK 7 BLOCK 8 ENTER OPEN AMS CHECK CLEAR • See pages 4 - 5 for the hookup information. • Make sure you have selected 4 Turn the JOG dial until the disc number you want (1 DISC). Empty disc slots are skipped. You can also play all the tracks on page 6. • You can play up to 200 discs...
... Operations Playing a CD 23 4 5 ENTER POWER CONTINUE SHUFFLE PROGRAM REPEAT BLOCK 1 BLOCK 2 BLOCK 3 BLOCK 4 BLOCK 5 BLOCK 6 BLOCK 7 BLOCK 8 ENTER OPEN AMS CHECK CLEAR • See pages 4 - 5 for the hookup information. • Make sure you have selected 4 Turn the JOG dial until the disc number you want (1 DISC). Empty disc slots are skipped. You can also play all the tracks on page 6. • You can play up to 200 discs...
Operating Instructions
Page 9
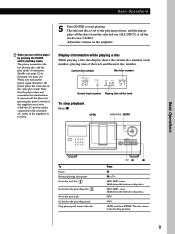
... power cord is set to skip discs. Adjust the volume on the player again, therefore, the player plays the same disc in the same play mode (Continuous, Shuffle (see page 12) or Program (see page 13)). Display information while playing a disc While playing a disc, the display shows the current disc number, track number, playing time of the track To stop playback Press p. The disc comes to the preceding track Stop playing and remove the disc ·P p Press P P or · DISC SKIP + once. Hold down the button to the playing...
... power cord is set to skip discs. Adjust the volume on the player again, therefore, the player plays the same disc in the same play mode (Continuous, Shuffle (see page 12) or Program (see page 13)). Display information while playing a disc While playing a disc, the display shows the current disc number, track number, playing time of the track To stop playback Press p. The disc comes to the preceding track Stop playing and remove the disc ·P p Press P P or · DISC SKIP + once. Hold down the button to the playing...
Operating Instructions
Page 10
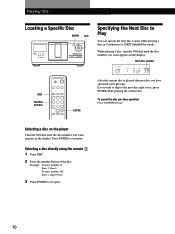
... starts playing. Playing CDs Locating a Specific Disc ENTER JOG POWER DISC Number buttons ENTER Specifying the Next Disc to Play You can specify the next disc to play while playing a disc in the display. Press ENTER to start play . Selecting a disc directly using the remote 1 Press DISC. 2 Press the number button of the disc. Selecting a disc on the player Turn the JOG dial until the disc number you have specified Press CONTINUE twice. If you want appears in the display. While playing a disc, turn...
... starts playing. Playing CDs Locating a Specific Disc ENTER JOG POWER DISC Number buttons ENTER Specifying the Next Disc to Play You can specify the next disc to play while playing a disc in the display. Press ENTER to start play . Selecting a disc directly using the remote 1 Press DISC. 2 Press the number button of the disc. Selecting a disc on the player Turn the JOG dial until the disc number you have specified Press CONTINUE twice. If you want appears in the display. While playing a disc, turn...
Operating Instructions
Page 11
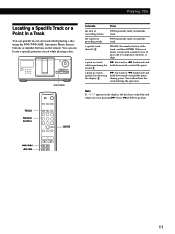
... track the current or preceding tracks ≠ repeatedly until you find the point during the operation. You will not hear the sound during pause. GettPinlagyiSntgarCteDds Locating a Specific Track or a Point in a Track You can also locate a specific point in a track while playing a disc. You can quickly locate any track while playing a disc using the ≠/± (AMS: Automatic Music Sensor) buttons or number buttons on the remote. TRACK Number buttons ENTER =/+ 0/) 11 a point in a track...
... track the current or preceding tracks ≠ repeatedly until you find the point during the operation. You will not hear the sound during pause. GettPinlagyiSntgarCteDds Locating a Specific Track or a Point in a Track You can also locate a specific point in a track while playing a disc. You can quickly locate any track while playing a disc using the ≠/± (AMS: Automatic Music Sensor) buttons or number buttons on the remote. TRACK Number buttons ENTER =/+ 0/) 11 a point in a track...
Operating Instructions
Page 12
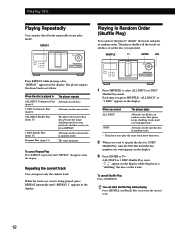
... Program Play (page 13) The same program To cancel Repeat Play Press REPEAT repeatedly until "REPEAT" disappears from the current track. 12 REPEAT POWER Press REPEAT while playing a disc. Each time you want appears in the display. 3 Press ENTER or ·. " " appears in the display while the player is being played, press REPEAT repeatedly until the disc number you press SHUFFLE, "ALL DISCS" or "1 DISC" appears in the display. SHUFFLE · ENTER JOG POWER 1 Press SHUFFLE to specify the disc for 1 DISC Shuffle Play, turn...
... Program Play (page 13) The same program To cancel Repeat Play Press REPEAT repeatedly until "REPEAT" disappears from the current track. 12 REPEAT POWER Press REPEAT while playing a disc. Each time you want appears in the display. 3 Press ENTER or ·. " " appears in the display while the player is being played, press REPEAT repeatedly until the disc number you press SHUFFLE, "ALL DISCS" or "1 DISC" appears in the display. SHUFFLE · ENTER JOG POWER 1 Press SHUFFLE to specify the disc for 1 DISC Shuffle Play, turn...
Operating Instructions
Page 13
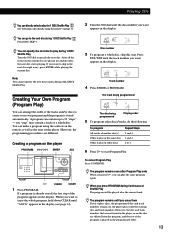
... tracks on the player. POWER · CHECK CLEAR 1 Press PROGRAM. Creating a program on page 10. GettPinlagyiSntgarCteDds You can directly select a disc for 1 DISC Shuffle Play See "Selecting a disc directly using the controls on the remote as well as the ones on other discs Repeat Steps 2 and 4 3 and 4 2 to 4 6 Press · to start Program Play. However, the programming procedures are played in the display (see page 14). So, the player plays only the existing disc and track numbers...
... tracks on the player. POWER · CHECK CLEAR 1 Press PROGRAM. Creating a program on page 10. GettPinlagyiSntgarCteDds You can directly select a disc for 1 DISC Shuffle Play See "Selecting a disc directly using the controls on the remote as well as the ones on other discs Repeat Steps 2 and 4 3 and 4 2 to 4 6 Press · to start Program Play. However, the programming procedures are played in the display (see page 14). So, the player plays only the existing disc and track numbers...
Operating Instructions
Page 14
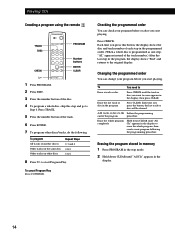
... need to Erase a track or disc Press CHECK until "All Clr" appears in the display. 14 Checking the programmed order You can change your program before you press the button, the last track or disc will be cleared. Each time you start Program Play. Playing CDs Creating a program using the remote TRACK DISC PROGRAM CHECK Number buttons ENTER CLEAR · 1 Press PROGRAM. 2 Press DISC. 3 Press the number button of the disc. 4 To program a whole disc, skip this button, the display shows the disc...
... need to Erase a track or disc Press CHECK until "All Clr" appears in the display. 14 Checking the programmed order You can change your program before you press the button, the last track or disc will be cleared. Each time you start Program Play. Playing CDs Creating a program using the remote TRACK DISC PROGRAM CHECK Number buttons ENTER CLEAR · 1 Press PROGRAM. 2 Press DISC. 3 Press the number button of the disc. 4 To program a whole disc, skip this button, the display shows the disc...
Operating Instructions
Page 15
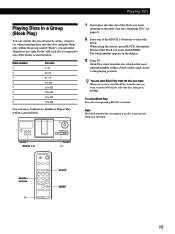
... 151-175 176-200 You can enjoy Continuous, Shuffle or Repeat Play within a certain block. 1 Insert discs into the slot of the BLOCK 1-8 buttons to select the block. Note The block number does not appear if no disc is put into the slots, and play them only within a block and located closest to the table. (See also "Inserting CDs" on page...
... 151-175 176-200 You can enjoy Continuous, Shuffle or Repeat Play within a certain block. 1 Insert discs into the slot of the BLOCK 1-8 buttons to select the block. Note The block number does not appear if no disc is put into the slots, and play them only within a block and located closest to the table. (See also "Inserting CDs" on page...
Operating Instructions
Page 16
... qualified service shop. To disconnect the AC power cord (mains lead), grasp the plug itself has been turned off . Should this case, leave the player turned on the lenses inside the car. • After removing a disc from the disc slot, store the disc in its case. On cleaning • Before playing, clean the disc with a mild detergent solution. On operation • If the player is brought directly from...
... qualified service shop. To disconnect the AC power cord (mains lead), grasp the plug itself has been turned off . Should this case, leave the player turned on the lenses inside the car. • After removing a disc from the disc slot, store the disc in its case. On cleaning • Before playing, clean the disc with a mild detergent solution. On operation • If the player is brought directly from...
Operating Instructions
Page 17
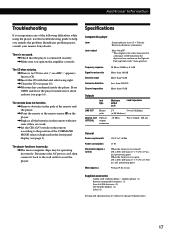
... problem. There is closed 430 × 200 × 480 mm (17 × 7 7/8 × 19 in .) incl. projecting parts 9.0 kg (19 lbs 14 oz) Supplied accessories Audio cord (2 phono plugs - 2 phono plugs) (1) Remote commander (remote) (1) Size AA (R6) batteries (2) CD booklet holders (2) Label (1) Design and specifications are weak. /Set the CD1/2/3 switch on the player. /Replace all the batteries in the front panel display (see page 5). Insert a CD. /Insert the CD with new...
... problem. There is closed 430 × 200 × 480 mm (17 × 7 7/8 × 19 in .) incl. projecting parts 9.0 kg (19 lbs 14 oz) Supplied accessories Audio cord (2 phono plugs - 2 phono plugs) (1) Remote commander (remote) (1) Size AA (R6) batteries (2) CD booklet holders (2) Label (1) Design and specifications are weak. /Set the CD1/2/3 switch on the player. /Replace all the batteries in the front panel display (see page 5). Insert a CD. /Insert the CD with new...
Operating Instructions
Page 18
... 9 Number 11 OPEN 6 PROGRAM 13 REPEAT 12 SHUFFLE 12 TRACK 11 ≠/± 9 ·9 P9 p9 0/) 11 Switches CD1/2/3 5 POWER 6 Jacks CONTROL A1 5 LINE OUT 5 Connectors DIGITAL OUT (OPTICAL) 5 Others COMMAND MODE selector 5 Disc slots 6 Display 9 Front cover 6 JOG dial 6, 8 Rotary table 6 g4 18 AIndddeixtional Information Index A AMS 11 Automatic Music Sensor 11. B Block Play 15 C, D Connecting 4 Continuous Play 8 E, F, G Erasing programs 14 H Handling CDs 16 Hookups overview 4 I Inserting CDs 6 J, K JOG dial 6 L, M, N O Locating a specific point 11 a specific track...
... 9 Number 11 OPEN 6 PROGRAM 13 REPEAT 12 SHUFFLE 12 TRACK 11 ≠/± 9 ·9 P9 p9 0/) 11 Switches CD1/2/3 5 POWER 6 Jacks CONTROL A1 5 LINE OUT 5 Connectors DIGITAL OUT (OPTICAL) 5 Others COMMAND MODE selector 5 Disc slots 6 Display 9 Front cover 6 JOG dial 6, 8 Rotary table 6 g4 18 AIndddeixtional Information Index A AMS 11 Automatic Music Sensor 11. B Block Play 15 C, D Connecting 4 Continuous Play 8 E, F, G Erasing programs 14 H Handling CDs 16 Hookups overview 4 I Inserting CDs 6 J, K JOG dial 6 L, M, N O Locating a specific point 11 a specific track...

Operating Instructions
Page 20
Additional Information Sony Corporation Printed in Malaysia 20
Additional Information Sony Corporation Printed in Malaysia 20


