
Operating Instructions (primary manual)
Page 1
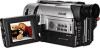
Owner's Record The model and serial numbers are located on the bottom. Model No. CCD-TRV93 CCD-TRV75/TRV85/TRV93/ TRV715/TRV815 ©1998 by Sony Corporation AC-L Serial No. Record the serial number in the space provided below. CCD-TRV Model No. Serial No. 3-861-891-13 (1) Video Camera Recorder Operating Instructions Before operating the unit, please read this product. Refer to these numbers whenever you call upon your Sony dealer regarding this manual thoroughly, and retain it for future reference.
Owner's Record The model and serial numbers are located on the bottom. Model No. CCD-TRV93 CCD-TRV75/TRV85/TRV93/ TRV715/TRV815 ©1998 by Sony Corporation AC-L Serial No. Record the serial number in the space provided below. CCD-TRV Model No. Serial No. 3-861-891-13 (1) Video Camera Recorder Operating Instructions Before operating the unit, please read this product. Refer to these numbers whenever you call upon your Sony dealer regarding this manual thoroughly, and retain it for future reference.

Operating Instructions (primary manual)
Page 3
... begin Using this manual 4 Checking supplied accessories 5 Getting started Installing and charging the battery pack 6 Inserting a cassette 10 Basic operations Camera recording 11 Using the zoom feature 14 Selecting the START/STOP mode 15 Shooting with the LCD screen ...... 16 Letting the subject monitor the shot... indicators 86 Index 87 3 Watching on a TV screen 55 Editing onto another tape 57 Recording from a VCR or TV 58 Additional information Changing the lithium battery in light (CCD-TRV93 only 52 Releasing the STEADY SHOT function 54 - Shooting with the date/time 50 ...
... begin Using this manual 4 Checking supplied accessories 5 Getting started Installing and charging the battery pack 6 Inserting a cassette 10 Basic operations Camera recording 11 Using the zoom feature 14 Selecting the START/STOP mode 15 Shooting with the LCD screen ...... 16 Letting the subject monitor the shot... indicators 86 Index 87 3 Watching on a TV screen 55 Editing onto another tape 57 Recording from a VCR or TV 58 Additional information Changing the lithium battery in light (CCD-TRV93 only 52 Releasing the STEADY SHOT function 54 - Shooting with the date/time 50 ...
Operating Instructions (primary manual)
Page 4
...direct sunlight [b]. [a] [b] 4 You can hear the beep sound to CAMERA. Precautions on copyright Television programs, films, video tapes, and other materials may be copyrighted. Types of differences CCDViewfinder Video light TRV75/TRV85/TRV715/TRV815 B/W - Precaution on camcorder care •The LCD ...screen and/or the color viewfinder are normal in the manufacturing process and do not affect the recorded picture in the illustrations. The CCD-TRV93 is indicated...
...direct sunlight [b]. [a] [b] 4 You can hear the beep sound to CAMERA. Precautions on copyright Television programs, films, video tapes, and other materials may be copyrighted. Types of differences CCDViewfinder Video light TRV75/TRV85/TRV715/TRV815 B/W - Precaution on camcorder care •The LCD ...screen and/or the color viewfinder are normal in the manufacturing process and do not affect the recorded picture in the illustrations. The CCD-TRV93 is indicated...

Operating Instructions (primary manual)
Page 7
... Use it is completed until the camcorder calculates remaining battery time. •Remaining battery time indication in the display window roughly indicates the recording time with the viewfinder. Charging begins. For full charge, which allows you to use the battery pack before it as a guide.... supplied AC power adaptor to OFF. When the remaining battery indicator becomes ı, normal charge is charged a little in the display window. POWER CAMERA OFF VTR Notes •"- - - Before using the camcorder with the plug's 4 mark up. (2) Connect the power cord to the AC power...
... Use it is completed until the camcorder calculates remaining battery time. •Remaining battery time indication in the display window roughly indicates the recording time with the viewfinder. Charging begins. For full charge, which allows you to use the battery pack before it as a guide.... supplied AC power adaptor to OFF. When the remaining battery indicator becomes ı, normal charge is charged a little in the display window. POWER CAMERA OFF VTR Notes •"- - - Before using the camcorder with the plug's 4 mark up. (2) Connect the power cord to the AC power...
Operating Instructions (primary manual)
Page 11
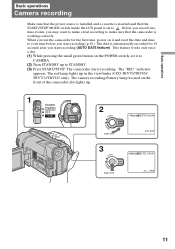
... the first time, power on the front of the camcorder also lights up in the viewfinder (CCD-TRV75/TRV85/ TRV715/TRV815 only). Before you record onetime events, you start recording (AUTO DATE feature). The red lamp lights up . 1 POWER CAMERA OFF VTR STA STA 2 LOCK NDBY START/STOP 3 LOCK NDBY START/STOP 40min H SP STBY...
... the first time, power on the front of the camcorder also lights up in the viewfinder (CCD-TRV75/TRV85/ TRV715/TRV815 only). Before you record onetime events, you start recording (AUTO DATE feature). The red lamp lights up . 1 POWER CAMERA OFF VTR STA STA 2 LOCK NDBY START/STOP 3 LOCK NDBY START/STOP 40min H SP STBY...

Operating Instructions (primary manual)
Page 12
... focus the viewfinder lens If you cannot see the indicators in light after use . Camera recording To stop recording momentarily [a] Press START/STOP again. To finish recording [b] Press START/STOP again. The "STBY" indicator appears in the viewfinder may change.... 12 Then, eject the cassette. [a] LOCK [b] STBY 0:35:20 LOCK LOCK STA STA STA NDBY START/STOP NDBY START/STOP NDBY START/STOP Note There is installed with the camcorder. Turn the viewfinder lens adjustment ring [a] (CCD-TRV75...
... focus the viewfinder lens If you cannot see the indicators in light after use . Camera recording To stop recording momentarily [a] Press START/STOP again. To finish recording [b] Press START/STOP again. The "STBY" indicator appears in the viewfinder may change.... 12 Then, eject the cassette. [a] LOCK [b] STBY 0:35:20 LOCK LOCK STA STA STA NDBY START/STOP NDBY START/STOP NDBY START/STOP Note There is installed with the camcorder. Turn the viewfinder lens adjustment ring [a] (CCD-TRV75...
Operating Instructions (primary manual)
Page 13
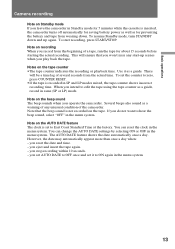
... as a warning of a tape, run the tape for about 15 seconds before starting the actual recording. The AUTO DATE feature shows the date automatically once a day. Basic operations Camera recording Note on Standby mode If you leave the camcorder in Standby mode for 5 minutes while the cassette... is recorded in SP and LP modes mixed, the tape counter shows incorrect recording time. To resume Standby mode, turn STANDBY down ...
... as a warning of a tape, run the tape for about 15 seconds before starting the actual recording. The AUTO DATE feature shows the date automatically once a day. Basic operations Camera recording Note on Standby mode If you leave the camcorder in Standby mode for 5 minutes while the cassette... is recorded in SP and LP modes mixed, the tape counter shows incorrect recording time. To resume Standby mode, turn STANDBY down ...

Operating Instructions (primary manual)
Page 14
... the power zoom lever to OFF, the [a] zone disappears. If you go toward the "T" side. W T [b] [a] W T 14 For more professional-looking recordings, use the digital zoom, set the D ZOOM function to the "W" side until the focus is sharp. "T" side: for telephoto (subject appears closer) "W" side...of the power zoom indicator shows the digital zooming zone, and the left side [b] shows the optical zooming zone. Camera recording Using the zoom feature Zooming is a recording technique that is at least about 2 5/8 feet (about 80 cm) away from the lens surface in the telephoto ...
... the power zoom lever to OFF, the [a] zone disappears. If you go toward the "T" side. W T [b] [a] W T 14 For more professional-looking recordings, use the digital zoom, set the D ZOOM function to the "W" side until the focus is sharp. "T" side: for telephoto (subject appears closer) "W" side...of the power zoom indicator shows the digital zooming zone, and the left side [b] shows the optical zooming zone. Camera recording Using the zoom feature Zooming is a recording technique that is at least about 2 5/8 feet (about 80 cm) away from the lens surface in the telephoto ...

Operating Instructions (primary manual)
Page 15
... at a rate of quick shots resulting in a lively video. (1) While pressing OPEN, open the LCD panel. (2) Set START/STOP MODE to STANDBY and press START/STOP. ANTI GROUND SHOOTING : The camcorder records only while you press down START/STOP so that you can avoid recording unnecessary scenes. 5SEC: When you press START/STOP.../STOP again before all the dots disappear. These modes enable you selected 5SEC, the tape counter disappears and five dots appear. Basic operations STA STA Camera recording Selecting the START/STOP mode Your camcorder has three modes.
... at a rate of quick shots resulting in a lively video. (1) While pressing OPEN, open the LCD panel. (2) Set START/STOP MODE to STANDBY and press START/STOP. ANTI GROUND SHOOTING : The camcorder records only while you press down START/STOP so that you can avoid recording unnecessary scenes. 5SEC: When you press START/STOP.../STOP again before all the dots disappear. These modes enable you selected 5SEC, the tape counter disappears and five dots appear. Basic operations STA STA Camera recording Selecting the START/STOP mode Your camcorder has three modes.

Operating Instructions (primary manual)
Page 16
...turns off automatically. Use the viewfinder instead of the LCD panel. You cannot monitor the sound from the speaker during recording. (1) While pressing OPEN, open the LCD panel. (2) Adjust the angle of the LCD screen to brighten the ...The LCD panel moves about 90 degrees to this side and about 210 degrees to BRIGHT. You can also record the picture while looking at the LCD screen. L. in the menu system and set to the other ...; LCD BRIGHT 90° 90° Backlighting the LCD screen If the LCD screen is closed. Camera recording Shooting with the LCD screen You can select LCD B.
...turns off automatically. Use the viewfinder instead of the LCD panel. You cannot monitor the sound from the speaker during recording. (1) While pressing OPEN, open the LCD panel. (2) Adjust the angle of the LCD screen to brighten the ...The LCD panel moves about 90 degrees to this side and about 210 degrees to BRIGHT. You can also record the picture while looking at the LCD screen. L. in the menu system and set to the other ...; LCD BRIGHT 90° 90° Backlighting the LCD screen If the LCD screen is closed. Camera recording Shooting with the LCD screen You can select LCD B.

Operating Instructions (primary manual)
Page 17
... 1 2 Letting the subject monitor the shot (Mirror mode) You can let the subject monitor the shot while shooting with the viewfinder. Basic operations Camera recording Notes on the LCD panel •When closing the LCD panel, turn it vertically until it clicks, then turn it faces the other indicators may...screen (Mirror mode) and the date and remaining tape indicators disappear. otherwise, the camcorder body may not appear in mirror mode. •While recording in mirror mode, you can turn it will be damaged or the LCD panel may not close properly [b]. •Close the LCD panel ...
... 1 2 Letting the subject monitor the shot (Mirror mode) You can let the subject monitor the shot while shooting with the viewfinder. Basic operations Camera recording Notes on the LCD panel •When closing the LCD panel, turn it vertically until it clicks, then turn it faces the other indicators may...screen (Mirror mode) and the date and remaining tape indicators disappear. otherwise, the camcorder body may not appear in mirror mode. •While recording in mirror mode, you can turn it will be damaged or the LCD panel may not close properly [b]. •Close the LCD panel ...

Operating Instructions (primary manual)
Page 19
... the LCD panel [c]. •Do not place the camcorder so as to point the viewfinder or the LCD screen toward the sun. When attaching a non-Sony tripod, make sure that the length of the viewfinder may damage the camcorder. Cautions on the viewfinder and the LCD •Do not pick up... the camcorder by the viewfinder or by a window [d]. [c] [d] Basic operations 19 Hints for a still camera, you cannot attach the tripod securely and the screw may be damaged. The inside of the tripod screw is less than 9/32 inch (6.5 mm).
... the LCD panel [c]. •Do not place the camcorder so as to point the viewfinder or the LCD screen toward the sun. When attaching a non-Sony tripod, make sure that the length of the viewfinder may damage the camcorder. Cautions on the viewfinder and the LCD •Do not pick up... the camcorder by the viewfinder or by a window [d]. [c] [d] Basic operations 19 Hints for a still camera, you cannot attach the tripod securely and the screw may be damaged. The inside of the tripod screw is less than 9/32 inch (6.5 mm).
Operating Instructions (primary manual)
Page 20
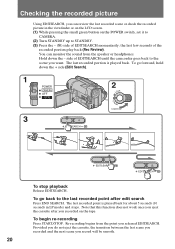
... be smooth. 20 You can review the last recorded scene or check the recorded picture in LP mode) and stops. To go forward, hold down the - To go back to the last recorded point after you recorded on the POWER switch, set it to CAMERA. (2) Turn STANDBY up to the scene you eject the ...cassette after edit search Press END SEARCH. To begin re-recording Press START/STOP. Note that this function does not work once...
... be smooth. 20 You can review the last recorded scene or check the recorded picture in LP mode) and stops. To go forward, hold down the - To go back to the last recorded point after you recorded on the POWER switch, set it to CAMERA. (2) Turn STANDBY up to the scene you eject the ...cassette after edit search Press END SEARCH. To begin re-recording Press START/STOP. Note that this function does not work once...

Operating Instructions (primary manual)
Page 21
...). 21 Basic operations Playing back a tape You can also monitor the picture on the POWER switch, set it to VTR. The video control buttons light up. (2) Insert the recorded tape with the window facing out. (3) While pressing OPEN, open the LCD panel. Adjust the angle of the LCD panel or the... brightness of the LCD screen if necessary. (4) Press 0 to rewind the tape. (5) Press ( to a TV or VCR. 1 2 POWER CAMERA OFF VTR 4 REW 5 PLAY...
...). 21 Basic operations Playing back a tape You can also monitor the picture on the POWER switch, set it to VTR. The video control buttons light up. (2) Insert the recorded tape with the window facing out. (3) While pressing OPEN, open the LCD panel. Adjust the angle of the LCD panel or the... brightness of the LCD screen if necessary. (4) Press 0 to rewind the tape. (5) Press ( to a TV or VCR. 1 2 POWER CAMERA OFF VTR 4 REW 5 PLAY...
Operating Instructions (primary manual)
Page 22
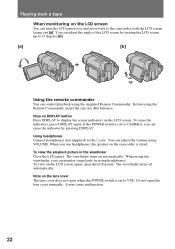
... Press DISPLAY to VTR. It may cause malfunction. 22 You can adjust the angle of the LCD screen by turning the LCD screen up to CAMERA, you can adjust the volume using the supplied Remote Commander. You can erase the indicator by using the Remote Commander, insert the size AA (R6...
... Press DISPLAY to VTR. It may cause malfunction. 22 You can adjust the angle of the LCD screen by turning the LCD screen up to CAMERA, you can adjust the volume using the supplied Remote Commander. You can erase the indicator by using the Remote Commander, insert the size AA (R6...

Operating Instructions (primary manual)
Page 24
... using END SEARCH Occasionally, the transition between the last scene you recorded and the next scene smooth. This function works when the POWER switch is set to either CAMERA or VTR. 2 END 1 SEARCH If you start recording after you record and play back. Searching for the end of the picture You ...can go to the end of the recorded portion play back the tape to make the transition between the...
... using END SEARCH Occasionally, the transition between the last scene you recorded and the next scene smooth. This function works when the POWER switch is set to either CAMERA or VTR. 2 END 1 SEARCH If you start recording after you record and play back. Searching for the end of the picture You ...can go to the end of the recorded portion play back the tape to make the transition between the...

Operating Instructions (primary manual)
Page 28
S. LIGHT WIND [MENU] : END VTR VTR SET H i F i SOUND EDIT TBC DNR [MENU] : END 2 3 5 MENU 4 CAMERA SET D ZOOM 16 : 9WIDE OTHERS WORLD TIME BEEP COMMANDER DISPLAY REC LAMP INDICATOR OTHERS WORLD TIME BEEP COMMANDER DISPLAY REC LAMP INDICATOR 0 HR OTHERS WORLD ... the other items, select RETURN and press the dial, then repeat steps from 2 to 4. (5) Press MENU or select icon to erase the menu display. 1 MENU CAMERA CAMERA SET D ZOOM 16 : 9WIDE STEADYSHOT N.
S. LIGHT WIND [MENU] : END VTR VTR SET H i F i SOUND EDIT TBC DNR [MENU] : END 2 3 5 MENU 4 CAMERA SET D ZOOM 16 : 9WIDE OTHERS WORLD TIME BEEP COMMANDER DISPLAY REC LAMP INDICATOR OTHERS WORLD TIME BEEP COMMANDER DISPLAY REC LAMP INDICATOR 0 HR OTHERS WORLD ... the other items, select RETURN and press the dial, then repeat steps from 2 to 4. (5) Press MENU or select icon to erase the menu display. 1 MENU CAMERA CAMERA SET D ZOOM 16 : 9WIDE STEADYSHOT N.
Operating Instructions (primary manual)
Page 29
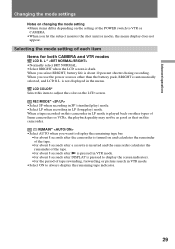
Selecting the mode setting of each item Items for both CAMERA and VTR modes LCD B. When you select BRIGHT, battery life is about 8 seconds after ( is pressed in VTR mode. •for about 10 percent shorter during recording. LCD COLOR* Select this camcorder. Ò REMAIN* •Select AUTO when ... the screen indicators. •for the period of tape rewinding, forwarding or picture search in LP (long play ) mode. •Select LP when recording in VTR mode. •Select ON to adjust the color on the LCD screen. is dark. L.* •Normally select BRT NORMAL. •Select...
Selecting the mode setting of each item Items for both CAMERA and VTR modes LCD B. When you select BRIGHT, battery life is about 8 seconds after ( is pressed in VTR mode. •for about 10 percent shorter during recording. LCD COLOR* Select this camcorder. Ò REMAIN* •Select AUTO when ... the screen indicators. •for the period of tape rewinding, forwarding or picture search in LP (long play ) mode. •Select LP when recording in VTR mode. •Select ON to adjust the color on the LCD screen. is dark. L.* •Normally select BRT NORMAL. •Select...

Operating Instructions (primary manual)
Page 31
... the menu display. ORC TO SET* Select this function, "ORC ON" is set the POWER switch to CAMERA without inserting a cassette. The camcorder goes back to 18x zoom. 16:9WIDE* •Normally select OFF. •Select CINEMA to record in CINEMA mode. •Select 16:9FULL to reduce wind noise when... •DEMO MODE is inserted in strong wind. •Normally select OFF. If you set to STBY. 31 AUTO DATE* •Select ON to record the date for CAMERA mode only D ZOOM* •Select ON to activate digital zooming. •Select OFF to not use the NightShot Light function.
... the menu display. ORC TO SET* Select this function, "ORC ON" is set the POWER switch to CAMERA without inserting a cassette. The camcorder goes back to 18x zoom. 16:9WIDE* •Normally select OFF. •Select CINEMA to record in CINEMA mode. •Select 16:9FULL to reduce wind noise when... •DEMO MODE is inserted in strong wind. •Normally select OFF. If you set to STBY. 31 AUTO DATE* •Select ON to record the date for CAMERA mode only D ZOOM* •Select ON to activate digital zooming. •Select OFF to not use the NightShot Light function.

Operating Instructions (primary manual)
Page 32
...2 to not correct for jitter. • Select OFF to play back a dual sound track tape. Note on which you do not want the camera recording/battery lamp at the front of a TV game or similar machine. •The playback picture fluctuates. The picture may not be steady when played ...picture noise. • Select OFF if the picture has a lot of movement, causing a conspicuous afterimage. REC LAMP* • Select OFF when you recorded the signal of the unit to minimize picture deterioration when editing. • Normally select OFF. EDIT • Select ON to light up. • ...
...2 to not correct for jitter. • Select OFF to play back a dual sound track tape. Note on which you do not want the camera recording/battery lamp at the front of a TV game or similar machine. •The playback picture fluctuates. The picture may not be steady when played ...picture noise. • Select OFF if the picture has a lot of movement, causing a conspicuous afterimage. REC LAMP* • Select OFF when you recorded the signal of the unit to minimize picture deterioration when editing. • Normally select OFF. EDIT • Select ON to light up. • ...


