
Operating Instructions
Page 5
BACK LIGHT 25 Shooting in light 47 5 NightShot 26 Superimposing the date and time on TV 32 Customizing Your Camcorder Changing the menu settings 51 Troubleshooting Types of contents Main Features 4 Quick Start Guide 6 Editing Dubbing a tape ... Adjusting the exposure manually ...... 41 Focusing manually 42 Superimposing a title 43 Making your camcorder abroad 66 Maintenance information and precautions 67 Specifications 72 Quick Reference Identifying the parts and controls ...... 73 Index Back cover Advanced Recording Operations Using the wide mode 34 Using the ...
BACK LIGHT 25 Shooting in light 47 5 NightShot 26 Superimposing the date and time on TV 32 Customizing Your Camcorder Changing the menu settings 51 Troubleshooting Types of contents Main Features 4 Quick Start Guide 6 Editing Dubbing a tape ... Adjusting the exposure manually ...... 41 Focusing manually 42 Superimposing a title 43 Making your camcorder abroad 66 Maintenance information and precautions 67 Specifications 72 Quick Reference Identifying the parts and controls ...... 73 Index Back cover Advanced Recording Operations Using the wide mode 34 Using the ...

Operating Instructions
Page 29
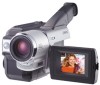
Playback - Basics - You can control playback using the Remote Commander supplied with your camcorder is silent when the LCD panel is closed. 4 REW 5 PLAY 2 POWER PLAYER OFF (CHARGE) CAMERA 3 To stop playback Press x. 6 VOLUME 29 The speaker on your camcorder (CCD-TRV49/TRV78/TRV98 only). (1) Install the power source and insert the recorded tape. (2) Set...
Playback - Basics - You can control playback using the Remote Commander supplied with your camcorder is silent when the LCD panel is closed. 4 REW 5 PLAY 2 POWER PLAYER OFF (CHARGE) CAMERA 3 To stop playback Press x. 6 VOLUME 29 The speaker on your camcorder (CCD-TRV49/TRV78/TRV98 only). (1) Install the power source and insert the recorded tape. (2) Set...

Operating Instructions
Page 30
The indicators appear on your camcorder or the Remote Commander (CCD-TRV49/TRV78/ TRV98 only) supplied with the LCD screen facing out [a]. DISPLAY 30 You can turn the LCD panel over and move it back to the camcorder body with your camcorder. Playing back a tape When monitoring on the LCD screen You can adjust the angle of the LCD panel by lifting the LCD panel up by 23 degrees [b]. [a] [b] 23° To control the display of the screen indicators Press DISPLAY on the LCD screen. To make the indicators disappear, press DISPLAY again.
The indicators appear on your camcorder or the Remote Commander (CCD-TRV49/TRV78/ TRV98 only) supplied with the LCD screen facing out [a]. DISPLAY 30 You can turn the LCD panel over and move it back to the camcorder body with your camcorder. Playing back a tape When monitoring on the LCD screen You can adjust the angle of the LCD panel by lifting the LCD panel up by 23 degrees [b]. [a] [b] 23° To control the display of the screen indicators Press DISPLAY on the LCD screen. To make the indicators disappear, press DISPLAY again.
Operating Instructions
Page 31
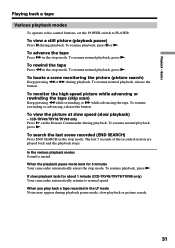
...playback. To resume normal playback, press N. To resume playback, press X or N. When the playback pause mode lasts for about 1 minute (CCD-TRV49/TRV78/TRV98 only) Your camcorder automatically returns to PLAYER. To resume playback, press N. In the various playback modes Sound is muted. To resume normal playback, press N. ... last scene recorded (END SEARCH) Press END SEARCH in the stop mode. Basics Playing back a tape Various playback modes To operate video control buttons, set the POWER switch to normal speed. To view a still picture (playback pause) Press X during playback.
...playback. To resume normal playback, press N. To resume playback, press X or N. When the playback pause mode lasts for about 1 minute (CCD-TRV49/TRV78/TRV98 only) Your camcorder automatically returns to PLAYER. To resume playback, press N. In the various playback modes Sound is muted. To resume normal playback, press N. ... last scene recorded (END SEARCH) Press END SEARCH in the stop mode. Basics Playing back a tape Various playback modes To operate video control buttons, set the POWER switch to normal speed. To view a still picture (playback pause) Press X during playback.

Operating Instructions
Page 32
...VCR to LINE. Set the input selector on the TV screen, we recommend that you power your camcorder from a wall outlet using the AC power adaptor (p. 16). To connect to the operating instructions ... video cable (optional) to the S video jacks on the LCD screen. You can operate the playback control buttons in the same way as when you do not need to connect the yellow (video) plug of ... V OUT Yellow IN S VIDEO Black VIDEO AUDIO If your TV is already connected to a VCR Connect your camcorder to the LINE IN input on the TV screen. Refer to obtain high-quality pictures. Connect your TV has ...
...VCR to LINE. Set the input selector on the TV screen, we recommend that you power your camcorder from a wall outlet using the AC power adaptor (p. 16). To connect to the operating instructions ... video cable (optional) to the S video jacks on the LCD screen. You can operate the playback control buttons in the same way as when you do not need to connect the yellow (video) plug of ... V OUT Yellow IN S VIDEO Black VIDEO AUDIO If your TV is already connected to a VCR Connect your camcorder to the LINE IN input on the TV screen. Refer to obtain high-quality pictures. Connect your TV has ...
Operating Instructions
Page 56
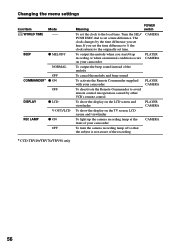
... set here. The clock changes by other VCR's remote control To show the display on the LCD screen and viewfinder PLAYER CAMERA To show the display on your camcorder To output the beep sound instead of the recording * CCD-TRV49/TRV78/TRV98 only 56 Changing the menu settings Icon/... aware of the melody To cancel the melody and beep sound To activate the Remote Commander supplied with your camcorder PLAYER CAMERA To deactivate the Remote Commander to avoid remote control misoperation caused by the time difference you set the time difference to 0, the clock returns to the local ...
... set here. The clock changes by other VCR's remote control To show the display on the LCD screen and viewfinder PLAYER CAMERA To show the display on your camcorder To output the beep sound instead of the recording * CCD-TRV49/TRV78/TRV98 only 56 Changing the menu settings Icon/... aware of the melody To cancel the melody and beep sound To activate the Remote Commander supplied with your camcorder PLAYER CAMERA To deactivate the Remote Commander to avoid remote control misoperation caused by the time difference you set the time difference to 0, the clock returns to the local ...
Operating Instructions
Page 58
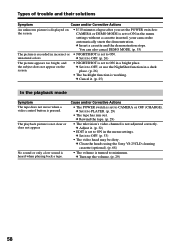
...26) • The backlight function is set to ON in the menu settings without a cassette inserted, your camcorder automatically starts the demonstration. c Insert a cassette and the demonstration stops. c Set it . (p. 25) ...In the playback mode Symptom The tape does not move when a video control button is set to CAMERA or OFF (CHARGE). c Turn up the volume. (p. 29) 58 c Cancel... you set the POWER switch to CAMERA or DEMO MODE is pressed. c Clean the heads using the Sony V8-25CLD cleaning cassette (optional). (p. 68) • The volume is set to PLAYER. (p. 29...
...26) • The backlight function is set to ON in the menu settings without a cassette inserted, your camcorder automatically starts the demonstration. c Insert a cassette and the demonstration stops. c Set it . (p. 25) ...In the playback mode Symptom The tape does not move when a video control button is set to CAMERA or OFF (CHARGE). c Turn up the volume. (p. 29) 58 c Cancel... you set the POWER switch to CAMERA or DEMO MODE is pressed. c Clean the heads using the Sony V8-25CLD cleaning cassette (optional). (p. 68) • The volume is set to PLAYER. (p. 29...

Operating Instructions
Page 73
... and controls Camcorder 1 2 7 3 8 9 4 0 5 qa 6 qs 1 Eyecup (p. 69) 2 Viewfinder lens adjustment lever (p. 24) 3 Eyecup RELEASE knob (p. 69) 4 v (earphone) jack When you purchase accessories with this product is silent. 5 OPEN button (p. 20) 6 SEL/PUSH EXEC dial (p. 35, 51) 7 Power zoom lever (p. 23) 8 BATT RELEASE lever (p. 11) 9 POWER switch (p. 20) q; When purchasing Sony video products, Sony recommends...
... and controls Camcorder 1 2 7 3 8 9 4 0 5 qa 6 qs 1 Eyecup (p. 69) 2 Viewfinder lens adjustment lever (p. 24) 3 Eyecup RELEASE knob (p. 69) 4 v (earphone) jack When you purchase accessories with this product is silent. 5 OPEN button (p. 20) 6 SEL/PUSH EXEC dial (p. 35, 51) 7 Power zoom lever (p. 23) 8 BATT RELEASE lever (p. 11) 9 POWER switch (p. 20) q; When purchasing Sony video products, Sony recommends...
Operating Instructions
Page 74
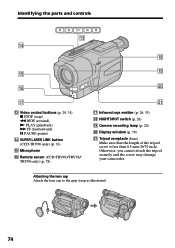
... qf qk ql qg qh w; qj qd Video control buttons (p. 29, 31) x STOP (stop) m REW (rewind) N PLAY (playback) M FF (fastforward) X PAUSE (pause) qf SUPER LASER LINK button (CCD-TRV98 only) (p. 33) qg Microphone qh Remote sensor (CCD-TRV49/TRV78/ TRV98 only) (p. 78) wa qj Infrared rays emitter ...(p. 26, 33) qk NIGHTSHOT switch (p. 26) ql Camera recording lamp (p. 20) w; Otherwise, you cannot attach the tripod securely and the screw may damage your camcorder.
... qf qk ql qg qh w; qj qd Video control buttons (p. 29, 31) x STOP (stop) m REW (rewind) N PLAY (playback) M FF (fastforward) X PAUSE (pause) qf SUPER LASER LINK button (CCD-TRV98 only) (p. 33) qg Microphone qh Remote sensor (CCD-TRV49/TRV78/ TRV98 only) (p. 78) wa qj Infrared rays emitter ...(p. 26, 33) qk NIGHTSHOT switch (p. 26) ql Camera recording lamp (p. 20) w; Otherwise, you cannot attach the tripod securely and the screw may damage your camcorder.

Operating Instructions
Page 75
Identifying the parts and controls ws wd wf wg ws Speaker wd LCD screen (p. 21) wf MENU button (p. 51) wg RESET button (p. 60) wh wj wk wl wh EXPOSURE button (p. 41) wj FADER button (p. 37) wk BACK LIGHT button (p. 25) wl FOCUS button (p. 42) Attaching the shoulder strap Attach the shoulder strap supplied with your camcorder to the hooks for the shoulder strap. Quick Reference 75
Identifying the parts and controls ws wd wf wg ws Speaker wd LCD screen (p. 21) wf MENU button (p. 51) wg RESET button (p. 60) wh wj wk wl wh EXPOSURE button (p. 41) wj FADER button (p. 37) wk BACK LIGHT button (p. 25) wl FOCUS button (p. 42) Attaching the shoulder strap Attach the shoulder strap supplied with your camcorder to the hooks for the shoulder strap. Quick Reference 75

Operating Instructions
Page 76
DATE button (p. 27) ea DISPLAY button (p. 30) es TITLE button (p. 43) ed VOLUME buttons (p. 29) ef LIGHT button (p. 47) eg TIME button (p. 27) eh Viewfinder (p. 24) ej COUNTER RESET button (p. 21) ek CHG lamp (p. 12) el END SEARCH button (p. 28) 76 ej ea ek es ed el e; Identifying the parts and controls ef eg eh e;
DATE button (p. 27) ea DISPLAY button (p. 30) es TITLE button (p. 43) ed VOLUME buttons (p. 29) ef LIGHT button (p. 47) eg TIME button (p. 27) eh Viewfinder (p. 24) ej COUNTER RESET button (p. 21) ek CHG lamp (p. 12) el END SEARCH button (p. 28) 76 ej ea ek es ed el e; Identifying the parts and controls ef eg eh e;

Operating Instructions
Page 77
Identifying the parts and controls r; EJECT button (p. 19) ra Cassette compartment (p. 19) rs Grip strap rd S VIDEO OUT jack (p. 32) Fastening the grip strap Fasten the grip strap firmly. ra rs r; rd rf rg rh rf Built-in light (p. 47) rg A/V OUT jack (p. 32) rh RFU DC OUT (RFU adaptor DC output) jack (p. 32) Quick Reference 77
Identifying the parts and controls r; EJECT button (p. 19) ra Cassette compartment (p. 19) rs Grip strap rd S VIDEO OUT jack (p. 32) Fastening the grip strap Fasten the grip strap firmly. ra rs r; rd rf rg rh rf Built-in light (p. 47) rg A/V OUT jack (p. 32) rh RFU DC OUT (RFU adaptor DC output) jack (p. 32) Quick Reference 77

Operating Instructions
Page 78
...modes 1, 2 and 3 are used to distinguish your camcorder from strong light sources such as on your camcorder function identically to the buttons on your camcorder. 1 4 2 5 3 1 Transmitter Point toward the remote sensor to avoid remote control misoperation. CCD-TRV49/TRV78/TRV98 only The buttons that have the ...covering the sensor of the VCR with black paper. 78 Notes on the Remote Commander •Point the remote sensor away from other Sony VCRs to control your camcorder. 2 Video control buttons (p. 31) 3 DISPLAY button (p. 30) 4 START/STOP button (p. 20) 5 Power zoom button (p. 23) To ...
...modes 1, 2 and 3 are used to distinguish your camcorder from strong light sources such as on your camcorder function identically to the buttons on your camcorder. 1 4 2 5 3 1 Transmitter Point toward the remote sensor to avoid remote control misoperation. CCD-TRV49/TRV78/TRV98 only The buttons that have the ...covering the sensor of the VCR with black paper. 78 Notes on the Remote Commander •Point the remote sensor away from other Sony VCRs to control your camcorder. 2 Video control buttons (p. 31) 3 DISPLAY button (p. 30) 4 START/STOP button (p. 20) 5 Power zoom button (p. 23) To ...

Operating Instructions
Page 79
... and controls Operation indicators LCD screen and Viewfinder Display window 1 qf 2 wd 3 qg 4 40min W T STBY 0:00:00 qh 5 M . TRV68/TRV78...20) This indicator appears in light indicator (p. 47) qf STBY/REC indicator (p. 20)/Video control mode indicator (p. 31) qg Tape counter indicator (p. 25)/ Self-diagnosis display indicator (p. ... 9 w; 0 wa qa qs ws qd Quick Reference 1 Recording mode indicator (p. 54)/ Mirror mode indicator (p. 21) 2 Hi8 format indicator 3 Remaining battery time indicator (p. 25) 4 Exposure indicator (p. 41)/Zoom indicator (p. 23) 5 Fader indicator (p. ...
... and controls Operation indicators LCD screen and Viewfinder Display window 1 qf 2 wd 3 qg 4 40min W T STBY 0:00:00 qh 5 M . TRV68/TRV78...20) This indicator appears in light indicator (p. 47) qf STBY/REC indicator (p. 20)/Video control mode indicator (p. 31) qg Tape counter indicator (p. 25)/ Self-diagnosis display indicator (p. ... 9 w; 0 wa qa qs ws qd Quick Reference 1 Recording mode indicator (p. 54)/ Mirror mode indicator (p. 21) 2 Hi8 format indicator 3 Remaining battery time indicator (p. 25) 4 Exposure indicator (p. 41)/Zoom indicator (p. 23) 5 Fader indicator (p. ...


