Operating Instructions
Page 1
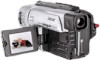
Serial No. CCD-TRV87 CCD-TRV87 CCD-TRV67 CCD-TRV17/TRV37/TRV57 ©1999 Sony Corporation Refer to these numbers whenever you call upon your Sony dealer regarding this manual thoroughly, and retain it for future reference. AC-L Serial No. Model No. CCD-TRV Model No. Record the serial number in the space provided below. Owner's Record The model and serial numbers are located on the bottom. 3-868-323-12 (1) Video Camera Recorder Operating Instructions Before operating the unit, please read this product.
Serial No. CCD-TRV87 CCD-TRV87 CCD-TRV67 CCD-TRV17/TRV37/TRV57 ©1999 Sony Corporation Refer to these numbers whenever you call upon your Sony dealer regarding this manual thoroughly, and retain it for future reference. AC-L Serial No. Model No. CCD-TRV Model No. Record the serial number in the space provided below. Owner's Record The model and serial numbers are located on the bottom. 3-868-323-12 (1) Video Camera Recorder Operating Instructions Before operating the unit, please read this product.
Operating Instructions
Page 3
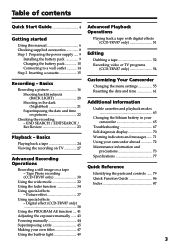
... Playing back a tape 24 Viewing the recording on pictures 22 Checking the recording - Basics Recording a picture 16 Shooting backlit subjects (BACK LIGHT 20 Shooting in your camcorder 65 Troubleshooting 67 Self-diagnosis display 70 Playback - Tape Photo recording (CCD-TRV87 only 30 Using the wide mode 32 Using the fader function 34 Quick Reference Identifying the parts and controls ...... 79 Quick Function Guide 86 Index 87 Using special effects - END SEARCH / EDITSEARCH / Rec Review 23 Customizing Your Camcorder Changing the menu settings 55 Resetting the date and time...
... Playing back a tape 24 Viewing the recording on pictures 22 Checking the recording - Basics Recording a picture 16 Shooting backlit subjects (BACK LIGHT 20 Shooting in your camcorder 65 Troubleshooting 67 Self-diagnosis display 70 Playback - Tape Photo recording (CCD-TRV87 only 30 Using the wide mode 32 Using the fader function 34 Quick Reference Identifying the parts and controls ...... 79 Quick Function Guide 86 Index 87 Using special effects - END SEARCH / EDITSEARCH / Rec Review 23 Customizing Your Camcorder Changing the menu settings 55 Resetting the date and time...
Operating Instructions
Page 6
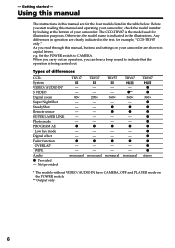
.... Set the POWER switch to indicate that the operation is indicated in capital letters. Types of your camcorder are shown in the illustrations. Not provided TRV17 TRV37 TRV57 TRV67 - - 80 z - - z z - - z** 360× - z z - - z - - As you read through this manual and operating your camcorder, check the model number by looking at the bottom of differences CCDSystem VIDEO/AUDIO IN* S VIDEO Digital zoom Super NightShot SteadyShot Remote sensor SUPER LASER LINK Photo mode PROGRAM...
.... Set the POWER switch to indicate that the operation is indicated in capital letters. Types of your camcorder are shown in the illustrations. Not provided TRV17 TRV37 TRV57 TRV67 - - 80 z - - z z - - z** 360× - z z - - z - - As you read through this manual and operating your camcorder, check the model number by looking at the bottom of differences CCDSystem VIDEO/AUDIO IN* S VIDEO Digital zoom Super NightShot SteadyShot Remote sensor SUPER LASER LINK Photo mode PROGRAM...
Operating Instructions
Page 12
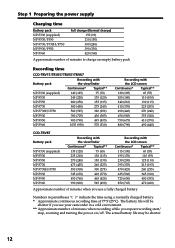
... be shorter if you use your camcorder in a cold environment. ** Approximate number of minutes when you repeat recording start/ stop, zooming and turning the power on/off. The battery life will be shorter. 12 Step 1 Preparing the power supply Charging time Battery pack NP-F330 (supplied) NP-F530/F550 NP-F730/F730H/F750 NP-F930/F950 NP-F960 Full charge (Normal charge) 150 (90) 210...
... be shorter if you use your camcorder in a cold environment. ** Approximate number of minutes when you repeat recording start/ stop, zooming and turning the power on/off. The battery life will be shorter. 12 Step 1 Preparing the power supply Charging time Battery pack NP-F330 (supplied) NP-F530/F550 NP-F730/F730H/F750 NP-F930/F950 NP-F960 Full charge (Normal charge) 150 (90) 210...
Operating Instructions
Page 16
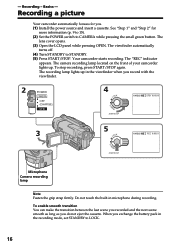
... not eject the cassette. Your camcorder starts recording. The camera recording lamp located on the front of your camcorder lights up in the recording mode, set STANDBY to LOCK. 16 Do not touch the built-in microphone during recording. The viewfinder automatically turns off. (4) Turn STANDBY to CAMERA while pressing the small green button. The lens cover opens. (3) Open the LCD panel while pressing OPEN. The "REC" indicator appears. To stop recording, press START/STOP again...
... not eject the cassette. Your camcorder starts recording. The camera recording lamp located on the front of your camcorder lights up in the recording mode, set STANDBY to LOCK. 16 Do not touch the built-in microphone during recording. The viewfinder automatically turns off. (4) Turn STANDBY to CAMERA while pressing the small green button. The lens cover opens. (3) Open the LCD panel while pressing OPEN. The "REC" indicator appears. To stop recording, press START/STOP again...

Operating Instructions
Page 17
... LCD panel. (3) Eject the cassette. (4) Set the POWER switch to OFF (CHARGE). (5) Remove the battery pack. To start recording, press START/STOP. To set it vertically until it clicks, and swing it faces the other indicators appear mirror-reversed and others are not displayed. •The date appears mirror-reversed when the auto date function is a mirror-image. If you use the LCD screen outdoors in the mirror mode, the viewfinder automatically turns...
... LCD panel. (3) Eject the cassette. (4) Set the POWER switch to OFF (CHARGE). (5) Remove the battery pack. To start recording, press START/STOP. To set it vertically until it clicks, and swing it faces the other indicators appear mirror-reversed and others are not displayed. •The date appears mirror-reversed when the auto date function is a mirror-image. If you use the LCD screen outdoors in the mirror mode, the viewfinder automatically turns...
Operating Instructions
Page 27
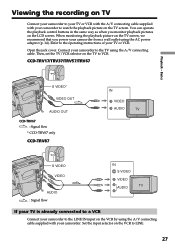
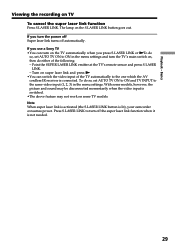
... IN input on the VCR by using the AC power adaptor (p. 14). Viewing the recording on TV Connect your camcorder to your TV or VCR with the A/V connecting cable supplied with your camcorder to watch the playback picture on the TV screen. CCD-TRV17/TRV37/TRV57/TRV67 Playback - Open the jack cover. When monitoring the playback picture on the TV screen, we recommend that you monitor playback pictures on the LCD screen. You can operate the playback control buttons in...
... IN input on the VCR by using the AC power adaptor (p. 14). Viewing the recording on TV Connect your camcorder to your TV or VCR with the A/V connecting cable supplied with your camcorder to watch the playback picture on the TV screen. CCD-TRV17/TRV37/TRV57/TRV67 Playback - Open the jack cover. When monitoring the playback picture on the TV screen, we recommend that you monitor playback pictures on the LCD screen. You can operate the playback control buttons in...
Operating Instructions
Page 28
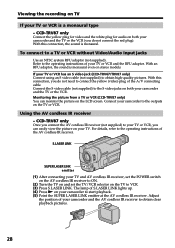
... or VCR without Video/Audio input jacks Use an NTSC system RFU adaptor (not supplied). Refer to the operating instructions of your camcorder to the outputs on the TV or VCR. Monitoring the picture from a TV or VCR (CCD-TRV87 only) You can easily view the picture on your camcorder and the AV cordless IR receiver to obtain clear playback pictures. 28 With this connection, you do not connect the red plug). Connect the S video cable...
... or VCR without Video/Audio input jacks Use an NTSC system RFU adaptor (not supplied). Refer to the operating instructions of your camcorder to the outputs on the TV or VCR. Monitoring the picture from a TV or VCR (CCD-TRV87 only) You can easily view the picture on your camcorder and the AV cordless IR receiver to obtain clear playback pictures. 28 With this connection, you do not connect the red plug). Connect the S video cable...
Operating Instructions
Page 29
... TV INPUT to turn on some models, however, the picture and sound may be disconnected momentarily when the video input is connected. To do either of the TV automatically to ON in the menu settings. If you turn the power off Super laser link turns off the super laser link function when it is lit), your camcorder consumes power. If you use a Sony TV •You can switch the video input...
... TV INPUT to turn on some models, however, the picture and sound may be disconnected momentarily when the video input is connected. To do either of the TV automatically to ON in the menu settings. If you turn the power off Super laser link turns off the super laser link function when it is lit), your camcorder consumes power. If you use a Sony TV •You can switch the video input...
Operating Instructions
Page 33
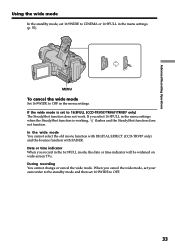
... 16:9FULL (CCD-TRV57/TRV67/TRV87 only) The SteadyShot function does not work. Date or time indicator When you select 16:9FULL in the menu settings. During recording You cannot change or cancel the wide mode. In the wide mode You cannot select the old movie function with DIGITAL EFFECT (CCD-TRV87 only) and the bounce function with FADER. Advanced Recording Operations Using the wide mode In the standby mode, set 16:9WIDE...
... 16:9FULL (CCD-TRV57/TRV67/TRV87 only) The SteadyShot function does not work. Date or time indicator When you select 16:9FULL in the menu settings. During recording You cannot change or cancel the wide mode. In the wide mode You cannot select the old movie function with DIGITAL EFFECT (CCD-TRV87 only) and the bounce function with FADER. Advanced Recording Operations Using the wide mode In the standby mode, set 16:9WIDE...
Operating Instructions
Page 39
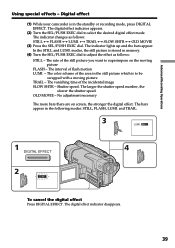
... memory. (4) Turn the SEL/PUSH EXEC dial to be swapped with a moving picture FLASH - The color scheme of flash motion LUMI. - Shutter speed. OLD MOVIE - and TRAIL. 3 LUMI. 1 4 DIGITAL EFFECT 2 LUMI. The digital effect indicator appears. (2) Turn the SEL/PUSH EXEC dial to superimpose on screen, the stronger the digital effect. The indicator lights up and the bars appear. The bars appear in the standby or recording mode...
... memory. (4) Turn the SEL/PUSH EXEC dial to be swapped with a moving picture FLASH - The color scheme of flash motion LUMI. - Shutter speed. OLD MOVIE - and TRAIL. 3 LUMI. 1 4 DIGITAL EFFECT 2 LUMI. The digital effect indicator appears. (2) Turn the SEL/PUSH EXEC dial to superimpose on screen, the stronger the digital effect. The indicator lights up and the bars appear. The bars appear in the standby or recording mode...
Operating Instructions
Page 49
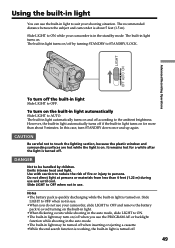
...;The battery pack is quickly discharging while the built-in light is turned on for a while after the light is turned off . LIGHT OFF AUTO ON Advanced Recording Operations Using the built-in light You can use and until cool. Emits intense heat and light. Slide LIGHT to OFF when not in use the PROGRAM AE or backlight function while shooting in the auto mode. •The built-in light may turn...
...;The battery pack is quickly discharging while the built-in light is turned on for a while after the light is turned off . LIGHT OFF AUTO ON Advanced Recording Operations Using the built-in light You can use and until cool. Emits intense heat and light. Slide LIGHT to OFF when not in use the PROGRAM AE or backlight function while shooting in the auto mode. •The built-in light may turn...
Operating Instructions
Page 52
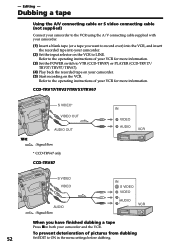
... menu settings before dubbing. Dubbing a tape Using the A/V connecting cable or S video connecting cable (not supplied) Connect your VCR for more information. CCD-TRV17/TRV37/TRV57/TRV67 S VIDEO* VIDEO OUT AUDIO OUT 76VRT-DCC : Signal flow * CCD-TRV67 only CCD-TRV87 IN VIDEO AUDIO S VIDEO VIDEO AUDIO : Signal flow IN S VIDEO VIDEO AUDIO When you want to record over) into the VCR, and insert the recorded tape into your camcorder. (2) Set the input selector on the VCR to VTR (CCD-TRV87) or PLAYER (CCD-TRV17/ TRV37/TRV57/TRV67). (4) Play...
... menu settings before dubbing. Dubbing a tape Using the A/V connecting cable or S video connecting cable (not supplied) Connect your VCR for more information. CCD-TRV17/TRV37/TRV57/TRV67 S VIDEO* VIDEO OUT AUDIO OUT 76VRT-DCC : Signal flow * CCD-TRV67 only CCD-TRV87 IN VIDEO AUDIO S VIDEO VIDEO AUDIO : Signal flow IN S VIDEO VIDEO AUDIO When you want to record over) into the VCR, and insert the recorded tape into your camcorder. (2) Set the input selector on the VCR to VTR (CCD-TRV87) or PLAYER (CCD-TRV17/ TRV37/TRV57/TRV67). (4) Play...
Operating Instructions
Page 56
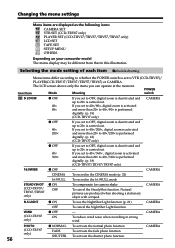
... SET (CCD-TRV17/TRV37/TRV57/TRV67 only) LCD SET TAPE SET SETUP MENU OTHERS Depending on your camcorder model The menu display may be different from that in this illustration. If you set to OFF, digital zoom is deactivated and up to 20× is performed digitally. (p. 18) (CCD-TRV37 only) z OFF 40× 360× If you can operate at the moment. CAMERA N.S.LIGHT z ON To use the NightShot Light function (p. 21) CAMERA OFF...
... SET (CCD-TRV17/TRV37/TRV57/TRV67 only) LCD SET TAPE SET SETUP MENU OTHERS Depending on your camcorder model The menu display may be different from that in this illustration. If you set to OFF, digital zoom is deactivated and up to 20× is performed digitally. (p. 18) (CCD-TRV37 only) z OFF 40× 360× If you can operate at the moment. CAMERA N.S.LIGHT z ON To use the NightShot Light function (p. 21) CAMERA OFF...
Operating Instructions
Page 58
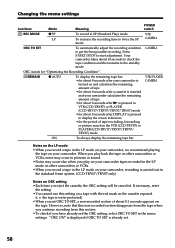
... your camcorder, recording is already set. 58 CAMERA ORC stands for the period of tape • for about 8 seconds after DISPLAY is pressed to display the screen indicators • for "Optimizing the Recording Condition". e. Changing the menu settings Icon/item Mode Meaning POWER switch REC MODE z SP LP To record in the LP mode on the cassette exposed. (i. When you play back the tape on other camcorders or VCRs, noise may occur in pictures or sound...
... your camcorder, recording is already set. 58 CAMERA ORC stands for the period of tape • for about 8 seconds after DISPLAY is pressed to display the screen indicators • for "Optimizing the Recording Condition". e. Changing the menu settings Icon/item Mode Meaning POWER switch REC MODE z SP LP To record in the LP mode on the cassette exposed. (i. When you play back the tape on other camcorders or VCRs, noise may occur in pictures or sound...
Operating Instructions
Page 67
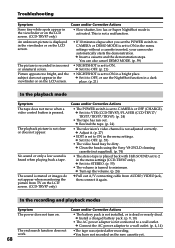
... Corrective Actions • The POWER switch is set to troubleshoot the problem. c Set it to OFF in the viewfinder, the self-diagnosis display function has worked. c Remove the cassette and leave your camcorder has been in the CAMERA mode, your camcorder for more than 5 minutes. c Set it . (p. 38) • The video heads may be dirty. c Clean the heads using your Sony dealer or local authorized Sony service facility. c Close the LCD panel. (p. 17) • The...
... Corrective Actions • The POWER switch is set to troubleshoot the problem. c Set it to OFF in the viewfinder, the self-diagnosis display function has worked. c Remove the cassette and leave your camcorder has been in the CAMERA mode, your camcorder for more than 5 minutes. c Set it . (p. 38) • The video heads may be dirty. c Clean the heads using your Sony dealer or local authorized Sony service facility. c Close the LCD panel. (p. 17) • The...
Operating Instructions
Page 68
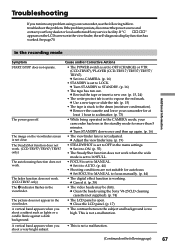
... search function does not work. 68 •The tape was ejected after you set the POWER switch to CAMERA or DEMO MODE is set to ON in a bright place. You can also cancel DEMO MODE. (p. 59) The picture is recorded in incorrect • NIGHTSHOT is set to CAMERA or OFF (CHARGE). c Turn up the volume. (p. 24) c Pull out A/V connecting cable from TV on the new cassette yet. place. (p. 21) In the playback mode Symptom The tape...
... search function does not work. 68 •The tape was ejected after you set the POWER switch to CAMERA or DEMO MODE is set to ON in a bright place. You can also cancel DEMO MODE. (p. 59) The picture is recorded in incorrect • NIGHTSHOT is set to CAMERA or OFF (CHARGE). c Turn up the volume. (p. 24) c Pull out A/V connecting cable from TV on the new cassette yet. place. (p. 21) In the playback mode Symptom The tape...
Operating Instructions
Page 71
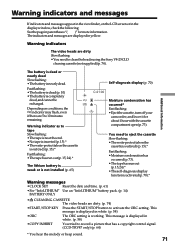
...* Fast flashing: • Eject the cassette, turn off your camcorder, and leave it for about 1 hour with the cassette compartment open (p. 73). This message is activated (p. 70).* Warning messages •CLOCK SET Reset the date and time. (p. 61) •For "InfoLITHIUM" Use an "InfoLITHIUM" battery pack. (p. 14) BATTERY ONLY • CLEANING CASSETTE The video heads are 5 to activate the ORC setting. The indicators and messages are dirty Slow flashing: •You need to eject the cassette Slow flashing: •...
...* Fast flashing: • Eject the cassette, turn off your camcorder, and leave it for about 1 hour with the cassette compartment open (p. 73). This message is activated (p. 70).* Warning messages •CLOCK SET Reset the date and time. (p. 61) •For "InfoLITHIUM" Use an "InfoLITHIUM" battery pack. (p. 14) BATTERY ONLY • CLEANING CASSETTE The video heads are 5 to activate the ORC setting. The indicators and messages are dirty Slow flashing: •You need to eject the cassette Slow flashing: •...
Operating Instructions
Page 77
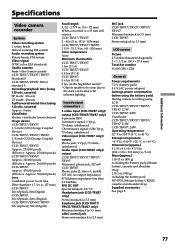
... the battery pack NP-F330, lithium battery CR2025, cassette and shoulder strap Supplied accessories See page 8. 77 Additional Information Specifications Video camera recorder System Video recording system 2 rotary heads Helical scanning FM system Audio recording system Rotary heads, FM system Video signal NTSC color, EIA standards Usable cassette 8mm video format cassette CCD-TRV17/TRV37/TRV57: Standard 8 CCD-TRV67/TRV87: Hi8 or standard 8 Recording/playback time (using 120 min. cassette) Approx. 5 min. cassette) SP mode: 2 hours LP mode: 4 hours Fastforward/rewind time (using 120...
... the battery pack NP-F330, lithium battery CR2025, cassette and shoulder strap Supplied accessories See page 8. 77 Additional Information Specifications Video camera recorder System Video recording system 2 rotary heads Helical scanning FM system Audio recording system Rotary heads, FM system Video signal NTSC color, EIA standards Usable cassette 8mm video format cassette CCD-TRV17/TRV37/TRV57: Standard 8 CCD-TRV67/TRV87: Hi8 or standard 8 Recording/playback time (using 120 min. cassette) Approx. 5 min. cassette) SP mode: 2 hours LP mode: 4 hours Fastforward/rewind time (using 120...
Operating Instructions
Page 87
... sound 57 Manual focus 44 Menu settings 55 Mirror mode 17 Moisture condensation .......... 73 Monaural 64 MONOTONE 34 Mosaic fader 34 NIGHTSHOT 21 Normal charge 10 NTSC system 72 O, P, Q OLD MOVIE 38 Operation indicators 85 ORC 58 OVERLAP 34 Picture effect 37 Picture search 26 Playback pause 26 Power sources (house current 14 (car battery 14 (battery pack 9 Power zoom 18 PROGRAM AE 41 R Rec Review 23 Recording and playback systems 63 Recording mode 58 Recording time...
... sound 57 Manual focus 44 Menu settings 55 Mirror mode 17 Moisture condensation .......... 73 Monaural 64 MONOTONE 34 Mosaic fader 34 NIGHTSHOT 21 Normal charge 10 NTSC system 72 O, P, Q OLD MOVIE 38 Operation indicators 85 ORC 58 OVERLAP 34 Picture effect 37 Picture search 26 Playback pause 26 Power sources (house current 14 (car battery 14 (battery pack 9 Power zoom 18 PROGRAM AE 41 R Rec Review 23 Recording and playback systems 63 Recording mode 58 Recording time...


