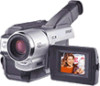

Operating Instructions (primary manual)
Page 2
.... Congratulations on your authority to constitute a risk of uninsulated "dangerous voltage" within the product's enclosure that may be producing home video that any changes or modifications not expressly approved in this manual could void your purchase of important operating and maintenance (servicing) instructions...In some areas the disposal of lithium ion batteries in household or business trash may be of sufficient magnitude to operate this Sony Handycam VisionTM camcorder. WARNING To prevent fire or shock hazard, do not expose the unit to use. This symbol is very easy to ...
.... Congratulations on your authority to constitute a risk of uninsulated "dangerous voltage" within the product's enclosure that may be producing home video that any changes or modifications not expressly approved in this manual could void your purchase of important operating and maintenance (servicing) instructions...In some areas the disposal of lithium ion batteries in household or business trash may be of sufficient magnitude to operate this Sony Handycam VisionTM camcorder. WARNING To prevent fire or shock hazard, do not expose the unit to use. This symbol is very easy to ...
Operating Instructions (primary manual)
Page 5
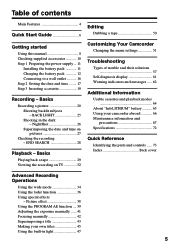
... 41 Focusing manually 42 Superimposing a title 43 Making your camcorder abroad 66 Maintenance information and precautions 67 Specifications 72 Quick Reference Identifying the parts and controls ...... 73 Index Back cover Advanced Recording Operations Using the wide mode 34 Using the fader function ... Using special effects - Basics Playing back a tape 29 Viewing the recording on pictures 27 Checking the recording - NightShot 26 Superimposing the date and time on TV 32 Customizing Your Camcorder Changing the menu settings 51 Troubleshooting Types of contents Main Features 4 ...
... 41 Focusing manually 42 Superimposing a title 43 Making your camcorder abroad 66 Maintenance information and precautions 67 Specifications 72 Quick Reference Identifying the parts and controls ...... 73 Index Back cover Advanced Recording Operations Using the wide mode 34 Using the fader function ... Using special effects - Basics Playing back a tape 29 Viewing the recording on pictures 27 Checking the recording - NightShot 26 Superimposing the date and time on TV 32 Customizing Your Camcorder Changing the menu settings 51 Troubleshooting Types of contents Main Features 4 ...
Operating Instructions (primary manual)
Page 6
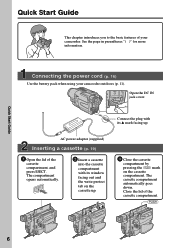
... write-protect tab on the cassette compartment. The cassette compartment automatically goes down. Connecting the power cord (p. 16) Use the battery pack when using your camcorder. Connect the plug with its v mark facing up . 3 Close the cassette compartment by pressing the mark on the cassette up . Quick Start Guide ...6 Open the DC IN jack cover. Quick Start Guide This chapter introduces you to the basic features of your camcorder outdoors (p. 11). See the page in parentheses "( )" for more information. The compartment opens automatically.
... write-protect tab on the cassette compartment. The cassette compartment automatically goes down. Connecting the power cord (p. 16) Use the battery pack when using your camcorder. Connect the plug with its v mark facing up . 3 Close the cassette compartment by pressing the mark on the cassette up . Quick Start Guide ...6 Open the DC IN jack cover. Quick Start Guide This chapter introduces you to the basic features of your camcorder outdoors (p. 11). See the page in parentheses "( )" for more information. The compartment opens automatically.
Operating Instructions (primary manual)
Page 7
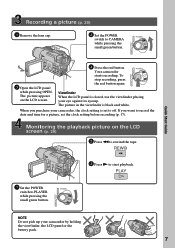
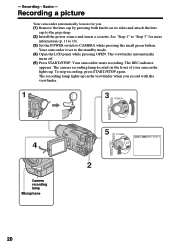
... is set the clock setting before recording (p. 17). Monitoring the playback picture on the LCD screen. 4 Press the red button. OFF (CHARGE) PLAYER POWER CAMERA NOTE Do not pick up your eye against its eyecup. Your camcorder starts recording. To stop recording, press the red button again. ...If you purchase your camcorder, the clock setting is black and white. When you want to...
... is set the clock setting before recording (p. 17). Monitoring the playback picture on the LCD screen. 4 Press the red button. OFF (CHARGE) PLAYER POWER CAMERA NOTE Do not pick up your eye against its eyecup. Your camcorder starts recording. To stop recording, press the red button again. ...If you purchase your camcorder, the clock setting is black and white. When you want to...

Operating Instructions (primary manual)
Page 8
...TRV58 - 460× - - z TRV78 z 560× - As you need an NTSC system-based TV. 8 e.g. Not provided TRV49 z 450× - - Getting started - TRV68 - 460× - To view your camcorder are shown in the illustrations. - Before you start reading this manual, buttons and settings on your recordings...model name is the model used for illustration purposes. Set the POWER switch to CAMERA. Types of your camcorder. z TRV88 - 560× - Any differences in operation are for example, "CCD-TRV98 only." Using this manual are clearly indicated in the text, for the six...
...TRV58 - 460× - - z TRV78 z 560× - As you need an NTSC system-based TV. 8 e.g. Not provided TRV49 z 450× - - Getting started - TRV68 - 460× - To view your camcorder are shown in the illustrations. - Before you start reading this manual, buttons and settings on your recordings...model name is the model used for illustration purposes. Set the POWER switch to CAMERA. Types of your camcorder. z TRV88 - 560× - Any differences in operation are for example, "CCD-TRV98 only." Using this manual are clearly indicated in the text, for the six...
Operating Instructions (primary manual)
Page 9
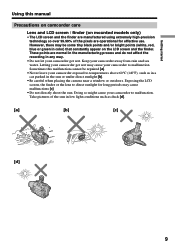
... are normal in the manufacturing process and do not affect the recording in the sun or under direct sunlight [b]. • Be careful when placing the camera near a window or outdoors. Keep your camcorder to malfunction. These points are operational for long periods may be... repaired [a]. • Never leave your camcorder to malfunction. Sometimes this manual Precautions on camcorder care Lens and LCD screen / finder...
... are normal in the manufacturing process and do not affect the recording in the sun or under direct sunlight [b]. • Be careful when placing the camera near a window or outdoors. Keep your camcorder to malfunction. These points are operational for long periods may be... repaired [a]. • Never leave your camcorder to malfunction. Sometimes this manual Precautions on camcorder care Lens and LCD screen / finder...
Operating Instructions (primary manual)
Page 10
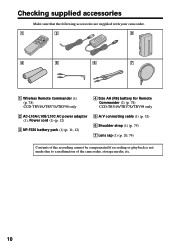
...that the following accessories are supplied with your camcorder. 1 2 3 4 5 6 7 1 Wireless Remote Commander (1) (p. 78) CCD-TRV49/TRV78/TRV98 only 4 Size AA (R6) battery for Remote Commander (2) (p. 78) CCD-TRV49/TRV78/TRV98 only 2 AC-L10A/L10B.../L10C AC power adaptor (1), Power cord (1) (p. 12) 3 NP-F330 battery pack (1) (p. 11, 12) 5 A/V connecting cable (1) (p. 32) 6 Shoulder strap (1) (p. 75) 7 Lens cap (1) (p. 20, 74) Contents of the recording cannot be compensated if recording or playback is not made due to a malfunction of the camcorder...
...that the following accessories are supplied with your camcorder. 1 2 3 4 5 6 7 1 Wireless Remote Commander (1) (p. 78) CCD-TRV49/TRV78/TRV98 only 4 Size AA (R6) battery for Remote Commander (2) (p. 78) CCD-TRV49/TRV78/TRV98 only 2 AC-L10A/L10B.../L10C AC power adaptor (1), Power cord (1) (p. 12) 3 NP-F330 battery pack (1) (p. 11, 12) 5 A/V connecting cable (1) (p. 32) 6 Shoulder strap (1) (p. 75) 7 Lens cap (1) (p. 20, 74) Contents of the recording cannot be compensated if recording or playback is not made due to a malfunction of the camcorder...
Operating Instructions (primary manual)
Page 11
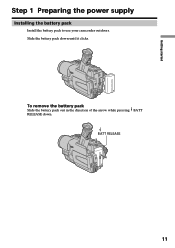
To remove the battery pack Slide the battery pack out in the direction of the arrow while pressing BATT RELEASE down until it clicks. Getting started Step 1 Preparing the power supply Installing the battery pack Install the battery pack to use your camcorder outdoors. BATT RELEASE 11 Slide the battery pack down .
To remove the battery pack Slide the battery pack out in the direction of the arrow while pressing BATT RELEASE down until it clicks. Getting started Step 1 Preparing the power supply Installing the battery pack Install the battery pack to use your camcorder outdoors. BATT RELEASE 11 Slide the battery pack down .
Operating Instructions (primary manual)
Page 12
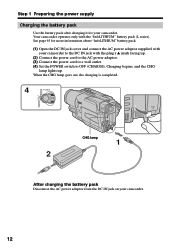
When the CHG lamp goes out, the charging is completed. 4 POWER PLAYER OFF (CHARGE) CAMERA CHG lamp 1 2 After charging the battery pack Disconnect the AC power adaptor from the DC IN jack on your camcorder. 12 Charging begins, and the CHG lamp lights up . (2) Connect the power cord to ... (4) Set the POWER switch to the DC IN jack with the "InfoLITHIUM" battery pack (L series). Your camcorder operates only with the plug's v mark facing up . See page 65 for your camcorder. Step 1 Preparing the power supply Charging the battery pack Use the battery pack after charging it for more ...
When the CHG lamp goes out, the charging is completed. 4 POWER PLAYER OFF (CHARGE) CAMERA CHG lamp 1 2 After charging the battery pack Disconnect the AC power adaptor from the DC IN jack on your camcorder. 12 Charging begins, and the CHG lamp lights up . (2) Connect the power cord to ... (4) Set the POWER switch to the DC IN jack with the "InfoLITHIUM" battery pack (L series). Your camcorder operates only with the plug's v mark facing up . See page 65 for your camcorder. Step 1 Preparing the power supply Charging the battery pack Use the battery pack after charging it for more ...

Operating Instructions (primary manual)
Page 14
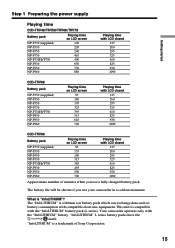
.../ stop, zooming and turning the power on/off. Step 1 Preparing the power supply Recording time CCD-TRV49/TRV58/TRV68/TRV78 Battery pack Recording with the viewfinder Continuous* Typical** NP-F330 (supplied) 140 75 NP-F530 245 135 NP-F550 280 155 NP-F730 500 ...385 210 495 270 590 325 700 385 Approximate number of minutes when you use your camcorder in a cold environment. ** Approximate number of minutes when recording while you use a fully charged battery pack * Approximate continuous recording time at 25°C (77°F). The battery life will be shorter. 14
.../ stop, zooming and turning the power on/off. Step 1 Preparing the power supply Recording time CCD-TRV49/TRV58/TRV68/TRV78 Battery pack Recording with the viewfinder Continuous* Typical** NP-F330 (supplied) 140 75 NP-F530 245 135 NP-F550 280 155 NP-F730 500 ...385 210 495 270 590 325 700 385 Approximate number of minutes when you use your camcorder in a cold environment. ** Approximate number of minutes when recording while you use a fully charged battery pack * Approximate continuous recording time at 25°C (77°F). The battery life will be shorter. 14
Operating Instructions (primary manual)
Page 15
...825 930 1090 Approximate number of Sony Corporation. 15 "InfoLITHIUM" L series battery packs have the mark. The "InfoLITHIUM" is a trademark of minutes when you use a fully charged battery pack The battery life will be shorter if you use your camcorder in a cold environment. What is... compatible with compatible electronic equipment. Getting started Step 1 Preparing the power supply Playing time CCD-TRV49/TRV58/TRV68/TRV78 Battery pack NP-F330 (supplied) NP-F530 NP-F550 ...
...825 930 1090 Approximate number of Sony Corporation. 15 "InfoLITHIUM" L series battery packs have the mark. The "InfoLITHIUM" is a trademark of minutes when you use a fully charged battery pack The battery life will be shorter if you use your camcorder in a cold environment. What is... compatible with compatible electronic equipment. Getting started Step 1 Preparing the power supply Playing time CCD-TRV49/TRV58/TRV68/TRV78 Battery pack NP-F330 (supplied) NP-F530 NP-F550 ...

Operating Instructions (primary manual)
Page 16
Using a car battery Use Sony DC Adaptor/Charger (optional). 16 This means that you use your camcorder for a long time, we recommend that the battery pack cannot supply any trouble ... Open the DC IN jack cover, and connect the AC power adaptor to the DC IN jack on your camcorder. •The DC IN jack has "source priority". Notes •The AC power adaptor can supply power even... if the battery pack is attached to your camcorder with this unit, disconnect the plug from the wall outlet as soon as it from a wall outlet using...
Using a car battery Use Sony DC Adaptor/Charger (optional). 16 This means that you use your camcorder for a long time, we recommend that the battery pack cannot supply any trouble ... Open the DC IN jack cover, and connect the AC power adaptor to the DC IN jack on your camcorder. •The DC IN jack has "source priority". Notes •The AC power adaptor can supply power even... if the battery pack is attached to your camcorder with this unit, disconnect the plug from the wall outlet as soon as it from a wall outlet using...
Operating Instructions (primary manual)
Page 17
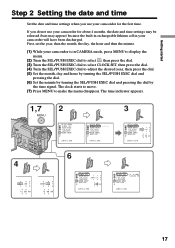
...:00 PM [ MENU ] : END 17 Getting started Step 2 Setting the date and time Set the date and time settings when you do not use your camcorder will have been discharged. The clock starts to move. (7) Press MENU to adjust the desired year, then press the dial. (5) Set the month, day and... EXEC dial and pressing the dial by the time signal. If you use your camcorder for about 4 months, the date and time settings may be released (bars may appear) because the built-in rechargeable lithium cell in CAMERA mode, press MENU to display the menu. (2) Turn the SEL/PUSH EXEC dial to...
...:00 PM [ MENU ] : END 17 Getting started Step 2 Setting the date and time Set the date and time settings when you do not use your camcorder will have been discharged. The clock starts to move. (7) Press MENU to adjust the desired year, then press the dial. (5) Set the month, day and... EXEC dial and pressing the dial by the time signal. If you use your camcorder for about 4 months, the date and time settings may be released (bars may appear) because the built-in rechargeable lithium cell in CAMERA mode, press MENU to display the menu. (2) Turn the SEL/PUSH EXEC dial to...
Operating Instructions (primary manual)
Page 18
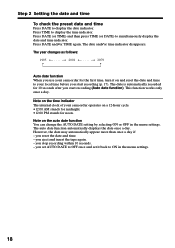
... date function). The date is automatically recorded for noon. Note on a 12-hour cycle. •12:00 AM stands for midnight. •12:00 PM stands for 10 seconds after you use your camcorder for the first time, turn it back to ON in the menu settings. However, the date may ...automatically appear more than once a day if: - The year changes as follows: 1995 T t 2001 T t 2079 Auto date function When you start recording (p. 17). you set AUTO DATE to...
... date function). The date is automatically recorded for noon. Note on a 12-hour cycle. •12:00 AM stands for midnight. •12:00 PM stands for 10 seconds after you use your camcorder for the first time, turn it back to ON in the menu settings. However, the date may ...automatically appear more than once a day if: - The year changes as follows: 1995 T t 2001 T t 2079 Auto date function When you start recording (p. 17). you set AUTO DATE to...
Operating Instructions (primary manual)
Page 19
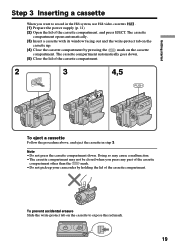
...opens automatically. (3) Insert a cassette with its window facing out and the write-protect tab on the cassette up your camcorder by pressing the mark on the cassette to record in step 3. Note • Do not press the cassette compartment down . (5) Close the lid of the cassette... compartment. 2 3 EJECT 4,5 To eject a cassette Follow the procedure above, and eject the cassette in the Hi8 system, use Hi8 video cassettes . (1) Prepare ...
...opens automatically. (3) Insert a cassette with its window facing out and the write-protect tab on the cassette up your camcorder by pressing the mark on the cassette to record in step 3. Note • Do not press the cassette compartment down . (5) Close the lid of the cassette... compartment. 2 3 EJECT 4,5 To eject a cassette Follow the procedure above, and eject the cassette in the Hi8 system, use Hi8 video cassettes . (1) Prepare ...
Operating Instructions (primary manual)
Page 20
... lights up . See "Step 1" to "Step 3" for you record with the viewfinder. 1 3 POWER PLAYER OFF (CHARGE) CAMERA 4 Camera recording lamp Microphone PLAYER 5 POWER 40min REC 0:00:01 OFF (CHARGE) CAMERA 2 20 The camera recording lamp located on the front of your camcorder lights up in the viewfinder when you . (1) Remove the lens cap by pressing both knobs on...
... lights up . See "Step 1" to "Step 3" for you record with the viewfinder. 1 3 POWER PLAYER OFF (CHARGE) CAMERA 4 Camera recording lamp Microphone PLAYER 5 POWER 40min REC 0:00:01 OFF (CHARGE) CAMERA 2 20 The camera recording lamp located on the front of your camcorder lights up in the viewfinder when you . (1) Remove the lens cap by pressing both knobs on...
Operating Instructions (primary manual)
Page 21
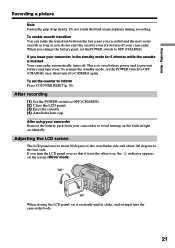
... not touch the built-in the standby mode for 5 minutes while the cassette is to save battery power and to CAMERA again. This is inserted Your camcorder automatically turns off your camcorder to OFF (CHARGE) once, then turn the LCD panel over so that it faces the other way, the indicator ...closing the LCD panel, set the counter to the lens side. When you turn off . If you leave your camcorder in microphone during recording. If you turn it into the camcorder body. 21 Adjusting the LCD screen The LCD panel moves about 90 degrees to the viewfinder side and about 180 degrees...
... not touch the built-in the standby mode for 5 minutes while the cassette is to save battery power and to CAMERA again. This is inserted Your camcorder automatically turns off your camcorder to OFF (CHARGE) once, then turn the LCD panel over so that it faces the other way, the indicator ...closing the LCD panel, set the counter to the lens side. When you turn off . If you leave your camcorder in microphone during recording. If you turn it into the camcorder body. 21 Adjusting the LCD screen The LCD panel moves about 90 degrees to the viewfinder side and about 180 degrees...
Operating Instructions (primary manual)
Page 22
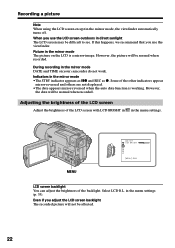
... When using the LCD screen except in the mirror mode The picture on your camcorder do not work. However, the date will be normal when recorded. LCD SET LCD BR I GHT MENU [ MENU ] : END LCD screen backlight You can adjust the brightness of the other indicators appear mirror-reversed and ... turns off. If this happens, we recommend that you use the LCD screen outdoors in direct sunlight The LCD screen may be affected. 22 During recording in the menu settings (p. 53). in the mirror mode DATE and TIME on the LCD is working. Indicators in the menu settings. Even if...
... When using the LCD screen except in the mirror mode The picture on your camcorder do not work. However, the date will be normal when recorded. LCD SET LCD BR I GHT MENU [ MENU ] : END LCD screen backlight You can adjust the brightness of the other indicators appear mirror-reversed and ... turns off. If this happens, we recommend that you use the LCD screen outdoors in direct sunlight The LCD screen may be affected. 22 During recording in the menu settings (p. 53). in the mirror mode DATE and TIME on the LCD is working. Indicators in the menu settings. Even if...
Operating Instructions (primary manual)
Page 26
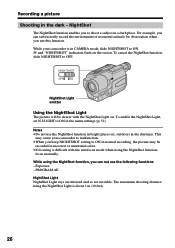
... Shooting in the daytime). While using the NightShot Light is in CAMERA mode, slide NIGHTSHOT to ON in a dark place. NightShot The NightShot function enables you to ON in normal recording, the picture may cause your camcorder is about 3 m (10 feet). 26 To cancel the NightShot function, slide NIGHTSHOT to OFF. and "NIGHTSHOT...
... Shooting in the daytime). While using the NightShot Light is in CAMERA mode, slide NIGHTSHOT to ON in a dark place. NightShot The NightShot function enables you to ON in normal recording, the picture may cause your camcorder is about 3 m (10 feet). 26 To cancel the NightShot function, slide NIGHTSHOT to OFF. and "NIGHTSHOT...
Operating Instructions (primary manual)
Page 27
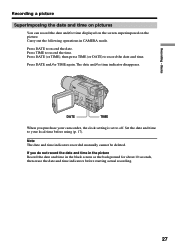
... the picture Record the date and time in CAMERA mode. If you purchase your local time before starting actual recording. 27 Press DATE (or TIME), then press TIME (or DATE) to off. Press DATE and/or TIME again. Press TIME to record the date. Set the date and time to your camcorder, the clock... setting is set to record the ...
... the picture Record the date and time in CAMERA mode. If you purchase your local time before starting actual recording. 27 Press DATE (or TIME), then press TIME (or DATE) to off. Press DATE and/or TIME again. Press TIME to record the date. Set the date and time to your camcorder, the clock... setting is set to record the ...


