Operating Instructions
Page 1
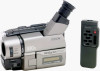
Refer to these numbers whenever you call upon your Sony dealer regarding this manual thoroughly, and retain it for future reference. AC-L Serial No. Model No. CCD-TRV87 CCD-TRV87 CCD-TRV67 CCD-TRV17/TRV37/TRV57 ©1999 Sony Corporation CCD-TRV Model No. Serial No. 3-868-323-12 (1) Video Camera Recorder Operating Instructions Before operating the unit, please read this product. Record the serial number in the space provided below. Owner's Record The model and serial numbers are located on the bottom.
Refer to these numbers whenever you call upon your Sony dealer regarding this manual thoroughly, and retain it for future reference. AC-L Serial No. Model No. CCD-TRV87 CCD-TRV87 CCD-TRV67 CCD-TRV17/TRV37/TRV57 ©1999 Sony Corporation CCD-TRV Model No. Serial No. 3-868-323-12 (1) Video Camera Recorder Operating Instructions Before operating the unit, please read this product. Record the serial number in the space provided below. Owner's Record The model and serial numbers are located on the bottom.
Operating Instructions
Page 5
...green button. (CHARGE) VTR STA 3 Turn STANDBY to rewind the tape. NDBY START/STOP Viewfinder When the LCD panel is black and white. POWER CAMERA OFF (CHARGE) VTR 2 Press m to STANDBY. PLAY Quick Start Guide NOTE Do not pick up your eye against its eyecup. LOCK NDBY START... playback picture on the LCD screen. REW 3 Press N to VTR (CCD-TRV87) or PLAYER (CCDTRV17/TRV37/ TRV57/TRV67) while pressing the small green button. The picture in the viewfinder is closed, use the viewfinder placing your camcorder by holding the viewfinder, the LCD panel or the battery pack. 5 Your...
...green button. (CHARGE) VTR STA 3 Turn STANDBY to rewind the tape. NDBY START/STOP Viewfinder When the LCD panel is black and white. POWER CAMERA OFF (CHARGE) VTR 2 Press m to STANDBY. PLAY Quick Start Guide NOTE Do not pick up your eye against its eyecup. LOCK NDBY START... playback picture on the LCD screen. REW 3 Press N to VTR (CCD-TRV87) or PLAYER (CCDTRV17/TRV37/ TRV57/TRV67) while pressing the small green button. The picture in the viewfinder is closed, use the viewfinder placing your camcorder by holding the viewfinder, the LCD panel or the battery pack. 5 Your...
Operating Instructions
Page 6
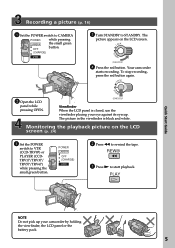
... - - 200 z - - z z - - z - - z - - Not provided TRV17 TRV37 TRV57 TRV67 - - 80 z - - monaural - - 360× - monaural - The CCD-TRV87 is the model used for example, "CCD-TRV87 only." When you carry out an operation, you read through this manual are clearly indicated in the... table below. z - - z - - z** 360× - monaural TRV87 z z 360× z z z z z z z z z z z stereo * The models without VIDEO/AUDIO IN have CAMERA, OFF and PLAYER mode on your camcorder...
... - - 200 z - - z z - - z - - z - - Not provided TRV17 TRV37 TRV57 TRV67 - - 80 z - - monaural - - 360× - monaural - The CCD-TRV87 is the model used for example, "CCD-TRV87 only." When you carry out an operation, you read through this manual are clearly indicated in the... table below. z - - z - - z** 360× - monaural TRV87 z z 360× z z z z z z z z z z z stereo * The models without VIDEO/AUDIO IN have CAMERA, OFF and PLAYER mode on your camcorder...
Operating Instructions
Page 10
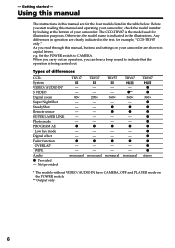
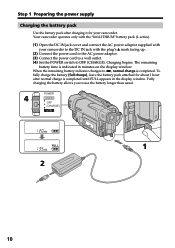
...DC IN jack cover and connect the AC power adaptor supplied with your camcorder. The remaining battery time is indicated in the display window. Fully charging the battery allows you to use the battery longer than usual. POWER 4 CAMERA OFF (CHARGE) VTR 1 2 10 When the remaining battery indicator ...about 1 hour after normal charge is completed. Charging begins. To fully charge the battery (full charge), leave the battery pack attached for your camcorder to the DC IN jack with the plug's v mark facing up. (2) Connect the power cord to the AC power adaptor. (3) Connect the...
...DC IN jack cover and connect the AC power adaptor supplied with your camcorder. The remaining battery time is indicated in the display window. Fully charging the battery allows you to use the battery longer than usual. POWER 4 CAMERA OFF (CHARGE) VTR 1 2 10 When the remaining battery indicator ...about 1 hour after normal charge is completed. Charging begins. To fully charge the battery (full charge), leave the battery pack attached for your camcorder to the DC IN jack with the plug's v mark facing up. (2) Connect the power cord to the AC power adaptor. (3) Connect the...
Operating Instructions
Page 16
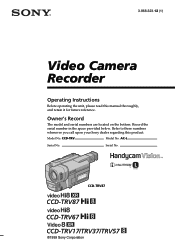
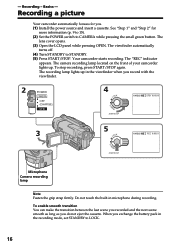
Basics - The viewfinder automatically turns off. (4) Turn STANDBY to CAMERA while pressing the small green button. Recording - The camera recording lamp located on the front of your camcorder lights up in microphone during recording. Do not touch the built-in the viewfinder when you do ...opens. (3) Open the LCD panel while pressing OPEN. When you . (1) Install the power source and insert a cassette. Recording a picture Your camcorder automatically focuses for more information (p. 9 to 15). (2) Set the POWER switch to STANDBY. (5) Press START/STOP. The recording lamp lights up ...
Basics - The viewfinder automatically turns off. (4) Turn STANDBY to CAMERA while pressing the small green button. Recording - The camera recording lamp located on the front of your camcorder lights up in microphone during recording. Do not touch the built-in the viewfinder when you do ...opens. (3) Open the LCD panel while pressing OPEN. When you . (1) Install the power source and insert a cassette. Recording a picture Your camcorder automatically focuses for more information (p. 9 to 15). (2) Set the POWER switch to STANDBY. (5) Press START/STOP. The recording lamp lights up ...
Operating Instructions
Page 24
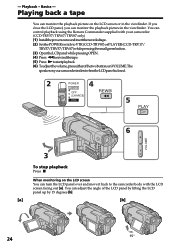
... closed. 2 POWER 4 CAMERA OFF REW (CHARGE) VTR 5 PLAY 6 VOLUME 3 To stop playback Press x. Playing back a tape You can monitor the playback picture in the viewfinder. If you close the LCD panel, you can monitor the playback picture on your camcorder. (CCD-TRV57/TRV67/TRV87 only) (1) Installthepowersourceandinserttherecordedtape. (2) SetthePOWERswitchtoVTR(CCD-TRV87)orPLAYER(CCD-TRV17/ TRV37/TRV57/TRV67) while pressing...
... closed. 2 POWER 4 CAMERA OFF REW (CHARGE) VTR 5 PLAY 6 VOLUME 3 To stop playback Press x. Playing back a tape You can monitor the playback picture in the viewfinder. If you close the LCD panel, you can monitor the playback picture on your camcorder. (CCD-TRV57/TRV67/TRV87 only) (1) Installthepowersourceandinserttherecordedtape. (2) SetthePOWERswitchtoVTR(CCD-TRV87)orPLAYER(CCD-TRV17/ TRV37/TRV57/TRV67) while pressing...
Operating Instructions
Page 31
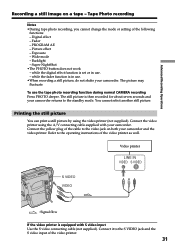
... to the video jack on a tape - Fader - Exposure - Digital effect - while the fader function is then recorded for about seven seconds and your camcorder. Connect the yellow plug of the following functions: - You cannot select another still picture. Printing the still picture You can print a still picture by using ... supplied). To use . - Super NightShot •The PHOTO button does not work: - The still picture is in use the tape photo recording function during normal CAMERA recording Press PHOTO deeper.
... to the video jack on a tape - Fader - Exposure - Digital effect - while the fader function is then recorded for about seven seconds and your camcorder. Connect the yellow plug of the following functions: - You cannot select another still picture. Printing the still picture You can print a still picture by using ... supplied). To use . - Super NightShot •The PHOTO button does not work: - The still picture is in use the tape photo recording function during normal CAMERA recording Press PHOTO deeper.
Operating Instructions
Page 55
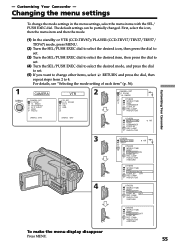
...can be partially changed. First, select the icon, then the menu item and then the mode. (1) In the standby or VTR (CCD-TRV87)/PLAYER (CCD-TRV17/TRV37/TRV57/ TRV67) mode, press MENU. (2) Turn the SEL/PUSH EXEC dial to select the desired icon, then press the dial to set....PUSH EXEC dial. For details, see "Selecting the mode setting of each item" (p. 56). 1 MENU CAMERA CAMERA SET D ZOOM 16 : 9WIDE STEADYSHOT N. Customizing Your Camcorder - Changing the menu settings Customizing Your Camcorder To change other items, select RETURN and press the dial, then repeat steps from 2 to 4. - ...
...can be partially changed. First, select the icon, then the menu item and then the mode. (1) In the standby or VTR (CCD-TRV87)/PLAYER (CCD-TRV17/TRV37/TRV57/ TRV67) mode, press MENU. (2) Turn the SEL/PUSH EXEC dial to select the desired icon, then press the dial to set....PUSH EXEC dial. For details, see "Selecting the mode setting of each item" (p. 56). 1 MENU CAMERA CAMERA SET D ZOOM 16 : 9WIDE STEADYSHOT N. Customizing Your Camcorder - Changing the menu settings Customizing Your Camcorder To change other items, select RETURN and press the dial, then repeat steps from 2 to 4. - ...
Operating Instructions
Page 56
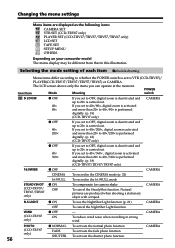
...you can operate at the moment. Natural pictures are displayed as the following icons: CAMERA SET VTR SET (CCD-TRV87 only) PLAYER SET (CCD-TRV17/TRV37/TRV57/TRV67 only) LCD SET TAPE SET SETUP MENU OTHERS Depending on your camcorder model The menu display may be different from that in strong wind... CAMERA PHOTO z NORMAL To activate the normal photo function (CCD-TRV87 FADE To activate the ...
...you can operate at the moment. Natural pictures are displayed as the following icons: CAMERA SET VTR SET (CCD-TRV87 only) PLAYER SET (CCD-TRV17/TRV37/TRV57/TRV67 only) LCD SET TAPE SET SETUP MENU OTHERS Depending on your camcorder model The menu display may be different from that in strong wind... CAMERA PHOTO z NORMAL To activate the normal photo function (CCD-TRV87 FADE To activate the ...
Operating Instructions
Page 57
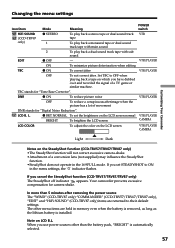
... CAMERA Customizing Your Camcorder Light Dark Notes on LCD B.L. If you have dubbed over and recorded the signal of movement DNR stands for "Digital Noise Reduction". z BRT NORMAL To set STEADYSHOT to their default settings. When you cancel the SteadyShot function (CCD-TRV57/...TRV67/TRV87 only) The SteadyShot off indicator appears. Your camcorder prevents excessive compensation for "Time Base Corrector". In more than the battery pack, "BRIGHT" is ...
... CAMERA Customizing Your Camcorder Light Dark Notes on LCD B.L. If you have dubbed over and recorded the signal of movement DNR stands for "Digital Noise Reduction". z BRT NORMAL To set STEADYSHOT to their default settings. When you cancel the SteadyShot function (CCD-TRV57/...TRV67/TRV87 only) The SteadyShot off indicator appears. Your camcorder prevents excessive compensation for "Time Base Corrector". In more than the battery pack, "BRIGHT" is ...
Operating Instructions
Page 58
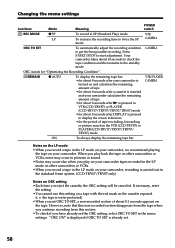
... of tape • for about 8 seconds after a cassette is inserted and your camcorder calculates the remaining amount of tape • for about 8 seconds after N is pressed in VTR (CCD-TRV87) or PLAYER (CCD-TRV17/TRV37/TRV57/TRV67) mode • for about 8 seconds after DISPLAY is pressed to get the...red mark on your camcorder, recording is carried out in the menu settings. the tape is already set ORC TO SET, a non-recorded section of tape rewinding, forwarding or picture search in the VTR (CCD-TRV87) or PLAYER (CCD-TRV17/TRV37/TRV57/ TRV67) mode VTR/PLAYER CAMERA ON To always display...
... of tape • for about 8 seconds after a cassette is inserted and your camcorder calculates the remaining amount of tape • for about 8 seconds after N is pressed in VTR (CCD-TRV87) or PLAYER (CCD-TRV17/TRV37/TRV57/TRV67) mode • for about 8 seconds after DISPLAY is pressed to get the...red mark on your camcorder, recording is carried out in the menu settings. the tape is already set ORC TO SET, a non-recorded section of tape rewinding, forwarding or picture search in the VTR (CCD-TRV87) or PLAYER (CCD-TRV17/TRV37/TRV57/ TRV67) mode VTR/PLAYER CAMERA ON To always display...
Operating Instructions
Page 59
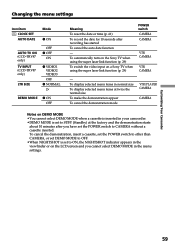
...Sony TV when using the super laser link function (p. 29) POWER switch CAMERA CAMERA VTR CAMERA VTR CAMERA - To display selected menu items in normal size To display selected menu items at the factory and the demonstration starts about 10 minutes after recording has started To cancel the auto date function - Customizing Your Camcorder... 59 Changing the menu settings Icon/item CLOCK SET AUTO DATE Mode z ON AUTO TV ON (CCD-TRV87 only) TV INPUT (CCD-TRV87 only) LTR SIZE OFF z OFF ON z VIDEO1 VIDEO2 ...
...Sony TV when using the super laser link function (p. 29) POWER switch CAMERA CAMERA VTR CAMERA VTR CAMERA - To display selected menu items in normal size To display selected menu items at the factory and the demonstration starts about 10 minutes after recording has started To cancel the auto date function - Customizing Your Camcorder... 59 Changing the menu settings Icon/item CLOCK SET AUTO DATE Mode z ON AUTO TV ON (CCD-TRV87 only) TV INPUT (CCD-TRV87 only) LTR SIZE OFF z OFF ON z VIDEO1 VIDEO2 ...
Operating Instructions
Page 60
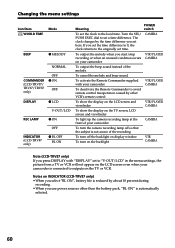
... the menu settings, the picture from a TV or VCR will not appear on the LCD screen even when your camcorder CAMERA To turn on the backlight VTR CAMERA Note (CCD-TRV87 only) If you set the time difference to 0, the clock returns to avoid remote control misoperation caused by ...backlight on the TV or VCR. If you press DISPLAY with your camcorder VTR/PLAYER CAMERA To deactivate the Remote Commander to the originally set here. Changing the menu settings Icon/item Mode WORLD TIME BEEP z MELODY NORMAL COMMANDER (CCD-TRV57/ TRV67/TRV87 only) OFF z ON OFF DISPLAY z LCD V-OUT...
... the menu settings, the picture from a TV or VCR will not appear on the LCD screen even when your camcorder CAMERA To turn on the backlight VTR CAMERA Note (CCD-TRV87 only) If you set the time difference to 0, the clock returns to avoid remote control misoperation caused by ...backlight on the TV or VCR. If you press DISPLAY with your camcorder VTR/PLAYER CAMERA To deactivate the Remote Commander to the originally set here. Changing the menu settings Icon/item Mode WORLD TIME BEEP z MELODY NORMAL COMMANDER (CCD-TRV57/ TRV67/TRV87 only) OFF z ON OFF DISPLAY z LCD V-OUT...
Operating Instructions
Page 65
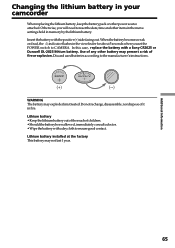
Do not recharge, disassemble, nor dispose of it in your camcorder When replacing the lithium battery, keep the battery pack or other power source attached. Lithium battery • Keep the lithium battery out of the reach ... the manufacturer's instructions. (+) (---) WARNING The battery may not last 1 year. In this case, replace the battery with a Sony CR2025 or Duracell DL-2025 lithium battery. Additional Information 65 Otherwise, you will need to CAMERA. Use of any other items in the menu settings hold in the viewfinder for about 5 seconds when you...
Do not recharge, disassemble, nor dispose of it in your camcorder When replacing the lithium battery, keep the battery pack or other power source attached. Lithium battery • Keep the lithium battery out of the reach ... the manufacturer's instructions. (+) (---) WARNING The battery may not last 1 year. In this case, replace the battery with a Sony CR2025 or Duracell DL-2025 lithium battery. Additional Information 65 Otherwise, you will need to CAMERA. Use of any other items in the menu settings hold in the viewfinder for about 5 seconds when you...
Operating Instructions
Page 67
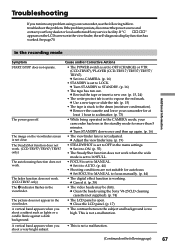
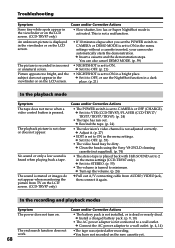
...CAMERA mode, your camcorder has been in the viewfinder. c Adjust the viewfinder lens. (p. 19) • STEADYSHOT is not a malfunction. c Cancel it to MANUAL. This is set to expose the red mark. The image on the viewfinder screen is set to OFF in the menu settings. The SteadyShot function does not work. (CCD-TRV57... POWER switch is not clear. c Set it to OFF (CHARGE) or VTR (CCD-TRV87)/PLAYER (CCD-TRV17/TRV37/TRV57/ TRV67). c Clean the heads using your Sony dealer or local authorized Sony service facility. A vertical band appears when you shoot a very bright subject. •...
...CAMERA mode, your camcorder has been in the viewfinder. c Adjust the viewfinder lens. (p. 19) • STEADYSHOT is not a malfunction. c Cancel it to MANUAL. This is set to expose the red mark. The image on the viewfinder screen is set to OFF in the menu settings. The SteadyShot function does not work. (CCD-TRV57... POWER switch is not clear. c Set it to OFF (CHARGE) or VTR (CCD-TRV87)/PLAYER (CCD-TRV17/TRV37/TRV57/ TRV67). c Clean the heads using your Sony dealer or local authorized Sony service facility. A vertical band appears when you shoot a very bright subject. •...
Operating Instructions
Page 68
...the menu settings (CCD-TRV87 only). c Set it again. c Set it to VTR (CCD-TRV87)/PLAYER (CCD-TRV17/ TRV37/TRV57/TRV67). (p. 24)...CCD-TRV87 only) Cause and/or Corrective Actions • The POWER switch is activated. Troubleshooting Symptom Cause and/or Corrective Actions Some tiny white spots appear in the menu settings without a cassette inserted, your camcorder...The video head may be dirty. c Clean the heads using the Sony V8-25CLD cleaning cassette (not supplied). (p. 74) • The...switch to CAMERA or DEMO MODE is set to ON in the viewfinder or on the LCD screen. (CCD-TRV87 only...
...the menu settings (CCD-TRV87 only). c Set it again. c Set it to VTR (CCD-TRV87)/PLAYER (CCD-TRV17/ TRV37/TRV57/TRV67). (p. 24)...CCD-TRV87 only) Cause and/or Corrective Actions • The POWER switch is activated. Troubleshooting Symptom Cause and/or Corrective Actions Some tiny white spots appear in the menu settings without a cassette inserted, your camcorder...The video head may be dirty. c Clean the heads using the Sony V8-25CLD cleaning cassette (not supplied). (p. 74) • The...switch to CAMERA or DEMO MODE is set to ON in the viewfinder or on the LCD screen. (CCD-TRV87 only...

Operating Instructions
Page 74
... [b] [a] Slightly dirty [b] Very dirty Note on the LCD screen or in a clockwise direction, then replace the screw. Contact your Sony dealer or local authorized Sony service facility. If this is the case, they must be dirty when: •The x␣ indicator and " CLEANING CASSETTE" message ...ensure normal recording and clear pictures, clean the video heads. The video head may be replaced with a commercially available blower for a still camera. (3) Turn the eyecup in the viewfinder. • Playback pictures contain noise. •Playback pictures are still contain noise even if ...
... [b] [a] Slightly dirty [b] Very dirty Note on the LCD screen or in a clockwise direction, then replace the screw. Contact your Sony dealer or local authorized Sony service facility. If this is the case, they must be dirty when: •The x␣ indicator and " CLEANING CASSETTE" message ...ensure normal recording and clear pictures, clean the video heads. The video head may be replaced with a commercially available blower for a still camera. (3) Turn the eyecup in the viewfinder. • Playback pictures contain noise. •Playback pictures are still contain noise even if ...
Operating Instructions
Page 75
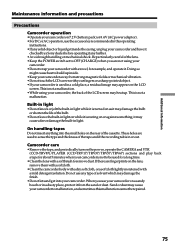
...light. This is not a malfunction. •While using your camcorder. • Do not wrap your camcorder with a towel, for example, and operate it may heat up inside the casing, unplug your camcorder and have it checked by a Sony dealer before operating it is resting on or against something; ...it may appear on the LCD screen. Sand or dust may cause your camcorder to build up . Camcorder care •Remove the tape, and periodically turn on the power, operate the CAMERA and VTR (CCD-TRV87)/PLAYER (CCD-TRV17/TRV37/TRV57/TRV67) sections and play back a tape for a long time. &#...
...light. This is not a malfunction. •While using your camcorder. • Do not wrap your camcorder with a towel, for example, and operate it may heat up inside the casing, unplug your camcorder and have it checked by a Sony dealer before operating it is resting on or against something; ...it may appear on the LCD screen. Sand or dust may cause your camcorder to build up . Camcorder care •Remove the tape, and periodically turn on the power, operate the CAMERA and VTR (CCD-TRV87)/PLAYER (CCD-TRV17/TRV37/TRV57/TRV67) sections and play back a tape for a long time. &#...
Operating Instructions
Page 77
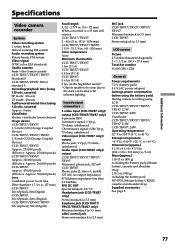
... be shot with infrared lighting. Additional Information Specifications Video camera recorder System Video recording system 2 rotary heads Helical scanning FM system Audio recording system Rotary heads, FM system Video signal NTSC color, EIA standards Usable cassette 8mm video format cassette CCD-TRV17/TRV37/TRV57: Standard 8 CCD-TRV67/TRV87: Hi8 or standard 8 Recording/playback time (using...
... be shot with infrared lighting. Additional Information Specifications Video camera recorder System Video recording system 2 rotary heads Helical scanning FM system Audio recording system Rotary heads, FM system Video signal NTSC color, EIA standards Usable cassette 8mm video format cassette CCD-TRV17/TRV37/TRV57: Standard 8 CCD-TRV67/TRV87: Hi8 or standard 8 Recording/playback time (using...
Operating Instructions
Page 80
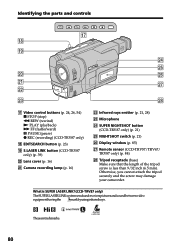
... camcorder. What is less than 9/32 inch (6.5 mm). Identifying the parts and controls qj qk ql wf wg w; Lens cover (p. 16) wa Camera recording lamp (p. 16) ws Infrared rays emitter (p. 21, 28) wd Microphone wf SUPER NIGHTSHOT button (CCD-TRV87 only) (p. 21) wg NIGHTSHOT switch (p. 21) wh Display window (p. 85) wj Remote sensor (CCD-TRV57...
... camcorder. What is less than 9/32 inch (6.5 mm). Identifying the parts and controls qj qk ql wf wg w; Lens cover (p. 16) wa Camera recording lamp (p. 16) ws Infrared rays emitter (p. 21, 28) wd Microphone wf SUPER NIGHTSHOT button (CCD-TRV87 only) (p. 21) wg NIGHTSHOT switch (p. 21) wh Display window (p. 85) wj Remote sensor (CCD-TRV57...


