
Camera Operations Guide
Page 21
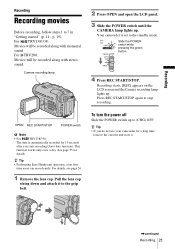
...Slide the POWER switch until the CAMERA lamp lights up . Your camcorder is automatically recorded for 10 seconds after you do not use your camcorder for details. Recording starts. [REC] appears on the LCD screen and the Camera recording lamp lights up . Press REC ...(p. 11 - For TRV138/338: Movies will be recorded along with monaural sound. For TRV280: Movies will be recorded along with stereo sound. z Tip • Performing Easy Handycam operation, even first time users can record easily. Recording Recording Recording movies Before recording, follow steps 1 to (CHG) OFF. z ...
...Slide the POWER switch until the CAMERA lamp lights up . Your camcorder is automatically recorded for 10 seconds after you do not use your camcorder for details. Recording starts. [REC] appears on the LCD screen and the Camera recording lamp lights up . Press REC ...(p. 11 - For TRV138/338: Movies will be recorded along with monaural sound. For TRV280: Movies will be recorded along with stereo sound. z Tip • Performing Easy Handycam operation, even first time users can record easily. Recording Recording Recording movies Before recording, follow steps 1 to (CHG) OFF. z ...
Camera Operations Guide
Page 26
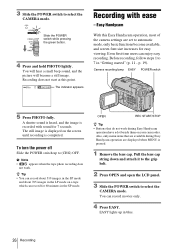
...available, and screen font size increases for easy viewing. Camera recording lamp EASY POWER switch 5 Press PHOTO fully. b Note • appears when the tape photo recording does not work during Easy Handycam operation are set to select the CAMERA mode. 3 Slide the POWER switch to automatic mode...camera settings are displayed when MENU is completed. OPEN REC START/STOP z Tip • Buttons that are available during Easy Handycam operation have a dot beside them on a tape which can record about 510 images in the SP mode and about 765 images in the LP mode on your camcorder...
...available, and screen font size increases for easy viewing. Camera recording lamp EASY POWER switch 5 Press PHOTO fully. b Note • appears when the tape photo recording does not work during Easy Handycam operation are set to select the CAMERA mode. 3 Slide the POWER switch to automatic mode...camera settings are displayed when MENU is completed. OPEN REC START/STOP z Tip • Buttons that are available during Easy Handycam operation have a dot beside them on a tape which can record about 510 images in the SP mode and about 765 images in the LP mode on your camcorder...
Camera Operations Guide
Page 27
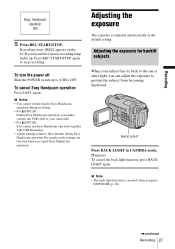
...when you press EXPOSURE (p. 28). ,continued Recording 27 Adjusting the exposure for backlit subjects When your camcorder. • For TRV280: You cannot use Easy Handycam operation together with USB Streaming. • All the settings return to stop recording. BACK LIGHT Press BACK LIGHT in the default... back light function, press BACK LIGHT again. b Note • The back light function is adjusted automatically in CAMERA mode. . Recording starts. [REC] appears on the LCD screen and the Camera recording lamp lights up to prevent the subject from /to Easy Handycam operation during Easy...
...when you press EXPOSURE (p. 28). ,continued Recording 27 Adjusting the exposure for backlit subjects When your camcorder. • For TRV280: You cannot use Easy Handycam operation together with USB Streaming. • All the settings return to stop recording. BACK LIGHT Press BACK LIGHT in the default... back light function, press BACK LIGHT again. b Note • The back light function is adjusted automatically in CAMERA mode. . Recording starts. [REC] appears on the LCD screen and the Camera recording lamp lights up to prevent the subject from /to Easy Handycam operation during Easy...
Camera Operations Guide
Page 34
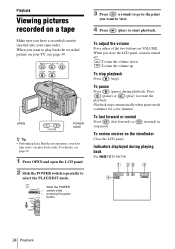
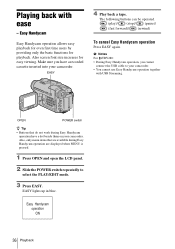
When you want to play back the recorded picture on your camcorder. Slide the POWER switch while pressing the green button. 3 Press (rewind) to go to the point you close the LCD panel, sound is turned off. :... movies on the viewfinder Close the LCD panel. To fast forward or rewind Press (fast forward) or stop ). OPEN POWER switch z Tip • Performing Easy Handycam operation, even first time users can play ) to restart the playback. To pause Press (pause) during playing back For TRV138/338: 60min 0:00:00 34...
When you want to play back the recorded picture on your camcorder. Slide the POWER switch while pressing the green button. 3 Press (rewind) to go to the point you close the LCD panel, sound is turned off. :... movies on the viewfinder Close the LCD panel. To fast forward or rewind Press (fast forward) or stop ). OPEN POWER switch z Tip • Performing Easy Handycam operation, even first time users can play ) to restart the playback. To pause Press (pause) during playing back For TRV138/338: 60min 0:00:00 34...
Camera Operations Guide
Page 36
...is pressed. 1 Press OPEN and open the LCD panel. 2 Slide the POWER switch repeatedly to your camcorder. • You cannot use Easy Handycam operation together with ease - Also screen font size increases for playback. Make sure you cannot connect the ...Handycam Easy Handycam operation allows easy playback for even first time users by providing only the basic functions for easy viewing. EASY lights up in blue. Also, only menu items that do not work during Easy Handycam operation are available during Easy Handycam operation have a recorded cassette inserted into your camcorder...
...is pressed. 1 Press OPEN and open the LCD panel. 2 Slide the POWER switch repeatedly to your camcorder. • You cannot use Easy Handycam operation together with ease - Also screen font size increases for playback. Make sure you cannot connect the ...Handycam Easy Handycam operation allows easy playback for even first time users by providing only the basic functions for easy viewing. EASY lights up in blue. Also, only menu items that do not work during Easy Handycam operation are available during Easy Handycam operation have a recorded cassette inserted into your camcorder...
Camera Operations Guide
Page 90
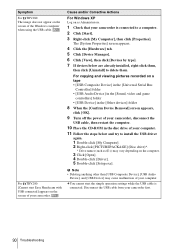
...recorded on a tape • [USB Composite Device] in the [Universal Serial Bus Controller] folder • [USB Audio Device] in the [Sound, video and game controllers] folder • [USB Device] in the [Other devices] folder 8 When the [Confirm Device Removal] screen appears, click [OK]. 9 Turn off the power of your camcorder...the USB cable, then restart the computer. 10 Place the CD-ROM in the disc drive of your camcorder first. 90 Troubleshooting cYou cannot start Easy Handycam with USB connected] appears on the screen of your computer. b Note • Deleting anything other than...
...recorded on a tape • [USB Composite Device] in the [Universal Serial Bus Controller] folder • [USB Audio Device] in the [Sound, video and game controllers] folder • [USB Device] in the [Other devices] folder 8 When the [Confirm Device Removal] screen appears, click [OK]. 9 Turn off the power of your camcorder...the USB cable, then restart the computer. 10 Place the CD-ROM in the disc drive of your camcorder first. 90 Troubleshooting cYou cannot start Easy Handycam with USB connected] appears on the screen of your computer. b Note • Deleting anything other than...

Camera Operations Guide
Page 91
...the following URL: http://www.ppackage.com/ For TRV280: "First Step Guide" is not supported on the CD-R in the (-) direction on [Select video quality]. 3 Follow the on -screen instructions, click [Next], then click [Done]. cRefer to another device on the [Select audio device] screen....click [Done]. Symptom Cause and/or Corrective Actions For TRV280: There is no sound when the camcorder is not smooth during USB streaming. cChange the settings for Windows XP), [Picture Package], [Handycam Tools], and [USB Streaming Tool], then start up [USB Streaming Tool]. 2 Adjust the slider...
...the following URL: http://www.ppackage.com/ For TRV280: "First Step Guide" is not supported on the CD-R in the (-) direction on [Select video quality]. 3 Follow the on -screen instructions, click [Next], then click [Done]. cRefer to another device on the [Select audio device] screen....click [Done]. Symptom Cause and/or Corrective Actions For TRV280: There is no sound when the camcorder is not smooth during USB streaming. cChange the settings for Windows XP), [Picture Package], [Handycam Tools], and [USB Streaming Tool], then start up [USB Streaming Tool]. 2 Adjust the slider...


