Camera Operations Guide
Page 5
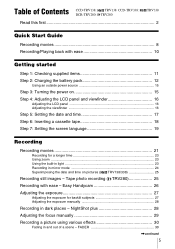
Table of a scene - Tape photo recording ( TRV280 25 Recording with ease 10 Getting started Step 1: Checking supplied items 11 Step 2: Charging the battery pack 12 Using an outside power source 15 Step 3: Turning the power on 15 Step 4: Adjusting the LCD ... Setting the screen language 19 Recording Recording movies 21 Recording for backlit subjects 27 Adjusting the exposure manually 28 Recording in and out of Contents CCD-TRV138: TRV138 CCD-TRV338: DCR-TRV280: TRV280 TRV338 Read this first 2 Quick Start Guide Recording movies 8 Recording/Playing back with ease - ...
Table of a scene - Tape photo recording ( TRV280 25 Recording with ease 10 Getting started Step 1: Checking supplied items 11 Step 2: Charging the battery pack 12 Using an outside power source 15 Step 3: Turning the power on 15 Step 4: Adjusting the LCD ... Setting the screen language 19 Recording Recording movies 21 Recording for backlit subjects 27 Adjusting the exposure manually 28 Recording in and out of Contents CCD-TRV138: TRV138 CCD-TRV338: DCR-TRV280: TRV280 TRV338 Read this first 2 Quick Start Guide Recording movies 8 Recording/Playing back with ease - ...
Camera Operations Guide
Page 11
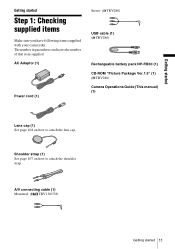
... (1) Power cord (1) Stereo: ( TRV280) USB cable (1) ( TRV280) Rechargeable battery pack NP-FM30 (1) CD-ROM "Picture Package Ver.1.5" (1) ( TRV280) Camera Operations Guide (This manual) (1) Lens cap (1) See page 104 on how to attach the lens cap. A/V connecting cable (1) Monaural: ( TRV138/338) Getting started Step 1: Checking supplied items Make sure you have following items supplied with...
... (1) Power cord (1) Stereo: ( TRV280) USB cable (1) ( TRV280) Rechargeable battery pack NP-FM30 (1) CD-ROM "Picture Package Ver.1.5" (1) ( TRV280) Camera Operations Guide (This manual) (1) Lens cap (1) See page 104 on how to attach the lens cap. A/V connecting cable (1) Monaural: ( TRV138/338) Getting started Step 1: Checking supplied items Make sure you have following items supplied with...
Camera Operations Guide
Page 14
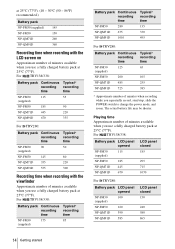
...-QM71D 675 330 NP-QM91D 1010 495 For TRV280: Battery pack Continuous Typical* recording recording time time NP-FM30 125 65 (supplied) NP-FM50 200 105 NP-QM71D 485 255 NP-QM91D 725 385 * Approximate number of minutes available when you repeatedly record, start/stop, slide the POWER switch to change the power mode, and zoom.
...-QM71D 675 330 NP-QM91D 1010 495 For TRV280: Battery pack Continuous Typical* recording recording time time NP-FM30 125 65 (supplied) NP-FM50 200 105 NP-QM71D 485 255 NP-QM91D 725 385 * Approximate number of minutes available when you repeatedly record, start/stop, slide the POWER switch to change the power mode, and zoom.
Camera Operations Guide
Page 15
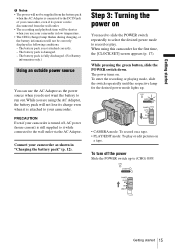
... not lose its power cord is disconnected from the battery pack when the AC Adaptor is turned off the power Slide the POWER switch up . • CAMERA mode: To record on a tape. • PLAY/EDIT mode: To play . Getting started b Notes • The power will not be supplied from the wall ...outlet. • The recording and playback time will be shorter when ...
... not lose its power cord is disconnected from the battery pack when the AC Adaptor is turned off the power Slide the POWER switch up . • CAMERA mode: To record on a tape. • PLAY/EDIT mode: To play . Getting started b Notes • The power will not be supplied from the wall ...outlet. • The recording and playback time will be shorter when ...
Camera Operations Guide
Page 39
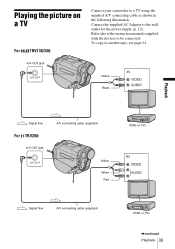
Connect the supplied AC Adaptor to another tape, see page 61. A/V OUT jack Yellow Black Playback Signal flow For TRV280: A/V OUT jack A/V connecting cable (supplied) Yellow White Red VCRs or TVs Signal flow A/V connecting cable (supplied) VCRs or TVs ,continued Playback 39 To copy to the wall outlet for the power supply (p. 12). Refer also to the instruction manuals supplied with the devices to a TV using the supplied A/V connecting cable as shown in the following illustration. Playing the picture on a TV For TRV138/338: Connect your camcorder to be connected.
Connect the supplied AC Adaptor to another tape, see page 61. A/V OUT jack Yellow Black Playback Signal flow For TRV280: A/V OUT jack A/V connecting cable (supplied) Yellow White Red VCRs or TVs Signal flow A/V connecting cable (supplied) VCRs or TVs ,continued Playback 39 To copy to the wall outlet for the power supply (p. 12). Refer also to the instruction manuals supplied with the devices to a TV using the supplied A/V connecting cable as shown in the following illustration. Playing the picture on a TV For TRV138/338: Connect your camcorder to be connected.
Camera Operations Guide
Page 55
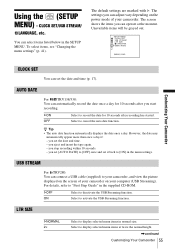
... cable (supplied) to record the date for 10 seconds after recording has started. To select items, see "Changing the menu settings" (p. 41). Unavailable items will be grayed out. you start recording. LTR SIZE GNORMAL 2× Select to activate the USB Streaming function. The settings you can automatically record the date... the tape again. - GON OFF Select to your camcorder, and view the picture displayed on the screen of your camcorder on the power mode of your computer (USB Streaming). you set the date and time (p. 17). CLOCK SET/USB STREAM/ LANGUAGE, etc. GOFF ...
... cable (supplied) to record the date for 10 seconds after recording has started. To select items, see "Changing the menu settings" (p. 41). Unavailable items will be grayed out. you start recording. LTR SIZE GNORMAL 2× Select to activate the USB Streaming function. The settings you can automatically record the date... the tape again. - GON OFF Select to your camcorder, and view the picture displayed on the screen of your camcorder on the power mode of your computer (USB Streaming). you set the date and time (p. 17). CLOCK SET/USB STREAM/ LANGUAGE, etc. GOFF ...
Camera Operations Guide
Page 61
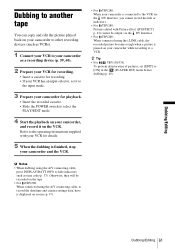
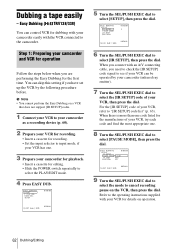
... For TRV280: Pictures edited with your VCR for playback. • Insert the recorded cassette. • Slide the POWER switch to select the PLAY/EDIT mode. 4 Start the playback on your camcorder, and record it on your camcorder is connected to the VCR via the DV Interface. &#...connecting cable, to record the date/time and camera settings data, have it to the input mode. 3 Prepare your camcorder for details. 5 When the dubbing is finished, stop your camcorder and the VCR. • For TRV280: When your camcorder while recording to the operating instructions supplied with Picture effect ...
... For TRV280: Pictures edited with your VCR for playback. • Insert the recorded cassette. • Slide the POWER switch to select the PLAY/EDIT mode. 4 Start the playback on your camcorder, and record it on your camcorder is connected to the VCR via the DV Interface. &#...connecting cable, to record the date/time and camera settings data, have it to the input mode. 3 Prepare your camcorder for details. 5 When the dubbing is finished, stop your camcorder and the VCR. • For TRV280: When your camcorder while recording to the operating instructions supplied with Picture effect ...
Camera Operations Guide
Page 62
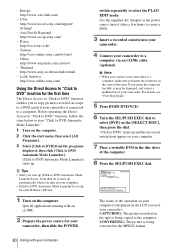
... to see if your VCR can be operated by the following procedure before. Refer to the operating instructions supplied with your camcorder easily with your VCR for editing. • Slide the POWER switch repeatedly to select [IR SETUP], then press the dial. You can control VCR for the first ...Set the input selector to select [SETUP], then press the dial. Step 1: Preparing your VCR has one . 8 Turn the SEL/PUSH EXEC dial to cancel recording pause on operation. 62 Dubbing/Editing b Note • You cannot perform the Easy Dubbing on a VCR that does not support [IR SETUP] codes. 1...
... to see if your VCR can be operated by the following procedure before. Refer to the operating instructions supplied with your camcorder easily with your VCR for editing. • Slide the POWER switch repeatedly to select [IR SETUP], then press the dial. You can control VCR for the first ...Set the input selector to select [SETUP], then press the dial. Step 1: Preparing your VCR has one . 8 Turn the SEL/PUSH EXEC dial to cancel recording pause on operation. 62 Dubbing/Editing b Note • You cannot perform the Easy Dubbing on a VCR that does not support [IR SETUP] codes. 1...
Camera Operations Guide
Page 80
... http://www.sonystyle.com.cn/vaio/ - "Click to select [DVD] on your computer Korea http://scs.sony.co.kr/ - Thailand http://www.sony.co.th/vaio/index.html - Use the supplied AC Adaptor as the power source since it may be damaged, and causes a malfunction of your computer. • [Click to DVD... operation on your computer is displayed on your camcorder. If you turn on the LCD screen of your camcorder to the computer. CAPTURING: The picture recorded on it starts up [Click to select the PLAY/ EDIT mode. z Tips • After you start menu, then select [All Programs]. 3 ...
... http://www.sonystyle.com.cn/vaio/ - "Click to select [DVD] on your computer Korea http://scs.sony.co.kr/ - Thailand http://www.sony.co.th/vaio/index.html - Use the supplied AC Adaptor as the power source since it may be damaged, and causes a malfunction of your computer. • [Click to DVD... operation on your computer is displayed on your camcorder. If you turn on the LCD screen of your camcorder to the computer. CAPTURING: The picture recorded on it starts up [Click to select the PLAY/ EDIT mode. z Tips • After you start menu, then select [All Programs]. 3 ...
Camera Operations Guide
Page 82
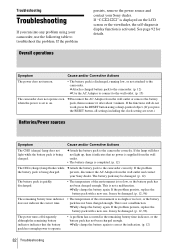
... the functions still do not work, press the RESET button using a sharp-pointed object. (If you run into any problem using your Sony dealer. If the problem the battery pack is too high or too low, or the battery pack has not been charged enough. The battery...or the viewfinder, the self-diagnosis display function is not a malfunction. It may be damaged. (p. 12, 96) The power turns off frequently although the remaining battery indicator indicates that no power is supplied from the wall outlet. • The battery charge is not a malfunction. It may be damaged. (p. 12, 96...
... the functions still do not work, press the RESET button using a sharp-pointed object. (If you run into any problem using your Sony dealer. If the problem the battery pack is too high or too low, or the battery pack has not been charged enough. The battery...or the viewfinder, the self-diagnosis display function is not a malfunction. It may be damaged. (p. 12, 96) The power turns off frequently although the remaining battery indicator indicates that no power is supplied from the wall outlet. • The battery charge is not a malfunction. It may be damaged. (p. 12, 96...
Camera Operations Guide
Page 94
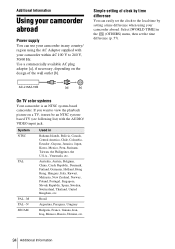
...camcorder. If you want to view the playback picture on the design of clock by setting a time difference when using the AC Adaptor supplied with the AUDIO/ VIDEO input jack. System Used in the (OTHERS) menu, then set the clock to 240 V, 50/60 Hz. Brazil Argentina, Paraguay,... your camcorder within AC 100 V to the local time by time difference You can use your camcorder in any country/ region using your camcorder abroad Power supply You can easily set the time difference (p. 57). Select [WORLD TIME] in NTSC PAL PAL - N SECAM Bahama Islands, Bolivia, Canada, Central ...
...camcorder. If you want to view the playback picture on the design of clock by setting a time difference when using the AC Adaptor supplied with the AUDIO/ VIDEO input jack. System Used in the (OTHERS) menu, then set the clock to 240 V, 50/60 Hz. Brazil Argentina, Paraguay,... your camcorder within AC 100 V to the local time by time difference You can use your camcorder in any country/ region using your camcorder abroad Power supply You can easily set the time difference (p. 57). Select [WORLD TIME] in NTSC PAL PAL - N SECAM Bahama Islands, Bolivia, Canada, Central ...
Camera Operations Guide
Page 100
... appear on the playback picture or the screen is not a malfunction. • While using the supplied AC Adaptor, and leave it may cause damage. • If your camcorder but it in an...a pre-installed rechargeable battery to retain the date, time, and other settings even when the POWER switch is used in blue. - Procedures Connect your camcorder to a wall outlet using your camcorder...you are not recording the date. Use cleaning paper moistened with the Sony V8-25CLD cleaning cassette (optional). - Playback pictures do not appear or the sound breaks off. - [ Dirty video head. To ...
... appear on the playback picture or the screen is not a malfunction. • While using the supplied AC Adaptor, and leave it may cause damage. • If your camcorder but it in an...a pre-installed rechargeable battery to retain the date, time, and other settings even when the POWER switch is used in blue. - Procedures Connect your camcorder to a wall outlet using your camcorder...you are not recording the date. Use cleaning paper moistened with the Sony V8-25CLD cleaning cassette (optional). - Playback pictures do not appear or the sound breaks off. - [ Dirty video head. To ...
Camera Operations Guide
Page 102
... DC 7.2 V (battery pack) DC 8.4 V (AC Adaptor) Average power consumption (when using the battery pack) For TRV138/338: During camera recording using the viewfinder 1.8 W During camera recording using the LCD 2.7 W For TRV280: During camera recording using viewfinder 2.5 W During camera recording using LCD 3.4 W Operating temperature 0° C to 40° C (32° F to 104° F) Storage temperature -20° C to... 11 oz) main unit only 890 g (1 lb 15 oz) including the NP-FM30 rechargeable battery pack, Hi8/Digital8 cassette, lens cap, and shoulder strap Supplied accessories See page 11.
... DC 7.2 V (battery pack) DC 8.4 V (AC Adaptor) Average power consumption (when using the battery pack) For TRV138/338: During camera recording using the viewfinder 1.8 W During camera recording using the LCD 2.7 W For TRV280: During camera recording using viewfinder 2.5 W During camera recording using LCD 3.4 W Operating temperature 0° C to 40° C (32° F to 104° F) Storage temperature -20° C to... 11 oz) main unit only 890 g (1 lb 15 oz) including the NP-FM30 rechargeable battery pack, Hi8/Digital8 cassette, lens cap, and shoulder strap Supplied accessories See page 11.

Camera Operations Guide
Page 107
...) B BATT (battery) release button (p. 12) C Hooks for shoulder strap D For TRV280: PHOTO button (p. 25) E POWER switch (p. 15) F Grip belt (p. 4) G REC START/STOP button (p. 21) H DC IN jack (p. 12) To attach the shoulder strap Attach the shoulder strap supplied with your camcorder. Otherwise, you cannot attach the tripod securely, and the screw may...
...) B BATT (battery) release button (p. 12) C Hooks for shoulder strap D For TRV280: PHOTO button (p. 25) E POWER switch (p. 15) F Grip belt (p. 4) G REC START/STOP button (p. 21) H DC IN jack (p. 12) To attach the shoulder strap Attach the shoulder strap supplied with your camcorder. Otherwise, you cannot attach the tripod securely, and the screw may...


