
Camera Operations Guide
Page 3
... a Sony dealer or an experienced radio/TV technician for details. Notes on this manual are captured using a digital still camera, and thus may be copyrighted. These points are normal results of the manufacturing process and do not affect the recording in ...video cassettes on a TV, you start reading this manual are based on , the user is not possible due to correct the interference by turning the equipment off and on the model DCR-TRV265. ,continued 3 This may be determined by one or more of your camcorder. CCD-TRV128: TRV128 CCD-TRV228: TRV228 CCD-TRV328: TRV328 CCD...
... a Sony dealer or an experienced radio/TV technician for details. Notes on this manual are captured using a digital still camera, and thus may be copyrighted. These points are normal results of the manufacturing process and do not affect the recording in ...video cassettes on a TV, you start reading this manual are based on , the user is not possible due to correct the interference by turning the equipment off and on the model DCR-TRV265. ,continued 3 This may be determined by one or more of your camcorder. CCD-TRV128: TRV128 CCD-TRV228: TRV228 CCD-TRV328: TRV328 CCD...
Camera Operations Guide
Page 11
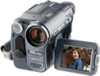
Rechargeable battery pack NP-FM30 (1) CD-ROM "SPVD-012 USB Driver" (1) ( TRV260/265) Camera Operations Guide (This manual) (1) Computer Applications Guide (1) ( TRV260/265) Wireless Remote Commander (1) A button-type lithium battery is already installed. Getting started ... supplied with your camcorder. The number in parentheses indicates the number of that item supplied. AC Adaptor (1) RMT-830: ( TRV265) A/V connecting cable (1) Monaural: ( TRV128/228/328/428) Stereo: ( TRV260/265) Power cord (1) USB cable (1) ( TRV260/265) Lens cap (1) See page 91 on how to attach the lens cap.
Rechargeable battery pack NP-FM30 (1) CD-ROM "SPVD-012 USB Driver" (1) ( TRV260/265) Camera Operations Guide (This manual) (1) Computer Applications Guide (1) ( TRV260/265) Wireless Remote Commander (1) A button-type lithium battery is already installed. Getting started ... supplied with your camcorder. The number in parentheses indicates the number of that item supplied. AC Adaptor (1) RMT-830: ( TRV265) A/V connecting cable (1) Monaural: ( TRV128/228/328/428) Stereo: ( TRV260/265) Power cord (1) USB cable (1) ( TRV260/265) Lens cap (1) See page 91 on how to attach the lens cap.
Camera Operations Guide
Page 27
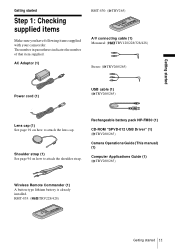
...is canceled when you cancel Easy Handycam operation. Recording starts. [REC] appears on the LCD screen and the Camera recording lamp lights up to (CHG) OFF. Previously made settings are restored when you press EXPOSURE (p. 28). ,continued Recording 27 BACK LIGHT Press BACK LIGHT in the default...b Note • The back light function is adjusted automatically in CAMERA mode. . Press REC START/STOP again to their defaults during recording. • For TRV260/265: During Easy Handycam operation, you cannot connect the USB cable to your camcorder. • For TRV260/265: You cannot use ...
...is canceled when you cancel Easy Handycam operation. Recording starts. [REC] appears on the LCD screen and the Camera recording lamp lights up to (CHG) OFF. Previously made settings are restored when you press EXPOSURE (p. 28). ,continued Recording 27 BACK LIGHT Press BACK LIGHT in the default...b Note • The back light function is adjusted automatically in CAMERA mode. . Press REC START/STOP again to their defaults during recording. • For TRV260/265: During Easy Handycam operation, you cannot connect the USB cable to your camcorder. • For TRV260/265: You cannot use ...

Camera Operations Guide
Page 36
... operate those operations and SLOW y on your camcorder. OPEN POWER switch z Tip • Buttons that are available during Easy Handycam operation have a recorded cassette inserted into your camcorder. • You cannot use Easy Handycam operation together with ease - Make sure you cannot connect the USB... cable to select the PLAY/EDIT mode. 3 Press EASY. EASY lights up in blue. EASY 4 Play back a tape. b Notes For TRV260/265: &#...
... operate those operations and SLOW y on your camcorder. OPEN POWER switch z Tip • Buttons that are available during Easy Handycam operation have a recorded cassette inserted into your camcorder. • You cannot use Easy Handycam operation together with ease - Make sure you cannot connect the USB... cable to select the PLAY/EDIT mode. 3 Press EASY. EASY lights up in blue. EASY 4 Play back a tape. b Notes For TRV260/265: &#...

Camera Operations Guide
Page 39
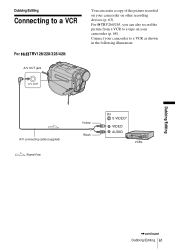
... camcorder to another tape, see page 63. To copy to a TV using the supplied A/V connecting cable as shown in the following illustration. Yellow Black Playback Signal flow A/V connecting cable (supplied) For TRV260/265: A/V OUT jack Yellow White Red VCRs or TVs Signal flow A/V connecting... cable (supplied) VCRs or TVs ,continued Playback 39 Refer also to the instruction manuals supplied ...
... camcorder to another tape, see page 63. To copy to a TV using the supplied A/V connecting cable as shown in the following illustration. Yellow Black Playback Signal flow A/V connecting cable (supplied) For TRV260/265: A/V OUT jack Yellow White Red VCRs or TVs Signal flow A/V connecting... cable (supplied) VCRs or TVs ,continued Playback 39 Refer also to the instruction manuals supplied ...
Camera Operations Guide
Page 40
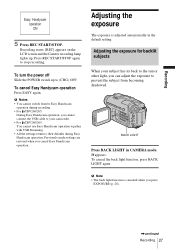
... LINE. The tape counter is monaural (When your TV has only one audio input jack) For TRV260/265: Connect the yellow plug of the A/V connecting cable to the video input jack and connect the white or the red plug to the audio input jack of using the A/V connecting... Remote Commander. 2 Press STOP when you want to play the sound in monaural mode, use a connecting cable (optional) for a desired scene - * When there is an S video jack on the device to be connected, connect the S video plug to that purpose. Pictures can be output when you want to locate later on the Remote...
... LINE. The tape counter is monaural (When your TV has only one audio input jack) For TRV260/265: Connect the yellow plug of the A/V connecting cable to the video input jack and connect the white or the red plug to the audio input jack of using the A/V connecting... Remote Commander. 2 Press STOP when you want to play the sound in monaural mode, use a connecting cable (optional) for a desired scene - * When there is an S video jack on the device to be connected, connect the S video plug to that purpose. Pictures can be output when you want to locate later on the Remote...
Camera Operations Guide
Page 57
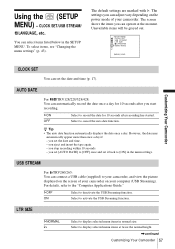
... display selected menu items in normal size. z Tip • The auto date function automatically displays the date once a day. you start recording. you can operate at twice the normal height. ,continued Customizing Your Camcorder 57 USB STREAM For TRV260/265: You can select items listed ...set the date and time (p. 17). The settings you eject and insert the tape again. - You can connect a USB cable (supplied) to record the date for 10 seconds after recording has started. you set [AUTO DATE] to activate the USB Streaming function. Using the (SETUP MENU) - CLOCK SET/USB...
... display selected menu items in normal size. z Tip • The auto date function automatically displays the date once a day. you start recording. you can operate at twice the normal height. ,continued Customizing Your Camcorder 57 USB STREAM For TRV260/265: You can select items listed ...set the date and time (p. 17). The settings you eject and insert the tape again. - You can connect a USB cable (supplied) to record the date for 10 seconds after recording has started. you set [AUTO DATE] to activate the USB Streaming function. Using the (SETUP MENU) - CLOCK SET/USB...
Camera Operations Guide
Page 61
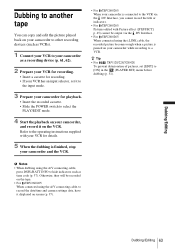
For TRV260/265, you can create a copy of the picture recorded on your camcorder on your camcorder to a tape on other recording devices (p. 63). A/V connecting cable (supplied) Signal flow Yellow Black VCRs Dubbing/Editing ,continued Dubbing/Editing 61 Connect your camcorder (p. 68). Dubbing/Editing Connecting to a VCR For TRV128/228/328/428: A/V OUT jack You can also record the picture from a VCR to a VCR as shown in the following illustration.
For TRV260/265, you can create a copy of the picture recorded on your camcorder on your camcorder to a tape on other recording devices (p. 63). A/V connecting cable (supplied) Signal flow Yellow Black VCRs Dubbing/Editing ,continued Dubbing/Editing 61 Connect your camcorder (p. 68). Dubbing/Editing Connecting to a VCR For TRV128/228/328/428: A/V OUT jack You can also record the picture from a VCR to a VCR as shown in the following illustration.
Camera Operations Guide
Page 62
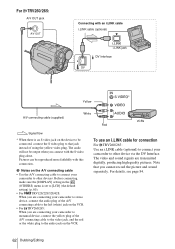
.... Before connecting, make sure the [DISPLAY] setting in the (OTHERS) menu is an S video jack on the device to be connected, connect the S video plug to that you cannot record the picture and sound separately. The audio will not be reproduced more faithfully with this connection. ...For TRV260/265: A/V OUT jack A/V OUT Connecting with an i.LINK cable i.LINK cable (optional) i.LINK jack DV Interface Yellow A/V connecting cable (supplied) ...
.... Before connecting, make sure the [DISPLAY] setting in the (OTHERS) menu is an S video jack on the device to be connected, connect the S video plug to that you cannot record the picture and sound separately. The audio will not be reproduced more faithfully with this connection. ...For TRV260/265: A/V OUT jack A/V OUT Connecting with an i.LINK cable i.LINK cable (optional) i.LINK jack DV Interface Yellow A/V connecting cable (supplied) ...
Camera Operations Guide
Page 63
... output via the DV Interface. • For TRV260/265: When connected using the i.LINK cable, the recorded picture becomes rough when a picture is connected to the VCR via the DV Interface, you cannot record the title or indicators. • For TRV260/265: Pictures edited with your VCR for playback...(PLAYER SET) menu before dubbing (p. 51). Dubbing/Editing Dubbing/Editing 63 b Notes • When dubbing using the A/V connecting cable, to record the date/time and camera settings data, have it on the VCR. Dubbing to another tape You can copy and edit the picture played back on your ...
... output via the DV Interface. • For TRV260/265: When connected using the i.LINK cable, the recorded picture becomes rough when a picture is connected to the VCR via the DV Interface, you cannot record the title or indicators. • For TRV260/265: Pictures edited with your VCR for playback...(PLAYER SET) menu before dubbing (p. 51). Dubbing/Editing Dubbing/Editing 63 b Notes • When dubbing using the A/V connecting cable, to record the date/time and camera settings data, have it on the VCR. Dubbing to another tape You can copy and edit the picture played back on your ...
Camera Operations Guide
Page 64
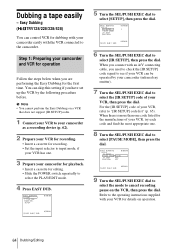
... your camcorder and VCR for operation Follow the steps below when you are performing the Easy Dubbing for dubbing with the VCR connected to cancel recording pause on operation. 64 Dubbing/Editing You can be operated by the following procedure before. b Note • You cannot perform the Easy Dubbing on a... 4 Press EASY DUB. For the [IR SETUP] code of your VCR, then press the dial. Refer to the operating instructions supplied with an A/V connecting cable, you need to check the [IR SETUP] code signal to see if your VCR can skip this setting if you connect with your VCR, refer...
... your camcorder and VCR for operation Follow the steps below when you are performing the Easy Dubbing for dubbing with the VCR connected to cancel recording pause on operation. 64 Dubbing/Editing You can be operated by the following procedure before. b Note • You cannot perform the Easy Dubbing on a... 4 Press EASY DUB. For the [IR SETUP] code of your VCR, then press the dial. Refer to the operating instructions supplied with an A/V connecting cable, you need to check the [IR SETUP] code signal to see if your VCR can skip this setting if you connect with your VCR, refer...
Camera Operations Guide
Page 68
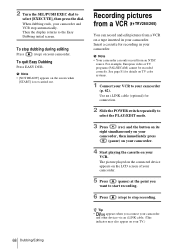
Then the display returns to select [EXECUTE], then press the dial. For example, European video or TV programs (PAL/SECAM) cannot be recorded correctly. Use an i.LINK cable (optional) for connection. 2 Slide the POWER switch repeatedly to select the PLAY/EDIT mode. 3 Press (rec) and the button ... from a VCR ( TRV260/265) You can only record from a VCR on your camcorder. 5 Press (pause) at the point you connect your camcorder and other devices via an i.LINK cable. (This indicator may also appear on your camcorder (p. 62). To quit Easy Dubbing Press EASY DUB. To ...
Then the display returns to select [EXECUTE], then press the dial. For example, European video or TV programs (PAL/SECAM) cannot be recorded correctly. Use an i.LINK cable (optional) for connection. 2 Slide the POWER switch repeatedly to select the PLAY/EDIT mode. 3 Press (rec) and the button ... from a VCR ( TRV260/265) You can only record from a VCR on your camcorder. 5 Press (pause) at the point you connect your camcorder and other devices via an i.LINK cable. (This indicator may also appear on your camcorder (p. 62). To quit Easy Dubbing Press EASY DUB. To ...
Camera Operations Guide
Page 69
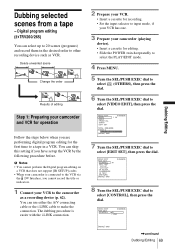
...not support [IR SETUP] codes. • When your camcorder is easier with the i.LINK connection. 2 Prepare your VCR. • Insert a cassette for recording. • Set the input selector to input mode, if your VCR has one. 3 Prepare your camcorder and VCR for operation Follow the steps below when... up the VCR by the following procedure before. Digital program editing ( TRV260/265) You can use either the A/V connecting cable or the i.LINK cable to select [CONTROL], then press the dial. VIDEO EDIT MARK UNDO ERASE ALL START EDIT SET 0:08:55:06 1 IN TOTAL 0:00:00:00 SCENE 0 [MENU] ...
...not support [IR SETUP] codes. • When your camcorder is easier with the i.LINK connection. 2 Prepare your VCR. • Insert a cassette for recording. • Set the input selector to input mode, if your VCR has one. 3 Prepare your camcorder and VCR for operation Follow the steps below when... up the VCR by the following procedure before. Digital program editing ( TRV260/265) You can use either the A/V connecting cable or the i.LINK cable to select [CONTROL], then press the dial. VIDEO EDIT MARK UNDO ERASE ALL START EDIT SET 0:08:55:06 1 IN TOTAL 0:00:00:00 SCENE 0 [MENU] ...
Camera Operations Guide
Page 70
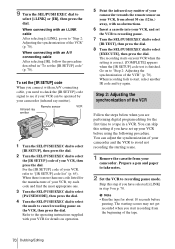
... synchronization of your camcorder towards the remote sensor on the VCR, then press the dial. When connecting with your camcorder. When there is finished. The recording starts on p. 70. Prepare a pen and paper to take notes. 2 Set the VCR to select [i.LINK] or [IR], then press the dial. Infrared... "To set the VCR to recording pause. 7 Turn the SEL/PUSH EXEC dial to select [IR TEST], then press the dial. 8 Turn the SEL/PUSH EXEC dial to select the [IR SETUP] code of the tape. 70 Dubbing/Editing When connecting with an A/V connecting cable, you are performing digital program ...
... synchronization of your camcorder towards the remote sensor on the VCR, then press the dial. When connecting with your camcorder. When there is finished. The recording starts on p. 70. Prepare a pen and paper to take notes. 2 Set the VCR to select [i.LINK] or [IR], then press the dial. Infrared... "To set the VCR to recording pause. 7 Turn the SEL/PUSH EXEC dial to select [IR TEST], then press the dial. 8 Turn the SEL/PUSH EXEC dial to select the [IR SETUP] code of the tape. 70 Dubbing/Editing When connecting with an A/V connecting cable, you are performing digital program ...
Camera Operations Guide
Page 72
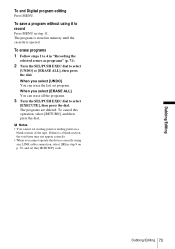
... SCENE 0 [MENU] : END 7 Search for the end of the program mark changes to select [MARK], then press the dial. To cancel recording, press (stop). 72 Dubbing/Editing VIDEO EDIT MARK UNDO ERASE ALL START EDIT SET 0:09:07:06 2 IN TOTAL 0:00:12:00 SCENE 1 [MENU] : END 9 Repeat steps... 5 to 8 and create programs. 10Set your camcorder is set , and the lower part of the first program is connected via an i.LINK cable. 11Turn the SEL/PUSH EXEC dial to record...
... SCENE 0 [MENU] : END 7 Search for the end of the program mark changes to select [MARK], then press the dial. To cancel recording, press (stop). 72 Dubbing/Editing VIDEO EDIT MARK UNDO ERASE ALL START EDIT SET 0:09:07:06 2 IN TOTAL 0:00:12:00 SCENE 1 [MENU] : END 9 Repeat steps... 5 to 8 and create programs. 10Set your camcorder is set , and the lower part of the first program is connected via an i.LINK cable. 11Turn the SEL/PUSH EXEC dial to record...
Camera Operations Guide
Page 73
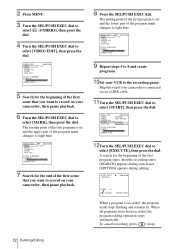
...PUSH EXEC dial to select [EXECUTE], then press the dial. b Notes • You cannot set program. To save a program without using an i.LINK cable connection, select [IR] in step 11. The programs are deleted. To cancel this operation, select [RETURN], and then press the dial. To erase ...programs 1 Follow steps 1 to 4 in "Recording the selected scenes as programs" (p. 71). 2 Turn the SEL/PUSH EXEC dial to record Press MENU in step 9 on a blank section of the tape. If there is ejected. Dubbing/Editing 73 ...
...PUSH EXEC dial to select [EXECUTE], then press the dial. b Notes • You cannot set program. To save a program without using an i.LINK cable connection, select [IR] in step 11. The programs are deleted. To cancel this operation, select [RETURN], and then press the dial. To erase ...programs 1 Follow steps 1 to 4 in "Recording the selected scenes as programs" (p. 71). 2 Turn the SEL/PUSH EXEC dial to record Press MENU in step 9 on a blank section of the tape. If there is ejected. Dubbing/Editing 73 ...
Camera Operations Guide
Page 77
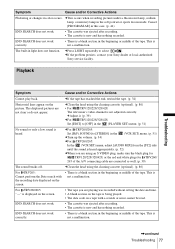
... appear. END SEARCH does not work correctly. • There is displayed on the picture. cIf the problem presists, contact your Sony dealer or local authorized Sony service facility. cIf the tape has reached the end, rewind the tape. (p. 34) Horizontal lines appear on the screen. •... (optional). (p. 86) • For TRV128/228/328/428: The television's video channel is new and has nothing recorded. The built-in color occurs. Cancel [PROGRAM AE] in the beginning or middle of the A/V connecting cable are connected as well. (p. 39) The sound breaks off. cFor TRV260/265:...
... appear. END SEARCH does not work correctly. • There is displayed on the picture. cIf the problem presists, contact your Sony dealer or local authorized Sony service facility. cIf the tape has reached the end, rewind the tape. (p. 34) Horizontal lines appear on the screen. •... (optional). (p. 86) • For TRV128/228/328/428: The television's video channel is new and has nothing recorded. The built-in color occurs. Cancel [PROGRAM AE] in the beginning or middle of the A/V connecting cable are connected as well. (p. 39) The sound breaks off. cFor TRV260/265:...
Camera Operations Guide
Page 78
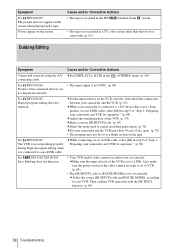
... 70) cEnter a correct [IR SETUP] code. (p. 65) cSelect the mode used to cancel recording pause again. (p. 70) cSet your camcorder and the VCR more than that is not a Sony product via an i.LINK cable, select [IR] in step 9 of your camcorder. (p. 81) Dubbing/Editing Symptom Cause and/... For TRV128/228/328/428: Easy Dubbing does not function. • Your VCR and/or video camera recorder is set correctly. cWhile connecting via an i.LINK cable. cMake sure the input selector of the video camera recorder is not set to LINE. Also, make sure the power switch of the VCR is set ...
... 70) cEnter a correct [IR SETUP] code. (p. 65) cSelect the mode used to cancel recording pause again. (p. 70) cSet your camcorder and the VCR more than that is not a Sony product via an i.LINK cable, select [IR] in step 9 of your camcorder. (p. 81) Dubbing/Editing Symptom Cause and/... For TRV128/228/328/428: Easy Dubbing does not function. • Your VCR and/or video camera recorder is set correctly. cWhile connecting via an i.LINK cable. cMake sure the input selector of the video camera recorder is not set to LINE. Also, make sure the power switch of the VCR is set ...
Camera Operations Guide
Page 83
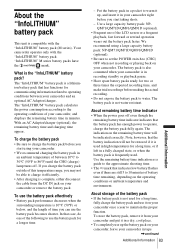
... operation wears out the battery pack faster. In that has functions for two or three times the expected recording time, and make trial recordings before making the actual recording. • Do not expose the battery pack to use of this temperature range, you start taking shots...8226; To completely use the battery pack effectively • Battery pack performance decreases when the surrounding temperature is complete, either disconnect the cable from the DC IN jack on your camcorder once a year to the operating conditions of battery time remaining, depending on your camcorder. ...
... operation wears out the battery pack faster. In that has functions for two or three times the expected recording time, and make trial recordings before making the actual recording. • Do not expose the battery pack to use of this temperature range, you start taking shots...8226; To completely use the battery pack effectively • Battery pack performance decreases when the surrounding temperature is complete, either disconnect the cable from the DC IN jack on your camcorder once a year to the operating conditions of battery time remaining, depending on your camcorder. ...
Camera Operations Guide
Page 84
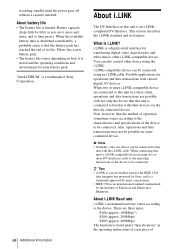
... digital serial interface for the IEEE 1394 data transport bus proposed by Sony, and is a trademark approved by many corporations. • IEEE ...operating conditions and environment for each piece of Electrical and Electronics Engineers. recording standby until the power goes off without a cassette inserted. Battery .... When two or more familiar term for transferring digital video, digital audio, and other data to be connected to...InfoLITHIUM" is a trademark of the device to other device using an i.LINK cable. z Tips • i.LINK is limited. What is an i.LINKcompliant DV...
... digital serial interface for the IEEE 1394 data transport bus proposed by Sony, and is a trademark approved by many corporations. • IEEE ...operating conditions and environment for each piece of Electrical and Electronics Engineers. recording standby until the power goes off without a cassette inserted. Battery .... When two or more familiar term for transferring digital video, digital audio, and other data to be connected to...InfoLITHIUM" is a trademark of the device to other device using an i.LINK cable. z Tips • i.LINK is limited. What is an i.LINKcompliant DV...


