
Operating Instructions
Page 4
CCD-TRV118 : CCD-TRV318 : CCD-TRV418 : DCR-TRV150 : DCR-TRV250 : DCR-TRV350 : DCR-TRV351 : Instructions with icons are used to capture images onto your computer (p. 208) 4 Capturing images on your computer - Recording moving or still images, and playing them back b On the tape •Recording moving pictures (p. 30) •Recording...163) •Viewing moving pictures (p. 166) Main Features •Viewing pictures recorded on a tape or live from your camcorder using the USB cable (p. 197) •Viewing images recorded on a "Memory Stick" using the USB cable (p. 185) •...
CCD-TRV118 : CCD-TRV318 : CCD-TRV418 : DCR-TRV150 : DCR-TRV250 : DCR-TRV350 : DCR-TRV351 : Instructions with icons are used to capture images onto your computer (p. 208) 4 Capturing images on your computer - Recording moving or still images, and playing them back b On the tape •Recording moving pictures (p. 30) •Recording...163) •Viewing moving pictures (p. 166) Main Features •Viewing pictures recorded on a tape or live from your camcorder using the USB cable (p. 197) •Viewing images recorded on a "Memory Stick" using the USB cable (p. 185) •...
Operating Instructions
Page 5
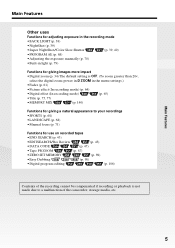
... 20×, select the digital zoom power in D ZOOM in the menu settings.) •Fader (p. 61) •Picture effect (In recording mode) (p. 64) •Digital effect (In recording mode) (p. 65) •Title (p. 75, 77) •MEMORY MIX (p. 140) Functions for giving a natural appearance to your...8226;Tape PB ZOOM (p. 87) •ZERO SET MEMORY (p. 89) •Easy Dubbing (p. 98) •Digital program editing (p. 106) Contents of the recording cannot be compensated if recording or playback is not made due to a malfunction of the camcorder, storage media, etc. Main Features 5
... 20×, select the digital zoom power in D ZOOM in the menu settings.) •Fader (p. 61) •Picture effect (In recording mode) (p. 64) •Digital effect (In recording mode) (p. 65) •Title (p. 75, 77) •MEMORY MIX (p. 140) Functions for giving a natural appearance to your...8226;Tape PB ZOOM (p. 87) •ZERO SET MEMORY (p. 89) •Easy Dubbing (p. 98) •Digital program editing (p. 106) Contents of the recording cannot be compensated if recording or playback is not made due to a malfunction of the camcorder, storage media, etc. Main Features 5
Operating Instructions
Page 7
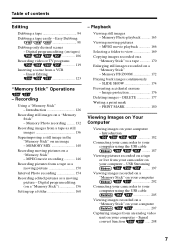
... from a VCR - Image protection 176 Deleting images - USB Streaming ......... 197 Viewing images recorded on a "Memory Stick" on your computer 202 Connecting your camcorder to a tape 170 Enlarging still images recorded on an image - Digital program editing (on tapes 106 Recording video or TV programs 119 Inserting a scene from a tape as a moving pictures - Insert Editing 123...
... from a VCR - Image protection 176 Deleting images - USB Streaming ......... 197 Viewing images recorded on a "Memory Stick" on your computer 202 Connecting your camcorder to a tape 170 Enlarging still images recorded on an image - Digital program editing (on tapes 106 Recording video or TV programs 119 Inserting a scene from a tape as a moving pictures - Insert Editing 123...
Operating Instructions
Page 8
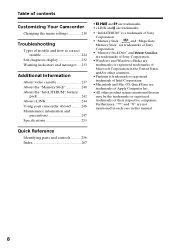
... 232 Warning indicators and messages .... 233 Additional Information About video cassette 237 About the "Memory Stick 240 About the "InfoLITHIUM" battery pack 242 About i.LINK 244 Using your camcorder abroad .......... 246 Maintenance information and precautions 247 Specifications 253 ...and are trademarks. • "InfoLITHIUM" is a trademark of Sony Corporation. • "Memory Stick," and "MagicGate Memory Stick" are trademarks of Sony Corporation. • "Memory Stick Duo" and are trademarks of Sony Corporation. •Windows and Windows Media are trademarks of Apple...
... 232 Warning indicators and messages .... 233 Additional Information About video cassette 237 About the "Memory Stick 240 About the "InfoLITHIUM" battery pack 242 About i.LINK 244 Using your camcorder abroad .......... 246 Maintenance information and precautions 247 Specifications 253 ...and are trademarks. • "InfoLITHIUM" is a trademark of Sony Corporation. • "Memory Stick," and "MagicGate Memory Stick" are trademarks of Sony Corporation. • "Memory Stick Duo" and are trademarks of Sony Corporation. •Windows and Windows Media are trademarks of Apple...
Operating Instructions
Page 9
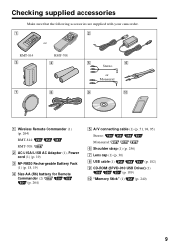
Checking supplied accessories Make sure that the following accessories are supplied with your camcorder. 1 2 or RMT-814 3 RMT-708 4 5 6 Stereo or Monaural 7 8 9 q; 1 Wireless Remote Commander (1) (p. 264) RMT-814: RMT-708: 2 AC-L15A/L15B AC Adaptor (1), Power cord (1) (p. 19) 3 NP-...
Checking supplied accessories Make sure that the following accessories are supplied with your camcorder. 1 2 or RMT-814 3 RMT-708 4 5 6 Stereo or Monaural 7 8 9 q; 1 Wireless Remote Commander (1) (p. 264) RMT-814: RMT-708: 2 AC-L15A/L15B AC Adaptor (1), Power cord (1) (p. 19) 3 NP-...

Operating Instructions
Page 10
See the page in the direction of the arrow and open the lid. 2 Push the center of your camcorder outdoors (p. 18). Power cord Connect the plug with the cassette window facing up. 3 Close the cassette compartment by pressing on a tape of the... the DC IN jack cover. Quick Start Guide 10 Recording on a tape This chapter introduces you to the basic features to record on the cassette compartment. Quick Start Guide - Connecting the power cord (p. 24) Use the battery pack when using your camcorder. After the cassette compartment goes down completely, close the...
See the page in the direction of the arrow and open the lid. 2 Push the center of your camcorder outdoors (p. 18). Power cord Connect the plug with the cassette window facing up. 3 Close the cassette compartment by pressing on a tape of the... the DC IN jack cover. Quick Start Guide 10 Recording on a tape This chapter introduces you to the basic features to record on the cassette compartment. Quick Start Guide - Connecting the power cord (p. 24) Use the battery pack when using your camcorder. After the cassette compartment goes down completely, close the...

Operating Instructions
Page 11
... eye against this part when the LCD panel is not attached when you want to record the date and time for a picture, set up your camcorder. 3 Open the LCD panel while pressing OPEN. If you purchase your camcorder by the viewfinder, the LCD panel, or the battery pack. * Modes on the POWER...switch vary depending on the LCD screen. 2 Set the POWER switch to CAMERA while pressing the small green button. PLAY CR 1 Set the POWER switch to rewind the tape. The picture in the viewfinder is not set the clock before recording (p. 26). Adjust the viewfinder lens to start playback. To stop...
... eye against this part when the LCD panel is not attached when you want to record the date and time for a picture, set up your camcorder. 3 Open the LCD panel while pressing OPEN. If you purchase your camcorder by the viewfinder, the LCD panel, or the battery pack. * Modes on the POWER...switch vary depending on the LCD screen. 2 Set the POWER switch to CAMERA while pressing the small green button. PLAY CR 1 Set the POWER switch to rewind the tape. The picture in the viewfinder is not set the clock before recording (p. 26). Adjust the viewfinder lens to start playback. To stop...

Operating Instructions
Page 12
... "Memory Stick," press the "Memory Stick" once lightly. 12 Open the DC IN jack cover. Recording on a "Memory Stick" Quick Start Guide This chapter introduces you to the basic features to record on a "Memory Stick" of your camcorder outdoors (p. 18). Power cord Connect the plug with the b mark facing the LCD panel as...
... "Memory Stick," press the "Memory Stick" once lightly. 12 Open the DC IN jack cover. Recording on a "Memory Stick" Quick Start Guide This chapter introduces you to the basic features to record on a "Memory Stick" of your camcorder outdoors (p. 18). Power cord Connect the plug with the b mark facing the LCD panel as...
Operating Instructions
Page 13
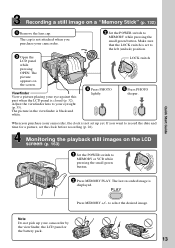
...the LCD panel is not set up your eyesight (p. 35). The last recorded image is black and white. Viewfinder View a picture placing your camcorder. 3 Open the LCD panel while pressing OPEN. The cap is not attached when you purchase your camcorder, the clock is closed (p. 32). Note Do not pick up yet.... Adjust the viewfinder lens to MEMORY while pressing the small green button. PHOTO PHOTO 2 Set the POWER switch to your camcorder by the viewfinder, the LCD panel or the battery pack. 13 LOCK switch V POWER OFF(CHG) CAM CR ME 4 Press PHOTO lightly. 5 Press ...
...the LCD panel is not set up your eyesight (p. 35). The last recorded image is black and white. Viewfinder View a picture placing your camcorder. 3 Open the LCD panel while pressing OPEN. The cap is not attached when you purchase your camcorder, the clock is closed (p. 32). Note Do not pick up yet.... Adjust the viewfinder lens to MEMORY while pressing the small green button. PHOTO PHOTO 2 Set the POWER switch to your camcorder by the viewfinder, the LCD panel or the battery pack. 13 LOCK switch V POWER OFF(CHG) CAM CR ME 4 Press PHOTO lightly. 5 Press ...

Operating Instructions
Page 14
... ." Otherwise, the model name is the model used for the seven models listed in this manual, buttons and settings on your camcorder are clearly indicated in the illustrations. When you carry out an operation, you start reading this manual The instructions in the table ...IN/OUT - Getting Started - Before you can hear a beep to CAMERA. e.g. Types of your camcorder, check the model number by looking at the bottom of differences Model Recording system Playback system AUDIO/VIDEO jack S VIDEO jack DV jack USB jack "Memory Stick" slot LANC jack SteadyShot ...
... ." Otherwise, the model name is the model used for the seven models listed in this manual, buttons and settings on your camcorder are clearly indicated in the illustrations. When you carry out an operation, you start reading this manual The instructions in the table ...IN/OUT - Getting Started - Before you can hear a beep to CAMERA. e.g. Types of your camcorder, check the model number by looking at the bottom of differences Model Recording system Playback system AUDIO/VIDEO jack S VIDEO jack DV jack USB jack "Memory Stick" slot LANC jack SteadyShot ...
Operating Instructions
Page 15
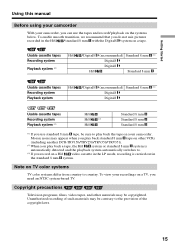
.... Note on TV color systems TV color systems differ from country to . *3) If you play back standard 8 mm tape on your camcorder. Mosaic noise may appear when you record on a Hi8 video cassette in the LP mode, recording is automatically detected and the playback system automatically switches to country. Copyright precautions Television programs, films...
.... Note on TV color systems TV color systems differ from country to . *3) If you play back standard 8 mm tape on your camcorder. Mosaic noise may appear when you record on a Hi8 video cassette in the LP mode, recording is automatically detected and the playback system automatically switches to country. Copyright precautions Television programs, films...
Operating Instructions
Page 16
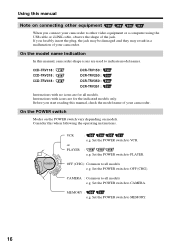
... Set the POWER switch to CAMERA. Set the POWER switch to VCR. : e.g. CCD-TRV118 : CCD-TRV318 : CCD-TRV418 : DCR-TRV150 : DCR-TRV250 : DCR-TRV350 : DCR-TRV351 : Instructions with icons are used to indicate model names. Consider this manual, camcorder-shape icons are for all ...CAMERA : Common to PLAYER. If you forcibly insert the plug, the jack may be damaged and they may result in a malfunction of your camcorder. MEMORY : e.g. Set the POWER switch to all models e.g. Before you connect your camcorder to all models e.g. OFF (CHG) : Common to other video...
... Set the POWER switch to CAMERA. Set the POWER switch to VCR. : e.g. CCD-TRV118 : CCD-TRV318 : CCD-TRV418 : DCR-TRV150 : DCR-TRV250 : DCR-TRV350 : DCR-TRV351 : Instructions with icons are used to indicate model names. Consider this manual, camcorder-shape icons are for all ...CAMERA : Common to PLAYER. If you forcibly insert the plug, the jack may be damaged and they may result in a malfunction of your camcorder. MEMORY : e.g. Set the POWER switch to all models e.g. Before you connect your camcorder to all models e.g. OFF (CHG) : Common to other video...
Operating Instructions
Page 17
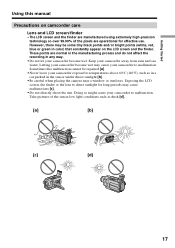
...pictures of the pixels are normal in the manufacturing process and do not affect the recording in any way. •Do not let your camcorder to malfunction. These points are operational for long periods may cause your camcorder become wet may cause malfunctions [c]. •Do not directly shoot the sun. ...sun in low light conditions such as in a car parked in the sun or under direct sunlight [b]. •Be careful when placing the camera near a window or outdoors. However, there may be repaired [a]. •Never leave your camcorder away from rain and sea water. Keep your...
...pictures of the pixels are normal in the manufacturing process and do not affect the recording in any way. •Do not let your camcorder to malfunction. These points are operational for long periods may cause your camcorder become wet may cause malfunctions [c]. •Do not directly shoot the sun. ...sun in low light conditions such as in a car parked in the sun or under direct sunlight [b]. •Be careful when placing the camera near a window or outdoors. However, there may be repaired [a]. •Never leave your camcorder away from rain and sea water. Keep your...
Operating Instructions
Page 18
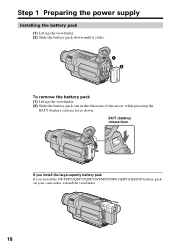
BATT (battery) release lever If you install the large-capacity battery pack If you install the NP-FM70/QM71/QM71D/FM90/FM91/QM91/QM91D battery pack on your camcorder, extend the viewfinder. 18 Step 1 Preparing the power supply Installing the battery pack (1) Lift up the viewfinder. (2) Slide the battery pack down until it clicks. 1 2 To remove the battery pack (1) Lift up the viewfinder. (2) Slide the battery pack out in the direction of the arrow while pressing the BATT (battery) release lever down.
BATT (battery) release lever If you install the large-capacity battery pack If you install the NP-FM70/QM71/QM71D/FM90/FM91/QM91/QM91D battery pack on your camcorder, extend the viewfinder. 18 Step 1 Preparing the power supply Installing the battery pack (1) Lift up the viewfinder. (2) Slide the battery pack down until it clicks. 1 2 To remove the battery pack (1) Lift up the viewfinder. (2) Slide the battery pack out in the direction of the arrow while pressing the BATT (battery) release lever down.
Operating Instructions
Page 19
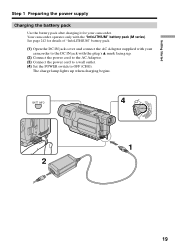
...switch to the DC IN jack with the plug's v mark facing up when charging begins. Your camcorder operates only with the "InfoLITHIUM" battery pack (M series). See page 242 for your camcorder to OFF (CHG). Getting Started Step 1 Preparing the power supply Charging the battery pack Use ...the battery pack after charging it for details of "InfoLITHIUM" battery pack. (1) Open the DC IN jack cover and connect the AC Adaptor supplied with your camcorder.
...switch to the DC IN jack with the plug's v mark facing up when charging begins. Your camcorder operates only with the "InfoLITHIUM" battery pack (M series). See page 242 for your camcorder to OFF (CHG). Getting Started Step 1 Preparing the power supply Charging the battery pack Use ...the battery pack after charging it for details of "InfoLITHIUM" battery pack. (1) Open the DC IN jack cover and connect the AC Adaptor supplied with your camcorder.

Operating Instructions
Page 20
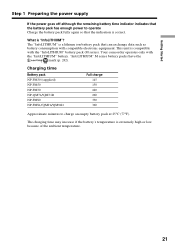
... displayed as a rough standard. The battery charge level is not set to the value displayed in the BATTERY INFO as percentage and recordable time with the metal parts on your camcorder. REC TIME AVAILABLE LCD SCREEN: 80 min VIEWFINDER: 105 min Full charge After charging the battery pack Disconnect the AC Adaptor...
... displayed as a rough standard. The battery charge level is not set to the value displayed in the BATTERY INFO as percentage and recordable time with the metal parts on your camcorder. REC TIME AVAILABLE LCD SCREEN: 80 min VIEWFINDER: 105 min Full charge After charging the battery pack Disconnect the AC Adaptor...
Operating Instructions
Page 21
Your camcorder operates only with the "InfoLITHIUM" battery pack (M series). The charging time may increase if the battery's temperature is "InfoLITHIUM"? TM SERIES Charging time Battery pack ...
Your camcorder operates only with the "InfoLITHIUM" battery pack (M series). The charging time may increase if the battery's temperature is "InfoLITHIUM"? TM SERIES Charging time Battery pack ...
Operating Instructions
Page 24
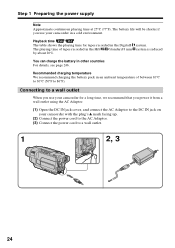
... other countries For details, see page 246. system. Connecting to a wall outlet When you use your camcorder for tapes recorded in the Digital8 The playing time of tapes recorded in an ambient temperature of between 10°C to 30°C (50°F to a wall outlet. 1 2, 3 24 system is reduced You can ...playing time at 25°C (77°F). Playback time The table shows the playing time for a long time, we recommend that you use your camcorder with the plug's v mark facing up. (2) Connect the power cord to the AC Adaptor. (3) Connect the power cord to 86°F).
... other countries For details, see page 246. system. Connecting to a wall outlet When you use your camcorder for tapes recorded in the Digital8 The playing time of tapes recorded in an ambient temperature of between 10°C to 30°C (50°F to a wall outlet. 1 2, 3 24 system is reduced You can ...playing time at 25°C (77°F). Playback time The table shows the playing time for a long time, we recommend that you use your camcorder with the plug's v mark facing up. (2) Connect the power cord to the AC Adaptor. (3) Connect the power cord to 86°F).

Operating Instructions
Page 25
Using a car battery Use Sony Car Battery Adaptor (optional). This means that the battery pack cannot supply any trouble occurs with this unit, disconnect the plug from the AC power ... as possible to cut off . Getting Started Step 1 Preparing the power supply PRECAUTION The set itself has been turned off the power. Refer to your camcorder. •The DC IN jack has "source priority." While using the AC Adaptor, if any power if the power cord is connected to the DC...
Using a car battery Use Sony Car Battery Adaptor (optional). This means that the battery pack cannot supply any trouble occurs with this unit, disconnect the plug from the AC power ... as possible to cut off . Getting Started Step 1 Preparing the power supply PRECAUTION The set itself has been turned off the power. Refer to your camcorder. •The DC IN jack has "source priority." While using the AC Adaptor, if any power if the power cord is connected to the DC...
Operating Instructions
Page 26
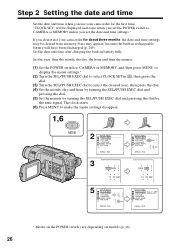
..., then the month, the day, the hour and then the minute. (1) Set the POWER switch to CAMERA or MEMORY, and then press MENU to display the menu settings.* (2) Turn the SEL/PUSH EXEC dial to CAMERA or MEMORY unless you set the date and time settings.* If you set the POWER switch... on the POWER switch vary depending on models (p. 16). 26 Step 2 Setting the date and time Set the date and time when you use your camcorder for about three months, the date and time settings may appear) because the built-in rechargeable battery will be cleared from memory (bars may be...
..., then the month, the day, the hour and then the minute. (1) Set the POWER switch to CAMERA or MEMORY, and then press MENU to display the menu settings.* (2) Turn the SEL/PUSH EXEC dial to CAMERA or MEMORY unless you set the date and time settings.* If you set the POWER switch... on the POWER switch vary depending on models (p. 16). 26 Step 2 Setting the date and time Set the date and time when you use your camcorder for about three months, the date and time settings may appear) because the built-in rechargeable battery will be cleared from memory (bars may be...


