Operating Instructions
Page 9
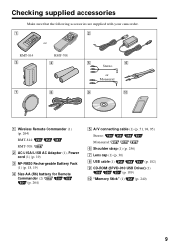
... the following accessories are supplied with your camcorder. 1 2 or RMT-814 3 RMT-708 4 5 6 Stereo or Monaural 7 8 9 q; 1 Wireless Remote Commander (1) (p. 264) RMT-814: RMT-708: 2 AC-L15A/L15B AC Adaptor (1), Power cord (1) (p. 19) 3 NP-FM30 Rechargeable Battery Pack (1) (p. 18, 19) 4 Size AA (R6) battery for Remote Commander (2) (p. 264) 5 A/V connecting cable (1) (p. 51, 94, 95) Stereo...
... the following accessories are supplied with your camcorder. 1 2 or RMT-814 3 RMT-708 4 5 6 Stereo or Monaural 7 8 9 q; 1 Wireless Remote Commander (1) (p. 264) RMT-814: RMT-708: 2 AC-L15A/L15B AC Adaptor (1), Power cord (1) (p. 19) 3 NP-FM30 Rechargeable Battery Pack (1) (p. 18, 19) 4 Size AA (R6) battery for Remote Commander (2) (p. 264) 5 A/V connecting cable (1) (p. 51, 94, 95) Stereo...

Operating Instructions
Page 10
After the cassette compartment goes down completely, close the lid. Recording on a tape This chapter introduces you to the basic features to record on the cassette compartment. AC Adaptor (supplied) Inserting a cassette (p. 28) 1 Slide OPEN/ EJECT in parentheses "( )" for more information. Open the DC IN jack cover. Quick Start Guide 10 Connecting the power ...
After the cassette compartment goes down completely, close the lid. Recording on a tape This chapter introduces you to the basic features to record on the cassette compartment. AC Adaptor (supplied) Inserting a cassette (p. 28) 1 Slide OPEN/ EJECT in parentheses "( )" for more information. Open the DC IN jack cover. Quick Start Guide 10 Connecting the power ...

Operating Instructions
Page 12
... lightly. 12 Quick Start Guide - AC Adaptor (supplied) Inserting a "Memory Stick" (p. 127) Insert a "Memory Stick" in parentheses "( )" for more information. Power cord Connect the plug with the b mark facing the LCD panel as illustrated. Open the DC IN jack cover. Recording on a "Memory Stick" Quick Start... Guide This chapter introduces you to the basic features to record on a "Memory Stick" of your camcorder outdoors (p. 18). See the page in the ...
... lightly. 12 Quick Start Guide - AC Adaptor (supplied) Inserting a "Memory Stick" (p. 127) Insert a "Memory Stick" in parentheses "( )" for more information. Power cord Connect the plug with the b mark facing the LCD panel as illustrated. Open the DC IN jack cover. Recording on a "Memory Stick" Quick Start... Guide This chapter introduces you to the basic features to record on a "Memory Stick" of your camcorder outdoors (p. 18). See the page in the ...
Operating Instructions
Page 19
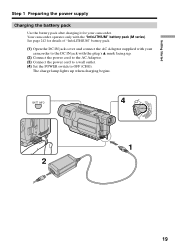
... it for details of "InfoLITHIUM" battery pack. (1) Open the DC IN jack cover and connect the AC Adaptor supplied with the "InfoLITHIUM" battery pack (M series). The charge lamp lights up . (2) Connect the power cord to the AC Adaptor. (3) Connect the power cord to a wall outlet. (4) Set the POWER switch to the DC IN jack...
... it for details of "InfoLITHIUM" battery pack. (1) Open the DC IN jack cover and connect the AC Adaptor supplied with the "InfoLITHIUM" battery pack (M series). The charge lamp lights up . (2) Connect the power cord to the AC Adaptor. (3) Connect the power cord to a wall outlet. (4) Set the POWER switch to the DC IN jack...

Operating Instructions
Page 20
...not installed properly. - When you keep pressing BATT INFO, the BATTERY INFO is not displayed in 10% increments. If you use the AC Adaptor Place the AC Adaptor near a wall outlet. The battery pack is displayed. The POWER switch is displayed for about 20 seconds. The information is not set to...INFO BATTERY CHARGE LEVEL 0% 50% 100% The battery charge level is displayed for another seven seconds. This may cause a short-circuit, damaging the AC Adaptor. The numeric value displayed in the BATTERY INFO as percentage and recordable time with the LCD screen/viewfinder.
...not installed properly. - When you keep pressing BATT INFO, the BATTERY INFO is not displayed in 10% increments. If you use the AC Adaptor Place the AC Adaptor near a wall outlet. The battery pack is displayed. The POWER switch is displayed for about 20 seconds. The information is not set to...INFO BATTERY CHARGE LEVEL 0% 50% 100% The battery charge level is displayed for another seven seconds. This may cause a short-circuit, damaging the AC Adaptor. The numeric value displayed in the BATTERY INFO as percentage and recordable time with the LCD screen/viewfinder.
Operating Instructions
Page 24
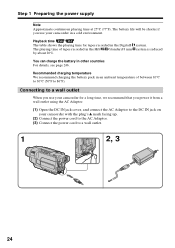
...°C (50°F to a wall outlet. 1 2, 3 24 system is reduced You can charge the battery in an ambient temperature of tapes recorded in a cold environment. system. Recommended charging temperature We recommend charging the battery pack in other countries For details, see page 246. Connecting to the DC... 8 mm by about 20%. The battery life will be shorter if you power it from a wall outlet using the AC Adaptor. (1) Open the DC IN jack cover, and connect the AC Adaptor to a wall outlet When you use your camcorder with the plug's v mark facing up. (2) Connect the power cord...
...°C (50°F to a wall outlet. 1 2, 3 24 system is reduced You can charge the battery in an ambient temperature of tapes recorded in a cold environment. system. Recommended charging temperature We recommend charging the battery pack in other countries For details, see page 246. Connecting to the DC... 8 mm by about 20%. The battery life will be shorter if you power it from a wall outlet using the AC Adaptor. (1) Open the DC IN jack cover, and connect the AC Adaptor to a wall outlet When you use your camcorder with the plug's v mark facing up. (2) Connect the power cord...

Operating Instructions
Page 25
...priority." Refer to the operating instructions of the Car Battery Adaptor for further information. 25 Notes •The AC Adaptor can supply power even if the battery pack is not plugged into a wall outlet. •Place the AC Adaptor near a wall outlet. This means that the battery pack ...cannot supply any trouble occurs with this unit, disconnect the plug from the AC power source (house current) as long as possible to cut off . Using a car battery Use Sony Car Battery Adaptor (optional). Getting Started...
...priority." Refer to the operating instructions of the Car Battery Adaptor for further information. 25 Notes •The AC Adaptor can supply power even if the battery pack is not plugged into a wall outlet. •Place the AC Adaptor near a wall outlet. This means that the battery pack ...cannot supply any trouble occurs with this unit, disconnect the plug from the AC power source (house current) as long as possible to cut off . Using a car battery Use Sony Car Battery Adaptor (optional). Getting Started...
Operating Instructions
Page 51
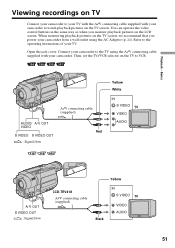
...VIDEO Red S VIDEO S VIDEO OUT : Signal flow Yellow White IN S VIDEO TV VIDEO AUDIO A/ V OUT S VIDEO OUT : Signal flow CCD-TRV418 A/V connecting cable (supplied) Yellow IN S VIDEO TV Black VIDEO AUDIO 51 When monitoring playback pictures on the TV to watch playback pictures on the LCD screen. Refer to the TV using the AC Adaptor... (p. 24). You can operate the video control buttons in the same way as when you power your camcorder. Open the jack cover. Connect your camcorder to the operating instructions of your camcorder to VCR. Basics Viewing recordings on...
...VIDEO Red S VIDEO S VIDEO OUT : Signal flow Yellow White IN S VIDEO TV VIDEO AUDIO A/ V OUT S VIDEO OUT : Signal flow CCD-TRV418 A/V connecting cable (supplied) Yellow IN S VIDEO TV Black VIDEO AUDIO 51 When monitoring playback pictures on the TV to watch playback pictures on the LCD screen. Refer to the TV using the AC Adaptor... (p. 24). You can operate the video control buttons in the same way as when you power your camcorder. Open the jack cover. Connect your camcorder to the operating instructions of your camcorder to VCR. Basics Viewing recordings on...
Operating Instructions
Page 192
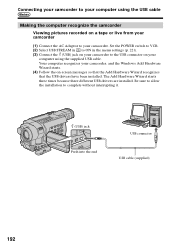
... drivers are installed. Connecting your camcorder to your computer using the USB cable Making the computer recognize the camcorder Viewing pictures recorded on a tape or live from your camcorder (1) Connect the AC Adaptor to the USB connector on your computer using the supplied USB cable. Be sure to allow the installation to complete...
... drivers are installed. Connecting your camcorder to your computer using the USB cable Making the computer recognize the camcorder Viewing pictures recorded on a tape or live from your camcorder (1) Connect the AC Adaptor to the USB connector on your computer using the supplied USB cable. Be sure to allow the installation to complete...
Operating Instructions
Page 193
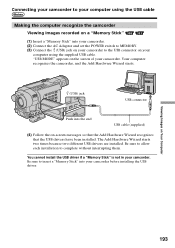
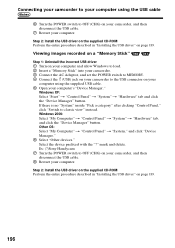
...cable. Your computer recognizes the camcorder, and the Add Hardware Wizard starts. (USB) jack USB connector Push into your camcorder. (2) Connect the AC Adaptor and set the POWER switch to MEMORY. (3) Connect the (USB) jack on your camcorder to the USB connector on your camcorder. "USB MODE..." appears on Your Computer 193 Viewing Images on the screen of your computer using the USB cable Making the computer recognize the camcorder Viewing images recorded on a "Memory Stick" (1) Insert a "Memory Stick" into the end USB cable (supplied) (4) Follow the on-screen messages so that...
...cable. Your computer recognizes the camcorder, and the Add Hardware Wizard starts. (USB) jack USB connector Push into your camcorder. (2) Connect the AC Adaptor and set the POWER switch to MEMORY. (3) Connect the (USB) jack on your camcorder to the USB connector on your camcorder. "USB MODE..." appears on Your Computer 193 Viewing Images on the screen of your computer using the USB cable Making the computer recognize the camcorder Viewing images recorded on a "Memory Stick" (1) Insert a "Memory Stick" into the end USB cable (supplied) (4) Follow the on-screen messages so that...
Operating Instructions
Page 194
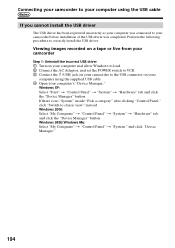
...: Select "My Computer" t "Control Panel" t "System," and click "Device Manager." 194 Viewing images recorded on a tape or live from your camcorder Step 1: Uninstall the incorrect USB driver 1 Turn on your computer and allow Windows to load. 2 Connect the AC Adaptor, and set the POWER switch to VCR. 3 Connect the (USB) jack on your...
...: Select "My Computer" t "Control Panel" t "System," and click "Device Manager." 194 Viewing images recorded on a tape or live from your camcorder Step 1: Uninstall the incorrect USB driver 1 Turn on your computer and allow Windows to load. 2 Connect the AC Adaptor, and set the POWER switch to VCR. 3 Connect the (USB) jack on your...
Operating Instructions
Page 196
..."Hardware" tab, and click the "Device Manager" button. Viewing images recorded on a "Memory Stick" Step 1: Uninstall the incorrect USB driver 1 Turn on your computer and allow Windows to load. 2 Insert a "Memory Stick" into your camcorder. 3 Connect the AC Adaptor, and set the POWER switch to MEMORY. 4 Connect the (USB) ...jack on your camcorder to the USB connector on your computer using the USB cable 6 Turn the POWER switch to OFF (CHG) on your camcorder, and then disconnect the USB cable. 8 Restart your computer. Ex: (?)Sony...
..."Hardware" tab, and click the "Device Manager" button. Viewing images recorded on a "Memory Stick" Step 1: Uninstall the incorrect USB driver 1 Turn on your computer and allow Windows to load. 2 Insert a "Memory Stick" into your camcorder. 3 Connect the AC Adaptor, and set the POWER switch to MEMORY. 4 Connect the (USB) ...jack on your camcorder to the USB connector on your computer using the USB cable 6 Turn the POWER switch to OFF (CHG) on your camcorder, and then disconnect the USB cable. 8 Restart your computer. Ex: (?)Sony...
Operating Instructions
Page 197
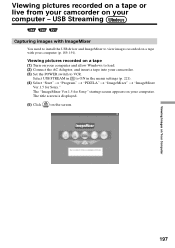
The "ImageMixer Ver.1.5 for Sony." Viewing pictures recorded on a tape or live from your camcorder on Your Computer 197 Viewing Images on your computer (p. 189, 191). The title screen is displayed. (5) ...menu settings (p. 221). (4) Select "Start" t "Program" t "PIXELA" t "ImageMixer" t "ImageMixer Ver.1.5 for Sony" startup screen appears on your camcorder. (3) Set the POWER switch to view images recorded on the screen. Viewing pictures recorded on a tape (1) Turn on your computer and allow Windows to load. (2) Connect the AC Adaptor, and insert a tape into your computer.
The "ImageMixer Ver.1.5 for Sony." Viewing pictures recorded on a tape or live from your camcorder on Your Computer 197 Viewing Images on your computer (p. 189, 191). The title screen is displayed. (5) ...menu settings (p. 221). (4) Select "Start" t "Program" t "PIXELA" t "ImageMixer" t "ImageMixer Ver.1.5 for Sony" startup screen appears on your camcorder. (3) Set the POWER switch to view images recorded on the screen. Viewing pictures recorded on a tape (1) Turn on your computer and allow Windows to load. (2) Connect the AC Adaptor, and insert a tape into your computer.

Operating Instructions
Page 202
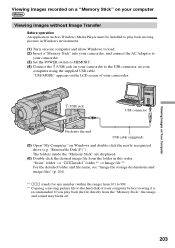
... a "Memory Stick" on your computer Viewing images with Image Transfer The image data recorded on your computer with ImageMixer. (1) Turn on your computer and allow Windows to load. (2) Insert a "Memory Stick" into your camcorder, and connect the AC Adaptor to your camcorder. (3) Set the POWER switch to MEMORY. (4) Connect the (USB) jack on...
... a "Memory Stick" on your computer Viewing images with Image Transfer The image data recorded on your computer with ImageMixer. (1) Turn on your computer and allow Windows to load. (2) Insert a "Memory Stick" into your camcorder, and connect the AC Adaptor to your camcorder. (3) Set the POWER switch to MEMORY. (4) Connect the (USB) jack on...
Operating Instructions
Page 203
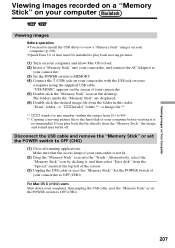
... you play back moving picture file to the hard disk of your camcorder. (USB) jack USB connector Push into your camcorder, and connect the AC Adaptor to your camcorder. (3) Set the POWER switch to MEMORY. (4) Connect the (USB) jack on your camcorder to the USB connector on your ...-click the newly recognized drive (e.g. "USB MODE" appears on the LCD screen of your computer using the supplied USB cable. Viewing images recorded on a "Memory Stick" on your computer Viewing images without Image Transfer Before operation An application such as Windows Media Player must be installed...
... you play back moving picture file to the hard disk of your camcorder. (USB) jack USB connector Push into your camcorder, and connect the AC Adaptor to your camcorder. (3) Set the POWER switch to MEMORY. (4) Connect the (USB) jack on your camcorder to the USB connector on your ...-click the newly recognized drive (e.g. "USB MODE" appears on the LCD screen of your computer using the supplied USB cable. Viewing images recorded on a "Memory Stick" on your computer Viewing images without Image Transfer Before operation An application such as Windows Media Player must be installed...
Operating Instructions
Page 207
...(1) Turn on your computer and allow Mac OS to load. (2) Insert a "Memory Stick" into the "Trash." Viewing Images on Your Computer Viewing images recorded on a "Memory Stick" on your computer Viewing images Before operation •You need to install the USB driver to view a "Memory Stick" images on ...Alternatively, select the "Memory Stick" icon by clicking it is not lit. (2) Drag the "Memory Stick" icon into your camcorder, and connect the AC Adaptor to your camcorder. (3) Set the POWER switch to MEMORY. (4) Connect the (USB) jack on your camcorder with the USB jack on your computer ...
...(1) Turn on your computer and allow Mac OS to load. (2) Insert a "Memory Stick" into the "Trash." Viewing Images on Your Computer Viewing images recorded on a "Memory Stick" on your computer Viewing images Before operation •You need to install the USB driver to view a "Memory Stick" images on ...Alternatively, select the "Memory Stick" icon by clicking it is not lit. (2) Drag the "Memory Stick" icon into your camcorder, and connect the AC Adaptor to your camcorder. (3) Set the POWER switch to MEMORY. (4) Connect the (USB) jack on your camcorder with the USB jack on your computer ...
Operating Instructions
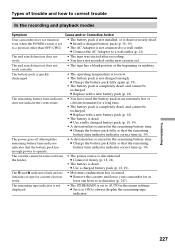
Page 227
...dead. c Set it firmly (p. 18, 24). • The battery is dead. c Install a charged battery pack (p. 18, 19). • The AC Adaptor is disconnected. The end search function does not work . • Moisture condensation has occurred. The end search function does not work correctly. • The ... recording and playback modes Symptom Cause and/or Corrective Action Your camcorder does not function even when the POWER switch is set to AUTO in an extremely hot or cold environment for a long time. • The battery pack is not charged enough. c Connect the AC Adaptor...
...dead. c Set it firmly (p. 18, 24). • The battery is dead. c Install a charged battery pack (p. 18, 19). • The AC Adaptor is disconnected. The end search function does not work . • Moisture condensation has occurred. The end search function does not work correctly. • The ... recording and playback modes Symptom Cause and/or Corrective Action Your camcorder does not function even when the POWER switch is set to AUTO in an extremely hot or cold environment for a long time. • The battery pack is not charged enough. c Connect the AC Adaptor...
Operating Instructions
Page 230
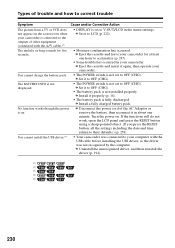
c Set it properly (p. 18). • The battery pack is fully discharged. c Install it to LCD (p. 222). c Disconnect the power cord of the AC Adaptor or remove the battery, then reconnect it again, then operate your camcorder. c Uninstall the unrecognized driver, and then reinstall the driver (p. 194). *1) *2) *3) *4) *5) 230 c Set it ...
c Set it properly (p. 18). • The battery pack is fully discharged. c Install it to LCD (p. 222). c Disconnect the power cord of the AC Adaptor or remove the battery, then reconnect it again, then operate your camcorder. c Uninstall the unrecognized driver, and then reinstall the driver (p. 194). *1) *2) *3) *4) *5) 230 c Set it ...
Operating Instructions
Page 232
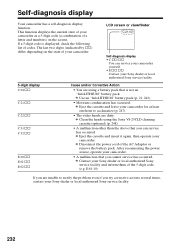
...your Sony dealer or local authorized Sony service facility and inform them of the AC Adaptor or remove the battery pack. LCD screen or viewfinder C:21:00 Self-diagnosis display • C:ss:ss You can service has occurred. c Eject the cassette and leave your Sony dealer or local authorized Sony service... camcorder for at least one hour to rectify the problem even if you are unable to acclimatize (p. 247). • The video heads are using the Sony V8-25CLD cleaning cassette (optional) (p. 248). • A malfunction other than the above that you can service your camcorder yourself...
...your Sony dealer or local authorized Sony service facility and inform them of the AC Adaptor or remove the battery pack. LCD screen or viewfinder C:21:00 Self-diagnosis display • C:ss:ss You can service has occurred. c Eject the cassette and leave your Sony dealer or local authorized Sony service... camcorder for at least one hour to rectify the problem even if you are unable to acclimatize (p. 247). • The video heads are using the Sony V8-25CLD cleaning cassette (optional) (p. 248). • A malfunction other than the above that you can service your camcorder yourself...

Operating Instructions
Page 242
...sometimes will not be used . So, the time that has functions for two or three times the expected recording time, and make a trial recordings before taking shots or playing back on your camcorder, and displays the remaining battery time in minutes. The...QM91/QM91D, optional). •Be sure to turn the POWER switch to OFF (CHG) when not taking the actual recording. •Do not expose the battery pack to ensure longer battery pack use of your camcorder or remove the battery ... either disconnect the cable from the DC IN jack on your camcorder and an AC Adaptor/charger (optional).
...sometimes will not be used . So, the time that has functions for two or three times the expected recording time, and make a trial recordings before taking shots or playing back on your camcorder, and displays the remaining battery time in minutes. The...QM91/QM91D, optional). •Be sure to turn the POWER switch to OFF (CHG) when not taking the actual recording. •Do not expose the battery pack to ensure longer battery pack use of your camcorder or remove the battery ... either disconnect the cable from the DC IN jack on your camcorder and an AC Adaptor/charger (optional).


