
Operating Instructions
Page 4
... camcorder using the USB cable (p. 197) •Viewing images recorded on a "Memory Stick" using the USB cable (p. 185) •Converting an analog signal into digital to indicate model names. Before you start reading this manual, camcorder-shape icons are for the indicated models only. CCD-TRV118 : CCD-TRV318 : CCD-TRV418 : DCR-TRV150 : DCR-TRV250 : DCR-TRV350 : DCR...
... camcorder using the USB cable (p. 197) •Viewing images recorded on a "Memory Stick" using the USB cable (p. 185) •Converting an analog signal into digital to indicate model names. Before you start reading this manual, camcorder-shape icons are for the indicated models only. CCD-TRV118 : CCD-TRV318 : CCD-TRV418 : DCR-TRV150 : DCR-TRV250 : DCR-TRV350 : DCR...
Operating Instructions
Page 6
...Features 4 Checking supplied accessories 9 Quick Start Guide - Color Slow Shutter 39 Self-timer recording 41 Superimposing the date and time on a "Memory Stick" 12 Getting Started Using this manual 14 Step 1 Preparing the power supply ... 18 ...function 61 Using special effects - Recording on pictures 42 Checking recordings - Display function 47 Viewing recordings on TV 51 Advanced Recording Operations Recording still images on a "Memory Stick" while recording on a tape 53 Recording still images on a tape 10 - Basics Recording a picture 30 Shooting a backlit...
...Features 4 Checking supplied accessories 9 Quick Start Guide - Color Slow Shutter 39 Self-timer recording 41 Superimposing the date and time on a "Memory Stick" 12 Getting Started Using this manual 14 Step 1 Preparing the power supply ... 18 ...function 61 Using special effects - Recording on pictures 42 Checking recordings - Display function 47 Viewing recordings on TV 51 Advanced Recording Operations Recording still images on a "Memory Stick" while recording on a tape 53 Recording still images on a tape 10 - Basics Recording a picture 30 Shooting a backlit...
Operating Instructions
Page 7
... playback 166 Selecting a folder to view 169 Copying images recorded on a "Memory Stick" to a tape 170 Enlarging still images recorded on a "Memory Stick" - Memory PB ZOOM 172 Playing back images continuously - Digital program editing (on tapes 106 Recording video or TV programs 119 Inserting a scene from a tape as a moving pictures on a "Memory Stick" - Memory Photo playback .......... 163 Viewing moving picture - PRINT MARK...
... playback 166 Selecting a folder to view 169 Copying images recorded on a "Memory Stick" to a tape 170 Enlarging still images recorded on a "Memory Stick" - Memory PB ZOOM 172 Playing back images continuously - Digital program editing (on tapes 106 Recording video or TV programs 119 Inserting a scene from a tape as a moving pictures on a "Memory Stick" - Memory Photo playback .......... 163 Viewing moving picture - PRINT MARK...
Operating Instructions
Page 8
... to correct trouble 224 Self-diagnosis display 232 Warning indicators and messages .... 233 Additional Information About video cassette 237 About the "Memory Stick 240 About the "InfoLITHIUM" battery pack 242 About i.LINK 244 Using your camcorder abroad .......... 246...United States and/or other countries. •Pentium is a trademark of Sony Corporation. • "Memory Stick," and "MagicGate Memory Stick" are trademarks of Sony Corporation. • "Memory Stick Duo" and are trademarks of Sony Corporation. •Windows and Windows Media are trademarks of Apple Computer ...
... to correct trouble 224 Self-diagnosis display 232 Warning indicators and messages .... 233 Additional Information About video cassette 237 About the "Memory Stick 240 About the "InfoLITHIUM" battery pack 242 About i.LINK 244 Using your camcorder abroad .......... 246...United States and/or other countries. •Pentium is a trademark of Sony Corporation. • "Memory Stick," and "MagicGate Memory Stick" are trademarks of Sony Corporation. • "Memory Stick Duo" and are trademarks of Sony Corporation. •Windows and Windows Media are trademarks of Apple Computer ...
Operating Instructions
Page 9
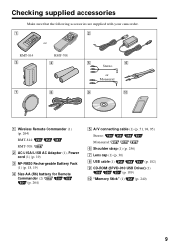
... Commander (2) (p. 264) 5 A/V connecting cable (1) (p. 51, 94, 95) Stereo: Monaural: 6 Shoulder strap (1) (p. 256) 7 Lens cap (1) (p. 30) 8 USB cable (1) (p. 182) 9 CD-ROM (SPVD-010 USB Driver) (1) (p. 189) 0 "Memory Stick" (1) (p. 240) 9
... Commander (2) (p. 264) 5 A/V connecting cable (1) (p. 51, 94, 95) Stereo: Monaural: 6 Shoulder strap (1) (p. 256) 7 Lens cap (1) (p. 30) 8 USB cable (1) (p. 182) 9 CD-ROM (SPVD-010 USB Driver) (1) (p. 189) 0 "Memory Stick" (1) (p. 240) 9

Operating Instructions
Page 12
... the plug with the b mark facing the LCD panel as illustrated. "Memory Stick" slot b mark When ejecting the "Memory Stick," press the "Memory Stick" once lightly. 12 Open the DC IN jack cover. AC Adaptor (supplied) Inserting a "Memory Stick" (p. 127) Insert a "Memory Stick" in parentheses "( )" for more information. Recording on a "Memory Stick" Quick Start Guide This chapter introduces you to the basic features...
... the plug with the b mark facing the LCD panel as illustrated. "Memory Stick" slot b mark When ejecting the "Memory Stick," press the "Memory Stick" once lightly. 12 Open the DC IN jack cover. AC Adaptor (supplied) Inserting a "Memory Stick" (p. 127) Insert a "Memory Stick" in parentheses "( )" for more information. Recording on a "Memory Stick" Quick Start Guide This chapter introduces you to the basic features...
Operating Instructions
Page 13
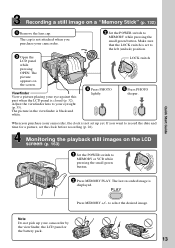
... pack. 13 PLAY Press MEMORY +/- to MEMORY while pressing the small green button. The picture appears on a "Memory Stick" (p. 132) 1 Remove the lens cap. The picture in the viewfinder is displayed. LOCK switch V POWER OFF(CHG) CAM CR ME 4 Press PHOTO lightly. 5 Press PHOTO deeper. Quick Start Guide ERMAORY ERMAORY Recording a still image on the...
... pack. 13 PLAY Press MEMORY +/- to MEMORY while pressing the small green button. The picture appears on a "Memory Stick" (p. 132) 1 Remove the lens cap. The picture in the viewfinder is displayed. LOCK switch V POWER OFF(CHG) CAM CR ME 4 Press PHOTO lightly. 5 Press PHOTO deeper. Quick Start Guide ERMAORY ERMAORY Recording a still image on the...

Operating Instructions
Page 14
... model number by looking at the bottom of differences Model Recording system Playback system AUDIO/VIDEO jack S VIDEO jack DV jack USB jack "Memory Stick" slot LANC jack SteadyShot Remote sensor RFU jack MIC jack Hi8 Hi8/8 OUT OUT - - - - - - z - - z z - - - - - As you can hear a beep to CAMERA. Types of your camcorder are shown in the table below...
... model number by looking at the bottom of differences Model Recording system Playback system AUDIO/VIDEO jack S VIDEO jack DV jack USB jack "Memory Stick" slot LANC jack SteadyShot Remote sensor RFU jack MIC jack Hi8 Hi8/8 OUT OUT - - - - - - z - - z z - - - - - As you can hear a beep to CAMERA. Types of your camcorder are shown in the table below...
Operating Instructions
Page 27
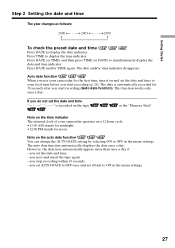
...indicator disappears. The auto date function automatically displays the date once a day. you set the date and time. - The date is recorded on the auto date function You can change the AUTO DATE setting by selecting ON or OFF in the menu settings. 27 This ...ON in the menu settings. Auto date function When you start recording (Auto date function). or the "Memory Stick" Note on the time indicator The internal clock of your camcorder for noon. you stop recording within 10 seconds. - you start recording (p. 26). Getting Started Step 2 Setting the date and time...
...indicator disappears. The auto date function automatically displays the date once a day. you set the date and time. - The date is recorded on the auto date function You can change the AUTO DATE setting by selecting ON or OFF in the menu settings. 27 This ...ON in the menu settings. Auto date function When you start recording (Auto date function). or the "Memory Stick" Note on the time indicator The internal clock of your camcorder for noon. you stop recording within 10 seconds. - you start recording (p. 26). Getting Started Step 2 Setting the date and time...

Operating Instructions
Page 41
...select ON, then press the dial. (4) Press MENU to OFF in the menu settings in 10 seconds automatically. Recording - The (self-timer) indicator appears on a "Memory Stick" with the self-timer (p. 135). 41 To restart the countdown, press START/STOP again. In the last ... 3 CAMERA SET SELFTIMER D ZOOM 16:9WIDE STEADYSHOT N.S.LIGHT RETURN OFF ON [MENU] : END To stop the countdown Press START/STOP. To cancel self-timer recording Set SELFTIMER to make the menu settings disappear. Basics Recording a picture Self-timer recording Recording with a beep. You can also record still ...
...select ON, then press the dial. (4) Press MENU to OFF in the menu settings in 10 seconds automatically. Recording - The (self-timer) indicator appears on a "Memory Stick" with the self-timer (p. 135). 41 To restart the countdown, press START/STOP again. In the last ... 3 CAMERA SET SELFTIMER D ZOOM 16:9WIDE STEADYSHOT N.S.LIGHT RETURN OFF ON [MENU] : END To stop the countdown Press START/STOP. To cancel self-timer recording Set SELFTIMER to make the menu settings disappear. Basics Recording a picture Self-timer recording Recording with a beep. You can also record still ...
Operating Instructions
Page 48
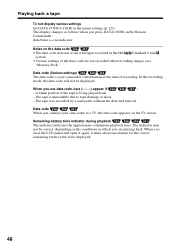
When you are not recorded when recording images on a "Memory Stick." Data code When you connect your camcorder's information at the time of recording. The display changes as follows when you close the LCD panel and open it again, it takes about one minute for the correct... time indicator during playback The indicator indicates the approximate continuous playback time. A blank portion of the data code are playing back. The tape was recorded by a camcorder without the date and time set. The indicator may not be correct, depending on the conditions in the menu settings (p. 222)....
When you are not recorded when recording images on a "Memory Stick." Data code When you connect your camcorder's information at the time of recording. The display changes as follows when you close the LCD panel and open it again, it takes about one minute for the correct... time indicator during playback The indicator indicates the approximate continuous playback time. A blank portion of the data code are playing back. The tape was recorded by a camcorder without the date and time set. The indicator may not be correct, depending on the conditions in the menu settings (p. 222)....
Operating Instructions
Page 53
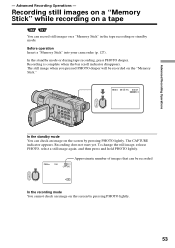
... press and hold PHOTO lightly. Approximate number of images that can be recorded on the "Memory Stick." 50min REC 0:00:01 Advanced Recording Operations PHOTO PHOTO In the standby mode You can record still images on the screen by pressing PHOTO lightly. 53 The still ...the standby mode or during tape recording, press PHOTO deeper. Recording is complete when the bar scroll indicator disappears. Recording does not start yet. Recording still images on a "Memory Stick" while recording on a tape You can check an image on a "Memory Stick" in the tape recording or standby mode. Advanced...
... press and hold PHOTO lightly. Approximate number of images that can be recorded on the "Memory Stick." 50min REC 0:00:01 Advanced Recording Operations PHOTO PHOTO In the standby mode You can record still images on the screen by pressing PHOTO lightly. 53 The still ...the standby mode or during tape recording, press PHOTO deeper. Recording is complete when the bar scroll indicator disappears. Recording does not start yet. Recording still images on a "Memory Stick" while recording on a tape You can check an image on a "Memory Stick" in the tape recording or standby mode. Advanced...
Operating Instructions
Page 54
...;Do not shake or strike your camcorder when you selected when the POWER switch was set to MEMORY are used: - The image may fluctuate. •You cannot record still images on a "Memory Stick" in CAMERA mode The image is recorded in the FIELD mode automatically even if you select FRAME in the following settings cannot be...
...;Do not shake or strike your camcorder when you selected when the POWER switch was set to MEMORY are used: - The image may fluctuate. •You cannot record still images on a "Memory Stick" in CAMERA mode The image is recorded in the FIELD mode automatically even if you select FRAME in the following settings cannot be...
Operating Instructions
Page 55
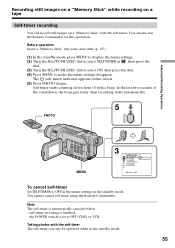
...record still images on a "Memory Stick" with the self-timer. The (self-timer) indicator appears on the screen. (5) Press PHOTO deeper. Note The self-timer is finished. - In the last two seconds of the countdown, the beep gets faster, then recording starts automatically. 5 PHOTO Advanced Recording Operations PHOTO MENU 3 CAMERA... self-timer using the Remote Commander. Recording still images on a "Memory Stick" while recording on a tape Self-timer recording You can also use the Remote Commander for this operation. Before operation Insert a "Memory Stick" into your camcorder (p. 127). (1)...
...record still images on a "Memory Stick" with the self-timer. The (self-timer) indicator appears on the screen. (5) Press PHOTO deeper. Note The self-timer is finished. - In the last two seconds of the countdown, the beep gets faster, then recording starts automatically. 5 PHOTO Advanced Recording Operations PHOTO MENU 3 CAMERA... self-timer using the Remote Commander. Recording still images on a "Memory Stick" while recording on a tape Self-timer recording You can also use the Remote Commander for this operation. Before operation Insert a "Memory Stick" into your camcorder (p. 127). (1)...

Operating Instructions
Page 60
... menu settings when the SteadyShot is compatible with the video ID (ID-1/ID-2) system. - BOUNCE (p. 61) Connection for a TV Pictures recorded in the 16:9WIDE mode automatically appear on a "Memory Stick" in tape recording or tape recording standby - ID-2 system The ID-2 system sends ...a copyright protection signal with video signals. If you set the wide mode to other equipment...
... menu settings when the SteadyShot is compatible with the video ID (ID-1/ID-2) system. - BOUNCE (p. 61) Connection for a TV Pictures recorded in the 16:9WIDE mode automatically appear on a "Memory Stick" in tape recording or tape recording standby - ID-2 system The ID-2 system sends ...a copyright protection signal with video signals. If you set the wide mode to other equipment...
Operating Instructions
Page 63
..., time indicator and title do not fade in the following functions: - Wide mode - At this stage, the picture may not be recorded clearly, depending on a "Memory Stick" - Exposure - PROGRAM AE - Zoom - Picture effect - Recording on the tape condition. When D ZOOM is set to 40× or 560×. - Focus - BACK LIGHT Note on the...
..., time indicator and title do not fade in the following functions: - Wide mode - At this stage, the picture may not be recorded clearly, depending on a "Memory Stick" - Exposure - PROGRAM AE - Zoom - Picture effect - Recording on the tape condition. When D ZOOM is set to 40× or 560×. - Focus - BACK LIGHT Note on the...
Operating Instructions
Page 69
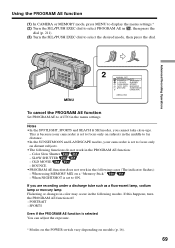
... - If you cannot take close-ups. Notes •In the SPOTLIGHT, SPORTS and BEACH & SKI modes, you are recording under a discharge tube such as a fluorescent lamp, sodium lamp or mercury lamp Flickering or changes in color may occur in... modes. If this happens, turn the PROGRAM AE function off: - When using MEMORY MIX on models (p. 16). 69 Using the PROGRAM AE function (1) In CAMERA or MEMORY mode, press MENU to display the menu settings.* (2) Turn the SEL/PUSH EXEC... You can adjust the exposure. * Modes on the POWER switch vary depending on a "Memory Stick." - PORTRAIT -
... - If you cannot take close-ups. Notes •In the SPOTLIGHT, SPORTS and BEACH & SKI modes, you are recording under a discharge tube such as a fluorescent lamp, sodium lamp or mercury lamp Flickering or changes in color may occur in... modes. If this happens, turn the PROGRAM AE function off: - When using MEMORY MIX on models (p. 16). 69 Using the PROGRAM AE function (1) In CAMERA or MEMORY mode, press MENU to display the menu settings.* (2) Turn the SEL/PUSH EXEC... You can adjust the exposure. * Modes on the POWER switch vary depending on a "Memory Stick." - PORTRAIT -
Operating Instructions
Page 84
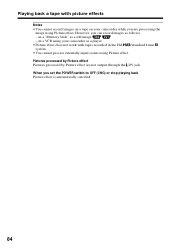
... processed by Picture effect are processing the image using Picture effect. on a "Memory Stick" as follows: - on a VCR using your camcorder while you are not output through the DV jack. Playing back a tape with picture effects Notes •You cannot record images on a tape on your camcorder as a player •Picture effect does...
... processed by Picture effect are processing the image using Picture effect. on a "Memory Stick" as follows: - on a VCR using your camcorder while you are not output through the DV jack. Playing back a tape with picture effects Notes •You cannot record images on a tape on your camcorder as a player •Picture effect does...

Operating Instructions
Page 86
... on a tape on your camcorder as a player •Digital effect does not work with tapes recorded in the Hi8 /standard 8 mm system. •You cannot process externally input scenes using Digital effect. Pictures processed by Digital effect Pictures processed by ...are processing the image using your camcorder while you are not output through the DV jack. When you can record images as a still image - However, you set the POWER switch to OFF (CHG) or stop playing back Digital effect is automatically canceled. 86 on a "Memory Stick" as follows: - on a VCR using Digital effect.
... on a tape on your camcorder as a player •Digital effect does not work with tapes recorded in the Hi8 /standard 8 mm system. •You cannot process externally input scenes using Digital effect. Pictures processed by Digital effect Pictures processed by ...are processing the image using your camcorder while you are not output through the DV jack. When you can record images as a still image - However, you set the POWER switch to OFF (CHG) or stop playing back Digital effect is automatically canceled. 86 on a "Memory Stick" as follows: - on a VCR using Digital effect.

Operating Instructions
Page 87
... - Besides the operation described here, your camcorder can enlarge still images recorded on tapes. You can enlarge an image recorded on a "Memory Stick" (p. 172). (1) In the playback or playback pause mode, press PB ZOOM. W : To decrease the zoom ratio T : To increase the zoom ratio 4 2 PB ZOOM × 2.0 1 PB ...
... - Besides the operation described here, your camcorder can enlarge still images recorded on tapes. You can enlarge an image recorded on a "Memory Stick" (p. 172). (1) In the playback or playback pause mode, press PB ZOOM. W : To decrease the zoom ratio T : To increase the zoom ratio 4 2 PB ZOOM × 2.0 1 PB ...


