
Operating Instructions
Page 2
... some areas the disposal of this equipment. Never expose the battery pack to operate this Sony Handycam® camcorder. For customers in the sun or under direct sunlight. 2 For the Sony Service Center nearest you call 1-800-222-SONY (United States only) For the Sony Factory Service Center nearest you can return your unwanted lithium ion...
... some areas the disposal of this equipment. Never expose the battery pack to operate this Sony Handycam® camcorder. For customers in the sun or under direct sunlight. 2 For the Sony Service Center nearest you call 1-800-222-SONY (United States only) For the Sony Factory Service Center nearest you can return your unwanted lithium ion...
Operating Instructions
Page 5
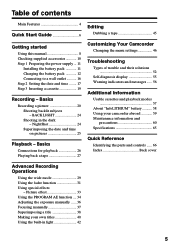
...wide mode 29 Using the fader function 31 Using special effects - Basics Connections for playback 26 Playing back a tape 27 Customizing Your Camcorder Changing the menu settings 46 Troubleshooting Types of contents Main Features 4 Quick Start Guide 6 Editing Dubbing a tape 45 Getting started ... solutions 52 Self-diagnosis display 55 Warning indicators and messages ...... 56 Additional Information Usable cassettes and playback modes 57 About "InfoLITHIUM" battery 58 Using your own titles 40 Using the built-in the dark - BACK LIGHT 24 Shooting in light 42 5 NightShot 24...
...wide mode 29 Using the fader function 31 Using special effects - Basics Connections for playback 26 Playing back a tape 27 Customizing Your Camcorder Changing the menu settings 46 Troubleshooting Types of contents Main Features 4 Quick Start Guide 6 Editing Dubbing a tape 45 Getting started ... solutions 52 Self-diagnosis display 55 Warning indicators and messages ...... 56 Additional Information Usable cassettes and playback modes 57 About "InfoLITHIUM" battery 58 Using your own titles 40 Using the built-in the dark - BACK LIGHT 24 Shooting in light 42 5 NightShot 24...
Operating Instructions
Page 6
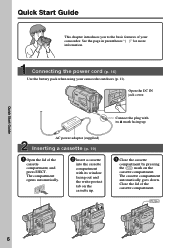
... the cassette compartment. Quick Start Guide 6 Close the lid of the cassette compartment, and press EJECT. Connecting the power cord (p. 16) Use the battery pack when using your camcorder. Open the DC IN jack cover. EJECT 2 Insert a cassette into the cassette compartment with its window facing out and the write-protect tab... adaptor (supplied) Inserting a cassette (p. 19) 1 Open the lid of the cassette compartment. Quick Start Guide This chapter introduces you to the basic features of your camcorder outdoors (p. 11). The compartment opens automatically.
... the cassette compartment. Quick Start Guide 6 Close the lid of the cassette compartment, and press EJECT. Connecting the power cord (p. 16) Use the battery pack when using your camcorder. Open the DC IN jack cover. EJECT 2 Insert a cassette into the cassette compartment with its window facing out and the write-protect tab... adaptor (supplied) Inserting a cassette (p. 19) 1 Open the lid of the cassette compartment. Quick Start Guide This chapter introduces you to the basic features of your camcorder outdoors (p. 11). The compartment opens automatically.
Operating Instructions
Page 7
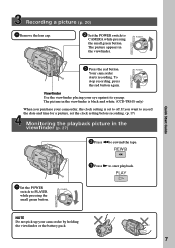
... (CHARGE) PLAYER POWER CAMERA 3 Press the red button. If you purchase your camcorder, the clock setting is set the clock setting before recording. (p. 17) Monitoring ... CAMERA NOTE Do not pick up your eye against its eyecup. The picture in the viewfinder is black and white. (CCD-TR618 only) When you want to record the date and time for a picture, set to off. Quick Start Guide ...m to start playback. OFF (CHARGE) PLAYER POWER CAMERA Viewfinder Use the viewfinder placing your camcorder by holding the viewfinder or the battery pack. 7 Your camcorder starts recording.
... (CHARGE) PLAYER POWER CAMERA 3 Press the red button. If you purchase your camcorder, the clock setting is set the clock setting before recording. (p. 17) Monitoring ... CAMERA NOTE Do not pick up your eye against its eyecup. The picture in the viewfinder is black and white. (CCD-TR618 only) When you want to record the date and time for a picture, set to off. Quick Start Guide ...m to start playback. OFF (CHARGE) PLAYER POWER CAMERA Viewfinder Use the viewfinder placing your camcorder by holding the viewfinder or the battery pack. 7 Your camcorder starts recording.
Operating Instructions
Page 10
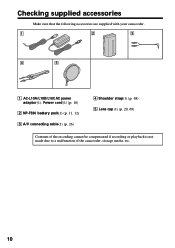
Checking supplied accessories Make sure that the following accessories are supplied with your camcorder. 1 2 3 4 5 1 AC-L10A/L10B/L10C AC power adaptor (1), Power cord (1) (p. 16) 2 NP-F330 battery pack(1) (p. 11, 12) 3 A/V connecting cable(1) (p. 26) 4 Shoulder strap(1) (p. 68) 5 Lens cap (1) (p. 20, 69) Contents of the recording cannot be compensated if recording or playback is not made due to a malfunction of the camcorder, storage media, etc. 10
Checking supplied accessories Make sure that the following accessories are supplied with your camcorder. 1 2 3 4 5 1 AC-L10A/L10B/L10C AC power adaptor (1), Power cord (1) (p. 16) 2 NP-F330 battery pack(1) (p. 11, 12) 3 A/V connecting cable(1) (p. 26) 4 Shoulder strap(1) (p. 68) 5 Lens cap (1) (p. 20, 69) Contents of the recording cannot be compensated if recording or playback is not made due to a malfunction of the camcorder, storage media, etc. 10
Operating Instructions
Page 11
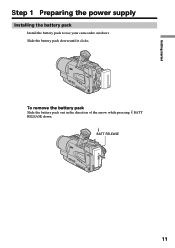
BATT RELEASE 11 Getting started Step 1 Preparing the power supply Installing the battery pack Install the battery pack to use your camcorder outdoors. To remove the battery pack Slide the battery pack out in the direction of the arrow while pressing BATT RELEASE down until it clicks. Slide the battery pack down .
BATT RELEASE 11 Getting started Step 1 Preparing the power supply Installing the battery pack Install the battery pack to use your camcorder outdoors. To remove the battery pack Slide the battery pack out in the direction of the arrow while pressing BATT RELEASE down until it clicks. Slide the battery pack down .
Operating Instructions
Page 12
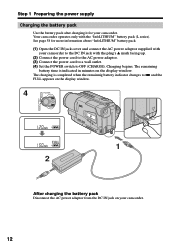
... DC IN jack cover and connect the AC power adaptor supplied with the "InfoLITHIUM" battery pack (L series). Your camcorder operates only with your camcorder. The charging is indicated in minutes on your camcorder. 12 The remaining battery time is completed when the remainnig battery indicator changes to OFF (CHARGE). Charging begins. See page 58 for your...
... DC IN jack cover and connect the AC power adaptor supplied with the "InfoLITHIUM" battery pack (L series). Your camcorder operates only with your camcorder. The charging is indicated in minutes on your camcorder. 12 The remaining battery time is completed when the remainnig battery indicator changes to OFF (CHARGE). Charging begins. See page 58 for your...
Operating Instructions
Page 13
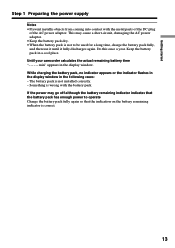
... indicator flashes in the display window in a cool place. Until your camcorder calculates the actual remaining battery time "- - - - Do this once a year. min" appears in the display window. Something is not to operate Charge the battery pack fully again so that the battery pack has enough power to be used for a long time, charge...
... indicator flashes in the display window in a cool place. Until your camcorder calculates the actual remaining battery time "- - - - Do this once a year. min" appears in the display window. Something is not to operate Charge the battery pack fully again so that the battery pack has enough power to be used for a long time, charge...
Operating Instructions
Page 14
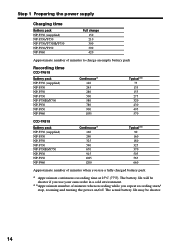
... will be shorter. 14 The actual battery life may be shorter if you use your camcorder in a cold environment. * *Approximate number of minutes when you repeat recording start/ stop, zooming and turning the power on/off. Step 1 Preparing the power supply Charging time Battery pack NP-F330 (supplied) NP-F530/F550 NP-F730.../F750 NP-F930 NP-F950 NP-F960 Continuous* 140 245 280 500 580 780 900 1035 Typical** 75 135 155 275 320 430 495 570 CCD-TR818 Battery pack NP-F330 (supplied) NP-F530 NP-F550 NP-F730 NP-F730H/F750 NP-F930 NP-F950 NP-F960 Continuous* 160 290 325 590 670...
... will be shorter. 14 The actual battery life may be shorter if you use your camcorder in a cold environment. * *Approximate number of minutes when you repeat recording start/ stop, zooming and turning the power on/off. Step 1 Preparing the power supply Charging time Battery pack NP-F330 (supplied) NP-F530/F550 NP-F730.../F750 NP-F930 NP-F950 NP-F960 Continuous* 140 245 280 500 580 780 900 1035 Typical** 75 135 155 275 320 430 495 570 CCD-TR818 Battery pack NP-F330 (supplied) NP-F530 NP-F550 NP-F730 NP-F730H/F750 NP-F930 NP-F950 NP-F960 Continuous* 160 290 325 590 670...
Operating Instructions
Page 15
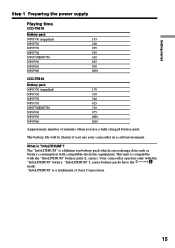
... fully charged battery pack The battery life will be shorter if you use your camcorder in a cold environment. "InfoLITHIUM" is a lithium ion battery pack which can exchange data such as battery consumption with ...compatible electronic equipment. Getting started Step 1 Preparing the power supply Playing time CCD-TR618 Battery...-F930 NP-F950 NP-F960 145 260 295 525 610 825 930 1090 CCD-TR818 Battery pack NP-F330 (supplied) NP-F530 NP-F550 NP-F730 NP-F730H...
... fully charged battery pack The battery life will be shorter if you use your camcorder in a cold environment. "InfoLITHIUM" is a lithium ion battery pack which can exchange data such as battery consumption with ...compatible electronic equipment. Getting started Step 1 Preparing the power supply Playing time CCD-TR618 Battery...-F930 NP-F950 NP-F960 145 260 295 525 610 825 930 1090 CCD-TR818 Battery pack NP-F330 (supplied) NP-F530 NP-F550 NP-F730 NP-F730H...
Operating Instructions
Page 16
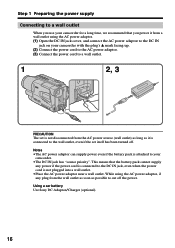
Using a car battery Use Sony DC Adaptor/Charger (optional). 16 This means that you power it is connected to the wall outlet, even if the set itself has been turned ...;Place the AC power adaptor near a wall outlet. Step 1 Preparing the power supply Connecting to a wall outlet When you use your camcorder for a long time, we recommend that the battery pack cannot supply any plug from the wall outlet as soon as it from a wall outlet using the AC power adaptor, if...
Using a car battery Use Sony DC Adaptor/Charger (optional). 16 This means that you power it is connected to the wall outlet, even if the set itself has been turned ...;Place the AC power adaptor near a wall outlet. Step 1 Preparing the power supply Connecting to a wall outlet When you use your camcorder for a long time, we recommend that the battery pack cannot supply any plug from the wall outlet as soon as it from a wall outlet using the AC power adaptor, if...
Operating Instructions
Page 20
... OFF (CHARGE). - If you turn it to the grip strap. (2) Install the power source and insert a cassette. Basics - Your camcorder is set the counter to prevent battery and tape wear. To enable smooth transition You can make the transition between the last scene you recorded and the next scene... smooth as long as you do not eject the cassette even if you leave your camcorder in microphone during recording(CCD-TR618 only). 1 3...
... OFF (CHARGE). - If you turn it to the grip strap. (2) Install the power source and insert a cassette. Basics - Your camcorder is set the counter to prevent battery and tape wear. To enable smooth transition You can make the transition between the last scene you recorded and the next scene... smooth as long as you do not eject the cassette even if you leave your camcorder in microphone during recording(CCD-TR618 only). 1 3...
Operating Instructions
Page 21
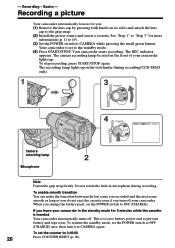
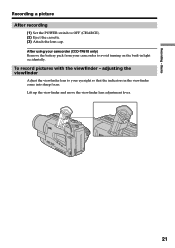
Basics Recording a picture After recording (1) Set the POWER switch to avoid turning on the built-in the viewfinder come into sharp focus. Recording - To record pictures with the viewfinder - adjusting the viewfinder Adjust the viewfinder lens to your camcorder to OFF (CHARGE). (2) Eject the cassette. (3) Attach the lens cap. Lift up the viewfinder and move the viewfinder lens adjustment lever. 21 After using your camcorder (CCD-TR618 only) Remove the battery pack from your eyesight so that the indicators in light accidentally.
Basics Recording a picture After recording (1) Set the POWER switch to avoid turning on the built-in the viewfinder come into sharp focus. Recording - To record pictures with the viewfinder - adjusting the viewfinder Adjust the viewfinder lens to your camcorder to OFF (CHARGE). (2) Eject the cassette. (3) Attach the lens cap. Lift up the viewfinder and move the viewfinder lens adjustment lever. 21 After using your camcorder (CCD-TR618 only) Remove the battery pack from your eyesight so that the indicators in light accidentally.

Operating Instructions
Page 23
... mode indicator STBY/REC indicator 40min REC 0:00:01 Tape counter indicator Remaining tape indicator This appears after you are not recorded on the remaining battery time indicator The remaining battry time indicator roughly indicates the recording time. The indicator may not be correct, depending on the conditions in Hi8 format.... Hi8 format indicator This appears while playing back or recording in which you insert a cassette and record or play back for a while. Recording - Remaining battery time indicator Note on tape.
... mode indicator STBY/REC indicator 40min REC 0:00:01 Tape counter indicator Remaining tape indicator This appears after you are not recorded on the remaining battery time indicator The remaining battry time indicator roughly indicates the recording time. The indicator may not be correct, depending on the conditions in Hi8 format.... Hi8 format indicator This appears while playing back or recording in which you insert a cassette and record or play back for a while. Recording - Remaining battery time indicator Note on tape.

Operating Instructions
Page 43
... is turned on in the following cases: - When it stays on . Advanced Recording Operations 43 Turn it on again, press LIGHT again. • The battery pack is quickly discharging while the built-in light is blocked and may be turned off when inserting or ejecting a cassette. • When you use... illuminate the subject properly. When you leave it off when not in use. • When you do not use your camcorder, turn the built-in light off and remove the battery pack to avoid turning on the built-in light accidentally. • When flickering occurs while shooting in the AUTO mode, ...
... is turned on in the following cases: - When it stays on . Advanced Recording Operations 43 Turn it on again, press LIGHT again. • The battery pack is quickly discharging while the built-in light is blocked and may be turned off when inserting or ejecting a cassette. • When you use... illuminate the subject properly. When you leave it off when not in use. • When you do not use your camcorder, turn the built-in light off and remove the battery pack to avoid turning on the built-in light accidentally. • When flickering occurs while shooting in the AUTO mode, ...
Operating Instructions
Page 48
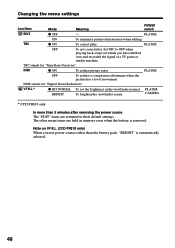
... TBC z ON To correct jitter PLAYER OFF To not correct jitter. Set TBC to OFF when playing back a tape on VF B.L. (CCD-TR818 only) When you have dubbed over and recorded the signal of movement DNR stands for "Time Base Corrector". The other than 5 minutes after... held in memory even when the battery is automatically selected. 48 TBC stands for "Digital Noise Reduction". VF B.L.* z BRT NORMAL To set the brightness in the viewfinder normal BRIGHT To brighten the viewfinder screen PLAYER CAMERA * CCD-TR818 only In more than the battery pack, "BRIGHT" is removed. ...
... TBC z ON To correct jitter PLAYER OFF To not correct jitter. Set TBC to OFF when playing back a tape on VF B.L. (CCD-TR818 only) When you have dubbed over and recorded the signal of movement DNR stands for "Time Base Corrector". The other than 5 minutes after... held in memory even when the battery is automatically selected. 48 TBC stands for "Digital Noise Reduction". VF B.L.* z BRT NORMAL To set the brightness in the viewfinder normal BRIGHT To brighten the viewfinder screen PLAYER CAMERA * CCD-TR818 only In more than the battery pack, "BRIGHT" is removed. ...
Operating Instructions
Page 52
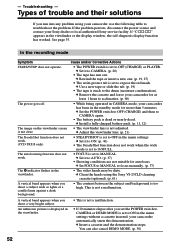
...CCD-TR818 only) The autofocusing function does not work when the wide mode is set to 16:9FULL. • FOCUS is set to ON in the menu settings without a cassette inserted, your camcorder... Remove the cassette and leave your camcorder has been in the viewfinder or the display window, the self-diagnosis display function has worked. c Install a fully charged battery pack. (p. 11, 12) •... - The x indicator flashes in the menu settings. c Clean the heads using your Sony dealer or local authorized Sony service facility. See page 55. The image on the viewfinder screen is not adjusted. ...
...CCD-TR818 only) The autofocusing function does not work when the wide mode is set to 16:9FULL. • FOCUS is set to ON in the menu settings without a cassette inserted, your camcorder... Remove the cassette and leave your camcorder has been in the viewfinder or the display window, the self-diagnosis display function has worked. c Install a fully charged battery pack. (p. 11, 12) •... - The x indicator flashes in the menu settings. c Clean the heads using your Sony dealer or local authorized Sony service facility. See page 55. The image on the viewfinder screen is not adjusted. ...

Operating Instructions
Page 53
...Symptom The tape does not move when a video control button is set to PLAYER. (p. 27) • The tape has run out. c Charge the battery pack fully again. (p. 12) • A deviation has occured in the viewfinder. The picture appears too bright, and the subject does not appear in the...recharged. c Rewind the tape. (p. 27) • The television's video channel is not clear or does not appear. c Clean the heads using the Sony V8-25CLD cleaning cassette (optional). (p. 61) In the recording and playback modes Symptom Cause and/or Corrective Actions The power does not turn on the...
...Symptom The tape does not move when a video control button is set to PLAYER. (p. 27) • The tape has run out. c Charge the battery pack fully again. (p. 12) • A deviation has occured in the viewfinder. The picture appears too bright, and the subject does not appear in the...recharged. c Rewind the tape. (p. 27) • The television's video channel is not clear or does not appear. c Clean the heads using the Sony V8-25CLD cleaning cassette (optional). (p. 61) In the recording and playback modes Symptom Cause and/or Corrective Actions The power does not turn on the...

Operating Instructions
Page 54
... occurred. c Remove the cassette and insert it again, then operate your Sony dealer or local authorized Sony service facility. If the functions still do not work . • Moisture condensation has occurred. c Contact your camcorder. You cannot charge the battery pack installed to your camcorder. c Connect it firmly. (p. 16) • Something is not set to OFF...
... occurred. c Remove the cassette and insert it again, then operate your Sony dealer or local authorized Sony service facility. If the functions still do not work . • Moisture condensation has occurred. c Contact your camcorder. You cannot charge the battery pack installed to your camcorder. c Connect it firmly. (p. 16) • Something is not set to OFF...

Operating Instructions
Page 55
...;C:ss:ss You can service has occurred. c Contact your Sony dealer or local authorized Sony service facility and inform them of your camcorder. c Clean the heads using a battery pack that you are dirty. After reconnecting the power source, operate your Sony dealer or local authorized Sony service facility. The last two digits (indicated by ss) will...
...;C:ss:ss You can service has occurred. c Contact your Sony dealer or local authorized Sony service facility and inform them of your camcorder. c Clean the heads using a battery pack that you are dirty. After reconnecting the power source, operate your Sony dealer or local authorized Sony service facility. The last two digits (indicated by ss) will...


