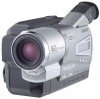

Operating Instructions
Page 3
... in accordance with the limits for help. However, there is connected. - Connect the equipment into an outlet on , the user is encouraged to try to Part 15 of the following measures: - Consult the dealer or an experienced radio/ TV technician for a Class B digital device, pursuant to correct the interference by turning...
... in accordance with the limits for help. However, there is connected. - Connect the equipment into an outlet on , the user is encouraged to try to Part 15 of the following measures: - Consult the dealer or an experienced radio/ TV technician for a Class B digital device, pursuant to correct the interference by turning...
Operating Instructions
Page 5
... the exposure manually ...... 36 Focusing manually 37 Superimposing a title 38 Making your camcorder abroad 59 Maintenance information and precautions 60 Specifications 65 Quick Reference Identifying the parts and controls ...... 66 Index Back cover Advanced Recording Operations Using the wide mode ... Playback - BACK LIGHT 24 Shooting in light 42 5 Basics Connections for playback 26 Playing back a tape 27 Customizing Your Camcorder Changing the menu settings 46 Troubleshooting Types of contents Main Features 4 Quick Start Guide 6 Editing Dubbing a tape 45 Getting ...
... the exposure manually ...... 36 Focusing manually 37 Superimposing a title 38 Making your camcorder abroad 59 Maintenance information and precautions 60 Specifications 65 Quick Reference Identifying the parts and controls ...... 66 Index Back cover Advanced Recording Operations Using the wide mode ... Playback - BACK LIGHT 24 Shooting in light 42 5 Basics Connections for playback 26 Playing back a tape 27 Customizing Your Camcorder Changing the menu settings 46 Troubleshooting Types of contents Main Features 4 Quick Start Guide 6 Editing Dubbing a tape 45 Getting ...
Operating Instructions
Page 13
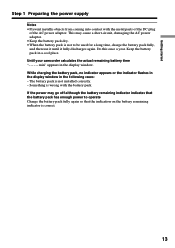
... the power supply Notes • Prevent metallic objects from coming into contact with the battery pack. Until your camcorder calculates the actual remaining battery time "- - - - The battery pack is wrong with the metal parts of the DC plug of the AC power adaptor. Do this once a year. This may go off although...
... the power supply Notes • Prevent metallic objects from coming into contact with the battery pack. Until your camcorder calculates the actual remaining battery time "- - - - The battery pack is wrong with the metal parts of the DC plug of the AC power adaptor. Do this once a year. This may go off although...
Operating Instructions
Page 19
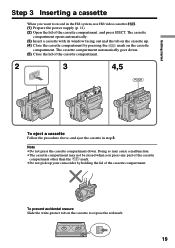
The cassette compartment opens automatically. (3) Insert a cassette with its window facing out and the tab on the cassette up your camcorder by pressing the mark on the cassette to record in step 3. Note •Do not press the cassette compartment down . (5) Close... . (1) Prepare the power supply (p. 11). (2) Open the lid of the cassette compartment. Getting started Step 3 Inserting a cassette When you press any part of the cassette compartment other than the mark. •Do not pick up . (4) Close the cassette compartment by holding the lid of the cassette compartment...
The cassette compartment opens automatically. (3) Insert a cassette with its window facing out and the tab on the cassette up your camcorder by pressing the mark on the cassette to record in step 3. Note •Do not press the cassette compartment down . (5) Close... . (1) Prepare the power supply (p. 11). (2) Open the lid of the cassette compartment. Getting started Step 3 Inserting a cassette When you press any part of the cassette compartment other than the mark. •Do not pick up . (4) Close the cassette compartment by holding the lid of the cassette compartment...

Operating Instructions
Page 41
...selecting alphabet and Russian characters appears. Set the POWER switch to OFF (CHARGE) once, and turn off . The last character is in your camcorder The power automatically turns off while you are entering title characters. Select [ to the previous screen. ] to CAMERA again, then proceed from ...the standby mode while a cassette is erased. Advanced Recording Operations 41 To enter a space Select [ Z& ? ! ], then select the blank part. We recommend setting the POWER switch to PLAYER or removing the cassette so that your own titles To change , then press the SEL/PUSH EXEC...
...selecting alphabet and Russian characters appears. Set the POWER switch to OFF (CHARGE) once, and turn off . The last character is in your camcorder The power automatically turns off while you are entering title characters. Select [ to the previous screen. ] to CAMERA again, then proceed from ...the standby mode while a cassette is erased. Advanced Recording Operations 41 To enter a space Select [ Z& ? ! ], then select the blank part. We recommend setting the POWER switch to PLAYER or removing the cassette so that your own titles To change , then press the SEL/PUSH EXEC...
Operating Instructions
Page 63
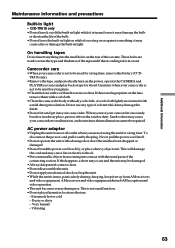
.... If this malfunction cannot be used to remove dust. Dusty or dirty - Additional Information Maintenance information and precautions Built-in locations that are: - CCD-TR618 only •Do not knock or jolt the built-in light while it is in use, particularly during use. On handling tapes Do not... When you are not using the unit for about 5 minutes when your camcorder on the lens, remove them with a soft cloth. •Clean the camcorder body with a dry soft cloth, or a soft cloth lightly moistened with the metal parts of the tape and if the recording tab is turned on as it...
.... If this malfunction cannot be used to remove dust. Dusty or dirty - Additional Information Maintenance information and precautions Built-in locations that are: - CCD-TR618 only •Do not knock or jolt the built-in light while it is in use, particularly during use. On handling tapes Do not... When you are not using the unit for about 5 minutes when your camcorder on the lens, remove them with a soft cloth. •Clean the camcorder body with a dry soft cloth, or a soft cloth lightly moistened with the metal parts of the tape and if the recording tab is turned on as it...
Operating Instructions
Page 65
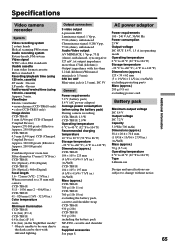
... × 2 1/2 in.) (w/h/d) excluding projecting parts Mass (approx.) 280 g (9.8 oz) excluding power cord Battery pack Maximum output voltage DC 8.4 V Output voltage DC 7.2 V Capacity 5.0 Wh (700 mAh) Dimensions (approx.) 38.4 × 20.6 × 70.8 mm (1 9/16 × 13/16 × 2 7/8 in .) (w/h/d) Mass (approx.) CCD-TR618: 780 g (1 lb 11 oz) CCD-TR818: 760 g (1 lb 10 oz) excluding...
... × 2 1/2 in.) (w/h/d) excluding projecting parts Mass (approx.) 280 g (9.8 oz) excluding power cord Battery pack Maximum output voltage DC 8.4 V Output voltage DC 7.2 V Capacity 5.0 Wh (700 mAh) Dimensions (approx.) 38.4 × 20.6 × 70.8 mm (1 9/16 × 13/16 × 2 7/8 in .) (w/h/d) Mass (approx.) CCD-TR618: 780 g (1 lb 11 oz) CCD-TR818: 760 g (1 lb 10 oz) excluding...
Operating Instructions
Page 66
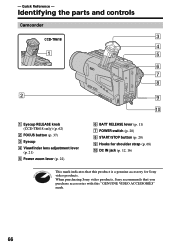
Quick Reference - When purchasing Sony video products, Sony recommends that this "GENUINE VIDEO ACCESSORIES" mark. 66 Identifying the parts and controls Camcorder 3 CCD-TR618 4 1 5 6 7 8 2 9 0 1 Eyecup RELEASE knob (CCD-TR618 only) (p. 62) 2 FOCUS button (p. 37) 3 Eyecup 4 Viewfinder lens adjustment lever (p. 21) 5 Power zoom lever (p. 22) 6 BATT RELEASE lever (p. 11) 7 POWER switch (p. 20) 8 ...) 9 Hooks for shoulder strap (p. 68) 0 DC IN jack (p. 12, 16) This mark indicates that you purchase accessories with this product is a genuine accessory for Sony video products. -
Quick Reference - When purchasing Sony video products, Sony recommends that this "GENUINE VIDEO ACCESSORIES" mark. 66 Identifying the parts and controls Camcorder 3 CCD-TR618 4 1 5 6 7 8 2 9 0 1 Eyecup RELEASE knob (CCD-TR618 only) (p. 62) 2 FOCUS button (p. 37) 3 Eyecup 4 Viewfinder lens adjustment lever (p. 21) 5 Power zoom lever (p. 22) 6 BATT RELEASE lever (p. 11) 7 POWER switch (p. 20) 8 ...) 9 Hooks for shoulder strap (p. 68) 0 DC IN jack (p. 12, 16) This mark indicates that you purchase accessories with this product is a genuine accessory for Sony video products. -
Operating Instructions
Page 67
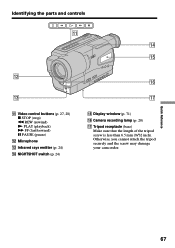
Identifying the parts and controls qa qf qg qs qd qa Video control buttons (p. 27, 28) x STOP (stop) m REW (rewind) N PLAY (playback) M FF (fastforward) X PAUSE (pause) qs Microphone qd Infrared rays emitter (p. 24) qf NIGHTSHOT switch (p. 24) qh qj qg Display window (p. 71) qh Camera recording lamp (p. 20) qj Tripod receptacle (base) Make sure that the length of the tripod screw is less than 6.5 mm (9/32 inch). Otherwise, you cannot attach the tripod securely and the screw may damage your camcorder. Quick Reference 67
Identifying the parts and controls qa qf qg qs qd qa Video control buttons (p. 27, 28) x STOP (stop) m REW (rewind) N PLAY (playback) M FF (fastforward) X PAUSE (pause) qs Microphone qd Infrared rays emitter (p. 24) qf NIGHTSHOT switch (p. 24) qh qj qg Display window (p. 71) qh Camera recording lamp (p. 20) qj Tripod receptacle (base) Make sure that the length of the tripod screw is less than 6.5 mm (9/32 inch). Otherwise, you cannot attach the tripod securely and the screw may damage your camcorder. Quick Reference 67

Operating Instructions
Page 68
Identifying the parts and controls qk ql w; ws wa wd qk BACK LIGHT button (p. 24) ql FADER button (p. 31) w; RESET button (p. 54) wa EXPOSURE button (p. 36) ws SEL/PUSH EXEC dial (p. 30, 46) wd MENU button (p. 46) Attaching the shoulder strap Attach the shoulder strap supplied with your camcorder to the hooks for the shoulder strap. 68
Identifying the parts and controls qk ql w; ws wa wd qk BACK LIGHT button (p. 24) ql FADER button (p. 31) w; RESET button (p. 54) wa EXPOSURE button (p. 36) ws SEL/PUSH EXEC dial (p. 30, 46) wd MENU button (p. 46) Attaching the shoulder strap Attach the shoulder strap supplied with your camcorder to the hooks for the shoulder strap. 68

Operating Instructions
Page 69
Quick Reference 69 Identifying the parts and controls CCD-TR618 wj wk wf wg wl wh wf DATE button (p. 25) wg TIME button (p. 25) wh TITLE button (p. 40) wj LIGHT button (CCD-TR618 only) (p. 42) wk Viewfinder (p. 21) wl COUNTER RESET button (p. 20) Attaching the lens cap Attach the lens cap to the grip strap as illustrated.
Quick Reference 69 Identifying the parts and controls CCD-TR618 wj wk wf wg wl wh wf DATE button (p. 25) wg TIME button (p. 25) wh TITLE button (p. 40) wj LIGHT button (CCD-TR618 only) (p. 42) wk Viewfinder (p. 21) wl COUNTER RESET button (p. 20) Attaching the lens cap Attach the lens cap to the grip strap as illustrated.

Operating Instructions
Page 70
EJECT button (p. 19) ea Cassette compartment (p. 19) es Grip strap Fastening the grip strap ed ef eg ed S VIDEO OUT jack (p. 26) ef A/V OUT jack (p. 26) eg RFU DC OUT (RFU adaptor DC output) (p. 26) Fasten the grip strap firmly. 70 ea es e; Identifying the parts and controls e;
EJECT button (p. 19) ea Cassette compartment (p. 19) es Grip strap Fastening the grip strap ed ef eg ed S VIDEO OUT jack (p. 26) ef A/V OUT jack (p. 26) eg RFU DC OUT (RFU adaptor DC output) (p. 26) Fasten the grip strap firmly. 70 ea es e; Identifying the parts and controls e;
Operating Instructions
Page 71
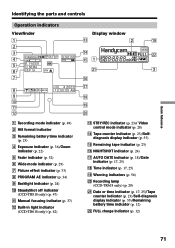
Recording lamp (CCD-TR618 only) (p. 20) wa Date or time indicator (p. 17, 25)/Tape counter indicator (p. 23)/Self-diagnosis display indicator (p. 55)/Remaining battery time indicator (p. 12) ws FULL charge indicator (p. 12) 71 Quick Reference Identifying the parts and controls Operation indicators Viewfinder 1... indicator (p. 33) 8 PROGRAM AE indicator (p. 34) 9 Backlight indicator (p. 24) 0 SteadyShot off indicator (CCD-TR818 only) (p. 47) qa Manual focusing indicator (p. 37) qs Built-in light indicator (CCD-TR618 only) (p. 42) Display window qd 2 ql qf ws qg 1 wa 3 qh qj qk ql ...
Recording lamp (CCD-TR618 only) (p. 20) wa Date or time indicator (p. 17, 25)/Tape counter indicator (p. 23)/Self-diagnosis display indicator (p. 55)/Remaining battery time indicator (p. 12) ws FULL charge indicator (p. 12) 71 Quick Reference Identifying the parts and controls Operation indicators Viewfinder 1... indicator (p. 33) 8 PROGRAM AE indicator (p. 34) 9 Backlight indicator (p. 24) 0 SteadyShot off indicator (CCD-TR818 only) (p. 47) qa Manual focusing indicator (p. 37) qs Built-in light indicator (CCD-TR618 only) (p. 42) Display window qd 2 ql qf ws qg 1 wa 3 qh qj qk ql ...


