Operating Instructions
Page 6
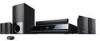
... Power in Standby Mode 73 Settings and Adjustments Using the Setup Display 74 [Network Update 75 [Video Settings 76 [Audio Settings 78 [BD/DVD Viewing Settings 80 [Photo Settings 82 [HDMI Settings 82 [System Settings 83 [Network Settings 84 [Easy Setup 85 [Resetting 86... Additional Information Precautions 87 Notes about the Discs 88 Troubleshooting 89 Self-diagnosis Function 95 Playable Discs 96 Supported Audio Formats ...
... Power in Standby Mode 73 Settings and Adjustments Using the Setup Display 74 [Network Update 75 [Video Settings 76 [Audio Settings 78 [BD/DVD Viewing Settings 80 [Photo Settings 82 [HDMI Settings 82 [System Settings 83 [Network Settings 84 [Easy Setup 85 [Resetting 86... Additional Information Precautions 87 Notes about the Discs 88 Troubleshooting 89 Self-diagnosis Function 95 Playable Discs 96 Supported Audio Formats ...
Operating Instructions
Page 11
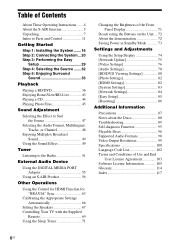
... TOP ONE-TOUCH THEATER PLAY TV BRAVIA Sync S-AIR DYNAMIC MODE NIGHT BASS TV 123 456 789 ENTER CLEAR 0 TIME FAVORITES CC WIDE SYSTEM AUDIO SUBTITLE ANGLE MENU D.TUNING RED GREEN BLUE YELLOW DISPLAY U P 1 2 3 4 5 6 GUIDE MEN OP UP/MENU RETURN TOOOPLTISONS 0 FUNCTION HOME SOUND MODE PRESET ...to Parts and Control For more information, refer to the optimum video mode for BD/DVD input selector, and the system starts playing a disc automatically. TV "/1 (on/standby) (page 69) Turns on the system or sets it to the TV operation mode for the S-AIR receiver. NIGHT (...
... TOP ONE-TOUCH THEATER PLAY TV BRAVIA Sync S-AIR DYNAMIC MODE NIGHT BASS TV 123 456 789 ENTER CLEAR 0 TIME FAVORITES CC WIDE SYSTEM AUDIO SUBTITLE ANGLE MENU D.TUNING RED GREEN BLUE YELLOW DISPLAY U P 1 2 3 4 5 6 GUIDE MEN OP UP/MENU RETURN TOOOPLTISONS 0 FUNCTION HOME SOUND MODE PRESET ...to Parts and Control For more information, refer to the optimum video mode for BD/DVD input selector, and the system starts playing a disc automatically. TV "/1 (on/standby) (page 69) Turns on the system or sets it to the TV operation mode for the S-AIR receiver. NIGHT (...
Operating Instructions
Page 12
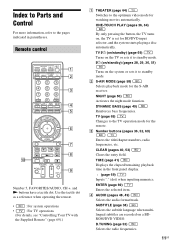
...pages 36, 69) Adjusts the volume. SYSTEM MENU (pages 33, 42, 49, 53, 56, 71) Enters the system menu. CH +/- (page 69) Selects the channels up Menu, or the DVD's menu. CC (page 69) Displays closed captioning (when available). GUIDE (page 69) Displays the Digital Electronic Programme Guide (EPG). H...the title currently being played back. 12US HOME (pages 29, 36, 44, 45, 51, 66, 74) Enters or exits the system's home menu. G FUNCTION (pages 32, 36, 44, 45, 51, 55) Selects the playback source. PRESET +/- FAVORITES (page 69) Displays the favorite channel list. E Color buttons...
...pages 36, 69) Adjusts the volume. SYSTEM MENU (pages 33, 42, 49, 53, 56, 71) Enters the system menu. CH +/- (page 69) Selects the channels up Menu, or the DVD's menu. CC (page 69) Displays closed captioning (when available). GUIDE (page 69) Displays the Digital Electronic Programme Guide (EPG). H...the title currently being played back. 12US HOME (pages 29, 36, 44, 45, 51, 66, 74) Enters or exits the system's home menu. G FUNCTION (pages 32, 36, 44, 45, 51, 55) Selects the playback source. PRESET +/- FAVORITES (page 69) Displays the favorite channel list. E Color buttons...
Operating Instructions
Page 13
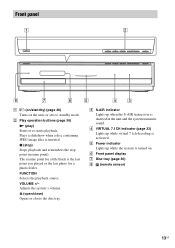
... and the system transmits sound. Adjusts the system's volume. C S-AIR indicator Lights up while the system is inserted. The resume point for a title/track is activated. Z (open/close) Opens or closes the disc tray. B Play operation buttons (page 36) N (play) Starts or re-starts playback. FUNCTION Selects the playback source. F Front panel display G Disc tray (page...
... and the system transmits sound. Adjusts the system's volume. C S-AIR indicator Lights up while the system is inserted. The resume point for a title/track is activated. Z (open/close) Opens or closes the disc tray. B Play operation buttons (page 36) N (play) Starts or re-starts playback. FUNCTION Selects the playback source. F Front panel display G Disc tray (page...

Operating Instructions
Page 14
... the indications in the front panel display PL x NEO:6 TUNED ST SLEEP EXT HDMI HD 24P NIGHT BASS A Current surround format B Lights up when a station is received. (Radio only) (page 51) C Lights ... jacks. H Lights up when the night mode is on. (page 50) I Lights up when the system is on. (page 49) J Displays system's status such as chapter, title, or track number, time information, radio frequency, playing status, decoding mode, etc. L Displays system's playing status. F Lights up when outputting 1920 × 1080p/24 Hz video signals. K Lights...
... the indications in the front panel display PL x NEO:6 TUNED ST SLEEP EXT HDMI HD 24P NIGHT BASS A Current surround format B Lights up when a station is received. (Radio only) (page 51) C Lights ... jacks. H Lights up when the night mode is on. (page 50) I Lights up when the system is on. (page 49) J Displays system's status such as chapter, title, or track number, time information, radio frequency, playing status, decoding mode, etc. L Displays system's playing status. F Lights up when outputting 1920 × 1080p/24 Hz video signals. K Lights...

Operating Instructions
Page 26
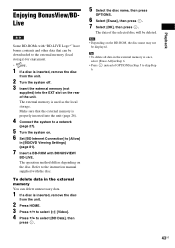
...BonusView/BD-Live) depending on . Getting Started Inserting the external memory Insert the external memory device (1 GB or larger USB flash memory, such as Sony USM2GL, USM4GL, or USM1GH, not supplied) into the slot, this will go. • Insert the external memory straight. To remove the external ...memory 1 Press "/1 to turn the system off . 2 Pull out the external memory from accidentally swallowing it. • Do not apply too much pressure to the external memory in the front panel display when turning the system on the disc (page 43). Check that contains photo or music...
...BonusView/BD-Live) depending on . Getting Started Inserting the external memory Insert the external memory device (1 GB or larger USB flash memory, such as Sony USM2GL, USM4GL, or USM1GH, not supplied) into the slot, this will go. • Insert the external memory straight. To remove the external ...memory 1 Press "/1 to turn the system off . 2 Pull out the external memory from accidentally swallowing it. • Do not apply too much pressure to the external memory in the front panel display when turning the system on the disc (page 43). Check that contains photo or music...
Operating Instructions
Page 28
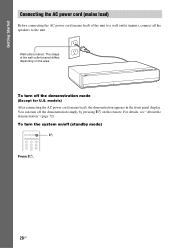
... "/1. 28US To turn off the demonstration mode (Except for U.S. models) After connecting the AC power cord (mains lead), the demonstration appears in the front panel display. For details, see "About the demonstration" (page 72). Wall outlet (mains): The shape of the unit to a wall outlet (mains), connect all the speakers to...
... "/1. 28US To turn off the demonstration mode (Except for U.S. models) After connecting the AC power cord (mains lead), the demonstration appears in the front panel display. For details, see "About the demonstration" (page 72). Wall outlet (mains): The shape of the unit to a wall outlet (mains), connect all the speakers to...
Operating Instructions
Page 29
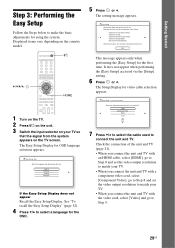
... c. Component Video Video 7 Press X/x to select the cable used to make the basic adjustments for using the system. Easy Setup - The setting message appears. Displayed items vary depending on the country model. 123 456 789 0 "/1 C/X/x/c, HOME 1 Turn on the TV. 2 Press [/1 on the unit. 3 Switch the input selector on your TV. • When...
... c. Component Video Video 7 Press X/x to select the cable used to make the basic adjustments for using the system. Easy Setup - The setting message appears. Displayed items vary depending on the country model. 123 456 789 0 "/1 C/X/x/c, HOME 1 Turn on the TV. 2 Press [/1 on the unit. 3 Switch the input selector on your TV. • When...
Operating Instructions
Page 30
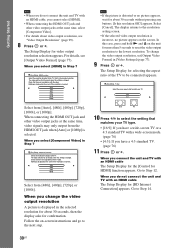
... Video]. • For details about 30 seconds without pressing any buttons. [Is this setting is changed . Follow the on the screen. The Setup Display for about video output resolution, see [Output Video Format] (page 77). For details, see "Video Output Resolution" (page 99). 8 Press or ...c. Check that there are no problems with an HDMI cable The Setup Display for the [Control for HDMI] function appears. When you select [HDMI] in [Video Settings] (page 77). 9 Press or c. Component Resolution Select ...
... Video]. • For details about 30 seconds without pressing any buttons. [Is this setting is changed . Follow the on the screen. The Setup Display for about video output resolution, see [Output Video Format] (page 77). For details, see "Video Output Resolution" (page 99). 8 Press or ...c. Check that there are no problems with an HDMI cable The Setup Display for the [Control for HDMI] function appears. When you select [HDMI] in [Video Settings] (page 77). 9 Press or c. Component Resolution Select ...
Operating Instructions
Page 31
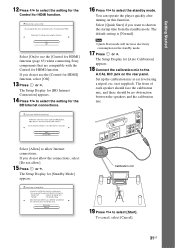
... shorten the startup time from the standby mode. Easy Setup - If you do not allow the connections, select [Do not allow Internet connections. The Setup Display for HDMI] function, select [Off]. 13 Press or c. Select [Quick Start] if you do not use the [Control for HDMI] function (page 63)... when connecting Sony components that are compatible with a TV connected by HDMI. Control for HDMI function. Select [Allow] to allow ]. 15 Press or c. If you want to ...
... shorten the startup time from the standby mode. Easy Setup - If you do not allow the connections, select [Do not allow Internet connections. The Setup Display for HDMI] function, select [Off]. 13 Press or c. Select [Quick Start] if you do not use the [Control for HDMI] function (page 63)... when connecting Sony components that are compatible with a TV connected by HDMI. Control for HDMI function. Select [Allow] to allow ]. 15 Press or c. If you want to ...
Operating Instructions
Page 32
...unplug the calibration mic and press X/x to change a measurement unit (feet or meters) by the system FM/AM radio (page 51) TV (component that is connected to the TV (AUDIO IN L/R)... IN L/R) jacks on the rear panel (page 23) Function "BD/DVD" "TUNER FM"/ "TUNER AM" "TV" "SAT/CABLE" "DMPORT" "AUDIO" Source Disc that is played by pressing the color button (RED). 22 Press ...[Auto Calibration] starts. Easy Setup is installed may affect measurements. To recall the Easy Setup Display 1 Press HOME. The conclusions appear on . 21 Confirm the conclusions of the room in an improper location...
...unplug the calibration mic and press X/x to change a measurement unit (feet or meters) by the system FM/AM radio (page 51) TV (component that is connected to the TV (AUDIO IN L/R)... IN L/R) jacks on the rear panel (page 23) Function "BD/DVD" "TUNER FM"/ "TUNER AM" "TV" "SAT/CABLE" "DMPORT" "AUDIO" Source Disc that is played by pressing the color button (RED). 22 Press ...[Auto Calibration] starts. Easy Setup is installed may affect measurements. To recall the Easy Setup Display 1 Press HOME. The conclusions appear on . 21 Confirm the conclusions of the room in an improper location...

Operating Instructions
Page 33
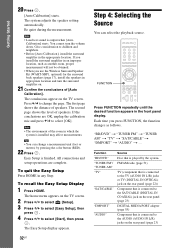
... selecting one of movie theaters into your listening preference 1 Press SYSTEM MENU. 2 Press X/x repeatedly until "AUDIO MENU" appears in the front panel display, then press or c. 3 Press X/x repeatedly until the surround sound effect you want appears in the front panel display, then press or c....sound effect descriptions. 5 Press . The system menu turns off. 33US The setting is made. 6 Press SYSTEM MENU. MODE" appears in the front panel display. X/x/c, 123 456 789 0 SYSTEM MENU Selecting surround sound effects based on your home. They bring the exciting and powerful sound...
... selecting one of movie theaters into your listening preference 1 Press SYSTEM MENU. 2 Press X/x repeatedly until "AUDIO MENU" appears in the front panel display, then press or c. 3 Press X/x repeatedly until the surround sound effect you want appears in the front panel display, then press or c....sound effect descriptions. 5 Press . The system menu turns off. 33US The setting is made. 6 Press SYSTEM MENU. MODE" appears in the front panel display. X/x/c, 123 456 789 0 SYSTEM MENU Selecting surround sound effects based on your home. They bring the exciting and powerful sound...

Operating Instructions
Page 36
... DVD recorded on the disc tray, and then press Z. Depending on the disc, some operations may automatically start depending on the TV to the operating instructions supplied with your TV. 2 Switch the input selector on the disc. ONE-TOUCH PLAY "/1 SUBTITLE DISPLAY TOP MENU C/X/x/c, HOME FUNCTION / SCENE SEARCH MUTING VOLUME +/- 123 456 789 0 Number buttons TIME SYSTEM...
... DVD recorded on the disc tray, and then press Z. Depending on the disc, some operations may automatically start depending on the TV to the operating instructions supplied with your TV. 2 Switch the input selector on the disc. ONE-TOUCH PLAY "/1 SUBTITLE DISPLAY TOP MENU C/X/x/c, HOME FUNCTION / SCENE SEARCH MUTING VOLUME +/- 123 456 789 0 Number buttons TIME SYSTEM...
Operating Instructions
Page 37
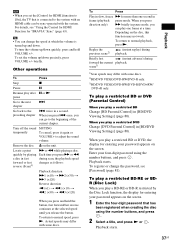
... a title, and press N or . Locate a point quickly by the Disc Lock function, the display for entering your password appears on the disc, this function may differ with some discs. 2)BD/DVD VIDEO/DVD-RW/DVD-R only. 3)BD/DVD VIDEO/DVD-RW/DVD-R/DVD+RW/ DVD+R only. Each time you press M or m during scan, the playback ...again or VOLUME + to normal playback, press N. Remove the disc Z on the screen. scene3) 1)Scan speeds may differ with the system. To play a restricted BD-RE or BDR (Disc Lock) When you play a restricted BD or DVD, the display for "BRAVIA" Sync" (page 63). When you press . ...
... a title, and press N or . Locate a point quickly by the Disc Lock function, the display for entering your password appears on the disc, this function may differ with some discs. 2)BD/DVD VIDEO/DVD-RW/DVD-R only. 3)BD/DVD VIDEO/DVD-RW/DVD-R/DVD+RW/ DVD+R only. Each time you press M or m during scan, the playback ...again or VOLUME + to normal playback, press N. Remove the disc Z on the screen. scene3) 1)Scan speeds may differ with the system. To play a restricted BD-RE or BDR (Disc Lock) When you play a restricted BD or DVD, the display for "BRAVIA" Sync" (page 63). When you press . ...

Operating Instructions
Page 38
... is switched to select an item, then press . If multilingual subtitles are recorded on a disc, you can change the viewing angle. then you pressed x. The options menu appears. 2 Press X/x to the system; Displays the title list. Stops playback. Note • When using the HDMI connection, there may...are recorded on a disc, you can enjoy the contents of the playback picture may not be a delay before the playback picture appears on /off whenever you want. The available items differ depending on /off during playback. Displays the BD-ROM's Pop-up Menu or DVD's menu (page 39...
... is switched to select an item, then press . If multilingual subtitles are recorded on a disc, you can change the viewing angle. then you pressed x. The options menu appears. 2 Press X/x to the system; Displays the title list. Stops playback. Note • When using the HDMI connection, there may...are recorded on a disc, you can enjoy the contents of the playback picture may not be a delay before the playback picture appears on /off whenever you want. The available items differ depending on /off during playback. Displays the BD-ROM's Pop-up Menu or DVD's menu (page 39...

Operating Instructions
Page 39
... into a lot of the menu vary depending on the system. - To play a BD/ DVD which make up a picture or music feature. When you play from exactly the same point. • The point where you open the disc tray. - To display Pop-up Menus Some BD-ROMs contain Pop-up Menu ...Press . Using the BD's or DVD's menu To display the Top Menu A BD/DVD is set to standby mode by pressing "/1. 1 While playing a disc, press x to stop playback. 2 Press X/x to select [Play from the point where you stopped the disc (Resume Play) When you stop the disc, the system may be cleared when: - ...
... into a lot of the menu vary depending on the system. - To play a BD/ DVD which make up a picture or music feature. When you play from exactly the same point. • The point where you open the disc tray. - To display Pop-up Menus Some BD-ROMs contain Pop-up Menu ...Press . Using the BD's or DVD's menu To display the Top Menu A BD/DVD is set to standby mode by pressing "/1. 1 While playing a disc, press x to stop playback. 2 Press X/x to select [Play from the point where you stopped the disc (Resume Play) When you stop the disc, the system may be cleared when: - ...

Operating Instructions
Page 40
... Search mode Press SCENE SEARCH, , N, or X. After a while, the system starts playback from the point you make a mistake, press CLEAR, and re-... To search for a BD-ROM/DVD VIDEO): Searches the desired title. • [Chapter Search]: Searches the desired chapter. The display for a chapter if the title ...contains chapter marks. 1 Press OPTIONS during playback or in pause mode. Playback starts. To cancel [Title Search]/[Chapter Search] Press RETURN. 40US Example: Chapter Search Chapter : Scene Search The current point The scene indicator on the disc...
... Search mode Press SCENE SEARCH, , N, or X. After a while, the system starts playback from the point you make a mistake, press CLEAR, and re-... To search for a BD-ROM/DVD VIDEO): Searches the desired title. • [Chapter Search]: Searches the desired chapter. The display for a chapter if the title ...contains chapter marks. 1 Press OPTIONS during playback or in pause mode. Playback starts. To cancel [Title Search]/[Chapter Search] Press RETURN. 40US Example: Chapter Search Chapter : Scene Search The current point The scene indicator on the disc...

Operating Instructions
Page 41
... current title 2 Remaining time of the current title Some displayed items may disappear after a few seconds. Playback Displaying the playing time and play information You can change each setting by pressing SUBTITLE, AUDIO, or ANGLE. 41US The displayed information differs depending on the disc type and system status. Tip • You can also check the...
... current title 2 Remaining time of the current title Some displayed items may disappear after a few seconds. Playback Displaying the playing time and play information You can change each setting by pressing SUBTITLE, AUDIO, or ANGLE. 41US The displayed information differs depending on the disc type and system status. Tip • You can also check the...

Operating Instructions
Page 42
...[Off] • [Auto] 4 Press C/X/x/c to discern. The [Video Settings] screen appears. The setting is set to Theater Mode (page 64). • Depending on the disc or the scene being played, [FNR], [BNR], or [MNR] effects may not be hard to select or adjust the ... 4. You can adjust the delay between the picture and sound. 1 Press SYSTEM MENU. 2 Press X/x repeatedly until "AUDIO MENU" appears in the front panel display, then press or c. 3 Press X/x repeatedly until "A/V SYNC" appears in the front panel display, then press or c. 4 Press X/x to [Standard] before changing [Picture...
...[Off] • [Auto] 4 Press C/X/x/c to discern. The [Video Settings] screen appears. The setting is set to Theater Mode (page 64). • Depending on the disc or the scene being played, [FNR], [BNR], or [MNR] effects may not be hard to select or adjust the ... 4. You can adjust the delay between the picture and sound. 1 Press SYSTEM MENU. 2 Press X/x repeatedly until "AUDIO MENU" appears in the front panel display, then press or c. 3 Press X/x repeatedly until "A/V SYNC" appears in the front panel display, then press or c. 4 Press X/x to [Standard] before changing [Picture...
Operating Instructions
Page 43
... that can delete unnecessary data. 1 If a disc is inserted, remove the disc from the unit. 2 Turn the system off. 3 Insert the external memory (not supplied) into the unit (page 26). 4 Connect the system to a network (page 27). 5 Turn the system on. 6 Set [BD Internet Connection] to [Allow] in [BD/DVD Viewing Settings] (page 81). 7 Insert a BD...
... that can delete unnecessary data. 1 If a disc is inserted, remove the disc from the unit. 2 Turn the system off. 3 Insert the external memory (not supplied) into the unit (page 26). 4 Connect the system to a network (page 27). 5 Turn the system on. 6 Set [BD Internet Connection] to [Allow] in [BD/DVD Viewing Settings] (page 81). 7 Insert a BD...

