Operating Instructions
Page 1
Blu-ray Disc™ / DVD Player Operating Instructions 4-410-140-12(1) Getting Started Playback Internet Settings and Adjustments Additional Information BDP-S590/BX59
Blu-ray Disc™ / DVD Player Operating Instructions 4-410-140-12(1) Getting Started Playback Internet Settings and Adjustments Additional Information BDP-S590/BX59
Operating Instructions
Page 2
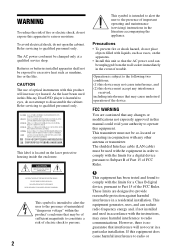
This label is intended to alert the user to the presence of uninsulated "dangerous voltage" within the product's enclosure that any changes or modifications not expressly approved in this manual could void your authority to Subpart B of Part 15 of FCC Rules. This symbol is located on the apparatus. • Install this unit so that the AC power cord can radiate radio frequency energy and, if not installed and used in accordance with this equipment. This transmitter must not be co-located or operating in conjunction with the limits for a digital device pursuant to operate this ...
This label is intended to alert the user to the presence of uninsulated "dangerous voltage" within the product's enclosure that any changes or modifications not expressly approved in this manual could void your authority to Subpart B of Part 15 of FCC Rules. This symbol is located on the apparatus. • Install this unit so that the AC power cord can radiate radio frequency energy and, if not installed and used in accordance with this equipment. This transmitter must not be co-located or operating in conjunction with the limits for a digital device pursuant to operate this ...
Operating Instructions
Page 3
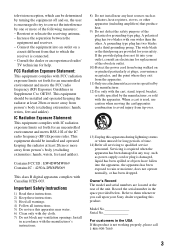
..., or sold with one or more of the following measures: - If the provided plug does not fit into your outlet, consult an electrician for your Sony dealer regarding this apparatus during lightning storms or when unused for help. This equipment should be installed and operated keeping the radiator at the rear...
..., or sold with one or more of the following measures: - If the provided plug does not fit into your outlet, consult an electrician for your Sony dealer regarding this apparatus during lightning storms or when unused for help. This equipment should be installed and operated keeping the radiator at the rear...
Operating Instructions
Page 4
It may condense on the disc tray. On power sources • The player is not disconnected from the AC power source as long as it is in use any type of your medical device before using a connection cable shorter than discs on the lenses inside the player. never pull the cord. • Observe following points to malfunction. It is not working properly, please contact our Customer Information Service Center at 1-877-899-7669 or write to us at: Customer Information Service 115 Gordon Baker Road, Toronto, Ontario, M2H 3R6 Precautions This equipment has been tested and ...
It may condense on the disc tray. On power sources • The player is not disconnected from the AC power source as long as it is in use any type of your medical device before using a connection cable shorter than discs on the lenses inside the player. never pull the cord. • Observe following points to malfunction. It is not working properly, please contact our Customer Information Service Center at 1-877-899-7669 or write to us at: Customer Information Service 115 Gordon Baker Road, Toronto, Ontario, M2H 3R6 Precautions This equipment has been tested and ...

Operating Instructions
Page 5
...your TV for an extended period of any other similar features. Do not twist or force the HDMI connector into the HDMI OUT jack. Sony recommends that this product and the restrictions placed may be advised of young children (especially those under six years old) is detected, a ...message will be interrupted. 5 You should supervise young children to limit the use of an unauthorized copy is still under development. Consult your nearest Sony dealer. The operation of this player is not upside down or tilted. • Be sure to this product and (ii) our website (http://...
...your TV for an extended period of any other similar features. Do not twist or force the HDMI connector into the HDMI OUT jack. Sony recommends that this product and the restrictions placed may be advised of young children (especially those under six years old) is detected, a ...message will be interrupted. 5 You should supervise young children to limit the use of an unauthorized copy is still under development. Consult your nearest Sony dealer. The operation of this player is not upside down or tilted. • Be sure to this product and (ii) our website (http://...
Operating Instructions
Page 6
...postcard with your mailing address to access their intellectual property, including copyrighted content. Use or distribution of this technology outside of Sony Corporation. • MPEG Layer-3 audio coding technology and patents licensed from Fraunhofer IIS and Thomson. • This product ...industry standard in music recognition technology and related content delivery. ENERGY STAR and the ENERGY STAR mark are trademarks of Sony Corporation and Sony Computer Entertainment Inc. • This product incorporates High-Definition Multimedia Interface (HDMI®) technology. See the Gracenote...
...postcard with your mailing address to access their intellectual property, including copyrighted content. Use or distribution of this technology outside of Sony Corporation. • MPEG Layer-3 audio coding technology and patents licensed from Fraunhofer IIS and Thomson. • This product ...industry standard in music recognition technology and related content delivery. ENERGY STAR and the ENERGY STAR mark are trademarks of Sony Corporation and Sony Computer Entertainment Inc. • This product incorporates High-Definition Multimedia Interface (HDMI®) technology. See the Gracenote...
Operating Instructions
Page 7
Copyright 1995-2010 Opera Software ASA. Gracenote® End User License Agreement This application or device contains software from Opera Software ASA. You agree not to assign, copy, transfer or transmit the Gracenote Software or any Gracenote Data to you for any information that you provide. You agree that your own personal noncommercial use of the Digital Living Network Alliance. • Opera® Browser from Gracenote, Inc. Under no circumstances will terminate if you directly in Gracenote Data, the Gracenote Software, and the Gracenote Servers, including all ownership ...
Copyright 1995-2010 Opera Software ASA. Gracenote® End User License Agreement This application or device contains software from Opera Software ASA. You agree not to assign, copy, transfer or transmit the Gracenote Software or any Gracenote Data to you for any information that you provide. You agree that your own personal noncommercial use of the Digital Living Network Alliance. • Opera® Browser from Gracenote, Inc. Under no circumstances will terminate if you directly in Gracenote Data, the Gracenote Software, and the Gracenote Servers, including all ownership ...
Operating Instructions
Page 8
GRACENOTE DOES NOT WARRANT THE RESULTS THAT WILL BE OBTAINED BY YOUR USE OF THE GRACENOTE SOFTWARE OR ANY GRACENOTE SERVER. The purpose of a randomly assigned numeric identifier is made that the Gracenote Software or Gracenote Servers are error-free or that functioning of Gracenote Software or Gracenote Servers will be uninterrupted. Gracenote makes no representations or warranties, express or implied, regarding the accuracy of Gracenote Data are . No warranty is to allow the Gracenote service to count queries without knowing anything about who you are licensed to you with new ...
GRACENOTE DOES NOT WARRANT THE RESULTS THAT WILL BE OBTAINED BY YOUR USE OF THE GRACENOTE SOFTWARE OR ANY GRACENOTE SERVER. The purpose of a randomly assigned numeric identifier is made that the Gracenote Software or Gracenote Servers are error-free or that functioning of Gracenote Software or Gracenote Servers will be uninterrupted. Gracenote makes no representations or warranties, express or implied, regarding the accuracy of Gracenote Data are . No warranty is to allow the Gracenote service to count queries without knowing anything about who you are licensed to you with new ...

Operating Instructions
Page 9
Table of Contents WARNING 2 Precautions 4 Getting Started Guide to Parts and Controls 10 Step 1: Supplied Accessories 14 Step 2: Connecting the Player 15 Step 3: Preparing for Network Connection 18 Step 4: Easy Setup 18 Playback Playing a Disc 20 Playing from a USB Device 21 Playing via a Network 22 Available Options 24 Internet Browsing Websites 26 Settings and Adjustments Using the Settings Displays 28 [Network Update 28 [Screen Settings 28 [Audio Settings 29 [BD/DVD Viewing Settings 30 [Parental Control Settings 31 [Music Settings 31 [System Settings 31 [Network Settings...
Table of Contents WARNING 2 Precautions 4 Getting Started Guide to Parts and Controls 10 Step 1: Supplied Accessories 14 Step 2: Connecting the Player 15 Step 3: Preparing for Network Connection 18 Step 4: Easy Setup 18 Playback Playing a Disc 20 Playing from a USB Device 21 Playing via a Network 22 Available Options 24 Internet Browsing Websites 26 Settings and Adjustments Using the Settings Displays 28 [Network Update 28 [Screen Settings 28 [Audio Settings 29 [BD/DVD Viewing Settings 30 [Parental Control Settings 31 [Music Settings 31 [System Settings 31 [Network Settings...
Operating Instructions
Page 10
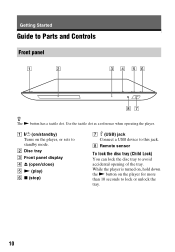
Getting Started Guide to avoid accidental opening of the tray. H Remote sensor To lock the disc tray (Child Lock) You can lock the disc tray to Parts and Controls Front panel z The N button has a tactile dot. A [/1 (on/standby) Turns on the player for more than 10 seconds to lock or unlock the tray. 10 While the player is turned on, hold down the N button on the player, or sets to this jack. Use the tactile dot as a reference when operating the player. B Disc tray C Front panel display D Z (open/close) E N (play) F x (stop) G (USB) jack Connect a USB device to standby mode....
Getting Started Guide to avoid accidental opening of the tray. H Remote sensor To lock the disc tray (Child Lock) You can lock the disc tray to Parts and Controls Front panel z The N button has a tactile dot. A [/1 (on/standby) Turns on the player for more than 10 seconds to lock or unlock the tray. 10 While the player is turned on, hold down the N button on the player, or sets to this jack. Use the tactile dot as a reference when operating the player. B Disc tray C Front panel display D Z (open/close) E N (play) F x (stop) G (USB) jack Connect a USB device to standby mode....

Operating Instructions
Page 12
Remote The available functions of the remote are different depending on CDs. Selects the sound track on the disc or the situation. D TOP MENU Opens or closes the BD's or DVD's Top Menu. 12 A Z OPEN/CLOSE Opens or closes the disc tray. -TV- DISPLAY (page 21) Displays the playback and web browsing information on BD-ROMs/DVD VIDEOs. AUDIO SUBTITLE DISPLAY YELLOW BLUE RED GREEN PREV PAUSE NEXT PLAY STOP NETFLIX SEN z Number 5, AUDIO, VOL +, and N PLAY buttons have a tactile dot. AUDIO (page 30) Selects the language track when multi-lingual tracks are recorded on the player ...
Remote The available functions of the remote are different depending on CDs. Selects the sound track on the disc or the situation. D TOP MENU Opens or closes the BD's or DVD's Top Menu. 12 A Z OPEN/CLOSE Opens or closes the disc tray. -TV- DISPLAY (page 21) Displays the playback and web browsing information on BD-ROMs/DVD VIDEOs. AUDIO SUBTITLE DISPLAY YELLOW BLUE RED GREEN PREV PAUSE NEXT PLAY STOP NETFLIX SEN z Number 5, AUDIO, VOL +, and N PLAY buttons have a tactile dot. AUDIO (page 30) Selects the language track when multi-lingual tracks are recorded on the player ...

Operating Instructions
Page 13
... (page 24) Displays the available options on the category icon of the home menu. X PAUSE Pauses or re-starts playback. SEN (page 22) Accesses the "Sony Entertainment Network™" online service. The search speed changes each time you press for a photo folder. RETURN Returns to the previous/next chapter, track, or...
... (page 24) Displays the available options on the category icon of the home menu. X PAUSE Pauses or re-starts playback. SEN (page 22) Accesses the "Sony Entertainment Network™" online service. The search speed changes each time you press for a photo folder. RETURN Returns to the previous/next chapter, track, or...
Operating Instructions
Page 14
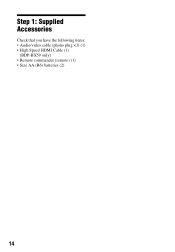
Step 1: Supplied Accessories Check that you have the following items: • Audio/video cable (phono plug ×3) (1) • High Speed HDMI Cable (1) (BDP-BX59 only) • Remote commander (remote) (1) • Size AA (R6) batteries (2) 14
Step 1: Supplied Accessories Check that you have the following items: • Audio/video cable (phono plug ×3) (1) • High Speed HDMI Cable (1) (BDP-BX59 only) • Remote commander (remote) (1) • Size AA (R6) batteries (2) 14
Operating Instructions
Page 15
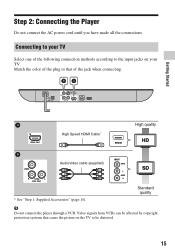
Connecting to be affected by copyright protection systems that of the following connection methods according to the input jacks on the TV to your TV. Video signals from VCRs can be distorted. 15 Step 2: Connecting the Player Do not connect the AC power cord until you have made all the connections. Getting Started High Speed HDMI Cable* High quality Audio/video cable (supplied) * See "Step 1: Supplied Accessories" (page 14). Match the color of the plug to that cause the picture on your TV Select one of the jack when connecting. Standard quality b Do not connect the player...
Connecting to be affected by copyright protection systems that of the following connection methods according to the input jacks on the TV to your TV. Video signals from VCRs can be distorted. 15 Step 2: Connecting the Player Do not connect the AC power cord until you have made all the connections. Getting Started High Speed HDMI Cable* High quality Audio/video cable (supplied) * See "Step 1: Supplied Accessories" (page 14). Match the color of the plug to that cause the picture on your TV Select one of the jack when connecting. Standard quality b Do not connect the player...
Operating Instructions
Page 16
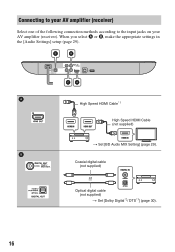
When you select A or B, make the appropriate settings in the [Audio Settings] setup (page 29). Coaxial digital cable (not supplied) or Optical digital cable (not supplied) t Set [Dolby Digital*2/ DTS*3] (page 30). 16 Connecting to your AV amplifier (receiver) Select one of the following connection methods according to the input jacks on your AV amplifier (receiver). High Speed HDMI Cable*1 High Speed HDMI Cable (not supplied) t Set [BD Audio MIX Setting] (page 29).
When you select A or B, make the appropriate settings in the [Audio Settings] setup (page 29). Coaxial digital cable (not supplied) or Optical digital cable (not supplied) t Set [Dolby Digital*2/ DTS*3] (page 30). 16 Connecting to your AV amplifier (receiver) Select one of the following connection methods according to the input jacks on your AV amplifier (receiver). High Speed HDMI Cable*1 High Speed HDMI Cable (not supplied) t Set [BD Audio MIX Setting] (page 29).
Operating Instructions
Page 17
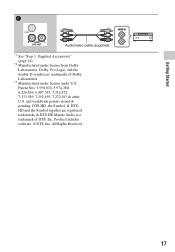
Dolby, Pro Logic, and the double-D symbol are registered trademarks & DTS-HD Master Audio is a trademark of Dolby Laboratories. *3 Manufactured under license under license from Dolby Laboratories. Product includes software. © DTS, Inc. Getting Started Audio/video cable (supplied) *1 See "Step 1: Supplied Accessories" (page 14). *2 Manufactured under U.S. All Rights Reserved. 17 DTS-HD, the Symbol, & DTSHD and the Symbol together are trademarks of DTS, Inc. Patent Nos: 5,956,674; 5,974,380; 6,226,616; 6,487,535; 7,212,872; 7,333,929; 7,392,195; 7,272,567 & other U.S. and...
Dolby, Pro Logic, and the double-D symbol are registered trademarks & DTS-HD Master Audio is a trademark of Dolby Laboratories. *3 Manufactured under license under license from Dolby Laboratories. Product includes software. © DTS, Inc. Getting Started Audio/video cable (supplied) *1 See "Step 1: Supplied Accessories" (page 14). *2 Manufactured under U.S. All Rights Reserved. 17 DTS-HD, the Symbol, & DTSHD and the Symbol together are trademarks of DTS, Inc. Patent Nos: 5,956,674; 5,974,380; 6,226,616; 6,487,535; 7,212,872; 7,333,929; 7,392,195; 7,272,567 & other U.S. and...
Operating Instructions
Page 18
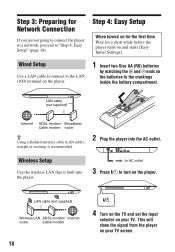
Wired Setup Use a LAN cable to connect to the LAN (100) terminal on the player. 1 Insert two Size AA (R6) batteries by matching the 3 and # ends on the batteries to turn on the player. LAN cable (not supplied) Wireless LAN ADSL modem/ Internet router Cable modem 18 4 Turn on the TV and set the input selector on your TV screen. Wireless Setup Use the wireless LAN that is recommended. 2 Plug the player into the player. to AC outlet 3 Press [/1 to the markings inside the battery compartment. Step 4: Easy Setup When turned on for the first time Wait for Network ...
Wired Setup Use a LAN cable to connect to the LAN (100) terminal on the player. 1 Insert two Size AA (R6) batteries by matching the 3 and # ends on the batteries to turn on the player. LAN cable (not supplied) Wireless LAN ADSL modem/ Internet router Cable modem 18 4 Turn on the TV and set the input selector on your TV screen. Wireless Setup Use the wireless LAN that is recommended. 2 Plug the player into the player. to AC outlet 3 Press [/1 to the markings inside the battery compartment. Step 4: Easy Setup When turned on for the first time Wait for Network ...
Operating Instructions
Page 19
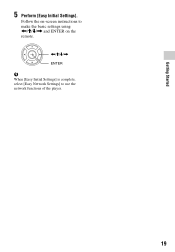
Follow the on-screen instructions to make the basic settings using Getting Started 5 Perform [Easy Initial Settings].
Follow the on-screen instructions to make the basic settings using Getting Started 5 Perform [Easy Initial Settings].
Operating Instructions
Page 20
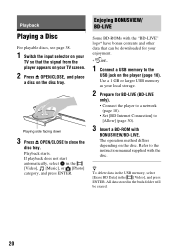
Playing side facing down 3 Press Z OPEN/CLOSE to [Allow] (page 30). 3 Insert a BD-ROM with the disc. Enjoying BONUSVIEW/ BD-LIVE Some BD-ROMs with the "BD-LIVE" logo* have bonus contents and other data that the signal from the player appears on your TV screen. 2 Press Z OPEN/CLOSE, and place a disc on the disc tray. Refer to the USB jack on the player (page 10). Playback Playing a Disc For playable discs, see page 38. 1 Switch the input selector on your TV so that can be erased. 20 The operation method differs depending on the disc. z To delete data in the USB memory, ...
Playing side facing down 3 Press Z OPEN/CLOSE to [Allow] (page 30). 3 Insert a BD-ROM with the disc. Enjoying BONUSVIEW/ BD-LIVE Some BD-ROMs with the "BD-LIVE" logo* have bonus contents and other data that the signal from the player appears on your TV screen. 2 Press Z OPEN/CLOSE, and place a disc on the disc tray. Refer to the USB jack on the player (page 10). Playback Playing a Disc For playable discs, see page 38. 1 Switch the input selector on your TV so that can be erased. 20 The operation method differs depending on the disc. z To delete data in the USB memory, ...
Operating Instructions
Page 21
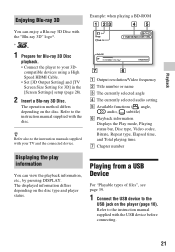
compatible devices using a High Speed HDMI Cable. • Set [3D Output Setting] and [TV Screen Size Setting for Blu-ray 3D Disc playback. • Connect the player to your TV and the connected device. z Refer also to the instruction manual supplied with your 3D- G Chapter number Displaying the play information You can enjoy a Blu-ray 3D Disc with the disc. Refer to the instruction manuals supplied with the USB device before connecting. 21 Playback Enjoying Blu-ray 3D Example: when playing a BD-ROM You can view the playback information, etc., by pressing DISPLAY. ...
compatible devices using a High Speed HDMI Cable. • Set [3D Output Setting] and [TV Screen Size Setting for Blu-ray 3D Disc playback. • Connect the player to your TV and the connected device. z Refer also to the instruction manual supplied with your 3D- G Chapter number Displaying the play information You can enjoy a Blu-ray 3D Disc with the disc. Refer to the instruction manuals supplied with the USB device before connecting. 21 Playback Enjoying Blu-ray 3D Example: when playing a BD-ROM You can view the playback information, etc., by pressing DISPLAY. ...
