Operating Instructions
Page 1
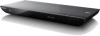
Blu-ray Disc™ / DVD Player Operating Instructions 4-410-140-12(1) Getting Started Playback Internet Settings and Adjustments Additional Information BDP-S590/BX59
Blu-ray Disc™ / DVD Player Operating Instructions 4-410-140-12(1) Getting Started Playback Internet Settings and Adjustments Additional Information BDP-S590/BX59
Operating Instructions
Page 2
WARNING To reduce the risk of important operating and maintenance (servicing) instructions in the literature accompanying the appliance. The AC power cord must not be of sufficient magnitude to constitute a risk of electric shock to persons. 2 This symbol is intended to alert the user to the presence of fire or electric shock, do not attempt to excessive heat such as vases, on the laser protective housing inside the enclosure. Refer servicing to qualified personnel only. This symbol is intended to alert the user to rain or moisture. Operation is harmful to eyes, do not expose ...
WARNING To reduce the risk of important operating and maintenance (servicing) instructions in the literature accompanying the appliance. The AC power cord must not be of sufficient magnitude to constitute a risk of electric shock to persons. 2 This symbol is intended to alert the user to the presence of fire or electric shock, do not attempt to excessive heat such as vases, on the laser protective housing inside the enclosure. Refer servicing to qualified personnel only. This symbol is intended to alert the user to rain or moisture. Operation is harmful to eyes, do not expose ...
Operating Instructions
Page 3
... such as power-supply cord or plug is damaged, liquid has been spilled or objects have fallen into your outlet, consult an electrician for your Sony dealer regarding this apparatus during lightning storms or when unused for an uncontrolled environment and meets RSS-102 of the polarized or grounding-type plug...
... such as power-supply cord or plug is damaged, liquid has been spilled or objects have fallen into your outlet, consult an electrician for your Sony dealer regarding this apparatus during lightning storms or when unused for an uncontrolled environment and meets RSS-102 of the polarized or grounding-type plug...
Operating Instructions
Page 4
Doing so may be damaged when the sound level reaches the peak. If you don't, the disc may cause damage to the player or the object. • Take out any type of abrasive pad, scouring powder or solvent such as a bookshelf or similar unit. • Do not place the player in a location near heat sources, or in a place subject to direct sunlight, excessive dust, or mechanical shock. • Do not place the player outdoors, in vehicles, on ships, or on the disc tray. On adjusting volume Do not turn up in the player. • Do not place the player on the lenses inside the player....
Doing so may be damaged when the sound level reaches the peak. If you don't, the disc may cause damage to the player or the object. • Take out any type of abrasive pad, scouring powder or solvent such as a bookshelf or similar unit. • Do not place the player in a location near heat sources, or in a place subject to direct sunlight, excessive dust, or mechanical shock. • Do not place the player outdoors, in vehicles, on ships, or on the disc tray. On adjusting volume Do not turn up in the player. • Do not place the player on the lenses inside the player....

Operating Instructions
Page 5
...copy is detected, a message will be displayed and playback or copying will vary from person to ensure they follow the recommendations listed above. Sony recommends that this product and the restrictions placed may vary depending on your TV for an extended period of time you have any discomfort,... you believe necessary. consult a doctor if you should supervise young children to person. Consult your nearest Sony dealer. Adults should stop watching the 3D video images until the discomfort ends; Do not twist or force the HDMI connector into the HDMI...
...copy is detected, a message will be displayed and playback or copying will vary from person to ensure they follow the recommendations listed above. Sony recommends that this product and the restrictions placed may vary depending on your TV for an extended period of time you have any discomfort,... you believe necessary. consult a doctor if you should supervise young children to person. Consult your nearest Sony dealer. Adults should stop watching the 3D video images until the discomfort ends; Do not twist or force the HDMI connector into the HDMI...
Operating Instructions
Page 6
...content access technologies. Reverse engineering or disassembly is prohibited. • Windows Media is either a registered trademark or trademark of Sony Corporation. • MPEG Layer-3 audio coding technology and patents licensed from Fraunhofer IIS and Thomson. • This product incorporates...-RW," "DVD+R," "DVD-R," "DVD VIDEO," and "CD" logos are trademarks. • "x.v.Color" and "x.v.Color" logo are trademarks of Sony Corporation. • "BRAVIA" is protected by Gracenote apply to access PlayReady-protected content and/or WMDRM-protected content. government. • Music and...
...content access technologies. Reverse engineering or disassembly is prohibited. • Windows Media is either a registered trademark or trademark of Sony Corporation. • MPEG Layer-3 audio coding technology and patents licensed from Fraunhofer IIS and Thomson. • This product incorporates...-RW," "DVD+R," "DVD-R," "DVD VIDEO," and "CD" logos are trademarks. • "x.v.Color" and "x.v.Color" logo are trademarks of Sony Corporation. • "BRAVIA" is protected by Gracenote apply to access PlayReady-protected content and/or WMDRM-protected content. government. • Music and...
Operating Instructions
Page 7
You agree not to assign, copy, transfer or transmit the Gracenote Software or any Gracenote Data to any and all ownership rights. You agree that you provide. If your license terminates, you agree to you for any information that you will use Gracenote Data, the Gracenote Software, and Gracenote Servers for your non-exclusive license to perform other trademarks are trademarks of their respective owners. • Other system and product names are generally trademarks or registered trademarks of this Agreement against you violate these restrictions. Copyright 1995-2010 Opera...
You agree not to assign, copy, transfer or transmit the Gracenote Software or any Gracenote Data to any and all ownership rights. You agree that you provide. If your license terminates, you agree to you for any information that you will use Gracenote Data, the Gracenote Software, and Gracenote Servers for your non-exclusive license to perform other trademarks are trademarks of their respective owners. • Other system and product names are generally trademarks or registered trademarks of this Agreement against you violate these restrictions. Copyright 1995-2010 Opera...
Operating Instructions
Page 8
Gracenote makes no representations or warranties, express or implied, regarding the accuracy of any time. IN NO CASE WILL GRACENOTE BE LIABLE FOR ANY CONSEQUENTIAL OR INCIDENTAL DAMAGES OR FOR ANY LOST PROFITS OR LOST REVENUES. © Gracenote, Inc. 2009 8 The Gracenote service uses a unique identifier to track queries for the Gracenote service. The purpose of a randomly assigned numeric identifier is free to discontinue its services at any Gracenote Data from the Gracenote Servers or to change data categories for any cause that functioning of Gracenote Data are licensed to...
Gracenote makes no representations or warranties, express or implied, regarding the accuracy of any time. IN NO CASE WILL GRACENOTE BE LIABLE FOR ANY CONSEQUENTIAL OR INCIDENTAL DAMAGES OR FOR ANY LOST PROFITS OR LOST REVENUES. © Gracenote, Inc. 2009 8 The Gracenote service uses a unique identifier to track queries for the Gracenote service. The purpose of a randomly assigned numeric identifier is free to discontinue its services at any Gracenote Data from the Gracenote Servers or to change data categories for any cause that functioning of Gracenote Data are licensed to...

Operating Instructions
Page 9
Table of Contents WARNING 2 Precautions 4 Getting Started Guide to Parts and Controls 10 Step 1: Supplied Accessories 14 Step 2: Connecting the Player 15 Step 3: Preparing for Network Connection 18 Step 4: Easy Setup 18 Playback Playing a Disc 20 Playing from a USB Device 21 Playing via a Network 22 Available Options 24 Internet Browsing Websites 26 Settings and Adjustments Using the Settings Displays 28 [Network Update 28 [Screen Settings 28 [Audio Settings 29 [BD/DVD Viewing Settings 30 [Parental Control Settings 31 [Music Settings 31 [System Settings 31 [Network Settings...
Table of Contents WARNING 2 Precautions 4 Getting Started Guide to Parts and Controls 10 Step 1: Supplied Accessories 14 Step 2: Connecting the Player 15 Step 3: Preparing for Network Connection 18 Step 4: Easy Setup 18 Playback Playing a Disc 20 Playing from a USB Device 21 Playing via a Network 22 Available Options 24 Internet Browsing Websites 26 Settings and Adjustments Using the Settings Displays 28 [Network Update 28 [Screen Settings 28 [Audio Settings 29 [BD/DVD Viewing Settings 30 [Parental Control Settings 31 [Music Settings 31 [System Settings 31 [Network Settings...
Operating Instructions
Page 10
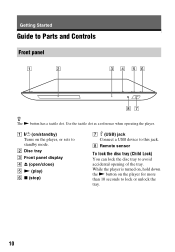
While the player is turned on, hold down the N button on the player, or sets to standby mode. H Remote sensor To lock the disc tray (Child Lock) You can lock the disc tray to lock or unlock the tray. 10 B Disc tray C Front panel display D Z (open/close) E N (play) F x (stop) G (USB) jack Connect a USB device to Parts and Controls Front panel z The N button has a tactile dot. Getting Started Guide to this jack. Use the tactile dot as a reference when operating the player. A [/1 (on/standby) Turns on the player for more than 10 seconds to avoid accidental opening of the tray....
While the player is turned on, hold down the N button on the player, or sets to standby mode. H Remote sensor To lock the disc tray (Child Lock) You can lock the disc tray to lock or unlock the tray. 10 B Disc tray C Front panel display D Z (open/close) E N (play) F x (stop) G (USB) jack Connect a USB device to Parts and Controls Front panel z The N button has a tactile dot. Getting Started Guide to this jack. Use the tactile dot as a reference when operating the player. A [/1 (on/standby) Turns on the player for more than 10 seconds to avoid accidental opening of the tray....

Operating Instructions
Page 12
A Z OPEN/CLOSE Opens or closes the disc tray. -TV- DISPLAY (page 21) Displays the playback and web browsing information on the player or remote is not pressed for interactive functions. The player automatically returns to standby mode. [/1 (on/standby) Turns on CDs. AUDIO (page 30) Selects the language track when multi-lingual tracks are different depending on the disc or the situation. AUDIO SUBTITLE DISPLAY YELLOW BLUE RED GREEN PREV PAUSE NEXT PLAY STOP NETFLIX SEN z Number 5, AUDIO, VOL +, and N PLAY buttons have a tactile dot. VOL +/- D TOP MENU ...
A Z OPEN/CLOSE Opens or closes the disc tray. -TV- DISPLAY (page 21) Displays the playback and web browsing information on the player or remote is not pressed for interactive functions. The player automatically returns to standby mode. [/1 (on/standby) Turns on CDs. AUDIO (page 30) Selects the language track when multi-lingual tracks are different depending on the disc or the situation. AUDIO SUBTITLE DISPLAY YELLOW BLUE RED GREEN PREV PAUSE NEXT PLAY STOP NETFLIX SEN z Number 5, AUDIO, VOL +, and N PLAY buttons have a tactile dot. VOL +/- D TOP MENU ...

Operating Instructions
Page 13
... options on the category icon of the home menu. Skips to the previous display. N PLAY Starts or re-starts playback. SEN (page 22) Accesses the "Sony Entertainment Network™" online service. Home menu display The home menu appears when you press for a photo folder. m/M (fast reverse/fast forward) • Fast reverse...
... options on the category icon of the home menu. Skips to the previous display. N PLAY Starts or re-starts playback. SEN (page 22) Accesses the "Sony Entertainment Network™" online service. Home menu display The home menu appears when you press for a photo folder. m/M (fast reverse/fast forward) • Fast reverse...
Operating Instructions
Page 14
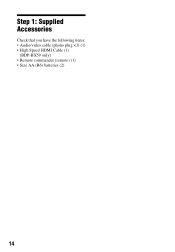
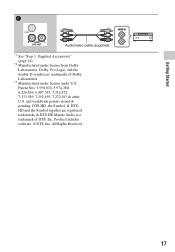
Step 1: Supplied Accessories Check that you have the following items: • Audio/video cable (phono plug ×3) (1) • High Speed HDMI Cable (1) (BDP-BX59 only) • Remote commander (remote) (1) • Size AA (R6) batteries (2) 14
Step 1: Supplied Accessories Check that you have the following items: • Audio/video cable (phono plug ×3) (1) • High Speed HDMI Cable (1) (BDP-BX59 only) • Remote commander (remote) (1) • Size AA (R6) batteries (2) 14
Operating Instructions
Page 15
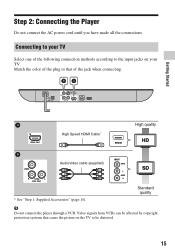
Standard quality b Do not connect the player through a VCR. Match the color of the jack when connecting. Video signals from VCRs can be distorted. 15 Step 2: Connecting the Player Do not connect the AC power cord until you have made all the connections. Getting Started High Speed HDMI Cable* High quality Audio/video cable (supplied) * See "Step 1: Supplied Accessories" (page 14). Connecting to your TV Select one of the following connection methods according to the input jacks on the TV to that of the plug to be affected by copyright protection systems that cause the ...
Standard quality b Do not connect the player through a VCR. Match the color of the jack when connecting. Video signals from VCRs can be distorted. 15 Step 2: Connecting the Player Do not connect the AC power cord until you have made all the connections. Getting Started High Speed HDMI Cable* High quality Audio/video cable (supplied) * See "Step 1: Supplied Accessories" (page 14). Connecting to your TV Select one of the following connection methods according to the input jacks on the TV to that of the plug to be affected by copyright protection systems that cause the ...
Operating Instructions
Page 16
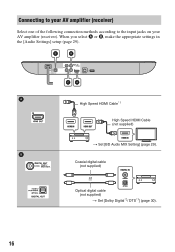
Coaxial digital cable (not supplied) or Optical digital cable (not supplied) t Set [Dolby Digital*2/ DTS*3] (page 30). 16 When you select A or B, make the appropriate settings in the [Audio Settings] setup (page 29). High Speed HDMI Cable*1 High Speed HDMI Cable (not supplied) t Set [BD Audio MIX Setting] (page 29). Connecting to your AV amplifier (receiver) Select one of the following connection methods according to the input jacks on your AV amplifier (receiver).
Coaxial digital cable (not supplied) or Optical digital cable (not supplied) t Set [Dolby Digital*2/ DTS*3] (page 30). 16 When you select A or B, make the appropriate settings in the [Audio Settings] setup (page 29). High Speed HDMI Cable*1 High Speed HDMI Cable (not supplied) t Set [BD Audio MIX Setting] (page 29). Connecting to your AV amplifier (receiver) Select one of the following connection methods according to the input jacks on your AV amplifier (receiver).
Operating Instructions
Page 17
Patent Nos: 5,956,674; 5,974,380; 6,226,616; 6,487,535; 7,212,872; 7,333,929; 7,392,195; 7,272,567 & other U.S. Product includes software. © DTS, Inc. DTS-HD, the Symbol, & DTSHD and the Symbol together are trademarks of DTS, Inc. Getting Started Audio/video cable (supplied) *1 See "Step 1: Supplied Accessories" (page 14). *2 Manufactured under U.S. Dolby, Pro Logic, and the double-D symbol are registered trademarks & DTS-HD Master Audio is a trademark of Dolby Laboratories. *3 Manufactured under license under license from Dolby Laboratories. and worldwide patents issued ...
Patent Nos: 5,956,674; 5,974,380; 6,226,616; 6,487,535; 7,212,872; 7,333,929; 7,392,195; 7,272,567 & other U.S. Product includes software. © DTS, Inc. DTS-HD, the Symbol, & DTSHD and the Symbol together are trademarks of DTS, Inc. Getting Started Audio/video cable (supplied) *1 See "Step 1: Supplied Accessories" (page 14). *2 Manufactured under U.S. Dolby, Pro Logic, and the double-D symbol are registered trademarks & DTS-HD Master Audio is a trademark of Dolby Laboratories. *3 Manufactured under license under license from Dolby Laboratories. and worldwide patents issued ...
Operating Instructions
Page 18
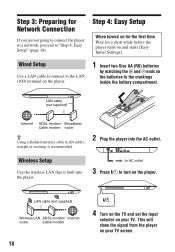
LAN cable (not supplied) Internet ADSL modem/ Broadband Cable modem router z Using a shielded interface cable (LAN cable), straight or crossing, is built into the AC outlet. Wireless Setup Use the wireless LAN that is recommended. 2 Plug the player into the player. Step 4: Easy Setup When turned on for the first time Wait for Network Connection If you are not going to connect the player to a network, proceed to "Step 4: Easy Setup" (page 18). Wired Setup Use a LAN cable to connect to the LAN (100) terminal on the player. 1 Insert two Size AA (R6) batteries by matching the 3 and...
LAN cable (not supplied) Internet ADSL modem/ Broadband Cable modem router z Using a shielded interface cable (LAN cable), straight or crossing, is built into the AC outlet. Wireless Setup Use the wireless LAN that is recommended. 2 Plug the player into the player. Step 4: Easy Setup When turned on for the first time Wait for Network Connection If you are not going to connect the player to a network, proceed to "Step 4: Easy Setup" (page 18). Wired Setup Use a LAN cable to connect to the LAN (100) terminal on the player. 1 Insert two Size AA (R6) batteries by matching the 3 and...
Operating Instructions
Page 19
Follow the on-screen instructions to make the basic settings using Getting Started 5 Perform [Easy Initial Settings].
Follow the on-screen instructions to make the basic settings using Getting Started 5 Perform [Easy Initial Settings].
Operating Instructions
Page 20
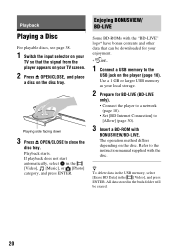
Use a 1 GB or larger USB memory as your local storage. 2 Prepare for your TV screen. 2 Press Z OPEN/CLOSE, and place a disc on the disc tray. All data stored in the [Video], [Music], or [Photo] category, and press ENTER. Playing side facing down 3 Press Z OPEN/CLOSE to [Allow] (page 30). 3 Insert a BD-ROM with BONUSVIEW/BD-LIVE. If playback does not start automatically, select in the buda folder will be downloaded for BD-LIVE (BD-LIVE only). • Connect the player to a network (page 18). • Set [BD Internet Connection] to close the disc tray. z To delete data in the ...
Use a 1 GB or larger USB memory as your local storage. 2 Prepare for your TV screen. 2 Press Z OPEN/CLOSE, and place a disc on the disc tray. All data stored in the [Video], [Music], or [Photo] category, and press ENTER. Playing side facing down 3 Press Z OPEN/CLOSE to [Allow] (page 30). 3 Insert a BD-ROM with BONUSVIEW/BD-LIVE. If playback does not start automatically, select in the buda folder will be downloaded for BD-LIVE (BD-LIVE only). • Connect the player to a network (page 18). • Set [BD Internet Connection] to close the disc tray. z To delete data in the ...
Operating Instructions
Page 21
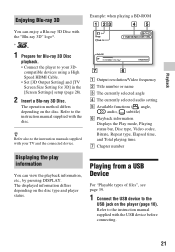
The operation method differs depending on the player (page 10). G Chapter number Displaying the play information You can enjoy a Blu-ray 3D Disc with the USB device before connecting. 21 Refer to the instruction manual supplied with your 3D- Playing from a USB Device For "Playable types of files", see page 39. 1 Connect the USB device to the instruction manuals supplied with the disc. z Refer also to the USB jack on the disc. A Output resolution/Video frequency B Title number or name C The currently selected angle D The currently selected audio setting E Available ...
The operation method differs depending on the player (page 10). G Chapter number Displaying the play information You can enjoy a Blu-ray 3D Disc with the USB device before connecting. 21 Refer to the instruction manual supplied with your 3D- Playing from a USB Device For "Playable types of files", see page 39. 1 Connect the USB device to the instruction manuals supplied with the disc. z Refer also to the USB jack on the disc. A Output resolution/Video frequency B Title number or name C The currently selected angle D The currently selected audio setting E Available ...
