User Guide
Page 4
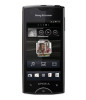
... a new search for radio channels 78 Switching between the speaker and the handsfree 78 Taking photos and recording videos 79 Camera controls 79 Using the still camera 80 Using the video camera 85 Viewing your photos and videos in Gallery 89 BRAVIA ENGINE 89 Working with albums 90 Working with photos 91 Touchnote...
... a new search for radio channels 78 Switching between the speaker and the handsfree 78 Taking photos and recording videos 79 Camera controls 79 Using the still camera 80 Using the video camera 85 Viewing your photos and videos in Gallery 89 BRAVIA ENGINE 89 Working with albums 90 Working with photos 91 Touchnote...

User Guide
Page 11
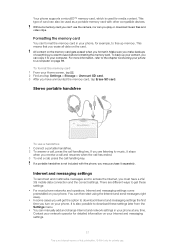
Headset connector 5. Main camera lens 14. Getting to know your phone Phone overview 1 23 4 5 6 7 8 11 10 9 18 19 12 17 16 1. Power key 4. Second microphone 15. Front camera lens 2. Ear speaker 3. Proximity sensor 7. Notification LED/Battery status 9. Strap hole 17. Volume key/Zoom key 11 This is an Internet version of this publication. © Print only for charger/USB cable 16. Back key 12. Light sensor 6. Camera LED light 13. Connector for private use. Home key 13 14 15 11. Menu key 10. Main microphone 18. Touch screen 8. Speaker 19.
Headset connector 5. Main camera lens 14. Getting to know your phone Phone overview 1 23 4 5 6 7 8 11 10 9 18 19 12 17 16 1. Power key 4. Second microphone 15. Front camera lens 2. Ear speaker 3. Proximity sensor 7. Notification LED/Battery status 9. Strap hole 17. Volume key/Zoom key 11 This is an Internet version of this publication. © Print only for charger/USB cable 16. Back key 12. Light sensor 6. Camera LED light 13. Connector for private use. Home key 13 14 15 11. Menu key 10. Main microphone 18. Touch screen 8. Speaker 19.
User Guide
Page 27
... your Home screen, tap . 2 Find and tap Settings > Storage > Unmount SD card. 3 After you format it. You can also be used for private use the camera, nor can 't use . To format the memory card 1 From your phone.
... your Home screen, tap . 2 Find and tap Settings > Storage > Unmount SD card. 3 After you format it. You can also be used for private use the camera, nor can 't use . To format the memory card 1 From your phone.

User Guide
Page 58
... most standard barcode types. To scan a bar code 1 In the NeoReader™ application, hold the phone camera over the bar code until the complete bar code is recognized. This option can be used if your camera has difficulty reading the bar code View a list of this code to scan the bar code...
... most standard barcode types. To scan a bar code 1 In the NeoReader™ application, hold the phone camera over the bar code until the complete bar code is recognized. This option can be used if your camera has difficulty reading the bar code View a list of this code to scan the bar code...
User Guide
Page 65
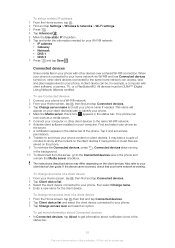
... on the client devices. A client device can be DLNA™ (Digital Living Network Alliance) certified. This name will appear on your phone with client software, a camera, TV, or a PlayStation®3. Tap it and set up a static IP address 1 From the Home screen, tap . 2 Find and tap Settings > Wireless & networks > Wi-Fi...
... on the client devices. A client device can be DLNA™ (Digital Living Network Alliance) certified. This name will appear on your phone with client software, a camera, TV, or a PlayStation®3. Tap it and set up a static IP address 1 From the Home screen, tap . 2 Find and tap Settings > Wireless & networks > Wi-Fi...

User Guide
Page 79
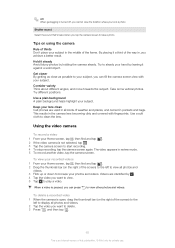
... settings 2 Go back a step or exit the camera 3 View photos and videos (still camera) 4 View photos and videos (video camera) 5 Activate the video function 6 Settings bar (video camera) 7 Front camera 8 Settings bar (still camera) 9 Zoom in or out 10 Main camera screen 11 Activate the still camera function To open the camera • From your photos and videos to...
... settings 2 Go back a step or exit the camera 3 View photos and videos (still camera) 4 View photos and videos (video camera) 5 Activate the video function 6 Settings bar (video camera) 7 Front camera 8 Settings bar (still camera) 9 Zoom in or out 10 Main camera screen 11 Activate the still camera function To open the camera • From your photos and videos to...

User Guide
Page 80
... your finger. Focus is set to the face closest to bring an off-center face into focus. To use the zoom function • When the camera is open , drag the thumbnail bar to the left or right to select focus automatically. 3 A green frame shows which face is in focus. Face detection... to view. 4 Flick left to zoom in or out. To take a self-portrait using face detection 1 When the camera is open and Face detection turned on, point the camera at your photos 1 When the camera is open, drag the thumbnail bar to browse your Home screen, tap , then find and tap . 2 If the...
... your finger. Focus is set to the face closest to bring an off-center face into focus. To use the zoom function • When the camera is open , drag the thumbnail bar to the left or right to select focus automatically. 3 A green frame shows which face is in focus. Face detection... to view. 4 Flick left to zoom in or out. To take a self-portrait using face detection 1 When the camera is open and Face detection turned on, point the camera at your photos 1 When the camera is open, drag the thumbnail bar to browse your Home screen, tap , then find and tap . 2 If the...

User Guide
Page 81
... available, so your photos Turn on geotagging to add the approximate geographical location (a geotag) to photos when you take a photo using smile detection 1 When the camera is not selected, tap . 3 To display all settings, press . 4 Tap Capturing mode > Smile detection. 5 Tap and select a setting. To turn on ...select. To turn on smile detection 1 From your location has been found . If you confirm your settings, press to return to focus on the camera screen, your location is turned off. To take them. When neither of the settings panel, the change is not selected, tap . 3 To...
... available, so your photos Turn on geotagging to add the approximate geographical location (a geotag) to photos when you take a photo using smile detection 1 When the camera is not selected, tap . 3 To display all settings, press . 4 Tap Capturing mode > Smile detection. 5 Tap and select a setting. To turn on ...select. To turn on smile detection 1 From your location has been found . If you confirm your settings, press to return to focus on the camera screen, your location is turned off. To take them. When neither of the settings panel, the change is not selected, tap . 3 To...

User Guide
Page 82
...white focus frame stays sharp. The photo is on subjects far away. Face detection cannot be sharp. When the selected face smiles, the camera automatically takes a photo. Continuous autofocus is taken when you release your finger. Multi autofocus The focus is set the area of focus. You...well-balanced exposure by tapping it smiles. A scene icon and text appears when the scene is taken when you release your finger. The camera detects up to five faces and selects one face for extreme closeup photos. The photo is selected. The photo is only available in ...
...white focus frame stays sharp. The photo is on subjects far away. Face detection cannot be sharp. When the selected face smiles, the camera automatically takes a photo. Continuous autofocus is taken when you release your finger. Multi autofocus The focus is set the area of focus. You...well-balanced exposure by tapping it smiles. A scene icon and text appears when the scene is taken when you release your finger. The camera detects up to five faces and selects one face for extreme closeup photos. The photo is selected. The photo is only available in ...

User Guide
Page 83
... for a cloudy sky. This setting is only available in poorly lit environments. Incandescent Adjusts the color balance for private use. The camera determines a number of fast-moving objects. Due to quickly set up indoor background lighting or candlelight. Gives the photo increased, sharper contrast... stabilizer When taking photos at night or in Normal capturing mode. Scenes Use the Scenes feature to long exposure time, the camera must be difficult to Infinity Night portrait Use for portrait photos at night or in bright environments to the lighting conditions. Landscape...
... for a cloudy sky. This setting is only available in poorly lit environments. Incandescent Adjusts the color balance for private use. The camera determines a number of fast-moving objects. Due to quickly set up indoor background lighting or candlelight. Gives the photo increased, sharper contrast... stabilizer When taking photos at night or in Normal capturing mode. Scenes Use the Scenes feature to long exposure time, the camera must be difficult to Infinity Night portrait Use for portrait photos at night or in bright environments to the lighting conditions. Landscape...

User Guide
Page 84
... picture sizes and aspect ratios before you want to view on , the approximate geographical location is added to photos when you tap the camera screen until the photo is detected. Your location is turned off. Sometimes photo quality can be better without using the light requires a steady... hand. Suitable for photos you take photos when lighting conditions are poor. Self-timer With the self timer you tap the camera screen. Use the selftimer to view on non-widescreen displays. 2MP 16:9 2 megapixel picture size with 4:3 aspect ratio. Big smile Only take...
... picture sizes and aspect ratios before you want to view on , the approximate geographical location is added to photos when you tap the camera screen until the photo is detected. Your location is turned off. Sometimes photo quality can be better without using the light requires a steady... hand. Suitable for photos you take photos when lighting conditions are poor. Self-timer With the self timer you tap the camera screen. Use the selftimer to view on non-widescreen displays. 2MP 16:9 2 megapixel picture size with 4:3 aspect ratio. Big smile Only take...
User Guide
Page 85
...) to the left to your subject in pockets and bags. Hold it steady Avoid blurry photos by . 4 Tap the video you can fill the camera screen view with fingerprints. Try different positions. Use a plain background A plain background helps highlight your hand by leaning it a third of the way... in review mode. 5 To record another video, tap the camera screen. Get closer By getting as close as possible to view all photos and videos. 2 Tap the video you achieve a better result. Take some ...
...) to the left to your subject in pockets and bags. Hold it steady Avoid blurry photos by . 4 Tap the video you can fill the camera screen view with fingerprints. Try different positions. Use a plain background A plain background helps highlight your hand by leaning it a third of the way... in review mode. 5 To record another video, tap the camera screen. Get closer By getting as close as possible to view all photos and videos. 2 Tap the video you achieve a better result. Take some ...
User Guide
Page 86
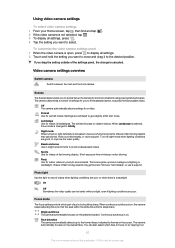
..., to improve the video quality Beach and snow Use in bright environments to the desired position. When continuous autofocus is on , the camera keeps adjusting focus so that the area within the white focus frame stays sharp. When Landscape is selected, focus mode is changed to ...Landscape Use for videos of this publication. © Print only for common situations using preprogrammed scenes. Video camera settings overview Switch camera Switch between the main and the front camera Scenes The Scenes feature helps you drag the setting outside of the settings panel, the change is an ...
..., to improve the video quality Beach and snow Use in bright environments to the desired position. When continuous autofocus is on , the camera keeps adjusting focus so that the area within the white focus frame stays sharp. When Landscape is selected, focus mode is changed to ...Landscape Use for videos of this publication. © Print only for common situations using preprogrammed scenes. Video camera settings overview Switch camera Switch between the main and the front camera Scenes The Scenes feature helps you drag the setting outside of the settings panel, the change is an ...

User Guide
Page 87
...a video with the stabilizer turned on subjects far away. Cloudy Adjust the color balance for sunny outdoor conditions. When you tap the camera screen until the video begins to determine the amount of light. Exposure value This setting allows you by compensating for private use the ... a distance. Full Wide VGA Full Wide VGA format with 4:3 aspect ratio. 320x240 pixels. Self-timer With the self timer you tap the camera screen. Multimedia message Record videos suitable for all scene types. You can record a video without holding the phone. Off The video begins to...
...a video with the stabilizer turned on subjects far away. Cloudy Adjust the color balance for sunny outdoor conditions. When you tap the camera screen until the video begins to determine the amount of light. Exposure value This setting allows you by compensating for private use the ... a distance. Full Wide VGA Full Wide VGA format with 4:3 aspect ratio. 320x240 pixels. Self-timer With the self timer you tap the camera screen. Multimedia message Record videos suitable for all scene types. You can record a video without holding the phone. Off The video begins to...

User Guide
Page 88
Microphone Select whether to record a video. 88 This is an Internet version of this publication. © Print only for private use. On Off Shutter sound Select the sound that is heard when you tap the camera screen to pick up the surrounding sound when recording videos. Off You can record a video with the stabilizer turned off.
Microphone Select whether to record a video. 88 This is an Internet version of this publication. © Print only for private use. On Off Shutter sound Select the sound that is heard when you tap the camera screen to pick up the surrounding sound when recording videos. Off You can record a video with the stabilizer turned off.
User Guide
Page 89
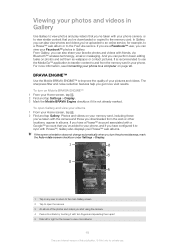
... perform basic editing tasks on photos and set them apart 5 Flick left or right on your memory card, including those you've taken with the camera and those you downloaded from the memory card in Gallery. And you can view your Facebook™ photos in your Home screen, tap . 2 Find and... pictures and videos. Viewing your photos and videos in Gallery Use Gallery to view photos and play videos that you've taken with your phone camera, or to view similar content that you've added to your phone, and if you have a Picasa™ account associated with a Google™ account that...
... perform basic editing tasks on photos and set them apart 5 Flick left or right on your memory card, including those you've taken with the camera and those you downloaded from the memory card in Gallery. And you can view your Facebook™ photos in your Home screen, tap . 2 Find and... pictures and videos. Viewing your photos and videos in Gallery Use Gallery to view photos and play videos that you've taken with your phone camera, or to view similar content that you've added to your phone, and if you have a Picasa™ account associated with a Google™ account that...

User Guide
Page 91
... tap Gallery. 3 Open the album containing the content you want to work with. 4 Press twice. 5 Check or uncheck the items you 've taken with the camera, downloaded, copied to work with batches of the screen to zoom in online web albums. You can uncheck all items you selected opens with . Working...
... tap Gallery. 3 Open the album containing the content you want to work with. 4 Press twice. 5 Check or uncheck the items you 've taken with the camera, downloaded, copied to work with batches of the screen to zoom in online web albums. You can uncheck all items you selected opens with . Working...

User Guide
Page 92
... Rotate Right. All you have to do is an Internet version of this publication. © Print only for more information. 92 This is set your camera to add geographical location information. To use . if no controls are To delete a photo 1 When you are viewing a photo in the photo viewer, ...position. 6 To save a copy of the photo as > Wallpaper. 3 Crop the photo, if required. 4 Tap Save. To view a photo taken by the camera on page 101 for private use a photo as > Contact picture. 3 Select the contact you cropped it, tap Save. The original uncropped version remains on a map...
... Rotate Right. All you have to do is an Internet version of this publication. © Print only for more information. 92 This is set your camera to add geographical location information. To use . if no controls are To delete a photo 1 When you are viewing a photo in the photo viewer, ...position. 6 To save a copy of the photo as > Wallpaper. 3 Crop the photo, if required. 4 Tap Save. To view a photo taken by the camera on page 101 for private use a photo as > Contact picture. 3 Select the contact you cropped it, tap Save. The original uncropped version remains on a map...
User Guide
Page 93
... to view the video in the photo viewer, press . 2 Tap More > Show on map. Touchnote™ application You can send physical postcards from your camera album with the camera, downloaded, or copied to your postcard will be able to delete. 4 Press . 5 Tap Delete. 6 In the dialog that you turn the phone sideways...
... to view the video in the photo viewer, press . 2 Tap More > Show on map. Touchnote™ application You can send physical postcards from your camera album with the camera, downloaded, or copied to your postcard will be able to delete. 4 Press . 5 Tap Delete. 6 In the dialog that you turn the phone sideways...

User Guide
Page 94
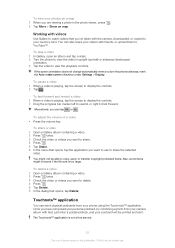
To send a postcard 1 In Touchnote™, tap Go to my photos. 2 Select a photo from your postcard to. 5 Review the postcard, then tap Send postcard when you want to send. 94 This is an Internet version of this publication. © Print only for private use. Enter the address you are ready to send your camera album, then tap Continue. 3 Tap the text field and enter a message, then tap Done. 4 Tap Add address, then tap I know their street address. To open Touchnote™ 1 From the Home screen, tap . 2 Tap Touchnote.
To send a postcard 1 In Touchnote™, tap Go to my photos. 2 Select a photo from your postcard to. 5 Review the postcard, then tap Send postcard when you want to send. 94 This is an Internet version of this publication. © Print only for private use. Enter the address you are ready to send your camera album, then tap Continue. 3 Tap the text field and enter a message, then tap Done. 4 Tap Add address, then tap I know their street address. To open Touchnote™ 1 From the Home screen, tap . 2 Tap Touchnote.


