Instruction Manual
Page 3
... Setting up bobbin thread, Extension table, Feed dog control Attaching embroidery unit 72 - 73 Removing embroidery unit 72 - 73 Securing material in embroidery hoop 74 - 75 Using the material and stabilizer 76 - 79 Preparing the machine before installing the hoop --------- 80 - 81 Attaching and removing embroidery hoop 80 - 81 Installation of the equipment: 2.26 kg Rated Voltage...
... Setting up bobbin thread, Extension table, Feed dog control Attaching embroidery unit 72 - 73 Removing embroidery unit 72 - 73 Securing material in embroidery hoop 74 - 75 Using the material and stabilizer 76 - 79 Preparing the machine before installing the hoop --------- 80 - 81 Attaching and removing embroidery hoop 80 - 81 Installation of the equipment: 2.26 kg Rated Voltage...
Instruction Manual
Page 6
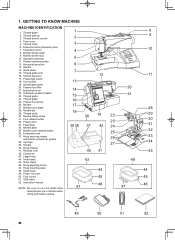
...Bobbin winder stop 10. Pattern reference guide 12. Horizontal spool pin 13. Hand wheel 15. Power/light switch 18. Thread guide 24. Hoop securing screws with your machine when doing embroidery sewing. 1 2 3 4 5 6 7 13 14 15 16 17 18 39 38 47 36 37 40 43 12 19 42 ...guide pole 16. Bobbin cover plate 28. Thread cutter 30. Presser foot 33. Embroidery unit 37. Hoop adjusting screw 47. 1. Presser foot lifter 21. Needle clamp screw 31. Needle plate 35. Hoop bracket 41. Connector 43. Large hoop 44. Face cover 5. Handle 14. Power line cord 50. Presser foot screw 26...
...Bobbin winder stop 10. Pattern reference guide 12. Horizontal spool pin 13. Hand wheel 15. Power/light switch 18. Thread guide 24. Hoop securing screws with your machine when doing embroidery sewing. 1 2 3 4 5 6 7 13 14 15 16 17 18 39 38 47 36 37 40 43 12 19 42 ...guide pole 16. Bobbin cover plate 28. Thread cutter 30. Presser foot 33. Embroidery unit 37. Hoop adjusting screw 47. 1. Presser foot lifter 21. Needle clamp screw 31. Needle plate 35. Hoop bracket 41. Connector 43. Large hoop 44. Face cover 5. Handle 14. Power line cord 50. Presser foot screw 26...
Instruction Manual
Page 72
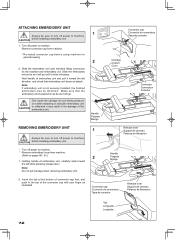
... connectors on it will go until it may be distorted. ATTACHING EMBROIDERY UNIT Always be sure to turn off power to machine CAUTION before installing embroidery unit. * Turn off power to machine. * Remove embroidery hoop from machine. * Re-install connector cap before installing embroidery unit. 1. Release lever Support de cerceau Palanca de liberación Handle...
... connectors on it will go until it may be distorted. ATTACHING EMBROIDERY UNIT Always be sure to turn off power to machine CAUTION before installing embroidery unit. * Turn off power to machine. * Remove embroidery hoop from machine. * Re-install connector cap before installing embroidery unit. 1. Release lever Support de cerceau Palanca de liberación Handle...
Instruction Manual
Page 74
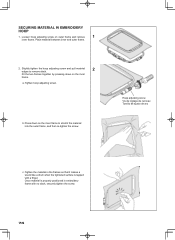
...by pressing down on outer frame and remove 1 inner frame. Place material between inner and outer frame. 2. b. Hoop adjusting screw Vis de réglage de cerceau Tornillo de ajuste de aro c. a. Press down on the inner frame. Slightly tighten...hoop adjusting screw and pull material edges to stretch the material into the outer frame, and then re-tighten the screw. Tighten the material in the frames so that it makes a sound like a drum when the tightened surface is properly positioned in embroidery frame with a finger. SECURING MATERIAL IN EMBROIDERY HOOP 1. Tighten hoop...
...by pressing down on outer frame and remove 1 inner frame. Place material between inner and outer frame. 2. b. Hoop adjusting screw Vis de réglage de cerceau Tornillo de ajuste de aro c. a. Press down on the inner frame. Slightly tighten...hoop adjusting screw and pull material edges to stretch the material into the outer frame, and then re-tighten the screw. Tighten the material in the frames so that it makes a sound like a drum when the tightened surface is properly positioned in embroidery frame with a finger. SECURING MATERIAL IN EMBROIDERY HOOP 1. Tighten hoop...

Instruction Manual
Page 76
Furthermore, when the material is removed from the embroidery area. Embroidery can result in the hoop, the result may shrink and cause the embroidered pattern to become distorted. When embroidery is being used. Always follow the manufacturer's instructions on the backside. * T-shirt type material usually ...* For soft or sheer fabrics, use a fine point scissor to carefully remove any excess stabilizer from the hoop after embroidery is complete, the material may be uneven embroidery. There are a variety of stabilizers available: tear-away, cut -away stabilizer on how to use and ...
Furthermore, when the material is removed from the embroidery area. Embroidery can result in the hoop, the result may shrink and cause the embroidered pattern to become distorted. When embroidery is being used. Always follow the manufacturer's instructions on the backside. * T-shirt type material usually ...* For soft or sheer fabrics, use a fine point scissor to carefully remove any excess stabilizer from the hoop after embroidery is complete, the material may be uneven embroidery. There are a variety of stabilizers available: tear-away, cut -away stabilizer on how to use and ...

Instruction Manual
Page 78
...to the edge of the fabric. 78 Hoop inner frame Cadre intérieur du cerceau Interior del marco del aro WHEN EMBROIDERING ALONG THE EDGE OF MATERIAL SUCH AS A HANDKERCHIEF WHEN EMBROIDERING A NARROW PIECE OF FABRIC SUCH AS RIBBON TAPE Embroidery surface at material edge Surface de broderie... sur le bord du tissu Superficie de bordado en el borde del material Stabilizer (Adhesive surface facing) Entoilage (face à la surface adhésive) Estabilizador (cara de la superficie adhesiva) Hoop inner frame Cadre int...
...to the edge of the fabric. 78 Hoop inner frame Cadre intérieur du cerceau Interior del marco del aro WHEN EMBROIDERING ALONG THE EDGE OF MATERIAL SUCH AS A HANDKERCHIEF WHEN EMBROIDERING A NARROW PIECE OF FABRIC SUCH AS RIBBON TAPE Embroidery surface at material edge Surface de broderie... sur le bord du tissu Superficie de bordado en el borde del material Stabilizer (Adhesive surface facing) Entoilage (face à la surface adhésive) Estabilizador (cara de la superficie adhesiva) Hoop inner frame Cadre int...
Instruction Manual
Page 80
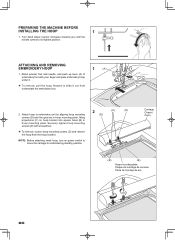
... screwdriver. To remove, loosen hoop mounting screws (D) and remove the hoop from underneath the embroidery foot. 2 (C) (D) 2. NOTE: Before attaching small hoop, turn on hoop bracket into square holes (B) in hoop mounting plate. ATTACHING AND REMOVING EMBROIDERY HOOP 1 (A) 1. PREPARING THE MACHINE BEFORE INSTALLING THE HOOP 1 1. Securely tighten hoop mounting screws (D) with your finger and pass embroidery hoop under it. To remove...
... screwdriver. To remove, loosen hoop mounting screws (D) and remove the hoop from underneath the embroidery foot. 2 (C) (D) 2. NOTE: Before attaching small hoop, turn on hoop bracket into square holes (B) in hoop mounting plate. ATTACHING AND REMOVING EMBROIDERY HOOP 1 (A) 1. PREPARING THE MACHINE BEFORE INSTALLING THE HOOP 1 1. Securely tighten hoop mounting screws (D) with your finger and pass embroidery hoop under it. To remove...
Instruction Manual
Page 84
... A progress bar will get a "Transmission Pending" error message. Next attach the embroidery unit to your sewing machine and connect the USB cable between your large hoop. IMPORTANT: If you have embroidered using the small hoop, and you are now ready to use your computer and sewing machine. 1. If...installation of available space on your hard disk, an error message will prompt you to free some hard disk space before proceeding with to your embroidery unit. 3. Finally you . 2. Please wait for a short while until this happens. The installation procedure is . You can always abort ...
... A progress bar will get a "Transmission Pending" error message. Next attach the embroidery unit to your sewing machine and connect the USB cable between your large hoop. IMPORTANT: If you have embroidered using the small hoop, and you are now ready to use your computer and sewing machine. 1. If...installation of available space on your hard disk, an error message will prompt you to free some hard disk space before proceeding with to your embroidery unit. 3. Finally you . 2. Please wait for a short while until this happens. The installation procedure is . You can always abort ...
Instruction Manual
Page 86
... activate the "Speed limiter", by the software for Photo Stitch (optional) it will give a more , the needle moves and stops at a time (The hoop moves.), after the embroidery data has been transferred. REVERSE STITCH BUTTON Embroidering can be reversed one stitch at its highest position. Forward stitch switch Interupteur couture avancé...
... activate the "Speed limiter", by the software for Photo Stitch (optional) it will give a more , the needle moves and stops at a time (The hoop moves.), after the embroidery data has been transferred. REVERSE STITCH BUTTON Embroidering can be reversed one stitch at its highest position. Forward stitch switch Interupteur couture avancé...
Instruction Manual
Page 90
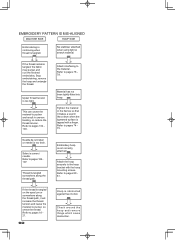
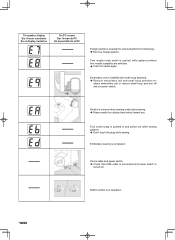
...a drum when the tightened surface is tangled. Refer to pages 80 81. Needle tip is broken or needle is not correctly attached. Embroidery hoop is too thick. Upper thread tension is obstructed against free motion. Refer to pucker and result in the frames so that it will ... material. Stop embroidering, remove the hoop and untangle the thread. Refer to pages 102 103. Check around the hoop and remove things which cause obstruction. Refer to pages 18 21. 90 Hoop is too tight. EMBROIDERY PATTERN IS MIS-ALIGNED MACHINE SIDE HOOP SIDE Embroidering is continuing when thread...
...a drum when the tightened surface is tangled. Refer to pages 80 81. Needle tip is broken or needle is not correctly attached. Embroidery hoop is too thick. Upper thread tension is obstructed against free motion. Refer to pucker and result in the frames so that it will ... material. Stop embroidering, remove the hoop and untangle the thread. Refer to pages 102 103. Check around the hoop and remove things which cause obstruction. Refer to pages 18 21. 90 Hoop is too tight. EMBROIDERY PATTERN IS MIS-ALIGNED MACHINE SIDE HOOP SIDE Embroidering is continuing when thread...
Instruction Manual
Page 92
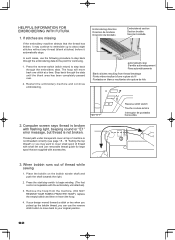
...áticamente Blank stitches resulting from the machine, (DO NOT REMOVE YOUR FABRIC FROM THE HOOP), replace the empty bobbin and then re-insert the hoop. 4. Remove the hoop from thread breakage Points vides résultant d'une rupture du fil Puntadas en blanco resultantes ... thread is broken with flashing light, beeping sound or "E1" error message, but thread is inoperable with accessories. 3. Restart the embroidery machine and continue embroidering. If your original position. 92 Reverse stitch switch Touche couture arrière interruptor de puntadas hacia atrá...
...áticamente Blank stitches resulting from the machine, (DO NOT REMOVE YOUR FABRIC FROM THE HOOP), replace the empty bobbin and then re-insert the hoop. 4. Remove the hoop from thread breakage Points vides résultant d'une rupture du fil Puntadas en blanco resultantes ... thread is broken with flashing light, beeping sound or "E1" error message, but thread is inoperable with accessories. 3. Restart the embroidery machine and continue embroidering. If your original position. 92 Reverse stitch switch Touche couture arrière interruptor de puntadas hacia atrá...
Instruction Manual
Page 120
...61672; Don't touch the plug while sewing. Twin needle mode switch is installed with small hoop attached. Remove embroidery unit and small hoop and then re- attach embroidery unit or remove small hoop and turn off and on . Foot control plug is inserted into cord socket for foot... control plug. Remove foreign particle. Embroidery unit is pushed, while patterns without twin needle ...
...61672; Don't touch the plug while sewing. Twin needle mode switch is installed with small hoop attached. Remove embroidery unit and small hoop and then re- attach embroidery unit or remove small hoop and turn off and on . Foot control plug is inserted into cord socket for foot... control plug. Remove foreign particle. Embroidery unit is pushed, while patterns without twin needle ...


