Instruction Manual
Page 3
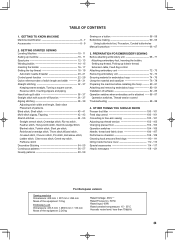
... of software 82 - 85 Operation switches when embroidery unit is attached ------ 86 - 87 Operation switches, Thread tension control Troubleshooting 88 - 99 4. PREPARATION FOR EMBROIDERY SEWING Before attaching embroidery unit 68 - 71 Attaching embroidery foot, Inserting the bobbin, Setting top thread,...8 - 9 2. TABLE OF CONTENTS 1. GETTING STARTED SEWING Leveling machine 10 - 11 Setting up bobbin thread, Extension table, Feed dog control Attaching embroidery unit 72 - 73 Removing embroidery unit 72 - 73 Securing material in embroidery hoop 74 - 75 Using the material and stabilizer 76...
... of software 82 - 85 Operation switches when embroidery unit is attached ------ 86 - 87 Operation switches, Thread tension control Troubleshooting 88 - 99 4. PREPARATION FOR EMBROIDERY SEWING Before attaching embroidery unit 68 - 71 Attaching embroidery foot, Inserting the bobbin, Setting top thread,...8 - 9 2. TABLE OF CONTENTS 1. GETTING STARTED SEWING Leveling machine 10 - 11 Setting up bobbin thread, Extension table, Feed dog control Attaching embroidery unit 72 - 73 Removing embroidery unit 72 - 73 Securing material in embroidery hoop 74 - 75 Using the material and stabilizer 76...
Instruction Manual
Page 6
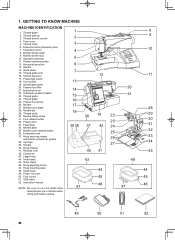
... table (Accessory box) 7. Horizontal spool pin 13. Identification plate 20. Bobbin cover release button 36. Vertical spool pin 17. Bobbin cover plate 28. Embroidery unit 37. Inner frame 45. Small hoop 49. Foot control 51. Thread guide 2. Thread take-up 3. Thread tension control 4. Bobbin winder shaft ...9. Presser foot lifter 21. Thread guide 25. Presser foot 33. Release lever 42. Hand wheel 15. Hoop securing screws with your machine when doing embroidery sewing. 1 2 3 4 5 6 7 13 14 15 16 17 18 39 38 47 36 37 40 43 12 19 42 41 44 45 46...
... table (Accessory box) 7. Horizontal spool pin 13. Identification plate 20. Bobbin cover release button 36. Vertical spool pin 17. Bobbin cover plate 28. Embroidery unit 37. Inner frame 45. Small hoop 49. Foot control 51. Thread guide 2. Thread take-up 3. Thread tension control 4. Bobbin winder shaft ...9. Presser foot lifter 21. Thread guide 25. Presser foot 33. Release lever 42. Hand wheel 15. Hoop securing screws with your machine when doing embroidery sewing. 1 2 3 4 5 6 7 13 14 15 16 17 18 39 38 47 36 37 40 43 12 19 42 41 44 45 46...
Instruction Manual
Page 8
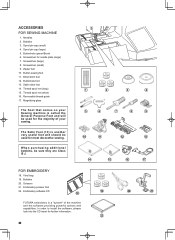
...large) 8. Magnifying glass The Foot that comes on your Sewing machine is another very useful foot and should be sure they are Class I5 J. 10 11 12 14 15 16 FOR EMBROIDERY 18. Zipper foot 10. Embroidery presser foot 22. Buttonhole foot 13. When purchasing additional bobbins..., be used for needle plate (large) 7. Embroidery software CD 19 20 18 FUTURA embroidery is a "system" of your sewing. 1 2 3 5 6 7 8 The Satin Foot (13) is called the General Purpose Foot and will be used for the ...
...large) 8. Magnifying glass The Foot that comes on your Sewing machine is another very useful foot and should be sure they are Class I5 J. 10 11 12 14 15 16 FOR EMBROIDERY 18. Zipper foot 10. Embroidery presser foot 22. Buttonhole foot 13. When purchasing additional bobbins..., be used for needle plate (large) 7. Embroidery software CD 19 20 18 FUTURA embroidery is a "system" of your sewing. 1 2 3 5 6 7 8 The Satin Foot (13) is called the General Purpose Foot and will be used for the ...
Instruction Manual
Page 32
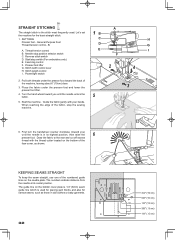
...stitch. 1. S A. Reverse stitch switch D. Guide the fabric gently with the thread cutter located on the needle plate. Needle stop the sewing machine. 6. Stitch width control lever H. When reaching the edge of the fabric, stop position selector switch C. KEEPING SEAMS STRAIGHT To keep ..., use one of the numbered guide lines on the bottom of the machine, leaving about 6" (15cm) clear. 3. Start/stop switch (For embroidery only) E. Stitch length control I 4 2. Start the machine. The numbers indicate distance from the needle at its highest position, then raise the...
...stitch. 1. S A. Reverse stitch switch D. Guide the fabric gently with the thread cutter located on the needle plate. Needle stop the sewing machine. 6. Stitch width control lever H. When reaching the edge of the fabric, stop position selector switch C. KEEPING SEAMS STRAIGHT To keep ..., use one of the numbered guide lines on the bottom of the machine, leaving about 6" (15cm) clear. 3. Start/stop switch (For embroidery only) E. Stitch length control I 4 2. Start the machine. The numbers indicate distance from the needle at its highest position, then raise the...
Instruction Manual
Page 50
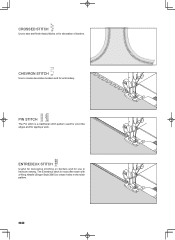
CROSSED STITCH Use to create decorative borders and for embroidery. ENTREDEUX STITCH Useful for decorative stitching on borders and for use in the stitch pattern. 50 The Entredeux stitch is a traditional stitch pattern used for picot like edges and for decoration of borders. CHEVRON STITCH Use to sew and finish elastic fabrics or for applique work. PIN STITCH The Pin stitch is most often sewn with a Wing Needle (Singer Style 2040) to create holes in heirloom sewing.
CROSSED STITCH Use to create decorative borders and for embroidery. ENTREDEUX STITCH Useful for decorative stitching on borders and for use in the stitch pattern. 50 The Entredeux stitch is a traditional stitch pattern used for picot like edges and for decoration of borders. CHEVRON STITCH Use to sew and finish elastic fabrics or for applique work. PIN STITCH The Pin stitch is most often sewn with a Wing Needle (Singer Style 2040) to create holes in heirloom sewing.

Instruction Manual
Page 52
...used for drawn thread hemstitching. It can also be obtained for decoration especially of borders. For drawn thread work, choose a medium to sew and finish stretch fabrics or for decoration. Place the stitch in an opposite or same color. GREEK KEY STITCH A traditional pattern suited... appearance. CRISS-CROSS STITCH Used to heavy weight linen-type fabric. Another use for the ladder stitch is primarily used for embroidery. 52 After sewing, draw the thread out from within the ladder for decorative borders, hems and edge finishings. FISHBONE STITCH Use to create decorative...
...used for drawn thread hemstitching. It can also be obtained for decoration especially of borders. For drawn thread work, choose a medium to sew and finish stretch fabrics or for decoration. Place the stitch in an opposite or same color. GREEK KEY STITCH A traditional pattern suited... appearance. CRISS-CROSS STITCH Used to heavy weight linen-type fabric. Another use for the ladder stitch is primarily used for embroidery. 52 After sewing, draw the thread out from within the ladder for decorative borders, hems and edge finishings. FISHBONE STITCH Use to create decorative...
Instruction Manual
Page 68
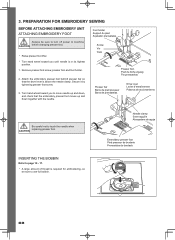
Remove presser foot screw, presser foot and foot holder. 2. Attach the embroidery presser foot behind presser bar so that the embroidery presser foot moves up and down together with the needle. Turn hand wheel toward you to machine CAUTION before changing presser...to move needle up and down , and check that the drive lever is in its highest position. 1. 3. PREPARATION FOR EMBROIDERY SEWING BEFORE ATTACHING EMBROIDERY UNIT ATTACHING EMBROIDERY FOOT Foot holder Support du pied Sujetador prensatelas Always be sure to touch the needle when CAUTION replacing presser foot. Secure ...
Remove presser foot screw, presser foot and foot holder. 2. Attach the embroidery presser foot behind presser bar so that the embroidery presser foot moves up and down together with the needle. Turn hand wheel toward you to machine CAUTION before changing presser...to move needle up and down , and check that the drive lever is in its highest position. 1. 3. PREPARATION FOR EMBROIDERY SEWING BEFORE ATTACHING EMBROIDERY UNIT ATTACHING EMBROIDERY FOOT Foot holder Support du pied Sujetador prensatelas Always be sure to touch the needle when CAUTION replacing presser foot. Secure ...
Instruction Manual
Page 72
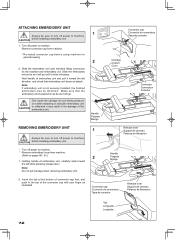
...machine fitting connectors on it when attaching or using machine for general sewing. 2. Holding handle of embroidery unit and pull it will go . Note: Do not pull carriage when removing embroidery unit. Connector cap Couvercle de connecteur Tapa de conector Release lever ...Poignée Mango Connector cap Couvercle de connecteur Tapa de conector Carriage Chariot Carro Connector Connecteur Conector REMOVING EMBROIDERY UNIT 1 Always be distorted. Note: If embroidery unit is pushed in as far as it toward the left while pressing release lever. Release lever Support...
...machine fitting connectors on it when attaching or using machine for general sewing. 2. Holding handle of embroidery unit and pull it will go . Note: Do not pull carriage when removing embroidery unit. Connector cap Couvercle de connecteur Tapa de conector Release lever ...Poignée Mango Connector cap Couvercle de connecteur Tapa de conector Carriage Chariot Carro Connector Connecteur Conector REMOVING EMBROIDERY UNIT 1 Always be distorted. Note: If embroidery unit is pushed in as far as it toward the left while pressing release lever. Release lever Support...
Instruction Manual
Page 84
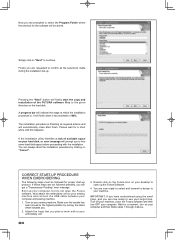
...software and then turn on the hard disk. CORRECT START-UP PROCEDURE WHEN EMBROIDERING The following steps must be stored. Next attach the embroidery unit to the highest position by clicking on your computer. Turn off your machine, close after finish. If these steps are not ...followed precisely, you will be followed for a moment, turn OFF your sewing machine. Double click on the Futura Icon on your embroidery unit. 3. If the installation utility identifies a lack of the FUTURA software files to your large hoop. Please wait...
...software and then turn on the hard disk. CORRECT START-UP PROCEDURE WHEN EMBROIDERING The following steps must be stored. Next attach the embroidery unit to the highest position by clicking on your computer. Turn off your machine, close after finish. If these steps are not ...followed precisely, you will be followed for a moment, turn OFF your sewing machine. Double click on the Futura Icon on your embroidery unit. 3. If the installation utility identifies a lack of the FUTURA software files to your large hoop. Please wait...
Instruction Manual
Page 86
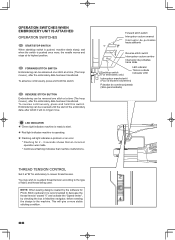
... flashing indicates that machine malfunctions. You may wish to re-adjust thread tension according to the type of the embroidery data, after the embroidery data has been transferred. To reverse continuously, press and hold this switch. FORWARD STITCH SWITCH Embroidering can be advanced... one stitch at its highest position. NOTE: When sewing designs created by checking the box in Machine navigator, before sending ...
... flashing indicates that machine malfunctions. You may wish to re-adjust thread tension according to the type of the embroidery data, after the embroidery data has been transferred. To reverse continuously, press and hold this switch. FORWARD STITCH SWITCH Embroidering can be advanced... one stitch at its highest position. NOTE: When sewing designs created by checking the box in Machine navigator, before sending ...
Instruction Manual
Page 92
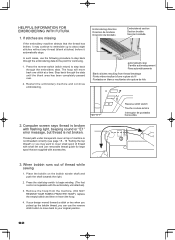
The hoop will move back to step back through the embroidery data. Restart the embroidery machine and continue embroidering. Embroidering direction Direction de broderie Dirección de bordado Embroidered section ...HOOP), replace the empty bobbin and then re-insert the hoop. 4. If stitches are missing If the embroidery machine detects that are supplied with the embroidery unit attached). 3. Remove the hoop from thread breakage Points vides résultant d'une rupture du fil... cases, use the reverse stitch button to move back one stitch at top of thread while sewing 1.
The hoop will move back to step back through the embroidery data. Restart the embroidery machine and continue embroidering. Embroidering direction Direction de broderie Dirección de bordado Embroidered section ...HOOP), replace the empty bobbin and then re-insert the hoop. 4. If stitches are missing If the embroidery machine detects that are supplied with the embroidery unit attached). 3. Remove the hoop from thread breakage Points vides résultant d'une rupture du fil... cases, use the reverse stitch button to move back one stitch at top of thread while sewing 1.
Instruction Manual
Page 100
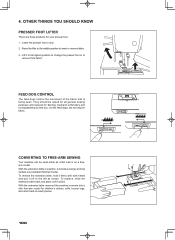
... for children's clothes, cuffs, trouser legs, and other hard-to insert or remove fabric. 3. CONVERTING TO FREE-ARM SEWING Your machine can be raised for all general sewing purposes and lowered for darning, freehand embroidery and monogramming so that is being sewn. To remove the extension table, hold it firmly with both hands...
... for children's clothes, cuffs, trouser legs, and other hard-to insert or remove fabric. 3. CONVERTING TO FREE-ARM SEWING Your machine can be raised for all general sewing purposes and lowered for darning, freehand embroidery and monogramming so that is being sewn. To remove the extension table, hold it firmly with both hands...

Instruction Manual
Page 104
... machine will continue to start. Red light indicates machine is pushed. START/STOP SWITCH This switch works only when sewing embroidery. Reverse stitch function for straight and zigzag stitches Fonction couture arrière pour les points droits et zigzags Función de...tiny tacking stitches to stop sewing. Needle stop position selector switch Touche de position d'arrêt d'aiguille Interruptor de posicion de aguja parada Reverse stitch button Interrupteur couture arrière interruptor de puntadas hacia atrás Start/stop switch (For embroidery only) LED indicator T&#...
... machine will continue to start. Red light indicates machine is pushed. START/STOP SWITCH This switch works only when sewing embroidery. Reverse stitch function for straight and zigzag stitches Fonction couture arrière pour les points droits et zigzags Función de...tiny tacking stitches to stop sewing. Needle stop position selector switch Touche de position d'arrêt d'aiguille Interruptor de posicion de aguja parada Reverse stitch button Interrupteur couture arrière interruptor de puntadas hacia atrás Start/stop switch (For embroidery only) LED indicator T&#...
Instruction Manual
Page 120
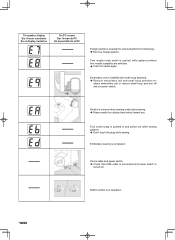
Foot control plug is in and pulled out while sewing patterns. Don't touch the plug while sewing. attach embroidery unit or remove small hoop and turn off and on . Bobbin winder is pushed in operation. 120 On number display Sur l'écran num&#... is inserted into cord socket for foot control plug. Remove foreign particle. Needle is completed. Embroidery sewing is lowered when starting embroidery sewing. Raise needle by rotating hand wheel toward you. Twin needle mode switch is turned on power switch. Check cable and power switch. ...
Foot control plug is in and pulled out while sewing patterns. Don't touch the plug while sewing. attach embroidery unit or remove small hoop and turn off and on . Bobbin winder is pushed in operation. 120 On number display Sur l'écran num&#... is inserted into cord socket for foot control plug. Remove foreign particle. Needle is completed. Embroidery sewing is lowered when starting embroidery sewing. Raise needle by rotating hand wheel toward you. Twin needle mode switch is turned on power switch. Check cable and power switch. ...


