
Instruction Manual
Page 2
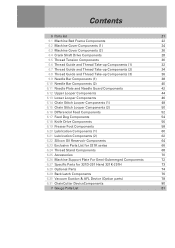
... and Adjustment Instructions 6 3.1 Table Cut-Out Diagram 6 3.2 Machine Installation 7 3.3 Lubrication and Oil Drainage 9 3.4 Fill Silicon Oil to Reservoir 10 3.5 Needle Attachment (or Replacement) 10 3.6 Replacing Upper and Lower Knife 11 3.7 Machine Threading 12 3.8 Thread Tension Adjustment 13 3.9 Presser foot pressure 14 3.10 Adjusting the Differential Feed Rate 14 3.11 Stitch Length Adjustment 15 3.12 Parts Relation and Timing 16 4 Maintenance 17 4.1 Machine Head Cleaning 17 4.2 Oil Change and Filter Cleaning 17 4.3 Safety Inspection 17 5 Troubleshooting...
... and Adjustment Instructions 6 3.1 Table Cut-Out Diagram 6 3.2 Machine Installation 7 3.3 Lubrication and Oil Drainage 9 3.4 Fill Silicon Oil to Reservoir 10 3.5 Needle Attachment (or Replacement) 10 3.6 Replacing Upper and Lower Knife 11 3.7 Machine Threading 12 3.8 Thread Tension Adjustment 13 3.9 Presser foot pressure 14 3.10 Adjusting the Differential Feed Rate 14 3.11 Stitch Length Adjustment 15 3.12 Parts Relation and Timing 16 4 Maintenance 17 4.1 Machine Head Cleaning 17 4.2 Oil Change and Filter Cleaning 17 4.3 Safety Inspection 17 5 Troubleshooting...
Instruction Manual
Page 3
... (1) 48 6.15 Chain Stitch Looper Components (2) 50 6.16 Differencial Feed Components 52 6.17 Feed Dog Components 54 6.18 Knife Drive Components 56 6.19 Presser Foot Components 58 6.20 Lubrication Components (1) 60 6.21 Lubrication Components (2) 62 6.22 Silicon Oil Reservoir Components 64 6.23 Exclusive Parts List for 321K series 66 6.24 Thread Stand Components 68 6.25 Accessories 70 6.26 Machine Support Plate For Semi-Submerged...
... (1) 48 6.15 Chain Stitch Looper Components (2) 50 6.16 Differencial Feed Components 52 6.17 Feed Dog Components 54 6.18 Knife Drive Components 56 6.19 Presser Foot Components 58 6.20 Lubrication Components (1) 60 6.21 Lubrication Components (2) 62 6.22 Silicon Oil Reservoir Components 64 6.23 Exclusive Parts List for 321K series 66 6.24 Thread Stand Components 68 6.25 Accessories 70 6.26 Machine Support Plate For Semi-Submerged...

Instruction Manual
Page 4
...; Passing the thread by the needle or replacing the bobbin or looper. • Replacing the needle, presser foot, throat plate, feed dog and sliding plate. • When the machine is in your country. • The machine should not be followed. Read with a generous amount of use should only be operated by properly trained personnel. • For your safety, goggles must be run without its instructions manual, and indications...
...; Passing the thread by the needle or replacing the bobbin or looper. • Replacing the needle, presser foot, throat plate, feed dog and sliding plate. • When the machine is in your country. • The machine should not be followed. Read with a generous amount of use should only be operated by properly trained personnel. • For your safety, goggles must be run without its instructions manual, and indications...
Instruction Manual
Page 5
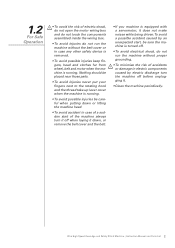
... be placed near those parts. • To avoid injuries never put your fingers next to the rotating hook and the thread take-up lever cover when the machine is running . 1.2 For Safe Operation • To avoid the risk of electric shock, do not open the motor wiring box and do not touch the components assembled inside the wiring box...
... be placed near those parts. • To avoid injuries never put your fingers next to the rotating hook and the thread take-up lever cover when the machine is running . 1.2 For Safe Operation • To avoid the risk of electric shock, do not open the motor wiring box and do not touch the components assembled inside the wiring box...
Instruction Manual
Page 7
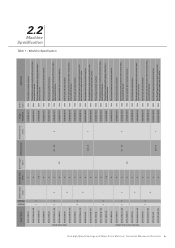
... Safety Stitch Machine | Instruction Manual and Parts List 4 Singer Model Needle Gauge [mm] Overedge Bight [mm] Stitch Length [mm] Differential Rate Presser Foot Lift [mm] Singer Needle Cat Speed [spm] Application 321D-131M-04 4 321D-131M-04 / KS 4 13 - 321D-132M-015 1.5 321D-134M-04 4 6120-06 75/11 6120-06 75/11 6120-06 65/9 6120-06 75/11 8500 Three-thread overlock machine 8500 8500 Three-thread overlock machine with...
... Safety Stitch Machine | Instruction Manual and Parts List 4 Singer Model Needle Gauge [mm] Overedge Bight [mm] Stitch Length [mm] Differential Rate Presser Foot Lift [mm] Singer Needle Cat Speed [spm] Application 321D-131M-04 4 321D-131M-04 / KS 4 13 - 321D-132M-015 1.5 321D-134M-04 4 6120-06 75/11 6120-06 75/11 6120-06 65/9 6120-06 75/11 8500 Three-thread overlock machine 8500 8500 Three-thread overlock machine with...
Instruction Manual
Page 11
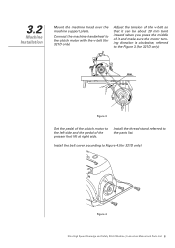
... make sure the motor turning direction is clockwise, referred to the Figure 3.(for 321D only) Figure 4 Ultra High Speed Overedge and Safety Stitch Machine | Instruction Manual and Parts List 8 Install the thread stand referred to the left side and the pedal of the presser foot lift at right side. Install the belt cover according to Figure 4.(for 321D only) 2cm Figure 3 Set the pedal of the clutch motor to the parts list...
... make sure the motor turning direction is clockwise, referred to the Figure 3.(for 321D only) Figure 4 Ultra High Speed Overedge and Safety Stitch Machine | Instruction Manual and Parts List 8 Install the thread stand referred to the left side and the pedal of the presser foot lift at right side. Install the belt cover according to Figure 4.(for 321D only) 2cm Figure 3 Set the pedal of the clutch motor to the parts list...
Instruction Manual
Page 12
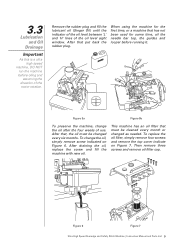
... speed machine, DO NOT run the machine before running it. H L Figure 5a Figure 5b To preserve the machine, change the oil, simply remove screw indicated on Figure 7. This machine has an oil filter that , the oil must be changed as needed. Figure 6 Figure 7 Ultra High Speed Overedge and Safety Stitch Machine | Instruction Manual and Parts List 9 After draining the oil, replace the screw and fill the machine with new oil. After that must be cleaned...
... speed machine, DO NOT run the machine before running it. H L Figure 5a Figure 5b To preserve the machine, change the oil, simply remove screw indicated on Figure 7. This machine has an oil filter that , the oil must be changed as needed. Figure 6 Figure 7 Ultra High Speed Overedge and Safety Stitch Machine | Instruction Manual and Parts List 9 After draining the oil, replace the screw and fill the machine with new oil. After that must be cleaned...

Instruction Manual
Page 13
... Oil to Reservoir When sewing in ultra high speed, fill the device with silicon oil in the accessory box and insert the needle (or remove the old For 1 needle 1 For 2 needle 1 needle). Tighten screw '1'. Insert the needle to prevent needle thread breakage and fabric damage. Figure 8 3.5 Needle Attachment (or Replacement) Use only Singer's Cat. 6120 needles Loosen screw '1' as indicated on Figure 8. Figure 9 (b) Figure 10 Ultra High Speed Overedge and Safety Stitch Machine | Instruction Manual and Parts List 10 Insert the needle...
... Oil to Reservoir When sewing in ultra high speed, fill the device with silicon oil in the accessory box and insert the needle (or remove the old For 1 needle 1 For 2 needle 1 needle). Tighten screw '1'. Insert the needle to prevent needle thread breakage and fabric damage. Figure 8 3.5 Needle Attachment (or Replacement) Use only Singer's Cat. 6120 needles Loosen screw '1' as indicated on Figure 8. Figure 9 (b) Figure 10 Ultra High Speed Overedge and Safety Stitch Machine | Instruction Manual and Parts List 10 Insert the needle...

Instruction Manual
Page 14
... of the upper anb lower knives by referring to "Replacing the upper knife" procedures 3 and 4. Install a new knife by turning the handwheel. 8 3 4 7 2 1 5 4 6 Figure 11 Replacing the lower knife 1. 3.6 Replacing Upper and Lower Knife Replacing the upper knife 1. Loosen screw '1'. Move lower knife holder '2' to the overedge width (Figure 11). 3. Tighten screw '1' temporarily. 2. Overlap the cutting edges of the needle plate 6 Figure 12 (b) Ultra High Speed Overedge and Safety Stitch Machine | Instruction Manual and Parts List 11...
... of the upper anb lower knives by referring to "Replacing the upper knife" procedures 3 and 4. Install a new knife by turning the handwheel. 8 3 4 7 2 1 5 4 6 Figure 11 Replacing the lower knife 1. 3.6 Replacing Upper and Lower Knife Replacing the upper knife 1. Loosen screw '1'. Move lower knife holder '2' to the overedge width (Figure 11). 3. Tighten screw '1' temporarily. 2. Overlap the cutting edges of the needle plate 6 Figure 12 (b) Ultra High Speed Overedge and Safety Stitch Machine | Instruction Manual and Parts List 11...
Instruction Manual
Page 15
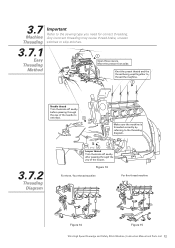
... thread the machine. 2 Needle thread Trim the knots off neatly before passing through the eye of the needle to rethread. 3 Make sure the machine is threaded correctly by referring to the sewing type you need for correct threading. Figure 13 For three / four thread machine For five thread machine Figure 14 Figure 15 Ultra High Speed Overedge and Safety Stitch Machine | Instruction Manual and Parts List 12 3.7 Machine Threading Important Refer to the threading diagram. 3.7.2 Threading Diagram 4 Looper thread...
... thread the machine. 2 Needle thread Trim the knots off neatly before passing through the eye of the needle to rethread. 3 Make sure the machine is threaded correctly by referring to the sewing type you need for correct threading. Figure 13 For three / four thread machine For five thread machine Figure 14 Figure 15 Ultra High Speed Overedge and Safety Stitch Machine | Instruction Manual and Parts List 12 3.7 Machine Threading Important Refer to the threading diagram. 3.7.2 Threading Diagram 4 Looper thread...
Instruction Manual
Page 16
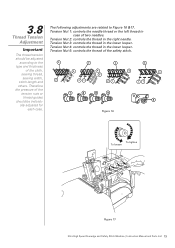
... needle thread or the left thread in the lower looper. ally adjusted for each case. Therefore the pressure of the tension nuts or thread guides should be individu- Tension Nut 3: controls the thread in Thread Tension Adjustment case of the safety stitch. Figure 16 To tighten To loosen 3 2 1 Figure 17 Ultra High Speed Overedge and Safety Stitch Machine | Instruction Manual and Parts List 13 3.8 The following adjustments are related to the 3 3 3 3 type and thickness of the cloth, sewing thread, 4 4 4 4 5 sewing...
... needle thread or the left thread in the lower looper. ally adjusted for each case. Therefore the pressure of the tension nuts or thread guides should be individu- Tension Nut 3: controls the thread in Thread Tension Adjustment case of the safety stitch. Figure 16 To tighten To loosen 3 2 1 Figure 17 Ultra High Speed Overedge and Safety Stitch Machine | Instruction Manual and Parts List 13 3.8 The following adjustments are related to the 3 3 3 3 type and thickness of the cloth, sewing thread, 4 4 4 4 5 sewing...

Instruction Manual
Page 17
... Safety Stitch Machine | Instruction Manual and Parts List 14 3.9 Presser foot pressure Loosen adjusting nut '1' of movements between the main feed dog and differential feed dog. When the movement of main feed dog is bigger than the differential feed dog, the fabric is the ratio of Figure 18 and turn the adjusting nut 2 to obtain the proper stitch formation. 2 1 Light Heavy Figure 18 3.10 Adjusting the Differential Feed Rate The differential feed ratio is stretched at sewing...
... Safety Stitch Machine | Instruction Manual and Parts List 14 3.9 Presser foot pressure Loosen adjusting nut '1' of movements between the main feed dog and differential feed dog. When the movement of main feed dog is bigger than the differential feed dog, the fabric is the ratio of Figure 18 and turn the adjusting nut 2 to obtain the proper stitch formation. 2 1 Light Heavy Figure 18 3.10 Adjusting the Differential Feed Rate The differential feed ratio is stretched at sewing...

Instruction Manual
Page 19
...needle plate Figure 26 Figure 27 Model 321D & 321K Upper looper Feed dog Height of needle (Figure 21) Lower looper left limit position (Figure 22) Upper looper left limit position ( c ) (Figure 23) Height of upper looper ( c ) (Figure 23) Upper looper holder left limit position (e) (Figure 23) Upper looper holder install direction Chain looper left limit position (f) (Figure 24) Height of feed dog (g) (Figure 25) Height of auxiliary feed dog (h) (Figure 27) Feed... 1.7 0.8 0.5 0.35~2.0 Ultra High Speed Overedge and Safety Stitch Machine | Instruction Manual and Parts List 16
...needle plate Figure 26 Figure 27 Model 321D & 321K Upper looper Feed dog Height of needle (Figure 21) Lower looper left limit position (Figure 22) Upper looper left limit position ( c ) (Figure 23) Height of upper looper ( c ) (Figure 23) Upper looper holder left limit position (e) (Figure 23) Upper looper holder install direction Chain looper left limit position (f) (Figure 24) Height of feed dog (g) (Figure 25) Height of auxiliary feed dog (h) (Figure 27) Feed... 1.7 0.8 0.5 0.35~2.0 Ultra High Speed Overedge and Safety Stitch Machine | Instruction Manual and Parts List 16

Instruction Manual
Page 20
... remove the excess of lacquer thinner to wipe the surface. Figure 28 4.2 Oil Change and Filter Cleaning 4.3 Safety Inspection When Machine is no oil sprayed, please check oil level (see that the cable and electric connector are properly installed and adjusted. If no motor overheating and be cleaned every month or replaced by a new one as necessary. Ultra High Speed Overedge and Safety Stitch Machine | Instruction Manual and Parts List...
... remove the excess of lacquer thinner to wipe the surface. Figure 28 4.2 Oil Change and Filter Cleaning 4.3 Safety Inspection When Machine is no oil sprayed, please check oil level (see that the cable and electric connector are properly installed and adjusted. If no motor overheating and be cleaned every month or replaced by a new one as necessary. Ultra High Speed Overedge and Safety Stitch Machine | Instruction Manual and Parts List...

Instruction Manual
Page 21
... needle hole. 2. Adjust the needle and looper. plate or the presser foot. 1. Adjust the thread tension unit. Replace the parts. 9. Fill in stitches 3. Wrong relation of needle with looper. 5. Needle installed the wrong way. 1. Wrong kind of looper damaged. 5. Replace the part. 1. Needle damaged. 6. Replace for cloth and thread. Adjust the needle cover. 1. Skip stitches 4. Ultra High Speed Overedge and Safety Stitch Machine | Instruction Manual and Parts List 18 Needle is not lubricated. 4. Fill in silicon oil or adjust needle guards. 8. Adjust...
... needle hole. 2. Adjust the needle and looper. plate or the presser foot. 1. Adjust the thread tension unit. Replace the parts. 9. Fill in stitches 3. Wrong relation of needle with looper. 5. Needle installed the wrong way. 1. Wrong kind of looper damaged. 5. Replace the part. 1. Needle damaged. 6. Replace for cloth and thread. Adjust the needle cover. 1. Skip stitches 4. Ultra High Speed Overedge and Safety Stitch Machine | Instruction Manual and Parts List 18 Needle is not lubricated. 4. Fill in silicon oil or adjust needle guards. 8. Adjust...

Instruction Manual
Page 22
...Adjust thread tension. 6. Ultra High Speed Overedge and Safety Stitch Machine | Instruction Manual and Parts List 19 Adjust the height of thread. 5. Inadequate height of lower knfe. 4. Differential feed is not correct. 6. Use proper needle to cloth and thread. 1. Thread guide or tension disc with looper. 7. Possible Solutions 1. Adjust or replace knives. 5. Pass thread correctly. 5. Polish thread tension disc. Incorrect presser foot. 2. Adjust presser foot correctly. 2. Adjust looper cam. 3. Wrong setting of feed dog. 4. Replace the needle. 7. Troubleshooting...
...Adjust thread tension. 6. Ultra High Speed Overedge and Safety Stitch Machine | Instruction Manual and Parts List 19 Adjust the height of thread. 5. Inadequate height of lower knfe. 4. Differential feed is not correct. 6. Use proper needle to cloth and thread. 1. Thread guide or tension disc with looper. 7. Possible Solutions 1. Adjust or replace knives. 5. Pass thread correctly. 5. Polish thread tension disc. Incorrect presser foot. 2. Adjust presser foot correctly. 2. Adjust looper cam. 3. Wrong setting of feed dog. 4. Replace the needle. 7. Troubleshooting...

Instruction Manual
Page 35
... / 321K-251H only) 0 Thread guide (for 321D-251H / 321K-251H only) 0 Screw 0 Thread guide (except 321D-251H / 321K-251H) 0 Thread guide (for 321D-251H / 321K-251H only) 0 Screw 0 Bracket 0 Thread retainer 0 Screw 0 Spring 0 Thread take-up Components (1) No. 6.6 Thread Guide and Thread Take-up (except 321D-251H / 321K-251H) 0 Screw (except 321D-251H / 321K-251H) 0 Qty 4 thread 0 0 0 0 0 0 0 0 0 0 0 0 0 0 0 0 0 0 0 0 0 0 5 thread 1 2 1 1 1 1 1 1 1 1 2 1 1 1 1 1 1 1 1 1 1 2 Ultra High Speed Overedge and Safety Stitch Machine | Instruction Manual and Parts List 33
... / 321K-251H only) 0 Thread guide (for 321D-251H / 321K-251H only) 0 Screw 0 Thread guide (except 321D-251H / 321K-251H) 0 Thread guide (for 321D-251H / 321K-251H only) 0 Screw 0 Bracket 0 Thread retainer 0 Screw 0 Spring 0 Thread take-up Components (1) No. 6.6 Thread Guide and Thread Take-up (except 321D-251H / 321K-251H) 0 Screw (except 321D-251H / 321K-251H) 0 Qty 4 thread 0 0 0 0 0 0 0 0 0 0 0 0 0 0 0 0 0 0 0 0 0 0 5 thread 1 2 1 1 1 1 1 1 1 1 2 1 1 1 1 1 1 1 1 1 1 2 Ultra High Speed Overedge and Safety Stitch Machine | Instruction Manual and Parts List 33

Instruction Manual
Page 37
... 3 207S14001 4 20701010 5 207S11019 6 20713004 7 20713005 8 207S11015 9 207S11019 10 20713006 11 20713007 12 207S20003 13 20727002 14 20713008 15 20713009 Description Thread guide Thread guide Screw Bracket Screw Thread eyelet Thread eyelet Screw Screw Bracket Thread retainer Screw Spring Thread take-up Thread take-up Components (2) No. 6.7 Thread Guide and Thread Take-up 3 thread 1 0 1 1 1 1 0 2 1 1 1 1 1 1 0 Qty 4 thread 0 1 1 1 1 0 1 2 1 1 1 1 1 0 1 5 thread 0 0 0 0 0 0 0 0 0 0 0 0 0 0 0 Ultra High Speed Overedge and Safety Stitch Machine | Instruction Manual and Parts List 35
... 3 207S14001 4 20701010 5 207S11019 6 20713004 7 20713005 8 207S11015 9 207S11019 10 20713006 11 20713007 12 207S20003 13 20727002 14 20713008 15 20713009 Description Thread guide Thread guide Screw Bracket Screw Thread eyelet Thread eyelet Screw Screw Bracket Thread retainer Screw Spring Thread take-up Thread take-up Components (2) No. 6.7 Thread Guide and Thread Take-up 3 thread 1 0 1 1 1 1 0 2 1 1 1 1 1 1 0 Qty 4 thread 0 1 1 1 1 0 1 2 1 1 1 1 1 0 1 5 thread 0 0 0 0 0 0 0 0 0 0 0 0 0 0 0 Ultra High Speed Overedge and Safety Stitch Machine | Instruction Manual and Parts List 35

Instruction Manual
Page 39
...14 207S11021 15 20713013 Description 3 thread Bracket 1 Thread guide 2 Screw 2 Washer 2 Thread take-up 1 Screw 1 Thread eyelet 1 Screw 1 Thread guide 1 Thread guide (for 321D-251H / 321K-25H only) 0 Thread guide (for 321D-251H / 321K-25H only) 0 Screw 1 Thread guide 1 Qty 4 thread 1 2 2 2 1 1 1 1 1 0 0 1 0 1 1 5 thread 1 2 2 2 1 1 1 1 1 1 1 1 1 1 1 Ultra High Speed Overedge and Safety Stitch Machine | Instruction Manual and Parts List 37 6.8 Thread Guide and Thread Take-up (for 321D-251H / 321K-25H only) 0 Thread take-up 1 Thread take-up Components (3) No...
...14 207S11021 15 20713013 Description 3 thread Bracket 1 Thread guide 2 Screw 2 Washer 2 Thread take-up 1 Screw 1 Thread eyelet 1 Screw 1 Thread guide 1 Thread guide (for 321D-251H / 321K-25H only) 0 Thread guide (for 321D-251H / 321K-25H only) 0 Screw 1 Thread guide 1 Qty 4 thread 1 2 2 2 1 1 1 1 1 0 0 1 0 1 1 5 thread 1 2 2 2 1 1 1 1 1 1 1 1 1 1 1 Ultra High Speed Overedge and Safety Stitch Machine | Instruction Manual and Parts List 37 6.8 Thread Guide and Thread Take-up (for 321D-251H / 321K-25H only) 0 Thread take-up 1 Thread take-up Components (3) No...

Instruction Manual
Page 79
...1 Feed dog assembly 0 Cloth plate 1 Thread guide plate 0 Thread tension plate 0 Nut 0 Frong frame 0 Thread tension releasing lever 0 Connector 0 Connector screw 0 Screw 0 Screw 0 Spring 0 Screw 0 Sleeve 0 Bracket 0 Collar 0 Screw 0 Screw 0 Qty 4 thread 1 1 1 1 1 1 0 0 2 0 2 0 0 0 0 0 0 0 1 1 4 1 1 1 1 1 1 1 0 1 1 0 1 0 1 1 1 1 1 1 1 1 1 2 1 1 1 1 1 1 1 2 5 thread 0 0 0 0 0 0 0 0 0 0 0 0 0 0 0 0 0 0 0 0 0 0 0 0 0 0 0 0 0 0 0 0 0 0 0 0 0 0 0 0 0 0 0 0 0 0 0 0 0 0 0 0 Ultra High Speed Overedge and Safety Stitch Machine | Instruction Manual and Parts List 77...
...1 Feed dog assembly 0 Cloth plate 1 Thread guide plate 0 Thread tension plate 0 Nut 0 Frong frame 0 Thread tension releasing lever 0 Connector 0 Connector screw 0 Screw 0 Screw 0 Spring 0 Screw 0 Sleeve 0 Bracket 0 Collar 0 Screw 0 Screw 0 Qty 4 thread 1 1 1 1 1 1 0 0 2 0 2 0 0 0 0 0 0 0 1 1 4 1 1 1 1 1 1 1 0 1 1 0 1 0 1 1 1 1 1 1 1 1 1 2 1 1 1 1 1 1 1 2 5 thread 0 0 0 0 0 0 0 0 0 0 0 0 0 0 0 0 0 0 0 0 0 0 0 0 0 0 0 0 0 0 0 0 0 0 0 0 0 0 0 0 0 0 0 0 0 0 0 0 0 0 0 0 Ultra High Speed Overedge and Safety Stitch Machine | Instruction Manual and Parts List 77...


