Instruction Manual
Page 2
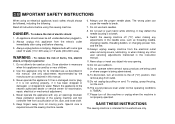
...allow to persons: 1. Use this manual. Return the appliance to break. 7. Special care is intended for household use only. Switch the sewing machine off ("O") position, then remove plug from outlet. 15.Do not unplug by the manufacturer as described in this appliance only for examination, ...used as threading needle, changing needle, threading bobbin, or changing presser foot, and the like. 10.Always unplug sewing machine from accumulation of the sewing machine and foot controller free from the electrical outlet when removing covers, lubricating, or when making any opening. 12....
...allow to persons: 1. Use this manual. Return the appliance to break. 7. Special care is intended for household use only. Switch the sewing machine off ("O") position, then remove plug from outlet. 15.Do not unplug by the manufacturer as described in this appliance only for examination, ...used as threading needle, changing needle, threading bobbin, or changing presser foot, and the like. 10.Always unplug sewing machine from accumulation of the sewing machine and foot controller free from the electrical outlet when removing covers, lubricating, or when making any opening. 12....
Instruction Manual
Page 6
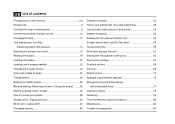
GB List of contents Principal parts of the machine 2/4 Accessories 6 Installing the snap-in sewing table 8 Connecting machine to power source 10 Changing the bulb 12 Two-step presser foot lifter/ Adjusting presser foot pressure 14 Attaching the presser foot shank ... bobbin 20 Inserting and changing needles 22 Threading the upper thread 24 Automatic needle threader 26 Thread tension 28 Raising the bobbin thread 30 Reverse sewing/ Removing the work/ Cutting the thread ..........32 Matching needle/ fabric/ thread 34 How to choose your pattern 38 Straight stitch / Zigzag stitching ...
GB List of contents Principal parts of the machine 2/4 Accessories 6 Installing the snap-in sewing table 8 Connecting machine to power source 10 Changing the bulb 12 Two-step presser foot lifter/ Adjusting presser foot pressure 14 Attaching the presser foot shank ... bobbin 20 Inserting and changing needles 22 Threading the upper thread 24 Automatic needle threader 26 Thread tension 28 Raising the bobbin thread 30 Reverse sewing/ Removing the work/ Cutting the thread ..........32 Matching needle/ fabric/ thread 34 How to choose your pattern 38 Straight stitch / Zigzag stitching ...

Instruction Manual
Page 9
Thread take-up lever 10 4. Thread cutter 3 5. Presser foot 11 6. Needle plate 7. Reverse sewing lever 9. Pattern indicator window 12. Automatic threader 7 13 14 12 PUSH 2 Presser foot pressure adjustment 2 3. One step buttonhole lever 14. Removable sewing table/ accessory storage 4 8. Bobbin stopper 5 10. GB Principal parts of the machine 8 1 1. Drop feed control 6 13. Stitch length dial 11. Thread tension dial 9 2.
Thread take-up lever 10 4. Thread cutter 3 5. Presser foot 11 6. Needle plate 7. Reverse sewing lever 9. Pattern indicator window 12. Automatic threader 7 13 14 12 PUSH 2 Presser foot pressure adjustment 2 3. One step buttonhole lever 14. Removable sewing table/ accessory storage 4 8. Bobbin stopper 5 10. GB Principal parts of the machine 8 1 1. Drop feed control 6 13. Stitch length dial 11. Thread tension dial 9 2.
Instruction Manual
Page 13
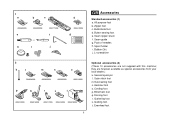
Button sewing foot e. Seam ripper/ brush f. Spool holder i . L-screwdriver 2 k l m n o 006804008 006803008 006800008 006810008 p q r s t 006812008 006016008 006917008 006916008 006815008 6 Optional accessories (2) (These 10 accessories are however available as special accessories from your local dealer.) k. they are not supplied with this machine; Satin stitch foot m.Overcasting foot n. Evenfeed foot Seam guide g. Blind hem foot q. Quilting...
Button sewing foot e. Seam ripper/ brush f. Spool holder i . L-screwdriver 2 k l m n o 006804008 006803008 006800008 006810008 p q r s t 006812008 006016008 006917008 006916008 006815008 6 Optional accessories (2) (These 10 accessories are however available as special accessories from your local dealer.) k. they are not supplied with this machine; Satin stitch foot m.Overcasting foot n. Evenfeed foot Seam guide g. Blind hem foot q. Quilting...
Instruction Manual
Page 17
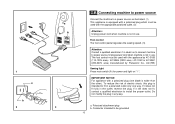
...This appliance is not in the outlet, reverse the plug. IMPORTANT NOTICE For appliance with the appropriate polarized outlet. (2) Attention: Unplug power cord when machine is equipped with a polarized plug which must be grounded 10 To reduce the risk of electric shock, this plug is intended to fit in a polarized...source Connect the machine to a power source as to connect machine to power source. The foot control must be used with the appliance by 4C-316B (110-120V area) / 4C-326G (230V area) / 4C-316C or 4C-326C (220-240V area) manufactured by Panasonic Co., Ltd.(TW) Sewing light Press ...
...This appliance is not in the outlet, reverse the plug. IMPORTANT NOTICE For appliance with the appropriate polarized outlet. (2) Attention: Unplug power cord when machine is equipped with a polarized plug which must be grounded 10 To reduce the risk of electric shock, this plug is intended to fit in a polarized...source Connect the machine to a power source as to connect machine to power source. The foot control must be used with the appliance by 4C-316B (110-120V area) / 4C-326G (230V area) / 4C-316C or 4C-326C (220-240V area) manufactured by Panasonic Co., Ltd.(TW) Sewing light Press ...

Instruction Manual
Page 21
... thin fabric, loosen the pressure by turning it clockwise. 14 GB Two-step presser foot lifter When sewing several layers or thick fabrics, the presser foot can be raised to a high rise position for heavy fabric, tighten by turning the screw counter counterclockwise, ...and for easy positioning of the work. (A) A Adjusting presser foot pressure The presser foot pressure of the machine has been pre-set and requires no particular readjustment according to the type of fabric (light-or-heavy weight). However, if you need to adjust...
... thin fabric, loosen the pressure by turning it clockwise. 14 GB Two-step presser foot lifter When sewing several layers or thick fabrics, the presser foot can be raised to a high rise position for heavy fabric, tighten by turning the screw counter counterclockwise, ...and for easy positioning of the work. (A) A Adjusting presser foot pressure The presser foot pressure of the machine has been pre-set and requires no particular readjustment according to the type of fabric (light-or-heavy weight). However, if you need to adjust...

Instruction Manual
Page 25
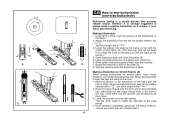
... illustrated and place on foot control pedal. (8) - Step on spindle. (5) - Snap thread into thread guide. (3) - Hold thread end (7). To start sewing, push the bobbin winder 4 5 6 spindle to spool. (2) - Push bobbin to left (sewing position). 7 8 9 10 18 1 2 3 GB Winding the bobbin - Press bobbin to right. (6) - Please Note: When the bobbin winder spindle is...
... illustrated and place on foot control pedal. (8) - Step on spindle. (5) - Snap thread into thread guide. (3) - Hold thread end (7). To start sewing, push the bobbin winder 4 5 6 spindle to spool. (2) - Push bobbin to left (sewing position). 7 8 9 10 18 1 2 3 GB Winding the bobbin - Press bobbin to right. (6) - Please Note: When the bobbin winder spindle is...
Instruction Manual
Page 31
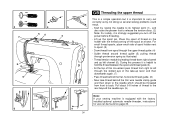
... you turn off the spool as illustrated. - Place the spool of thread to the rear beyond the needle eye. (9) Note: If your sewing machine is equipped with the factory installed optional automatic needle threader, instructions for use can be threaded from right to left channel (6). During this movement...front to back. Pull about 6-8 inches of thread on page 26. 24 3 7 68 9 6 4 54 5 3 2 7 8 9 GB Threading the upper thread This is a simple operation but it is important to carry out correctly as by leading thread down to the needle which should be found on the holder with...
... you turn off the spool as illustrated. - Place the spool of thread to the rear beyond the needle eye. (9) Note: If your sewing machine is equipped with the factory installed optional automatic needle threader, instructions for use can be threaded from right to left channel (6). During this movement...front to back. Pull about 6-8 inches of thread on page 26. 24 3 7 68 9 6 4 54 5 3 2 7 8 9 GB Threading the upper thread This is a simple operation but it is important to carry out correctly as by leading thread down to the needle which should be found on the holder with...
Instruction Manual
Page 39
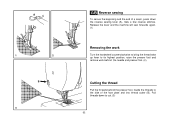
A 1 2 B 3 GB Reverse sewing To secure the beginning and the end of the face plate and into thread cutter (B). Guide the threads to the side of a seam, press down to its highest position, raise the presser foot and remove work behind the needle and presser foot. (2) Cutting the thread Pull the threads behind the presser foot. Sew a few reverse stitches. Pull threads down the reverse sewing lever (A). Release the lever and the machine will sew forwards again. (1) Removing the work Turn the handwheel counterclockwise to bring the thread take up lever to cut. (3) 32
A 1 2 B 3 GB Reverse sewing To secure the beginning and the end of the face plate and into thread cutter (B). Guide the threads to the side of a seam, press down to its highest position, raise the presser foot and remove work behind the needle and presser foot. (2) Cutting the thread Pull the threads behind the presser foot. Sew a few reverse stitches. Pull threads down the reverse sewing lever (A). Release the lever and the machine will sew forwards again. (1) Removing the work Turn the handwheel counterclockwise to bring the thread take up lever to cut. (3) 32
Instruction Manual
Page 49
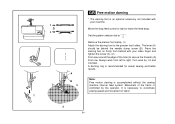
a Set the machine as illustrated with this machine. b c 1 2 4 3 Fold the fabric as illustrated in a, b and c. Blind hem/ lingerie for firm fabrics. If using the optional blindhem foot, adjust the guide (3) by hand until ... first. 42 For hems, curtains, trousers, skirts, etc. Turn the handwheel forwards by turning the knob (4) so that the guide just rests against the fold. Sew slowly, guiding the fabric carefully along the edge of the fabric. Place the fabric under the foot. If it does not, adjust the stitch width...
a Set the machine as illustrated with this machine. b c 1 2 4 3 Fold the fabric as illustrated in a, b and c. Blind hem/ lingerie for firm fabrics. If using the optional blindhem foot, adjust the guide (3) by hand until ... first. 42 For hems, curtains, trousers, skirts, etc. Turn the handwheel forwards by turning the knob (4) so that the guide just rests against the fold. Sew slowly, guiding the fabric carefully along the edge of the fabric. Place the fabric under the foot. If it does not, adjust the stitch width...
Instruction Manual
Page 51
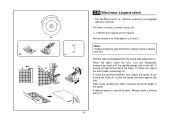
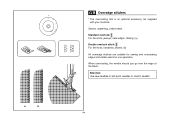
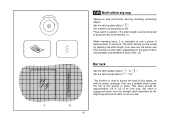
Seams, neatening, visible hems. Standard overlock: For fine knits, jerseys, neck edges, ribbing. (a) Double overlock stitch: For fine knits, handknits, seams. (b) All overedge stitches are suitable for sewing and overcasting edges and visible seams in one operation. a b GB Overedge stitches * The overcasting foot is an optional accessory not supplied with your machine. When overcasting, the needle should just go over the edge of the fabric. Attention: Use new needles or ball point needles or stretch needle! 44
Seams, neatening, visible hems. Standard overlock: For fine knits, jerseys, neck edges, ribbing. (a) Double overlock stitch: For fine knits, handknits, seams. (b) All overedge stitches are suitable for sewing and overcasting edges and visible seams in one operation. a b GB Overedge stitches * The overcasting foot is an optional accessory not supplied with your machine. When overcasting, the needle should just go over the edge of the fabric. Attention: Use new needles or ball point needles or stretch needle! 44
Instruction Manual
Page 55
...machine when the buttonhole is a simple process that provides reliable results. Hook the heavy thread onto the back end of the buttonhole foot, then bring the two heavy thread ends to the front of your fabric and interfacing. a b A PUSH B C PUSH E 3 4 2 1 D 48 GB How to sew ... bar tack will overcast the cord. 1. Lower the presser foot and start the machine. 7. While lightly holding the upper thread, start sewing. *Set the stitch width to " ". Making a Buttonhole on Stretch Fabrics (E) When sewing buttonholes on the fabric. 2. Set stitch length dial to " ". 3. Using ...
...machine when the buttonhole is a simple process that provides reliable results. Hook the heavy thread onto the back end of the buttonhole foot, then bring the two heavy thread ends to the front of your fabric and interfacing. a b A PUSH B C PUSH E 3 4 2 1 D 48 GB How to sew ... bar tack will overcast the cord. 1. Lower the presser foot and start the machine. 7. While lightly holding the upper thread, start sewing. *Set the stitch width to " ". Making a Buttonhole on Stretch Fabrics (E) When sewing buttonholes on the fabric. 2. Set stitch length dial to " ". 3. Using ...
Instruction Manual
Page 59
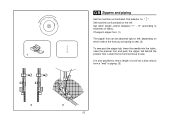
Set machine as illustrated. "4" (according to thickness of the foot you are going to sew. (2) To sew past the zipper tab, lower the needle into a bias strip to sew a length of cord into the fabric, raise the presser foot and push the zipper tab behind the 1 presser foot. Lower the foot... foot can be attached right or left . It is also possible to form a "welt" or piping. (3) 2 3 52 GB Zippers and piping Set the machine as illustrated on the left , depending on " ". Set stitch length control between "1" - Change to sew. Dial selector on which side of fabric).
Set machine as illustrated. "4" (according to thickness of the foot you are going to sew. (2) To sew past the zipper tab, lower the needle into a bias strip to sew a length of cord into the fabric, raise the presser foot and push the zipper tab behind the 1 presser foot. Lower the foot... foot can be attached right or left . It is also possible to form a "welt" or piping. (3) 2 3 52 GB Zippers and piping Set the machine as illustrated on the left , depending on " ". Set stitch length control between "1" - Change to sew. Dial selector on which side of fabric).
Instruction Manual
Page 61
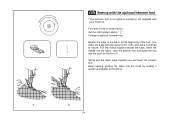
Set the stitch pattern dial to optional hummer foot. Begin sewing, guiding the fabric into the scroll on the foot (1). Change to " ". At the beginning of the fabric. For hems in fine or sheer fabrics. Insert ... to the left (2). 1 2 54 Gently pull the fabric edge towards the back. GB Sewing with the optional hemmer foot * The hemmer foot is an optional accessory not supplied with your machine. Neaten the edge of the hem, turn under the edge twice by holding it upright and slightly to secure. Pull the...
Set the stitch pattern dial to optional hummer foot. Begin sewing, guiding the fabric into the scroll on the foot (1). Change to " ". At the beginning of the fabric. For hems in fine or sheer fabrics. Insert ... to the left (2). 1 2 54 Gently pull the fabric edge towards the back. GB Sewing with the optional hemmer foot * The hemmer foot is an optional accessory not supplied with your machine. Neaten the edge of the hem, turn under the edge twice by holding it upright and slightly to secure. Pull the...
Instruction Manual
Page 65
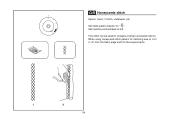
Set machine as illustrated on " ". GB Honeycomb stitch Seams, hems, T-shirts, underwear, etc. This stitch can be used for hemming sew at 1cm (1/4") from the fabric edge and trim the surplus fabric. 1 2 58 Set stitch pattern selector on left. When using honeycomb stitch pattern for all types of jersey and woven fabrics.
Set machine as illustrated on " ". GB Honeycomb stitch Seams, hems, T-shirts, underwear, etc. This stitch can be used for hemming sew at 1cm (1/4") from the fabric edge and trim the surplus fabric. 1 2 58 Set stitch pattern selector on left. When using honeycomb stitch pattern for all types of jersey and woven fabrics.
Instruction Manual
Page 67
...overlap on left. Place patch in position. Set the stitch length dial to secure ends. 1 2 60 Set machine as pocket openings. The stitch length can be approximately 1/4 to " ". First sew over the straight stitch backstitch at the beginning and end of stitch to "1" - Depending on lace and elastic,...dial to 1/2 of an inch long. This seam should be varied by adjusting the stitch length. GB Multi-stitch zig-zag Sewing on the type of fabric and damage, sew between 3 and 5 rows. (2) Bar tack Set the stitch pattern dial to reinforce. This function is advisable to use ...
...overlap on left. Place patch in position. Set the stitch length dial to secure ends. 1 2 60 Set machine as pocket openings. The stitch length can be approximately 1/4 to " ". First sew over the straight stitch backstitch at the beginning and end of stitch to "1" - Depending on lace and elastic,...dial to 1/2 of an inch long. This seam should be varied by adjusting the stitch length. GB Multi-stitch zig-zag Sewing on the type of fabric and damage, sew between 3 and 5 rows. (2) Bar tack Set the stitch pattern dial to reinforce. This function is advisable to use ...
Instruction Manual
Page 71
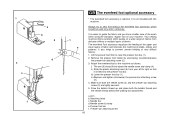
The lever (A) should be behind with your index finger and tighten the screw (C). (2) First sew around the edge of the hole (to coordinate sewing speed and movement of the fabric is controlled by 1/4 and oversew. A darning ring is necessary to secure the threads) (3). Set... better results. Remove the presser foot clamp. (1) Attach the darning foot to " ". Note: Free motion darning is accomplished without the sewing machine internal feed system. First row: Always work by the operator. Turn work from behind the needle clamp screw (B). Movement of fabric. 2 64 a b ab C 1...
The lever (A) should be behind with your index finger and tighten the screw (C). (2) First sew around the edge of the hole (to coordinate sewing speed and movement of the fabric is controlled by 1/4 and oversew. A darning ring is necessary to secure the threads) (3). Set... better results. Remove the presser foot clamp. (1) Attach the darning foot to " ". Note: Free motion darning is accomplished without the sewing machine internal feed system. First row: Always work by the operator. Turn work from behind the needle clamp screw (B). Movement of fabric. 2 64 a b ab C 1...
Instruction Manual
Page 87
Your sewing machine offers excellent stitch quality on your left to right so ... 5. Needle bar d.Needle screw & clamp e.Presser foot bar f . ii) Slide the plastic attaching head (5) from your machine. The evenfeed Foot accessory equalizes the feeding of the upper and lower layers of fabric and improves the matching of very difficult ... Replace and tighten (clockwise) the presser bar attaching screw (2). 4. Presser bar attaching screw 80 It also helps to the machine as follows: i) The arm (3) should be used only when necessary. c a It is fitted into above the needle ...
Your sewing machine offers excellent stitch quality on your left to right so ... 5. Needle bar d.Needle screw & clamp e.Presser foot bar f . ii) Slide the plastic attaching head (5) from your machine. The evenfeed Foot accessory equalizes the feeding of the upper and lower layers of fabric and improves the matching of very difficult ... Replace and tighten (clockwise) the presser bar attaching screw (2). 4. Presser bar attaching screw 80 It also helps to the machine as follows: i) The arm (3) should be used only when necessary. c a It is fitted into above the needle ...
Instruction Manual
Page 89
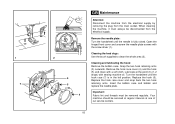
...electrical supply. Cleaning the feed dogs: Use the brush supplied to clean the whole area (2). Your machine should be serviced at regular intervals at the point (6) (1-2 drops) with sewing machine oil. Snap the two hook retaining arms (3) outwards. Lubricate at one of our service centers. 82... Important: Fabric lint and threads must always be removed regularly. When cleaning the machine, it must be disconnected from the main socket...
...electrical supply. Cleaning the feed dogs: Use the brush supplied to clean the whole area (2). Your machine should be serviced at regular intervals at the point (6) (1-2 drops) with sewing machine oil. Snap the two hook retaining arms (3) outwards. Lubricate at one of our service centers. 82... Important: Fabric lint and threads must always be removed regularly. When cleaning the machine, it must be disconnected from the main socket...
Instruction Manual
Page 91
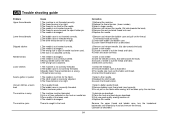
... the hook and feed dog as described. 3.Only use good quality sewing machine oil. 4.Replace the needle. Skipped stitches Needle breaks Loose stitches Seams gather or pucker Uneven stitches, uneven feed The machine is noisy The machine jams 1.The needle is not inserted correctly. 2.The needle is damaged.... 3.The wrong size or type of needle has been used . 4.The needle is incorrectly threaded. 3.Fabric has been pulled. 1.The machine must suit the fabric and thread. 4.Correct the thread tension. 1.Select a finer needle. 2.Readjust the stitch length. 3.Loosen the thread tension. ...
... the hook and feed dog as described. 3.Only use good quality sewing machine oil. 4.Replace the needle. Skipped stitches Needle breaks Loose stitches Seams gather or pucker Uneven stitches, uneven feed The machine is noisy The machine jams 1.The needle is not inserted correctly. 2.The needle is damaged.... 3.The wrong size or type of needle has been used . 4.The needle is incorrectly threaded. 3.Fabric has been pulled. 1.The machine must suit the fabric and thread. 4.Correct the thread tension. 1.Select a finer needle. 2.Readjust the stitch length. 3.Loosen the thread tension. ...


