Instruction Manual
Page 1
O SINGE IR._ Instruction Manual and Parts List Zigzag Sewing Machine 20U- 109 / 109C 112 / 112C 309 (E) Singer is a registered trademark of The Singer Company Limited or its affiliated companies. © 2009 Copyright The Singer Company Limited
O SINGE IR._ Instruction Manual and Parts List Zigzag Sewing Machine 20U- 109 / 109C 112 / 112C 309 (E) Singer is a registered trademark of The Singer Company Limited or its affiliated companies. © 2009 Copyright The Singer Company Limited
Instruction Manual
Page 3
... for Buttonhole Stitching 3.26. Zigzag Sewing Machine Contents 1. Zigzag Stitch Width Control 3.20. Fittings for Zipper and Cord Sewing - 2 - Safe Operation 2. Inserting the Needle 3.7. Instruction Manual and Parts List 4 4 5 6 6 7 8 8 9 9 10 11 11 13 13 14 14 15 17 18 19 19 20 20 20 21 22 22 23 24 25 26...
... for Buttonhole Stitching 3.26. Zigzag Sewing Machine Contents 1. Zigzag Stitch Width Control 3.20. Fittings for Zipper and Cord Sewing - 2 - Safe Operation 2. Inserting the Needle 3.7. Instruction Manual and Parts List 4 4 5 6 6 7 8 8 9 9 10 11 11 13 13 14 14 15 17 18 19 19 20 20 20 21 22 22 23 24 25 26...
Instruction Manual
Page 4
Safety Inspection 5. Feed Regulating Dial and Feed Reverse Lever Components 6.9. Parts List 6.1. Belt Cover Components and Extra Parts Instruction Manual and Parts List 31 31 31 31 32 33 33 35 37 39 41 43 45 47 49 51 53 55 57 Thread Take-up, ...
Safety Inspection 5. Feed Regulating Dial and Feed Reverse Lever Components 6.9. Parts List 6.1. Belt Cover Components and Extra Parts Instruction Manual and Parts List 31 31 31 31 32 33 33 35 37 39 41 43 45 47 49 51 53 55 57 Thread Take-up, ...
Instruction Manual
Page 5
... procedures must be followed. o Replacing the needle, presser foot, throat plate, feed dog and sliding plate. Zigzag Sewing Machine Instruction Manual and Parts List 1. When using the machine, understand all basic safety instructions which are not limited to specifications and technical rules in ...used running the machine, make sure all instruction before using this manual, and use it as indicated.in maintenance. Safety Instructions 1.1. In case of cold water. The machine should be followed. • Singer will not be conducted to assure that machine and operator are ...
... procedures must be followed. o Replacing the needle, presser foot, throat plate, feed dog and sliding plate. Zigzag Sewing Machine Instruction Manual and Parts List 1. When using the machine, understand all basic safety instructions which are not limited to specifications and technical rules in ...used running the machine, make sure all instruction before using this manual, and use it as indicated.in maintenance. Safety Instructions 1.1. In case of cold water. The machine should be followed. • Singer will not be conducted to assure that machine and operator are ...
Instruction Manual
Page 6
To avoid a possible accident caused by electric discharge turn the machine off before unplugging it. • Clean the machine periodically. - 5 - Zigzag Sewing Machine Instruction Manual and Parts List 1.2. Nothing should be placed near those parts. • To avoid injuries never put your fingers next to replace the bobbin. • To ...
To avoid a possible accident caused by electric discharge turn the machine off before unplugging it. • Clean the machine periodically. - 5 - Zigzag Sewing Machine Instruction Manual and Parts List 1.2. Nothing should be placed near those parts. • To avoid injuries never put your fingers next to replace the bobbin. • To ...
Instruction Manual
Page 8
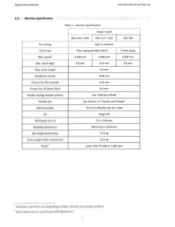
...bar lift (manual) 6.35 mm Presser bar lift (knee lifter) 9.0 mm Needle catalog (needle system) Cat. 1910-05 (135x9) Needle size See Section 3.5 "Needle and Thread" Machine pulley 74.0 mm effective dia. Machine Specification Singer model For sewing Stitch type 20U-109 / 109C 20U-112 / ...112C Light to DIN 4563-45-A 1. stitch bight 2,500 rpm 9.0 mm 2,000 rpm 12.0 mm 2,500 rpm 9.0 mm Max. for v-belt Oil Singer Oil Workspace (w x h) 211 x 130 mm ...
...bar lift (manual) 6.35 mm Presser bar lift (knee lifter) 9.0 mm Needle catalog (needle system) Cat. 1910-05 (135x9) Needle size See Section 3.5 "Needle and Thread" Machine pulley 74.0 mm effective dia. Machine Specification Singer model For sewing Stitch type 20U-109 / 109C 20U-112 / ...112C Light to DIN 4563-45-A 1. stitch bight 2,500 rpm 9.0 mm 2,000 rpm 12.0 mm 2,500 rpm 9.0 mm Max. for v-belt Oil Singer Oil Workspace (w x h) 211 x 130 mm ...
Instruction Manual
Page 9
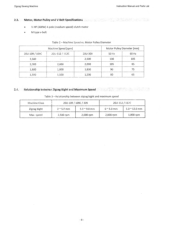
... 3 - Relationship between zigzag bight and maximum speed Machine Class Zigzag bight Max. Machine Speed vs. Zigzag Sewing Machine Instruction Manual and Parts List 2.3. speed 20U-109 / 109C / 309 0 - 5.0 mm 5.0 - 9.0 mm 2,500 rpm 2,000 rpm 20U-112 / 112C 0 - 5.0 mm 5.0 - 12.0 mm 2,000 rpm 1,800 rpm - 8 - Motor, Motor Pulley and V-Belt Specifications • HP (400W) 4-pole...
... 3 - Relationship between zigzag bight and maximum speed Machine Class Zigzag bight Max. Machine Speed vs. Zigzag Sewing Machine Instruction Manual and Parts List 2.3. speed 20U-109 / 109C / 309 0 - 5.0 mm 5.0 - 9.0 mm 2,500 rpm 2,000 rpm 20U-112 / 112C 0 - 5.0 mm 5.0 - 12.0 mm 2,000 rpm 1,800 rpm - 8 - Motor, Motor Pulley and V-Belt Specifications • HP (400W) 4-pole...
Instruction Manual
Page 10
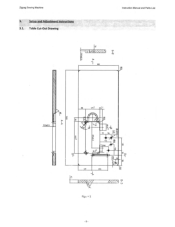
Table Cut-Out Drawing Instruction Manual and Parts List E 50C - srs L N j us =If ..! 7e. 934jx.;'-' , 10e IOC J Figu -^ 1 - 9 - Zigzag Sewing Machine 3. e- Setup and Adjustment Instructions 3.1.
Table Cut-Out Drawing Instruction Manual and Parts List E 50C - srs L N j us =If ..! 7e. 934jx.;'-' , 10e IOC J Figu -^ 1 - 9 - Zigzag Sewing Machine 3. e- Setup and Adjustment Instructions 3.1.
Instruction Manual
Page 11
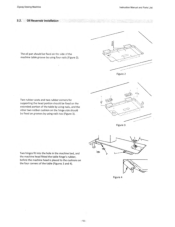
... on the side of the table (Figures 3 and 4). Oil Reservoir Installation The oil pan should be fixed on grooves by using nails too (Figure 3). Instruction Manual and Parts List kt1 Figure 2 Figure 3 Figure 4 - 10 - Two hinges fit into the hole in the machine bed, and the machine head fitted the table...
... on the side of the table (Figures 3 and 4). Oil Reservoir Installation The oil pan should be fixed on grooves by using nails too (Figure 3). Instruction Manual and Parts List kt1 Figure 2 Figure 3 Figure 4 - 10 - Two hinges fit into the hole in the machine bed, and the machine head fitted the table...
Instruction Manual
Page 12
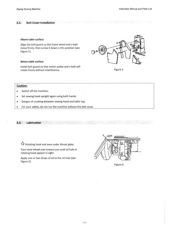
... (see Figure 6). 1 0 Figure 6 Turn hand wheel over toward you until oil hole in rotating hook appear in sight. Zigzag Sewing Machine 3.3. Belt Cover Installation Instruction Manual and Parts List Above table surface Align the belt guard so that motor pulley and v-belt will rotate freely without the belt cover. 3.4. Lubrication '406...
... (see Figure 6). 1 0 Figure 6 Turn hand wheel over toward you until oil hole in rotating hook appear in sight. Zigzag Sewing Machine 3.3. Belt Cover Installation Instruction Manual and Parts List Above table surface Align the belt guard so that motor pulley and v-belt will rotate freely without the belt cover. 3.4. Lubrication '406...
Instruction Manual
Page 13
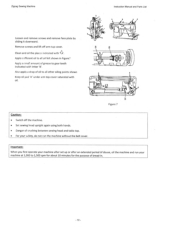
... and table top. • For your machine at 1,000 to all other oiling points shown Keep oil pad 'A' under arm top cover saturated with '6'. Instruction Manual and Parts List 0 • 0 O O • Figure 7 Caution: • Switch off arm top cover.
... and table top. • For your machine at 1,000 to all other oiling points shown Keep oil pad 'A' under arm top cover saturated with '6'. Instruction Manual and Parts List 0 • 0 O O • Figure 7 Caution: • Switch off arm top cover.

Instruction Manual
Page 14
... Figure 8). Zigzag Sewing Machine Instruction Manual and Parts List 3.5. c;P 2 Figure 8 - .3- Loosen needle set screw '1 securely. Needle and Thread Selection of thread Caution: • The power supply should be used on the material and thread used. Raise needle bar to the table below Model Application Light weight materials 20U-109 / 109C / 112 / 112C / 309...
... Figure 8). Zigzag Sewing Machine Instruction Manual and Parts List 3.5. c;P 2 Figure 8 - .3- Loosen needle set screw '1 securely. Needle and Thread Selection of thread Caution: • The power supply should be used on the material and thread used. Raise needle bar to the table below Model Application Light weight materials 20U-109 / 109C / 112 / 112C / 309...

Instruction Manual
Page 15
Zigzag Sewing Machine 3.7. Lift out bobbin case '2' (see Figure 9). Hold hand wheel with left hand and turn stop -motion screw '1', Figure 10. Raise latch '1' (see Figure 9). Bobbin Winding Stop motion of needle by loosening stop -motion screw toward you with throat plate left open. 3.8. Bobbin Case Removal Instruction Manual and Parts List Open bed slide. Caution: • Switch off the machine. • Do not operate the machine with right hand. 2 Figure 9 I A Figure 10 - 14 -
Zigzag Sewing Machine 3.7. Lift out bobbin case '2' (see Figure 9). Hold hand wheel with left hand and turn stop -motion screw '1', Figure 10. Raise latch '1' (see Figure 9). Bobbin Winding Stop motion of needle by loosening stop -motion screw toward you with throat plate left open. 3.8. Bobbin Case Removal Instruction Manual and Parts List Open bed slide. Caution: • Switch off the machine. • Do not operate the machine with right hand. 2 Figure 9 I A Figure 10 - 14 -
Instruction Manual
Page 16
... in the direction shown in Figure 12, and put bobbin in the direction indicated by arrow 'B' (see Figure 13) 15 • Zigzag Sewing Machine Instruction Manual and Parts List Place bobbin on latch '2' and swing the latch '2' away from you . Pre tension '1' (see Figure 11). Figure 12 Put thread into notch...
... in the direction shown in Figure 12, and put bobbin in the direction indicated by arrow 'B' (see Figure 13) 15 • Zigzag Sewing Machine Instruction Manual and Parts List Place bobbin on latch '2' and swing the latch '2' away from you . Pre tension '1' (see Figure 11). Figure 12 Put thread into notch...

Instruction Manual
Page 17
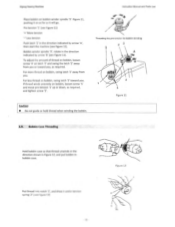
Figure 14 Figure 15 Note: • When straight stitching, a better result can be obtained if bobbin thread is not threaded through bobbin case thread guide '1', Figure 15. Allow about 4 inches of thread to hang freely from slot '2' on end of spring '1', (Figure 14) and pass it through bobbin case thread guide '1' of Figure 15. - 16 - Zigzag Sewing Machine Instruction Manual and Parts List Figure 13 Draw thread out from bobbin.
Figure 14 Figure 15 Note: • When straight stitching, a better result can be obtained if bobbin thread is not threaded through bobbin case thread guide '1', Figure 15. Allow about 4 inches of thread to hang freely from slot '2' on end of spring '1', (Figure 14) and pass it through bobbin case thread guide '1' of Figure 15. - 16 - Zigzag Sewing Machine Instruction Manual and Parts List Figure 13 Draw thread out from bobbin.
Instruction Manual
Page 18
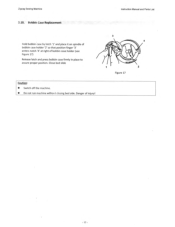
Zigzag Sewing Machine Instruction Manual and Parts List 3.10. Bobbin Case Replacement Hold bobbin case by latch '1' and place it on spindle of bobbin case holder '2' so that position finger '3' enters notch '4' at right of injury! 3 O 1 Figure 17 4 2 - 17 - Close bed slide Caution: • Switch off the machine. • Do not run machine without closing bed side. Danger of bobbin case holder (see Figure 17) Release latch and press bobbin case firmly in place to assure proper position.
Zigzag Sewing Machine Instruction Manual and Parts List 3.10. Bobbin Case Replacement Hold bobbin case by latch '1' and place it on spindle of bobbin case holder '2' so that position finger '3' enters notch '4' at right of injury! 3 O 1 Figure 17 4 2 - 17 - Close bed slide Caution: • Switch off the machine. • Do not run machine without closing bed side. Danger of bobbin case holder (see Figure 17) Release latch and press bobbin case firmly in place to assure proper position.

Instruction Manual
Page 19
Machine Threading Instruction Manual and Parts List 6 i / a co i -# ( G Figure 17 Lead thread from the thread unwinder through all the threading points in the order shown in Figure 17 Thread the needle from front to back, as show in Figure 17 Draw about 3 inches of thread through eye of needle. Caution: • Switch off the machine. • Do not operate the machine without thread take-up guard. • Do not operate the machine without finger guard. -18- Zigzag Sewing Machine 3.11.
Machine Threading Instruction Manual and Parts List 6 i / a co i -# ( G Figure 17 Lead thread from the thread unwinder through all the threading points in the order shown in Figure 17 Thread the needle from front to back, as show in Figure 17 Draw about 3 inches of thread through eye of needle. Caution: • Switch off the machine. • Do not operate the machine without thread take-up guard. • Do not operate the machine without finger guard. -18- Zigzag Sewing Machine 3.11.

Instruction Manual
Page 20
Stitch Length Adjustment Instruction Manual and Parts List Regulating the stitch length: To regulate the stitch length, turn feed regulating dial '1' Figure 18, toward left or right as required. to ...
Stitch Length Adjustment Instruction Manual and Parts List Regulating the stitch length: To regulate the stitch length, turn feed regulating dial '1' Figure 18, toward left or right as required. to ...
Instruction Manual
Page 21
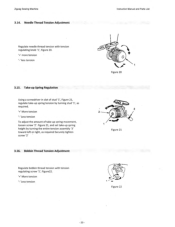
.... Bobbin Thread Tension Adjustment Regulate bobbin thread tension with tension regulating knob '1', Figure 20. • more tension '-' less tension 3.15. Needle Thread Tension Adjustment Instruction Manual and Parts List Regulate needle thread tension with tension regulating screw '1', Figure22. '+' More tension Less tension (0 Figure 20 2 3 -- Figure 21, and set take-up spring...
.... Bobbin Thread Tension Adjustment Regulate bobbin thread tension with tension regulating knob '1', Figure 20. • more tension '-' less tension 3.15. Needle Thread Tension Adjustment Instruction Manual and Parts List Regulate needle thread tension with tension regulating screw '1', Figure22. '+' More tension Less tension (0 Figure 20 2 3 -- Figure 21, and set take-up spring...
Instruction Manual
Page 22
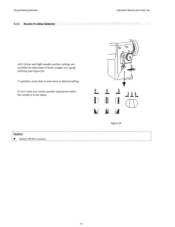
Do not make any needle position adjustment while the needle is in and move to desired salting. Caution: • Switch off the machine. III II En) Figure 23 - 21 - Instruction Manual and Parts List cCO -7 CIA _Ili L. To position, push lever in the fabric. Zigzag Sewing Machine 3.17_ Needle Position Selector Left, Center and Right needle position settings are available for placement of both straight and zigzag stitching (see Figure23).
Do not make any needle position adjustment while the needle is in and move to desired salting. Caution: • Switch off the machine. III II En) Figure 23 - 21 - Instruction Manual and Parts List cCO -7 CIA _Ili L. To position, push lever in the fabric. Zigzag Sewing Machine 3.17_ Needle Position Selector Left, Center and Right needle position settings are available for placement of both straight and zigzag stitching (see Figure23).


