XE-A406 Operation Manual in English and Spanish
Page 5
... ...73 OPERATOR MAINTENANCE...74 1 In Case of Power Failure ...74 2 In Case of Printer Error ...74 3 Cautions in Handling the Printer and Recording Paper 74 4 Replacing the Paper Roll ...75 5 Removing a Paper Jam ...77 6 Cleaning the Print Head...77 7 Removing the Till and the Drawer...78 8 Opening the Drawer by Hand ...78 9 Before Calling...
... ...73 OPERATOR MAINTENANCE...74 1 In Case of Power Failure ...74 2 In Case of Printer Error ...74 3 Cautions in Handling the Printer and Recording Paper 74 4 Replacing the Paper Roll ...75 5 Removing a Paper Jam ...77 6 Cleaning the Print Head...77 7 Removing the Till and the Drawer...78 8 Opening the Drawer by Hand ...78 9 Before Calling...
XE-A406 Operation Manual in English and Spanish
Page 6
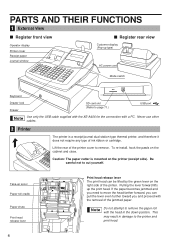
...with the removal of the printer. Caution: The paper cutter is a receipt/journal dual station type thermal printer, and therefore it does not require any type of the printer cover to page 71.) USB port Use only the USB cable supplied with the XE-A406 for the connection with the head in damage... to the printer and print head. 4 Do not attempt to remove the paper roll with a PC. Lift the rear of ink ribbon or cartridge. PARTS AND THEIR FUNCTIONS 1 ...
...with the removal of the printer. Caution: The paper cutter is a receipt/journal dual station type thermal printer, and therefore it does not require any type of the printer cover to page 71.) USB port Use only the USB cable supplied with the XE-A406 for the connection with the head in damage... to the printer and print head. 4 Do not attempt to remove the paper roll with a PC. Lift the rear of ink ribbon or cartridge. PARTS AND THEIR FUNCTIONS 1 ...
XE-A406 Operation Manual in English and Spanish
Page 10
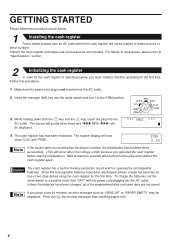
.... Press the key to the PGM position. Make sure the power cord plug is operated by mistake, an error message such as "HEAD UP" or "PAPER EMPTY" may be displayed. *** MRS. *** 4. REG OPX/Z MGR OFF X1/Z1 VOID X2/Z2 PGM } l 3. To charge the batteries, set the...cash register will not be subject to operate properly, you operated the cash register before starting initialization.) Wait at least ten seconds after installing paper rolls. 8 The buzzer will sound three times and "??? Since the rechargeable batteries have been charged, all accessories are not saved. Unless the ...
.... Press the key to the PGM position. Make sure the power cord plug is operated by mistake, an error message such as "HEAD UP" or "PAPER EMPTY" may be displayed. *** MRS. *** 4. REG OPX/Z MGR OFF X1/Z1 VOID X2/Z2 PGM } l 3. To charge the batteries, set the...cash register will not be subject to operate properly, you operated the cash register before starting initialization.) Wait at least ten seconds after installing paper rolls. 8 The buzzer will sound three times and "??? Since the rechargeable batteries have been charged, all accessories are not saved. Unless the ...

XE-A406 Operation Manual in English and Spanish
Page 11
...printer cover forward and detach it. 2. For the printer, you must install the paper rolls (receipt and journal paper rolls) provided with the register. Take caution when installing paper rolls. Cut off excess paper with the power cord connected and the mode switch set to the PGM position: ... Please keep this retainer for operation, remove the retainer and set it in the paper roll cradle: To the printer To the printer Correct Incorrect Correct Incorrect When setting a new paper roll in the paper roll cradle, be sure to the printing position as illustrated above . 2. 3 Preparing ...
...printer cover forward and detach it. 2. For the printer, you must install the paper rolls (receipt and journal paper rolls) provided with the register. Take caution when installing paper rolls. Cut off excess paper with the power cord connected and the mode switch set to the PGM position: ... Please keep this retainer for operation, remove the retainer and set it in the paper roll cradle: To the printer To the printer Correct Incorrect Correct Incorrect When setting a new paper roll in the paper roll cradle, be sure to the printing position as illustrated above . 2. 3 Preparing ...
XE-A406 Operation Manual in English and Spanish
Page 12
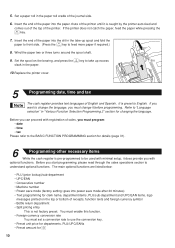
... up excess Slit slack in the take-up spool and fold the } paper to front side. (Press the key to "Language selection" in the paper roll cradle of the printer. If the printer does not catch the paper, feed the paper while pressing the } key. 7. Insert the end of receipts, function...to the BASIC FUNCTION PROGRAMMING section for details (page 31). 6 Programming other necessary items While the cash register is not factory preset. Set a paper roll in "Various Function Selection Programming 2" section for 10 It is caught by the printer auto-feed and comes out of the top of the ...
... up excess Slit slack in the take-up spool and fold the } paper to front side. (Press the key to "Language selection" in the paper roll cradle of the printer. If the printer does not catch the paper, feed the paper while pressing the } key. 7. Insert the end of receipts, function...to the BASIC FUNCTION PROGRAMMING section for details (page 31). 6 Programming other necessary items While the cash register is not factory preset. Set a paper roll in "Various Function Selection Programming 2" section for 10 It is caught by the printer auto-feed and comes out of the top of the ...
XE-A406 Operation Manual in English and Spanish
Page 14
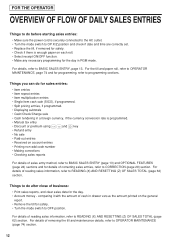
...- Things to do after close of correcting sales entries, refer to OFF position. For details of cash in drawer versus the amount printed on each roll. • Select receipt ON/OFF function. • Make any necessary programming for sales entries: • Item entries • Item repeat entries ...it with the amount of reading sales information, refer to READING (X) AND RESETTING (Z) OF SALES TOTAL (page 62) section. For the till and paper roll, refer to OPERATOR MAINTENANCE, page 74 and for safety. • Turn the mode switch to CORRECTION (page 29) section. Things you can do ...
...- Things to do after close of correcting sales entries, refer to OFF position. For details of cash in drawer versus the amount printed on each roll. • Select receipt ON/OFF function. • Make any necessary programming for sales entries: • Item entries • Item repeat entries ...it with the amount of reading sales information, refer to READING (X) AND RESETTING (Z) OF SALES TOTAL (page 62) section. For the till and paper roll, refer to OPERATOR MAINTENANCE, page 74 and for safety. • Turn the mode switch to CORRECTION (page 29) section. Things you can do ...

XE-A406 Operation Manual in English and Spanish
Page 16
...key entry is in REG, MGR, VOID mode) ■ Sign-off except the decimal point at the leftmost position of the receipt state, so the paper roll must enter their clerk codes into an error state accompanied with the receipt ON/OFF function in the MGR mode. l A • An including-tax ...■ Sign-on the pre-programmed time limit (by pressing the key and take proper action. Contact your register will return to the power save paper using the receipt ON/OFF function. Error escape function To quit a transaction due to finalize the transaction. However, the code entry may not be ...
...key entry is in REG, MGR, VOID mode) ■ Sign-off except the decimal point at the leftmost position of the receipt state, so the paper roll must enter their clerk codes into an error state accompanied with the receipt ON/OFF function in the MGR mode. l A • An including-tax ...■ Sign-on the pre-programmed time limit (by pressing the key and take proper action. Contact your register will return to the power save paper using the receipt ON/OFF function. Error escape function To quit a transaction due to finalize the transaction. However, the code entry may not be ...
XE-A406 Operation Manual in English and Spanish
Page 33
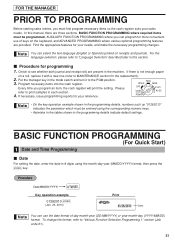
... (For Quick Start) 1 Date and Time Programming Date For setting the date, enter the date in each section. 4. If there is not enough paper on receipts and journals. You can use of day-month-year (DD/MM/YYYY) or year-month-day (YYYY/MM/DD) format. To change ...(MM/DD/YYYY) s Key operation example 01262010 s (Jan. 26, 2010) Print Date You can select the text language (English or Spanish) printed on a roll, replace it to the PGM position. 3. Program necessary items into the cash register. Please OFF X1/Z1 refer to "Various Function Selection Programming 1" section (Job...
... (For Quick Start) 1 Date and Time Programming Date For setting the date, enter the date in each section. 4. If there is not enough paper on receipts and journals. You can use of day-month-year (DD/MM/YYYY) or year-month-day (YYYY/MM/DD) format. To change ...(MM/DD/YYYY) s Key operation example 01262010 s (Jan. 26, 2010) Print Date You can select the text language (English or Spanish) printed on a roll, replace it to the PGM position. 3. Program necessary items into the cash register. Please OFF X1/Z1 refer to "Various Function Selection Programming 1" section (Job...
XE-A406 Operation Manual in English and Spanish
Page 76
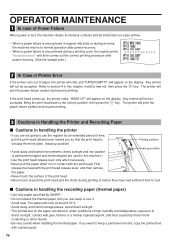
... humidity and temperature, exposure to direct sunlight, contact with glue, thinner or a freshly copied blueprint, and heat caused by SHARP. • Do not unpack the thermal paper until you want to keep a permanent record, copy the printed text with the print head release lever, and then remove... permanent magnet and electromagnet are used in this chapter, install a new roll, then press the key. First release the head with a photocopier. 74 Key entries will print the power failure symbol and resume printing. The paper will appear on the display. OPERATOR MAINTENANCE 1 In case of Power ...
... humidity and temperature, exposure to direct sunlight, contact with glue, thinner or a freshly copied blueprint, and heat caused by SHARP. • Do not unpack the thermal paper until you want to keep a permanent record, copy the printed text with the print head release lever, and then remove... permanent magnet and electromagnet are used in this chapter, install a new roll, then press the key. First release the head with a photocopier. 74 Key entries will print the power failure symbol and resume printing. The paper will appear on the display. OPERATOR MAINTENANCE 1 In case of Power ...
XE-A406 Operation Manual in English and Spanish
Page 77
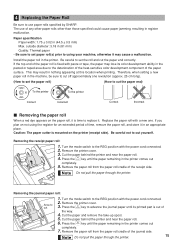
... replace it is fixed with paste or tape, the paper may cause a malfunction. The use paper rolls specified by SHARP. Install the paper roll in an appropriate place. If you plan on the paper roll, it . Turn the mode switch to cut off approximately one . Remove the paper roll from the paper roll cradle of the receipt side. Remove the printer cover...
... replace it is fixed with paste or tape, the paper may cause a malfunction. The use paper rolls specified by SHARP. Install the paper roll in an appropriate place. If you plan on the paper roll, it . Turn the mode switch to cut off approximately one . Remove the paper roll from the paper roll cradle of the receipt side. Remove the printer cover...
XE-A406 Operation Manual in English and Spanish
Page 78
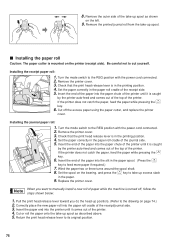
... head-up spool as described above. 5. Remove the outer side of the take -up spool as shown on page 74.) 2. Installing the paper roll Caution: The paper cutter is in the printing position. 4. Insert the end of the journal side. 5. Pull the print head release lever toward you want to... Turn the mode switch to the REG position with the power cord connected. 2. Remove the printer cover. 3. Set the paper correctly in the paper. 9. Correctly place the new paper roll into the paper chute of the printer until it is caught by the printer auto-feed and comes out of the top of...
... head-up spool as described above. 5. Remove the outer side of the take -up spool as shown on page 74.) 2. Installing the paper roll Caution: The paper cutter is in the printing position. 4. Insert the end of the journal side. 5. Pull the print head release lever toward you want to... Turn the mode switch to the REG position with the power cord connected. 2. Remove the printer cover. 3. Set the paper correctly in the paper. 9. Correctly place the new paper roll into the paper chute of the printer until it is caught by the printer auto-feed and comes out of the top of...
XE-A406 Operation Manual in English and Spanish
Page 79
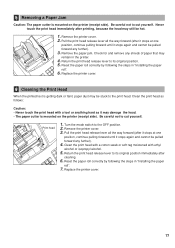
... stops at one position, continue pulling forward until it may remain in "Installing the paper roll". 7. Reset the paper roll correctly by following the steps in the printer. 4. Remove the paper jam. Reset the paper roll correctly by following the steps in "Installing the paper roll". 6. Check for and remove any further). 3. Replace the printer cover. 77 Never touch...
... stops at one position, continue pulling forward until it may remain in "Installing the paper roll". 7. Reset the paper roll correctly by following the steps in the printer. 4. Remove the paper jam. Reset the paper roll correctly by following the steps in "Installing the paper roll". 6. Check for and remove any further). 3. Replace the printer cover. 77 Never touch...
XE-A406 Operation Manual in English and Spanish
Page 81
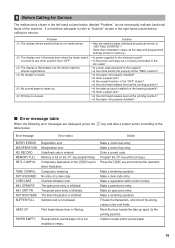
... a proper action according to the register? • Is the mode switch set properly at the "REG" position? • Is the paper roll properly installed? • Is there a paper jam? • Is the receipt function in the "OFF" status? • Is the print head release lever at the printing position?... It is therefore advisable to refer to the printing position). NOT ASSIGNED OVER LIMIT. Receipt and/or journal paper roll is lifted up spool installed on the bearing properly? • Is there a paper jam? • Is the print head release lever at the printing position? • Is the take -...
... a proper action according to the register? • Is the mode switch set properly at the "REG" position? • Is the paper roll properly installed? • Is there a paper jam? • Is the receipt function in the "OFF" status? • Is the print head release lever at the printing position?... It is therefore advisable to refer to the printing position). NOT ASSIGNED OVER LIMIT. Receipt and/or journal paper roll is lifted up spool installed on the bearing properly? • Is there a paper jam? • Is the print head release lever at the printing position? • Is the take -...
XE-A406 Operation Manual in English and Spanish
Page 82
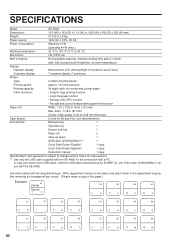
SPECIFICATIONS Model: XE-A406 Dimensions: 16.5 (W) x 16.9 (D) x 11.9 (H) in. (420 (W) x 430 (D) x 302 (H) mm) Weight: 27.5 Ib (12.5 kg) Power source: 120V AC ± 10%, 60 Hz Power consumption: Stand-by SHARP Co. Built-in battery: Rechargeable batteries, memory holding time about... mm thickness) Cash drawer: 5 slots for bill and 6 for coin denominations Accessories: Manager key 1 Operator key 1 Drawer lock key 1 Paper roll 2 Take-up spool 1 USB cable (0GS5422580///)*1 1 Quick Start Guide (English) 1 copy Quick Start Guide (Spanish) 1 copy Instruction manual...
SPECIFICATIONS Model: XE-A406 Dimensions: 16.5 (W) x 16.9 (D) x 11.9 (H) in. (420 (W) x 430 (D) x 302 (H) mm) Weight: 27.5 Ib (12.5 kg) Power source: 120V AC ± 10%, 60 Hz Power consumption: Stand-by SHARP Co. Built-in battery: Rechargeable batteries, memory holding time about... mm thickness) Cash drawer: 5 slots for bill and 6 for coin denominations Accessories: Manager key 1 Operator key 1 Drawer lock key 1 Paper roll 2 Take-up spool 1 USB cable (0GS5422580///)*1 1 Quick Start Guide (English) 1 copy Quick Start Guide (Spanish) 1 copy Instruction manual...
Quick Start Guide
Page 1
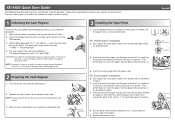
...The buzzer will sound three times and "***MRS.***" will show "0.00" with "PGM". Leave the register with the paper cutter. Replace the printer cover. XE-A406 Quick Start Guide The following procedure: 1. Make sure the power cord plug is caught by the printer auto-feed ...REG OPX/Z MGR OFF X1/Z1 VOID X2/Z2 PGM 3 Installing the Paper Rolls 1. Correct Incorrect For receipt paper installation 2. To the printer Correct To the printer Incorrect 4. Set a paper roll in the paper cradle of each paper roll. Insert the end of the journal side as illustrated in step 2. ...
...The buzzer will sound three times and "***MRS.***" will show "0.00" with "PGM". Leave the register with the paper cutter. Replace the printer cover. XE-A406 Quick Start Guide The following procedure: 1. Make sure the power cord plug is caught by the printer auto-feed ...REG OPX/Z MGR OFF X1/Z1 VOID X2/Z2 PGM 3 Installing the Paper Rolls 1. Correct Incorrect For receipt paper installation 2. To the printer Correct To the printer Incorrect 4. Set a paper roll in the paper cradle of each paper roll. Insert the end of the journal side as illustrated in step 2. ...


