
Operation Manual
Page 3
... used in a residential installation. INFORMATION This equipment has been tested and found to comply with Part 15 of blue, green, red, or black. These limits are subject to change without notice. However, there is a very high technology product with the instructions, may cause undesired operation. If this unit be determined by turning the equipment off and on the screen as a fixed...
... used in a residential installation. INFORMATION This equipment has been tested and found to comply with Part 15 of blue, green, red, or black. These limits are subject to change without notice. However, there is a very high technology product with the instructions, may cause undesired operation. If this unit be determined by turning the equipment off and on the screen as a fixed...

Operation Manual
Page 5
... the service technician has used replacement parts specified by the operating instructions as the original part. iv Object and Liquid EntryCNever push objects of overhead power lines or other hazards. Never spill liquid of any kind into this product, ask the service technician to perform safety checks to this product through openings as opening or removing covers may result in performanceCthis indicates a need for service...
... the service technician has used replacement parts specified by the operating instructions as the original part. iv Object and Liquid EntryCNever push objects of overhead power lines or other hazards. Never spill liquid of any kind into this product, ask the service technician to perform safety checks to this product through openings as opening or removing covers may result in performanceCthis indicates a need for service...
Operation Manual
Page 8
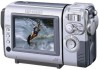
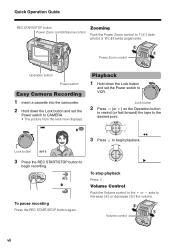
...) the tape to the desired point. 3 Press m to CAMERA. • The picture from the lens now displays. Playback 1 Hold down the Lock button and set the Power switch to begin playback. Lock button AU TO 3 Press the REC START/STOP button to VCR. Volume Control Push the Volume control to the L or + side to T (1) (telephoto) or W (2) (wide angle) side. Quick Operation Guide REC START/STOP button Power Zoom control/Volume control Zooming Push the Power Zoom control to increase (1) or decrease (2) the volume. To stop playback Press l. Volume control vii
...) the tape to the desired point. 3 Press m to CAMERA. • The picture from the lens now displays. Playback 1 Hold down the Lock button and set the Power switch to begin playback. Lock button AU TO 3 Press the REC START/STOP button to VCR. Volume Control Push the Volume control to the L or + side to T (1) (telephoto) or W (2) (wide angle) side. Quick Operation Guide REC START/STOP button Power Zoom control/Volume control Zooming Push the Power Zoom control to increase (1) or decrease (2) the volume. To stop playback Press l. Volume control vii

Operation Manual
Page 9
... not allow direct sunlight to malfunction. • Always respect prohibitions or restrictions on the use of the temperature and humidity. Precautions • When the camcorder is not in use, remember to remove the cassette tape, turn off the power, and disconnect the camcorder from incandescent lights may deform the camcorder, or cause it to strike the camcorder lens or LCD monitor screen, whether or not recording is...
... not allow direct sunlight to malfunction. • Always respect prohibitions or restrictions on the use of the temperature and humidity. Precautions • When the camcorder is not in use, remember to remove the cassette tape, turn off the power, and disconnect the camcorder from incandescent lights may deform the camcorder, or cause it to strike the camcorder lens or LCD monitor screen, whether or not recording is...
Operation Manual
Page 12
...-screen Display ..... 12 Setting the Date and Time 13 Attaching the Lens Hood 14 Attaching the Wrist Strap 14 Using the Lens Cap 14 Tips on Recording Positions 15 Basic Operations Camera Recording Easy Camera Recording in Full Auto Mode 16 Zooming 17 Auto Focus 17 Macro Shots 17 Remaining Recording Time Display 18 Remaining Battery Power Display 18 Playback Playback 19 Volume Control 19 Video Search 20 Still 20 Watching Playback on a TV 21 Useful Features Using the Menu Screens 22 Camera Recording Displaying the Recording Guide 23 Setting the Digital Zoom...
...-screen Display ..... 12 Setting the Date and Time 13 Attaching the Lens Hood 14 Attaching the Wrist Strap 14 Using the Lens Cap 14 Tips on Recording Positions 15 Basic Operations Camera Recording Easy Camera Recording in Full Auto Mode 16 Zooming 17 Auto Focus 17 Macro Shots 17 Remaining Recording Time Display 18 Remaining Battery Power Display 18 Playback Playback 19 Volume Control 19 Video Search 20 Still 20 Watching Playback on a TV 21 Useful Features Using the Menu Screens 22 Camera Recording Displaying the Recording Guide 23 Setting the Digital Zoom...
Operation Manual
Page 13
... Tripod Adapter 29 Wide Screen (16:9 30 Digital Image Stabilization (DIS 30 Self Recording 31 Recording in LP (Long Play Recording) Mode 32 Selecting the 16-bit Audio Recording Mode 33 Playback Using the Remote Control (Not supplied 34 Displaying the Date and Time of Recording 35 Gamma Playback 35 Picture Effect Playback 36 Advanced Features Camera Recording Manual Focus 37 Manual Exposure 38 White Balance Lock 39 Setting the Camcorder to Full Auto Mode 39 Digital Picture Effects 40 Scene Menu (Program AE 41 Playback Using the Time Code 42...
... Tripod Adapter 29 Wide Screen (16:9 30 Digital Image Stabilization (DIS 30 Self Recording 31 Recording in LP (Long Play Recording) Mode 32 Selecting the 16-bit Audio Recording Mode 33 Playback Using the Remote Control (Not supplied 34 Displaying the Date and Time of Recording 35 Gamma Playback 35 Picture Effect Playback 36 Advanced Features Camera Recording Manual Focus 37 Manual Exposure 38 White Balance Lock 39 Setting the Camcorder to Full Auto Mode 39 Digital Picture Effects 40 Scene Menu (Program AE 41 Playback Using the Time Code 42...

Operation Manual
Page 21
... plug into the DC input jack (2). • The charge indicator lights up. This may result in a decrease in the actual recording time compared to the maximum continuous recording time listed above. • The charging time and recording time may vary depending on and off . 3Remove the battery pack and store it is not a malfunction. • Using the zoom (see page 17) and other functions or turning the power...
... plug into the DC input jack (2). • The charge indicator lights up. This may result in a decrease in the actual recording time compared to the maximum continuous recording time listed above. • The charging time and recording time may vary depending on and off . 3Remove the battery pack and store it is not a malfunction. • Using the zoom (see page 17) and other functions or turning the power...

Operation Manual
Page 29
.... 30min. REC START/STOP button Power switch To pause recording Press the REC START/STOP button again. REC To turn off to save battery power and to protect the tape from the lens now displays. • The camcorder is not displayed at this time, set the Power switch to CAMERA. • The picture from being damaged. BT-L445 approx. 3hr. This may result in a decrease in the actual recording time compared to begin recording. Note: • Using the zoom (see page...
.... 30min. REC START/STOP button Power switch To pause recording Press the REC START/STOP button again. REC To turn off to save battery power and to protect the tape from the lens now displays. • The camcorder is not displayed at this time, set the Power switch to CAMERA. • The picture from being damaged. BT-L445 approx. 3hr. This may result in a decrease in the actual recording time compared to begin recording. Note: • Using the zoom (see page...
Operation Manual
Page 31
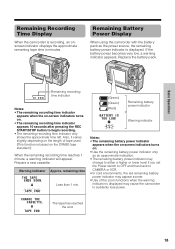
... power. CHANGE THE CASSE TTE. TAPE END The tape has reached the end. 18 Basic Operations 3 0 min Remaining recording time indicator Notes: • The remaining recording time indicator appears when the on-screen indicators turns on . • Use the remaining battery power indicator only as the power source, the remaining battery power indicator is recording, an onscreen indicator displays the approximate remaining tape time in minutes. Prepare a new cassette. Remaining Recording Time Display When the camcorder...
... power. CHANGE THE CASSE TTE. TAPE END The tape has reached the end. 18 Basic Operations 3 0 min Remaining recording time indicator Notes: • The remaining recording time indicator appears when the on-screen indicators turns on . • Use the remaining battery power indicator only as the power source, the remaining battery power indicator is recording, an onscreen indicator displays the approximate remaining tape time in minutes. Prepare a new cassette. Remaining Recording Time Display When the camcorder...

Operation Manual
Page 35
... VCR mode. • The menu screen automatically turns off the menu screen Press the MENU button. Lock button • Steps 2 to 5 show how to all camcorder modes. Example SE T T I NG 2 DG T L Z OOM O F F TAPE SPE ED DIS 16 : 9 A UD I C. To turn off if no settings are made within five minutes. • Items that are not selectable are common to change the DGTL ZOOM menu setting in each camcorder mode. Power switch SET button MENU button Operation button 1 Set to the desired camcorder mode (CAMERA...
... VCR mode. • The menu screen automatically turns off the menu screen Press the MENU button. Lock button • Steps 2 to 5 show how to all camcorder modes. Example SE T T I NG 2 DG T L Z OOM O F F TAPE SPE ED DIS 16 : 9 A UD I C. To turn off if no settings are made within five minutes. • Items that are not selectable are common to change the DGTL ZOOM menu setting in each camcorder mode. Power switch SET button MENU button Operation button 1 Set to the desired camcorder mode (CAMERA...
Operation Manual
Page 37
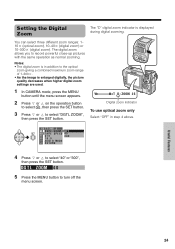
... E RE TURN 4 Press l or m to record powerful close-up pictures with the same operation as normal zooming. DG T L ZOOM 4 0 5 Press the MENU button to select "DGTL ZOOM", then press the SET button. Notes: • The digital zoom is in step 4 above. ZOOM 2 5 Digital zoom indicator To use optical zoom only Select "OFF" in addition to the optical zoom giving a combined maximum zoom range of 1-300K. • As the image is displayed during digital zooming. Useful Features...
... E RE TURN 4 Press l or m to record powerful close-up pictures with the same operation as normal zooming. DG T L ZOOM 4 0 5 Press the MENU button to select "DGTL ZOOM", then press the SET button. Notes: • The digital zoom is in step 4 above. ZOOM 2 5 Digital zoom indicator To use optical zoom only Select "OFF" in addition to the optical zoom giving a combined maximum zoom range of 1-300K. • As the image is displayed during digital zooming. Useful Features...

Operation Manual
Page 41
... If while playing back your tape you want to start recording again, use the quick return function. 1 In Recording Standby mode, press the MENU button until the menu screen appears. 2 Press l or m on the operation button to select T, then press the SET button. 3 Press l or m to turn off during search. • Forward edit search is flashing, press the SET button twice. • Quick return will not work if you remove the cassette and reload...
... If while playing back your tape you want to start recording again, use the quick return function. 1 In Recording Standby mode, press the MENU button until the menu screen appears. 2 Press l or m on the operation button to select T, then press the SET button. 3 Press l or m to turn off during search. • Forward edit search is flashing, press the SET button twice. • Quick return will not work if you remove the cassette and reload...
Operation Manual
Page 48
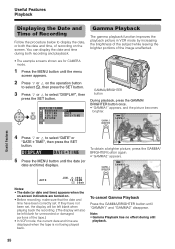
... correctly set , the display will be left blank when playing back the recording. (The display will also be left blank for CAMERA mode. 1 Press the MENU button until the date (or date and time) displays. Note: • Gamma Playback has no effect during both the date and time, of recording on the screen. Useful Features Playback Useful Features Displaying the Date and Time of Recording Follow the procedure below to display the date, or both recording and playback. GAMMA...
... correctly set , the display will be left blank when playing back the recording. (The display will also be left blank for CAMERA mode. 1 Press the MENU button until the date (or date and time) displays. Note: • Gamma Playback has no effect during both the date and time, of recording on the screen. Useful Features Playback Useful Features Displaying the Date and Time of Recording Follow the procedure below to display the date, or both recording and playback. GAMMA...
Operation Manual
Page 57
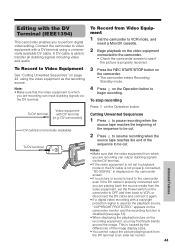
.... 2 Press m to resume recording when the source tape reaches the end of the image display sizes. • You cannot output the picture playing back from Video Equipment 1 Set the camcorder to VCR mode, and insert a Mini DV cassette. 2 Begin playback on the Operation button to an external monitor. 44 Advanced Features To Record to VCR, or disconnect the DV cable and connect it again. • If a digital video recording with DV terminal (e.g. Connect the camcorder to be cut...
.... 2 Press m to resume recording when the source tape reaches the end of the image display sizes. • You cannot output the picture playing back from Video Equipment 1 Set the camcorder to VCR mode, and insert a Mini DV cassette. 2 Begin playback on the Operation button to an external monitor. 44 Advanced Features To Record to VCR, or disconnect the DV cable and connect it again. • If a digital video recording with DV terminal (e.g. Connect the camcorder to be cut...

Operation Manual
Page 59
... to change the dubbed audio or dub additional scenes 1 Press the MENU button to turn off the audio dubbing screen. 2 Repeat steps 1 to select "AUDIO DUB", then press the SET button. • The audio dubbing screen appears. To cancel audio dubbing Press the MENU button. Audio Dubbing 1 Play back the recorded Mini DV cassette and locate the tape position where you wish to start audio dubbing. 2 Press m to pause playback. 3 Press the MENU button until the menu screen...
... to change the dubbed audio or dub additional scenes 1 Press the MENU button to turn off the audio dubbing screen. 2 Repeat steps 1 to select "AUDIO DUB", then press the SET button. • The audio dubbing screen appears. To cancel audio dubbing Press the MENU button. Audio Dubbing 1 Play back the recorded Mini DV cassette and locate the tape position where you wish to start audio dubbing. 2 Press m to pause playback. 3 Press the MENU button until the menu screen...

Operation Manual
Page 65
... record and play back using the adapter in humid or ex- If the monitor becomes dark or difficult to view, the fluorescent lamp may need to backlight the LCD monitor. Appendix 52 Replacing the Fluorescent Lamp This camcorder uses a fluorescent lamp to be automatically erased. • The Mini DV cassette will not operate if inserted in the wrong direction. • Do not repeatedly insert and eject...
... record and play back using the adapter in humid or ex- If the monitor becomes dark or difficult to view, the fluorescent lamp may need to backlight the LCD monitor. Appendix 52 Replacing the Fluorescent Lamp This camcorder uses a fluorescent lamp to be automatically erased. • The Mini DV cassette will not operate if inserted in the wrong direction. • Do not repeatedly insert and eject...
Operation Manual
Page 66
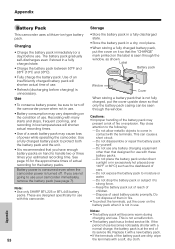
... battery power, be seen through the window, as the dashboard of actual recording for use becomes noticeably shorter with a soft, dry cloth. Use a fully charged battery pack to turn off . Note: • Use only SHARP BT-L225 or BT-L445 battery packs. Pay close attention to strong force. - If the period of use . Appendix Battery Pack This camcorder uses a lithium-ion type battery pack. Do not disassemble or repair...
... battery power, be seen through the window, as the dashboard of actual recording for use becomes noticeably shorter with a soft, dry cloth. Use a fully charged battery pack to turn off . Note: • Use only SHARP BT-L225 or BT-L445 battery packs. Pay close attention to strong force. - If the period of use . Appendix Battery Pack This camcorder uses a lithium-ion type battery pack. Do not disassemble or repair...

Operation Manual
Page 68
... a cleaning tape into the camcorder. 2 Set the camcorder to VCR mode. • The video head cleaning screen appears. 3 Press the SET button to the video heads. CL EAN I NG START S TOP • After about 20 seconds, video head cleaning automatically finishes, and "EJECT THE CASSETTE." NOW C L E AN I NG If the video heads become clogged, the v indicator appears on the playback picture. (see above illustration) • playback pictures do not move. • during cleaning. displays. 4 Remove the cleaning tape. Contact the nearest SHARP service...
... a cleaning tape into the camcorder. 2 Set the camcorder to VCR mode. • The video head cleaning screen appears. 3 Press the SET button to the video heads. CL EAN I NG START S TOP • After about 20 seconds, video head cleaning automatically finishes, and "EJECT THE CASSETTE." NOW C L E AN I NG If the video heads become clogged, the v indicator appears on the playback picture. (see above illustration) • playback pictures do not move. • during cleaning. displays. 4 Remove the cleaning tape. Contact the nearest SHARP service...
Operation Manual
Page 71
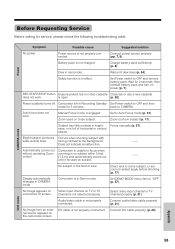
..." (p. 57). REC START/STOP button Erasure-protect tab on video cassette Close tab or use a new cassette does not work . No subject in Recording Standby Set Power switch to Auto Focus mode (p. 37). Display automatically changes in effect. No image appears on TV or TV channel is in CAMERA mode. Select video input channel or TV channel properly (p. 21). is not properly connected. Zoom out from an exter- Set DEMO MODE menu item to OFF and remove battery pack. Audio/video cable is...
..." (p. 57). REC START/STOP button Erasure-protect tab on video cassette Close tab or use a new cassette does not work . No subject in Recording Standby Set Power switch to Auto Focus mode (p. 37). Display automatically changes in effect. No image appears on TV or TV channel is in CAMERA mode. Select video input channel or TV channel properly (p. 21). is not properly connected. Zoom out from an exter- Set DEMO MODE menu item to OFF and remove battery pack. Audio/video cable is...

Operation Manual
Page 72
... monitor screen appear to de- Old or worn tape. General Fluorescent lamp has burned out. Connect audio/video cable properly (p. 43). Dirty video heads. Battery pack is not properly VCR. Stop tape and try again (p. 16). malfunctioned. Power source is recording. Set the date and time, then resume operation. ward tape. Camcorder is not properly connected. Use a new cassette. Position at beginning or end of tape. sired point (p. 19). Call for - Backlight has been turned...
... monitor screen appear to de- Old or worn tape. General Fluorescent lamp has burned out. Connect audio/video cable properly (p. 43). Dirty video heads. Battery pack is not properly VCR. Stop tape and try again (p. 16). malfunctioned. Power source is recording. Set the date and time, then resume operation. ward tape. Camcorder is not properly connected. Use a new cassette. Position at beginning or end of tape. sired point (p. 19). Call for - Backlight has been turned...


