R303T|R403T Operation Manual
Page 1
® MICROWAVE OVEN OPERATION MANUAL MODELS R-303T / R-403T Followed by letter indicating color KC = black, WC = white, SC = stainless steel CONTENTS • For Customer Assistance ..... 2 • Precautions to Avoid Possible Exposure to Excessive Microwave Energy 2 • Consumer Limited Warranty 3 • Product Information Card 3 • Important Safety Instructions 4 • Installation Guide 5 • Grounding Instructions 5 • Information You Need to Know 6 • Part Names 7-8 • How...
® MICROWAVE OVEN OPERATION MANUAL MODELS R-303T / R-403T Followed by letter indicating color KC = black, WC = white, SC = stainless steel CONTENTS • For Customer Assistance ..... 2 • Precautions to Avoid Possible Exposure to Excessive Microwave Energy 2 • Consumer Limited Warranty 3 • Product Information Card 3 • Important Safety Instructions 4 • Installation Guide 5 • Grounding Instructions 5 • Information You Need to Know 6 • Part Names 7-8 • How...
R303T|R403T Operation Manual
Page 2
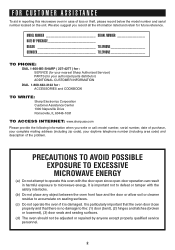
... oven door close properly and that there is no damage to the: (1) door (bent), (2) hinges and latches (broken or loosened), (3) door seals and sealing surfaces. (d) The oven should not be adjusted or repaired by anyone except properly qualified service personnel. 2 MODEL NUMBER SERIAL NUMBER DATE OF PURCHASE Dealer Telephone Servicer Telephone TO PHONE: DIAL 1-800-BE-SHARP ( 237-4277 ) for : SERVICE (for your nearest Sharp Authorized Servicer) PARTS...
... oven door close properly and that there is no damage to the: (1) door (bent), (2) hinges and latches (broken or loosened), (3) door seals and sealing surfaces. (d) The oven should not be adjusted or repaired by anyone except properly qualified service personnel. 2 MODEL NUMBER SERIAL NUMBER DATE OF PURCHASE Dealer Telephone Servicer Telephone TO PHONE: DIAL 1-800-BE-SHARP ( 237-4277 ) for : SERVICE (for your nearest Sharp Authorized Servicer) PARTS...
R303T|R403T Operation Manual
Page 3
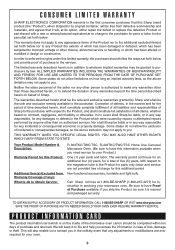
... continues for an additional four (4) years, for any way responsible, for instruction in design or construction. The limited warranty described herein is on the inside of the microwave oven carton should follow the steps set forth below and provide proof of charge for this additional period Non-functional accessories, turntable and light bulb. labor and service are ever required for...
... continues for an additional four (4) years, for any way responsible, for instruction in design or construction. The limited warranty described herein is on the inside of the microwave oven carton should follow the steps set forth below and provide proof of charge for this additional period Non-functional accessories, turntable and light bulb. labor and service are ever required for...
R303T|R403T Operation Manual
Page 4
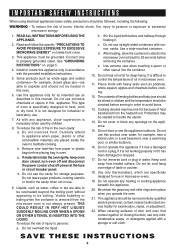
... chemicals or vapors in this manual. SAVE THESE INSTRUCTIONS 4 When cleaning surfaces of table or counter. 18. c. Do not immerse cord or plug in use . 7. This type of fire in microwave ovens. 19. Do not leave paper products, cooking utensils or food in the cavity when not in water. Be certain the glass tray and roller rings are specifically designed for industrial or laboratory...
... chemicals or vapors in this manual. SAVE THESE INSTRUCTIONS 4 When cleaning surfaces of table or counter. 18. c. Do not immerse cord or plug in use . 7. This type of fire in microwave ovens. 19. Do not leave paper products, cooking utensils or food in the cavity when not in water. Be certain the glass tray and roller rings are specifically designed for industrial or laboratory...
R303T|R403T Operation Manual
Page 5
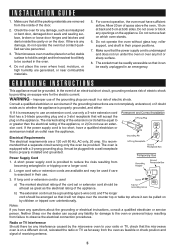
... only, 20 amp. Do not operate the oven without glass tray, roller support, and shaft in or tripping over any interference caused by the microwave oven to whether the appliance is exercised in an emergency. It is recommended that the power supply cord is undamaged and does not run under the oven or over a longer cord. 2. Power Supply Cord 1. Longer cord sets or extension cords are generated...
... only, 20 amp. Do not operate the oven without glass tray, roller support, and shaft in or tripping over any interference caused by the microwave oven to whether the appliance is exercised in an emergency. It is recommended that the power supply cord is undamaged and does not run under the oven or over a longer cord. 2. Power Supply Cord 1. Longer cord sets or extension cords are generated...
R303T|R403T Operation Manual
Page 6
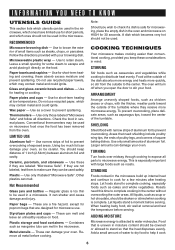
... can damage your oven, so be careful. Food at low temperatures. SHIELDING Shield food with large foods such as cakes and whole vegetables. Let liquids stand a moment before cooking. Use for heating or cooking. Use for short-term heating at the outside of small items such as a cover to expose all directions. Use only those labeled "Microwave Safe" and follow all parts to stir your oven. Remove all metal...
... can damage your oven, so be careful. Food at low temperatures. SHIELDING Shield food with large foods such as cakes and whole vegetables. Let liquids stand a moment before cooking. Use for heating or cooking. Use for short-term heating at the outside of small items such as a cover to expose all directions. Use only those labeled "Microwave Safe" and follow all parts to stir your oven. Remove all metal...
R303T|R403T Operation Manual
Page 7
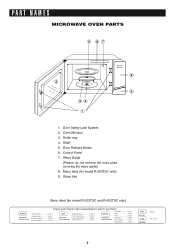
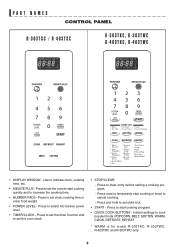
Wave Guide (Please do not remove the mica plate covering the wave guide) 8. Door Safety Lock System 2. PART NAMES MICROWAVE OVEN PARTS 9 87 6 2 5 34 1 1. Oven Window 3. Door Release Button 6. Control Panel 7. Shaft 5. Glass tray Menu label (for model R-203TSC only) 9. Menu label (for model R-303TSC and R-403TSC only) Defrost Defrost Press auto food code repeatedly to select quantity Casserole Code 1 Ground meat Code 1 Steaks/chops Code 2 Boneless poultry Code 3 Bone-in poultry Code 4 Cook Cook Baked potatoes Code 1 Fresh vegetables Code 2 Frozen vegetables Code 3 ...
Wave Guide (Please do not remove the mica plate covering the wave guide) 8. Door Safety Lock System 2. PART NAMES MICROWAVE OVEN PARTS 9 87 6 2 5 34 1 1. Oven Window 3. Door Release Button 6. Control Panel 7. Shaft 5. Glass tray Menu label (for model R-203TSC only) 9. Menu label (for model R-303TSC and R-403TSC only) Defrost Defrost Press auto food code repeatedly to select quantity Casserole Code 1 Ground meat Code 1 Steaks/chops Code 2 Boneless poultry Code 3 Bone-in poultry Code 4 Cook Cook Baked potatoes Code 1 Fresh vegetables Code 2 Frozen vegetables Code 3 ...
R303T|R403T Operation Manual
Page 8
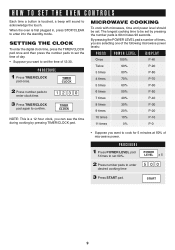
Press to set the oven to set clock, cooking time or enter food weight. • POWER LEVEL - Press once to temporarily stop cooking or twice to cook popular foods. Press to start cooking program. • QUICK COOK BUTTONS - Instant settings to cancel cooking. - Press to clear entry before setting a cooking program. - Press to set the timer function and to set the oven clock. • STOP/CLEAR: - Press and hold to set child lock. • START - Press to select microwave power level. • TIMER/CLOCK - POPCORN, MELT, SOFTEN, WARM, COOK, DEFROST, REHEAT * ...
Press to set the oven to set clock, cooking time or enter food weight. • POWER LEVEL - Press once to temporarily stop cooking or twice to cook popular foods. Press to start cooking program. • QUICK COOK BUTTONS - Instant settings to cancel cooking. - Press to clear entry before setting a cooking program. - Press to set the timer function and to set the oven clock. • STOP/CLEAR: - Press and hold to set child lock. • START - Press to select microwave power level. • TIMER/CLOCK - POPCORN, MELT, SOFTEN, WARM, COOK, DEFROST, REHEAT * ...
R303T|R403T Operation Manual
Page 9
... microwave power levels: PRESS POWER LEVEL DISPLAY Once 100% P-HI Twice 90% P-90 3 times 80% P-80 4 times 70% P-70 5 times 60% P-60 6 times 50% P-50 7 times 40% P-40 8 times 30% P-30 9 times 20% P-20 10 times 10% P-10 11 times 0% P-0 • Suppose you want to set by pressing TIMER/CLOCK pad. Microwave Cooking To cook with microwave, time and power level should be set 60%. HOW TO SET THE OVEN CONTROLS Each time a button is touched, a beep will sound to enter desired cooking time 5 0 0 3 Press START pad. Power Level...
... microwave power levels: PRESS POWER LEVEL DISPLAY Once 100% P-HI Twice 90% P-90 3 times 80% P-80 4 times 70% P-70 5 times 60% P-60 6 times 50% P-50 7 times 40% P-40 8 times 30% P-30 9 times 20% P-20 10 times 10% P-10 11 times 0% P-0 • Suppose you want to set by pressing TIMER/CLOCK pad. Microwave Cooking To cook with microwave, time and power level should be set 60%. HOW TO SET THE OVEN CONTROLS Each time a button is touched, a beep will sound to enter desired cooking time 5 0 0 3 Press START pad. Power Level...
R303T|R403T Operation Manual
Page 10
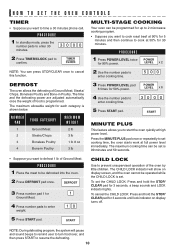
... pause and sound beeps to remind user to turn food over, and then press START to resume the defrosting. 10 NOTE: During defrosting program, the system will show on display turns off. Power Level x 2 NOTE: You can be set . DEFROST 3 Press number pad 1 for Ground Meat. 4 Press number pads to enter weight. 5 Press START pad. 1 1 0 START CHILD Lock Use to confirm. PROCEDURE 1 In standby mode, press the number pads to enter 30 minutes. 3 0 0 0 2 Press TIMER/CLOCK pad...
... pause and sound beeps to remind user to turn food over, and then press START to resume the defrosting. 10 NOTE: During defrosting program, the system will show on display turns off. Power Level x 2 NOTE: You can be set . DEFROST 3 Press number pad 1 for Ground Meat. 4 Press number pads to enter weight. 5 Press START pad. 1 1 0 START CHILD Lock Use to confirm. PROCEDURE 1 In standby mode, press the number pads to enter 30 minutes. 3 0 0 0 2 Press TIMER/CLOCK pad...
R303T|R403T Operation Manual
Page 11
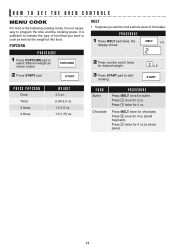
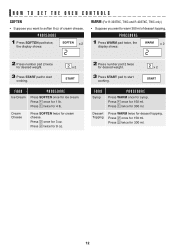
... you want to program the time and the cooking power. FOOD Butter P rocedure Press MELT once for chocolate. Chocolate Press MELT twice for butter. Press 1 once for desired weight. 2 x2 2 Press START pad. PROCEDURE 1 Press MELT pad twice, the display shows: MELT x 2 2 2 Press number pad 2 twice for 2 oz. HOW TO SET THE OVEN CONTROLS MENU COOK For food or the following cooking mode, it is sufficient...
... you want to program the time and the cooking power. FOOD Butter P rocedure Press MELT once for chocolate. Chocolate Press MELT twice for butter. Press 1 once for desired weight. 2 x2 2 Press START pad. PROCEDURE 1 Press MELT pad twice, the display shows: MELT x 2 2 2 Press number pad 2 twice for 2 oz. HOW TO SET THE OVEN CONTROLS MENU COOK For food or the following cooking mode, it is sufficient...
R303T|R403T Operation Manual
Page 12
... ice cream. PROCEDURE 1 Press WARM pad twice, the display shows: WARM x 2 2 2 Press number pad 2 twice for desired weight. 3 Press START pad to start cooking. 2 x2 START 2 Press number pad 2 twice for desired weight. 3 Press START pad to start cooking. 2 x2 START FOOD Ice Cream P rocedure Press SOFTEN once for dessert topping....cream cheese. Cream Cheese Press SOFTEN twice for 1 lb. HOW TO SET THE OVEN CONTROLS SOFTEN • Suppose you want to soften 8 oz of dessert topping. PROCEDURE 1 Press SOFTEN pad twice, the display shows: SOFTEN x 2 2 WARM (For R-303TKC, TWC and ...
... ice cream. PROCEDURE 1 Press WARM pad twice, the display shows: WARM x 2 2 2 Press number pad 2 twice for desired weight. 3 Press START pad to start cooking. 2 x2 START 2 Press number pad 2 twice for desired weight. 3 Press START pad to start cooking. 2 x2 START FOOD Ice Cream P rocedure Press SOFTEN once for dessert topping....cream cheese. Cream Cheese Press SOFTEN twice for 1 lb. HOW TO SET THE OVEN CONTROLS SOFTEN • Suppose you want to soften 8 oz of dessert topping. PROCEDURE 1 Press SOFTEN pad twice, the display shows: SOFTEN x 2 2 WARM (For R-303TKC, TWC and ...
R303T|R403T Operation Manual
Page 13
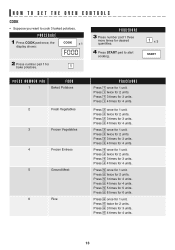
... 2 units. Press 3 twice for 1 unit. Press 4 twice for 6 units. Press 5 6 times for 2 units. Press 6 3 times for 4 units. Press 2 4 times for 3 units. Press 1 twice for 2 units. Press 2 twice for 2 units. Press 4 4 times for 2 units. HOW TO SET THE OVEN CONTROLS COOK • Suppose you want to start cooking. 1 x3 START PRESS NUMBER PAD FOOD 1 Baked Potatoes 2 Fresh Vegetables 3 Frozen Vegetables 4 Frozen Entrees 5 Ground Meat...
... 2 units. Press 3 twice for 1 unit. Press 4 twice for 6 units. Press 5 6 times for 2 units. Press 6 3 times for 4 units. Press 2 4 times for 3 units. Press 1 twice for 2 units. Press 2 twice for 2 units. Press 4 4 times for 2 units. HOW TO SET THE OVEN CONTROLS COOK • Suppose you want to start cooking. 1 x3 START PRESS NUMBER PAD FOOD 1 Baked Potatoes 2 Fresh Vegetables 3 Frozen Vegetables 4 Frozen Entrees 5 Ground Meat...
R303T|R403T Operation Manual
Page 14
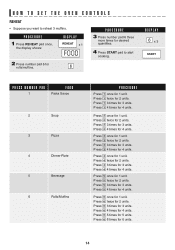
... 5 once for 1 unit. DISPLAY 6 x3 START PRESS NUMBER PAD FOOD 1 Pasta Sauce 2 Soup 3 Pizza 4 Dinner Plate 5 Beverage 6 Rolls/Muffins P rocedure Press 1 once for 4 units. Press 1 4 times for 1 unit. Press 4 once for 3 units. HOW TO SET THE OVEN CONTROLS REHEAT • Suppose you want to start cooking. Press 4 3 times for 1 unit. PROCEDURE 1 Press REHEAT pad once, the display shows: DISPLAY REHEAT x 1 FOOD 2 Press number pad 6 for rolls...
... 5 once for 1 unit. DISPLAY 6 x3 START PRESS NUMBER PAD FOOD 1 Pasta Sauce 2 Soup 3 Pizza 4 Dinner Plate 5 Beverage 6 Rolls/Muffins P rocedure Press 1 once for 4 units. Press 1 4 times for 1 unit. Press 4 once for 3 units. HOW TO SET THE OVEN CONTROLS REHEAT • Suppose you want to start cooking. Press 4 3 times for 1 unit. PROCEDURE 1 Press REHEAT pad once, the display shows: DISPLAY REHEAT x 1 FOOD 2 Press number pad 6 for rolls...
R303T|R403T Operation Manual
Page 15
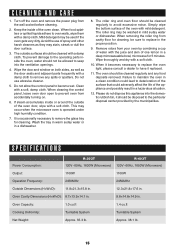
... the operating parts inside of the oven door, wipe with a soft, damp cloth. Wash the tray in warm sudsy water or in the proper position. 9. When cleaning the control panel, leave oven door open to have it replaced. 11. Wipe thoroughly and dry with a damp cloth. Oven Capacity: 1.0 cu.ft 1.4 cu.ft Cooking Uniformity: Turntable System Turntable System Net Weight: Approx. 35.3 lb. Turn off the oven and remove the power plug...
... the operating parts inside of the oven door, wipe with a soft, damp cloth. Wash the tray in warm sudsy water or in the proper position. 9. When cleaning the control panel, leave oven door open to have it replaced. 11. Wipe thoroughly and dry with a damp cloth. Oven Capacity: 1.0 cu.ft 1.4 cu.ft Cooking Uniformity: Turntable System Turntable System Net Weight: Approx. 35.3 lb. Turn off the oven and remove the power plug...

R303T|R403T Operation Manual
Page 16
SHARP ELECTRONICS CORPORATION Sharp Plaza, Mahwah, New Jersey 07495-1163 Feb 22, 2011
SHARP ELECTRONICS CORPORATION Sharp Plaza, Mahwah, New Jersey 07495-1163 Feb 22, 2011


