PN-655RU Operation Manual
Page 3
... presence of important operating and maintenance (servicing) instructions in the literature accompanying the product. NO USER-SERVICEABLE PARTS INSIDE. The lightning flash with arrowhead symbol, within the product's enclosure that may be easily accessible. 1E ENGLISH PN-655RU LCD MONITOR ENGLISH IMPORTANT: To aid reporting in case of loss or theft, please record the product's model and serial numbers in the rear of the...
... presence of important operating and maintenance (servicing) instructions in the literature accompanying the product. NO USER-SERVICEABLE PARTS INSIDE. The lightning flash with arrowhead symbol, within the product's enclosure that may be easily accessible. 1E ENGLISH PN-655RU LCD MONITOR ENGLISH IMPORTANT: To aid reporting in case of loss or theft, please record the product's model and serial numbers in the rear of the...

PN-655RU Operation Manual
Page 5
.... 8. Repair - However, improper use attachments not recommended by broken glass pieces in case the LCD panel breaks. 11. Cleaning - The LCD panel used to rain or water. Therefore, it can result in electric shock and/or fire. Servicing - e. Read instructions - Follow instructions - a. All operating instructions must be routed properly to prevent potential danger, please observe the following conditions occurs, unplug the power cord...
.... 8. Repair - However, improper use attachments not recommended by broken glass pieces in case the LCD panel breaks. 11. Cleaning - The LCD panel used to rain or water. Therefore, it can result in electric shock and/or fire. Servicing - e. Read instructions - Follow instructions - a. All operating instructions must be routed properly to prevent potential danger, please observe the following conditions occurs, unplug the power cord...
PN-655RU Operation Manual
Page 6
... mounted. In a domestic environment this product to ensure that the product is for temporary use the factory-installed temporary stand when installing the LCD monitor. This stand is in a weapon system. In case the product needs replacement parts, make sure that , could lead directly to death, personal injury, severe physical damage or other loss, including nuclear reaction control in nuclear facility, medical life support...
... mounted. In a domestic environment this product to ensure that the product is for temporary use the factory-installed temporary stand when installing the LCD monitor. This stand is in a weapon system. In case the product needs replacement parts, make sure that , could lead directly to death, personal injury, severe physical damage or other loss, including nuclear reaction control in nuclear facility, medical life support...
PN-655RU Operation Manual
Page 7
... the performance of use by way of the monitor and turn on top of the display. Also, do not add extension cords. Use only the power cord supplied with hard objects. - Do not remove or insert the power plug with the application of overheating. - Unplug the power cord if it . - In this may flash during use . Illustrations in electric shock. - The TFT color LCD panel used for any other...
... the performance of use by way of the monitor and turn on top of the display. Also, do not add extension cords. Use only the power cord supplied with hard objects. - Do not remove or insert the power plug with the application of overheating. - Unplug the power cord if it . - In this may flash during use . Illustrations in electric shock. - The TFT color LCD panel used for any other...
PN-655RU Operation Manual
Page 8
... 3 TIPS AND SAFETY INSTRUCTIONS 5 Supplied Accessories 7 Part Names ...8 Front view...8 Rear view ...8 Connection and Installation How to install the monitor 10 Mounting precautions 10 Connecting Peripheral Equipment 11 Connection with a PC 11 Connection with AV equipment 12 Other terminals...13 Connecting External Speakers 13 Connecting the Power Cord 14 Connecting Multiple Monitors 15 Removing the Temporary Stand 16 Removing the Handles 17 Preparing the Remote Control Unit 18 Setting the batteries 18 Remote control operation range 18 Basic Operation Turning Power On/Off 19...
... 3 TIPS AND SAFETY INSTRUCTIONS 5 Supplied Accessories 7 Part Names ...8 Front view...8 Rear view ...8 Connection and Installation How to install the monitor 10 Mounting precautions 10 Connecting Peripheral Equipment 11 Connection with a PC 11 Connection with AV equipment 12 Other terminals...13 Connecting External Speakers 13 Connecting the Power Cord 14 Connecting Multiple Monitors 15 Removing the Temporary Stand 16 Removing the Handles 17 Preparing the Remote Control Unit 18 Setting the batteries 18 Remote control operation range 18 Basic Operation Turning Power On/Off 19...
PN-655RU Operation Manual
Page 10
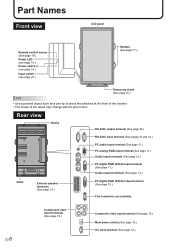
... 11.) Audio output terminals (See page 13.) Vents External speaker terminals (See page 13.) PC digital RGB (DVI-D) output terminal (See page 15.) This terminal is not available. E8 Component video input terminals (See page 12.) Composite video input terminal (See page 12.) Main power switch (See page 19.) AC input terminal (See page 14.) Part Names Front view LCD panel Remote control sensor (See page 18.) Power LED (see page 19.) Power switch INPUT (see...
... 11.) Audio output terminals (See page 13.) Vents External speaker terminals (See page 13.) PC digital RGB (DVI-D) output terminal (See page 15.) This terminal is not available. E8 Component video input terminals (See page 12.) Composite video input terminal (See page 12.) Main power switch (See page 19.) AC input terminal (See page 14.) Part Names Front view LCD panel Remote control sensor (See page 18.) Power LED (see page 19.) Power switch INPUT (see...

PN-655RU Operation Manual
Page 12
... to provide such space because the monitor is installed inside the monitor rises, this work must be performed by fastening the hooks at the top of the monitor to a wall or a pillar with the surface perpendicular to prevent the monitor from falling down. Our company will bear no responsibility for temporary use a stand or a wall-mount bracket designed or designated for other reasons...
... to provide such space because the monitor is installed inside the monitor rises, this work must be performed by fastening the hooks at the top of the monitor to a wall or a pillar with the surface perpendicular to prevent the monitor from falling down. Our company will bear no responsibility for temporary use a stand or a wall-mount bracket designed or designated for other reasons...

PN-655RU Operation Manual
Page 13
...; For compatible signal timing (see page 31). • When the analog RGB connection is used, the type of the equipment to turn off the main power switch and disconnect the plug from the power outlet before connecting/ disconnecting cables. PC audio input terminal Connect using a PC analog signal cable (commercially available). ENGLISH Connecting Peripheral Equipment Caution Be sure to be displayed properly. 11 E Connection with the analog RGB connection, or when the setting of the PC is changed...
...; For compatible signal timing (see page 31). • When the analog RGB connection is used, the type of the equipment to turn off the main power switch and disconnect the plug from the power outlet before connecting/ disconnecting cables. PC audio input terminal Connect using a PC analog signal cable (commercially available). ENGLISH Connecting Peripheral Equipment Caution Be sure to be displayed properly. 11 E Connection with the analog RGB connection, or when the setting of the PC is changed...
PN-655RU Operation Manual
Page 15
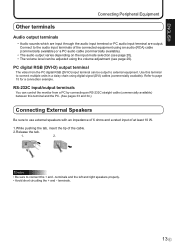
... using the volume adjustment (see page 20). Connect to use external speakers with an impedance of 6 ohms and a rated input of at least 10 W. 1.While pushing the tab, insert the tip of the connected equipment using an audio (RCA) cable (commercially available) or a PC audio cable (commercially available). • The audio output varies depending on the input mode selection (see page 20). • The volume level can be adjusted using digital signal (DVI) cables...
... using the volume adjustment (see page 20). Connect to use external speakers with an impedance of 6 ohms and a rated input of at least 10 W. 1.While pushing the tab, insert the tip of the connected equipment using an audio (RCA) cable (commercially available) or a PC audio cable (commercially available). • The audio output varies depending on the input mode selection (see page 20). • The volume level can be adjusted using digital signal (DVI) cables...
PN-655RU Operation Manual
Page 18
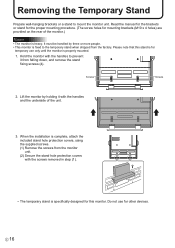
... covers, using the supplied screws. (1) Remove the screws from the monitor unit. (2) Secure the stand hole protection covers with the handles and the underside of the monitor.) Caution • The monitor is properly mounted. 1. Removing the Temporary Stand Prepare wall-hanging brackets or a stand to the temporary stand when shipped from falling down, and remove the stand fixing screws (4). It must be handled by holding it from the factory.
... covers, using the supplied screws. (1) Remove the screws from the monitor unit. (2) Secure the stand hole protection covers with the handles and the underside of the monitor.) Caution • The monitor is properly mounted. 1. Removing the Temporary Stand Prepare wall-hanging brackets or a stand to the temporary stand when shipped from falling down, and remove the stand fixing screws (4). It must be handled by holding it from the factory.
PN-655RU Operation Manual
Page 21
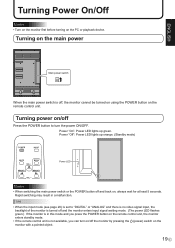
... input signal waiting mode. (The power LED flashes green.) If the monitor is not available, you press the POWER button on , always wait for at least 5 seconds. Power "Off": Power LED lights up green. ENGLISH Turning Power On/Off Caution • Turn on the monitor first before turning on the remote control unit. Power "On": Power LED lights up orange. (Standby mode) Power LED INPUT Caution • When switching the main power switch or the POWER button off , the monitor cannot be turned on using the POWER button...
... input signal waiting mode. (The power LED flashes green.) If the monitor is not available, you press the POWER button on , always wait for at least 5 seconds. Power "Off": Power LED lights up green. ENGLISH Turning Power On/Off Caution • Turn on the monitor first before turning on the remote control unit. Power "On": Power LED lights up orange. (Standby mode) Power LED INPUT Caution • When switching the main power switch or the POWER button off , the monitor cannot be turned on using the POWER button...
PN-655RU Operation Manual
Page 22
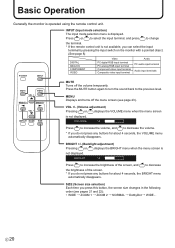
... 8) DIGITAL ANALOG COMPONENT VIDEO Video PC digital RGB input terminal PC analog RGB input terminal Component video input terminal Composite video input terminal Audio PC audio input terminal Audio input terminals MUTE Turns off the menu screen (see pages 21 and 22): • WIDE → ZOOM 1 → ZOOM 2 → NORMAL → DotbyDot → WIDE... INPUT (Input mode selection) The input mode selection menu is operated using the remote control unit. Press the MUTE button again to turn the sound back to change the terminal. * If the remote control...
... 8) DIGITAL ANALOG COMPONENT VIDEO Video PC digital RGB input terminal PC analog RGB input terminal Component video input terminal Composite video input terminal Audio PC audio input terminal Audio input terminals MUTE Turns off the menu screen (see pages 21 and 22): • WIDE → ZOOM 1 → ZOOM 2 → NORMAL → DotbyDot → WIDE... INPUT (Input mode selection) The input mode selection menu is operated using the remote control unit. Press the MUTE button again to turn the sound back to change the terminal. * If the remote control...
PN-655RU Operation Manual
Page 23
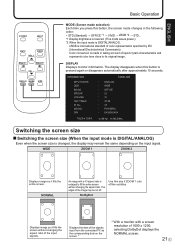
... : 18 : PN-655RU : XXXXXXXXX V: 60 Hz H: 66.3 kHz Switching the screen size Switching the screen size (When the input mode is DIGITAL/ANALOG) Even when the screen size is enlarged to its original image. WIDE ZOOM 1 ZOOM 2 Displays image so it fills the screen without changing the aspect ratio. Displays the dots of the signals input from the connected PC as the corresponding dots on the input signal. DotbyDot Use this button, the screen mode changes in taking...
... : 18 : PN-655RU : XXXXXXXXX V: 60 Hz H: 66.3 kHz Switching the screen size Switching the screen size (When the input mode is DIGITAL/ANALOG) Even when the screen size is enlarged to its original image. WIDE ZOOM 1 ZOOM 2 Displays image so it fills the screen without changing the aspect ratio. Displays the dots of the signals input from the connected PC as the corresponding dots on the input signal. DotbyDot Use this button, the screen mode changes in taking...

PN-655RU Operation Manual
Page 27
... BLACK LEVEL TINT COLORS SHARPNESS WHITE BALANCE GAMMA 480 LINES 768 LINES BEZEL ENLARGE ENLARGE-POS MULTI ZOOM AUDIO OFF TIMER OSD H-POSITION OSD V-POSITION LANGUAGE SCREEN MOTION MOTION TIME1 MOTION TIME2 POWER ON DELAY ID No. SET COLOR SYSTEM PIP MODES PIP SIZE PIP H-POS PIP V-POS PIP BLEND PIP SOURCE SOUND CHANGE MAIN POS PbyP2 POS AUTO OFF R-CONTRAST G-CONTRAST B-CONTRAST IMAGE ZOOM H-POS V-POS TREBLE BASS BALANCE Menu Items ENGLISH DIGITAL...
... BLACK LEVEL TINT COLORS SHARPNESS WHITE BALANCE GAMMA 480 LINES 768 LINES BEZEL ENLARGE ENLARGE-POS MULTI ZOOM AUDIO OFF TIMER OSD H-POSITION OSD V-POSITION LANGUAGE SCREEN MOTION MOTION TIME1 MOTION TIME2 POWER ON DELAY ID No. SET COLOR SYSTEM PIP MODES PIP SIZE PIP H-POS PIP V-POS PIP BLEND PIP SOURCE SOUND CHANGE MAIN POS PbyP2 POS AUTO OFF R-CONTRAST G-CONTRAST B-CONTRAST IMAGE ZOOM H-POS V-POS TREBLE BASS BALANCE Menu Items ENGLISH DIGITAL...
PN-655RU Operation Manual
Page 29
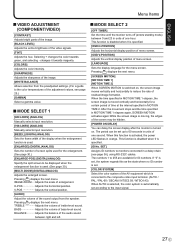
... video input terminal. (AUTO / PAL / PAL-60 / SECAM / NTSC3.58 / NTSC4.43) When AUTO is selected, the color system is automatically set , the system regards this function is set according to the input signal. 27 E This function is disabled when 0 is used. [ENLARGE] (DIGITAL/ANALOG) Sets the number of the image. [WHITE BALANCE] Allows selection from the speaker. Selecting + changes the color towards magenta. [COLORS] Adjusts the color intensity. [SHARPNESS] Adjusts the sharpness of screen splits used...
... video input terminal. (AUTO / PAL / PAL-60 / SECAM / NTSC3.58 / NTSC4.43) When AUTO is selected, the color system is automatically set , the system regards this function is set according to the input signal. 27 E This function is disabled when 0 is used. [ENLARGE] (DIGITAL/ANALOG) Sets the number of the image. [WHITE BALANCE] Allows selection from the speaker. Selecting + changes the color towards magenta. [COLORS] Adjusts the color intensity. [SHARPNESS] Adjusts the sharpness of screen splits used...

PN-655RU Operation Manual
Page 30
... PIP mode, use this menu item to sRGB or VIVID, COLOR CONTROL cannot be set. • When MODE is set to display the sub screen transparently. [PIP SOURCE] Selects the signal input of the sub screen in PbyP2 mode. [AUTO OFF] Sets the display method when no signals for the sub screen are input in PIP, PbyP, or PbyP2 mode. If the main screen is output in a line. OFF Displays one screen. TIPS • When WHITE BALANCE is set to THRU, BLACK...
... PIP mode, use this menu item to sRGB or VIVID, COLOR CONTROL cannot be set. • When MODE is set to display the sub screen transparently. [PIP SOURCE] Selects the signal input of the sub screen in PbyP2 mode. [AUTO OFF] Sets the display method when no signals for the sub screen are input in PIP, PbyP, or PbyP2 mode. If the main screen is output in a line. OFF Displays one screen. TIPS • When WHITE BALANCE is set to THRU, BLACK...

PN-655RU Operation Manual
Page 45
... Monitor with a PC Picture Adjustment (DIGITAL) Control item Command Direction Parameter Reply Control/Response contents * WHITE BALANCE THRU CTMP WR 0 0 PRESET 1 - 15 1 - 15 USER 99 99 Yes R-CONTRAST CRTR WR 0 - 255 0 - 255 G-CONTRAST CRTG WR 0 - 255 0 - 255 B-CONTRAST CRTB WR 0 - 255 0 - 255 GAMMA GAMM WR 0 - 2 0 - 2 0:1.8, 1:2.2, 2:2.4 Yes GAIN CONTROL BLACK LEVEL BLVL WR 0 - 60 0 - 60 Yes CONTRAST CONT WR 0 - 60 0 - 60 INPUT RESOLUTION RESOLUTION...
... Monitor with a PC Picture Adjustment (DIGITAL) Control item Command Direction Parameter Reply Control/Response contents * WHITE BALANCE THRU CTMP WR 0 0 PRESET 1 - 15 1 - 15 USER 99 99 Yes R-CONTRAST CRTR WR 0 - 255 0 - 255 G-CONTRAST CRTG WR 0 - 255 0 - 255 B-CONTRAST CRTB WR 0 - 255 0 - 255 GAMMA GAMM WR 0 - 2 0 - 2 0:1.8, 1:2.2, 2:2.4 Yes GAIN CONTROL BLACK LEVEL BLVL WR 0 - 60 0 - 60 Yes CONTRAST CONT WR 0 - 60 0 - 60 INPUT RESOLUTION RESOLUTION...

PN-655RU Operation Manual
Page 48
... 5 5 DSTA R 0 Internal temperature normal 1 Internal temperature abnormal (Standby mode) Internal temperature abnormal (Temperature is set in units of Timing (Incl: VESA DPMS/DMPM) 6 Standby mode by abnormal temperature 7 Standby mode by OFF TIMER function E 46 Controlling the Monitor with a PC Control item ADJUSTMENT LOCK LED SCREEN MOTION MOTION TIME 1 MOTION TIME 2 Power On Delay LANGUAGE TEMPERATURE SENSOR CAUSE OF LAST STANDBY MODE Command Direction Parameter Reply Control/Response contents * ALCK WR 0 - 2 0 - 2 0: OFF Yes OFLD...
... 5 5 DSTA R 0 Internal temperature normal 1 Internal temperature abnormal (Standby mode) Internal temperature abnormal (Temperature is set in units of Timing (Incl: VESA DPMS/DMPM) 6 Standby mode by abnormal temperature 7 Standby mode by OFF TIMER function E 46 Controlling the Monitor with a PC Control item ADJUSTMENT LOCK LED SCREEN MOTION MOTION TIME 1 MOTION TIME 2 Power On Delay LANGUAGE TEMPERATURE SENSOR CAUSE OF LAST STANDBY MODE Command Direction Parameter Reply Control/Response contents * ALCK WR 0 - 2 0 - 2 0: OFF Yes OFLD...

PN-655RU Operation Manual
Page 49
... the remote control unit toward the monitor's 18 remote control sensor. • Is the menu display hidden or is operation 32 disabled? ENGLISH Troubleshooting Before calling for repair services, make sure following checks for AUDIO. 11 to 13 13 27 There is a picture but no sound. • Is the sound muted? • Make sure the volume is not set to "OFF (O)"? 19 • Is the monitor in standby mode (the power LED 19 illuminating...
... the remote control unit toward the monitor's 18 remote control sensor. • Is the menu display hidden or is operation 32 disabled? ENGLISH Troubleshooting Before calling for repair services, make sure following checks for AUDIO. 11 to 13 13 27 There is a picture but no sound. • Is the sound muted? • Make sure the volume is not set to "OFF (O)"? 19 • Is the monitor in standby mode (the power LED 19 illuminating...

PN-655RU Operation Manual
Page 51
...No No DMPM: Digital Monitor Power Management DMPM Monitor ON Active OFF Screen Power consumption Display 560 W No display 1.5 W 49 E colors Pixel pitch Viewing angle Screen active area inch (mm) Computer input signal Sync signal Video color system Plug and play Power management Input terminals Output terminals Power requirement Operating temperature Operating humidity Power consumption Dimensions inch (mm) Weight lbs. (kg) PN-655RU 65" wide (163.9 cm diagonal) ASV low-reflection black TFT LCD 1920 x 1080 16.77 M colors (8 bits/color) 0.744mm (H) x 0.744mm (V) 170...
...No No DMPM: Digital Monitor Power Management DMPM Monitor ON Active OFF Screen Power consumption Display 560 W No display 1.5 W 49 E colors Pixel pitch Viewing angle Screen active area inch (mm) Computer input signal Sync signal Video color system Plug and play Power management Input terminals Output terminals Power requirement Operating temperature Operating humidity Power consumption Dimensions inch (mm) Weight lbs. (kg) PN-655RU 65" wide (163.9 cm diagonal) ASV low-reflection black TFT LCD 1920 x 1080 16.77 M colors (8 bits/color) 0.744mm (H) x 0.744mm (V) 170...


