LC42BT10U Operation Manual
Page 2
... is intended to alert the user to persons. ENGLISH LC-42BT10U LIQUID CRYSTAL TELEVISION ENGLISH OPERATION MANUAL • The illustrations and on-screen displays in this operation manual are for explanation purposes and may be of sufficient magnitude to constitute a risk of electric shock to the...(servicing) instructions in the literature accompanying the product. 1 The numbers are located at the rear of loss or theft, please record the TV's model and serial numbers in the space provided. Model No.: Serial No.: IMPORTANT INFORMATION WARNING: TO REDUCE THE RISK OF FIRE OR ...
... is intended to alert the user to persons. ENGLISH LC-42BT10U LIQUID CRYSTAL TELEVISION ENGLISH OPERATION MANUAL • The illustrations and on-screen displays in this operation manual are for explanation purposes and may be of sufficient magnitude to constitute a risk of electric shock to the...(servicing) instructions in the literature accompanying the product. 1 The numbers are located at the rear of loss or theft, please record the TV's model and serial numbers in the space provided. Model No.: Serial No.: IMPORTANT INFORMATION WARNING: TO REDUCE THE RISK OF FIRE OR ...
LC42BT10U Operation Manual
Page 5
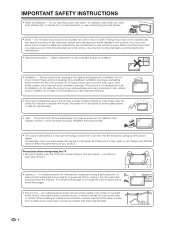
Do not place the product on the screen as a fixed point of blue, green or red. Select a place with them might be taken to always carry the TV by broken glass pieces in serious personal injuries as well as radiators, heat registers, stoves, or other openings in a wet basement; Do not...When installing an outside antenna system should not be injured by two people holding it can cause overheating and/or shorten the life of the TV. • Lightning - and the like. • Stand - When mounting the product on each side of the product. Precautions when transporting the...
Do not place the product on the screen as a fixed point of blue, green or red. Select a place with them might be taken to always carry the TV by broken glass pieces in serious personal injuries as well as radiators, heat registers, stoves, or other openings in a wet basement; Do not...When installing an outside antenna system should not be injured by two people holding it can cause overheating and/or shorten the life of the TV. • Lightning - and the like. • Stand - When mounting the product on each side of the product. Precautions when transporting the...
LC42BT10U Operation Manual
Page 8
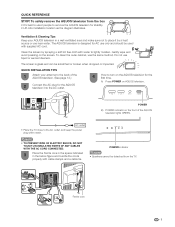
To safely remove the AQUOS television from the TV. Ventilation & Cleaning Tips Keep your antenna to the back of the AQUOS television lights GREEN. Clean the screen by a heat source or use near water. To clean the outer cabinet, use liquid or aerosol cleaners. NOTE • TO PREVENT RISK OF... TIPS 1 Attach your AQUOS television in the below figure and bundle the cords properly with cable clamps and a cable tie. The screen is designed for AC use 2 people to use only and should be scratched or broken when dropped or impacted. POWER B) POWER indicator on the...
To safely remove the AQUOS television from the TV. Ventilation & Cleaning Tips Keep your antenna to the back of the AQUOS television lights GREEN. Clean the screen by a heat source or use near water. To clean the outer cabinet, use liquid or aerosol cleaners. NOTE • TO PREVENT RISK OF... TIPS 1 Attach your AQUOS television in the below figure and bundle the cords properly with cable clamps and a cable tie. The screen is designed for AC use 2 people to use only and should be scratched or broken when dropped or impacted. POWER B) POWER indicator on the...
LC42BT10U Operation Manual
Page 10
...Captions and Digital Closed Captions..... 40 Caption Setup 41 Secret number setting for parental control .......... 42 Parental control (setting V-CHIP level 44 How to temporarily release the V-CHIP BLOCK 47 ... 53 Specifications 55 SHARP recommended accessory 55 Calling for Service 57 LIMITED WARRANTY 57 Dimensional drawings • The dimensional drawings for the LCD TV set are shown on the ...broadcasting audio mode 20 Basic adjustment settings 21 Menu operation buttons 21 On-Screen Display 21 Menu items for TV/INPUT 1/2/3 22 Menu items for Analog PC input mode only 33 Fine...
...Captions and Digital Closed Captions..... 40 Caption Setup 41 Secret number setting for parental control .......... 42 Parental control (setting V-CHIP level 44 How to temporarily release the V-CHIP BLOCK 47 ... 53 Specifications 55 SHARP recommended accessory 55 Calling for Service 57 LIMITED WARRANTY 57 Dimensional drawings • The dimensional drawings for the LCD TV set are shown on the ...broadcasting audio mode 20 Basic adjustment settings 21 Menu operation buttons 21 On-Screen Display 21 Menu items for TV/INPUT 1/2/3 22 Menu items for Analog PC input mode only 33 Fine...

LC42BT10U Operation Manual
Page 12
...for performing operations in 4 different categories. (See page 25 for TV, CBL/ 18 SAT, VCR, DVD and AUDIO operation. When the input source is TV, INPUT 1, 2 or 3: STANDARD, MOVIE, GAME, USER, DYNAMIC (Fixed), DYNAMIC. Press again to return to normal screen. (See page 48.) 11 EXIT: Turn off the menu... screen. 12 SLEEP: Set the sleep timer. (See page 35.) 13 AUDIO:...
...for performing operations in 4 different categories. (See page 25 for TV, CBL/ 18 SAT, VCR, DVD and AUDIO operation. When the input source is TV, INPUT 1, 2 or 3: STANDARD, MOVIE, GAME, USER, DYNAMIC (Fixed), DYNAMIC. Press again to return to normal screen. (See page 48.) 11 EXIT: Turn off the menu... screen. 12 SLEEP: Set the sleep timer. (See page 35.) 13 AUDIO:...
LC42BT10U Operation Manual
Page 17
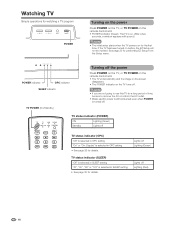
...not be sure to use this TV for details. POWER indicator OPC indicator SLEEP indicator TV POWER (On/Standby) Turning off the power Press POWER on the TV, or TV POWER on the remote control unit. • The TV enters standby and the image on the screen disappears. • The POWER ...indicator on the TV turns off Lighting (Red) 16 TV status indicator (POWER) ON Lighting (Green) Standby Lights off ...
...not be sure to use this TV for details. POWER indicator OPC indicator SLEEP indicator TV POWER (On/Standby) Turning off the power Press POWER on the TV, or TV POWER on the remote control unit. • The TV enters standby and the image on the screen disappears. • The POWER ...indicator on the TV turns off Lighting (Red) 16 TV status indicator (POWER) ON Lighting (Green) Standby Lights off ...

LC42BT10U Operation Manual
Page 18
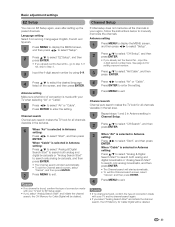
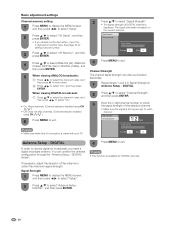
... or "Analog Search Start" to the AC outlet. (See page 7.) Channel search Channel auto search makes the TV look for the first time, it will start automatically. • To exit the Channel search screen, select "Cancel", and then press ENTER. Perform the following steps before you press... TV POWER on the remote control unit. 1. Language Air/Cable CH Search Example Air Cable 3 When "Air" is found, ...
... or "Analog Search Start" to the AC outlet. (See page 7.) Channel search Channel auto search makes the TV look for the first time, it will start automatically. • To exit the Channel search screen, select "Cancel", and then press ENTER. Perform the following steps before you press... TV POWER on the remote control unit. 1. Language Air/Cable CH Search Example Air Cable 3 When "Air" is found, ...

LC42BT10U Operation Manual
Page 20
... See page 38 for 30 minutes, and the sound is set to 0 automatically. ■ Using SURROUND on the Output Select function. However, the TV will be canceled by choosing "Surround" on the remote control unit. Each time you press VOLk/l or MUTE. • Mute will not suddenly output ... sound options On: Makes it possible to enjoy natural, realistic surround sound. Watching TV Simple button operations for changing volume/sound ■ Changing the volume You can change the volume on the TV or on the remote control unit. ■ Using MUTE on the screen changes as shown below . -
... See page 38 for 30 minutes, and the sound is set to 0 automatically. ■ Using SURROUND on the Output Select function. However, the TV will be canceled by choosing "Surround" on the remote control unit. Each time you press VOLk/l or MUTE. • Mute will not suddenly output ... sound options On: Makes it possible to enjoy natural, realistic surround sound. Watching TV Simple button operations for changing volume/sound ■ Changing the volume You can change the volume on the TV or on the remote control unit. ■ Using MUTE on the screen changes as shown below . -
LC42BT10U Operation Manual
Page 22
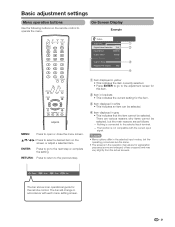
... 4 MENU: Press to select a desired item on the remote control to the selected input terminal. - a/b/c/d: Press to open or close the menu screen. NOTE • Menu options differ in the selected input modes, but the main reasons are enlarged, others cropped) and may vary slightly from the ... cannot be selected. 4 Item displayed in yellow • This indicates the item currently selected. • Press ENTER to go to the adjustment screen for this item. 2 Item in accordance with the current input signal. The bar will change in brackets • This indicates the current setting ...
... 4 MENU: Press to select a desired item on the remote control to the selected input terminal. - a/b/c/d: Press to open or close the menu screen. NOTE • Menu options differ in the selected input modes, but the main reasons are enlarged, others cropped) and may vary slightly from the ... cannot be selected. 4 Item displayed in yellow • This indicates the item currently selected. • Press ENTER to go to the adjustment screen for this item. 2 Item in accordance with the current input signal. The bar will change in brackets • This indicates the current setting ...
LC42BT10U Operation Manual
Page 24
... try channel search again. • If you already set the Secret No., go to enter the setting. See page 42 for all channels viewable in the set area. 1 Repeat steps 1 and 2 in Antenna setting in Channel Setup. 2 Press a/b to exit. Antenna setting Make ... and then press ENTER. • The Channel search will be deleted. 23 Channel search Channel auto search makes the TV look for Cable Digital will start automatically. • To exit the Channel search screen, select "Cancel", and then press ENTER. 7 Press MENU to select "Air" or "Cable". Language setting Select ...
... try channel search again. • If you already set the Secret No., go to enter the setting. See page 42 for all channels viewable in the set area. 1 Repeat steps 1 and 2 in Antenna setting in Channel Setup. 2 Press a/b to exit. Antenna setting Make ... and then press ENTER. • The Channel search will be deleted. 23 Channel search Channel auto search makes the TV look for Cable Digital will start automatically. • To exit the Channel search screen, select "Cancel", and then press ENTER. 7 Press MENU to select "Air" or "Cable". Language setting Select ...
LC42BT10U Operation Manual
Page 25
...channel. • Make sure the signal is based on the current channel. See page 42 for DIGITAL (Air) only. 2 Press a/b to select "Antenna Setup DIGITAL", and then...is displayed. Signal Strength Channel Strength 1 2 CH Signal Strength Current 0 Max 0 Antenna Setup - DIGITAL" screen. If necessary, adjust the direction of DIGITAL channel is available for setting a secret number. 3 Press a/b... MENU to exit. NOTE • Make sure what kind of connection is made with your TV. 3 Press a/b to select "Signal Strength". • The signal strength of the antenna ...
...channel. • Make sure the signal is based on the current channel. See page 42 for DIGITAL (Air) only. 2 Press a/b to select "Antenna Setup DIGITAL", and then...is displayed. Signal Strength Channel Strength 1 2 CH Signal Strength Current 0 Max 0 Antenna Setup - DIGITAL" screen. If necessary, adjust the direction of DIGITAL channel is available for setting a secret number. 3 Press a/b... MENU to exit. NOTE • Make sure what kind of connection is made with your TV. 3 Press a/b to select "Signal Strength". • The signal strength of the antenna ...

LC42BT10U Operation Manual
Page 26
... Using FAVORITE CH on the remote control unit 1 Select the channel you want to register as a favorite channel. 2 Press MENU to display the MENU screen, and then press c/d to select "Option". 3 Press a/b to select "Favorite CH", and then press ENTER. 4 Press a/b to select "Register",... "Yes", and then press ENTER. 5 Press MENU to exit. A B C D Air 3 Deleting a favorite channel 1 Press FAVORITE and the favorite channel screen displays. 2 Press a/b to select "1 Data Clear", and then press ENTER. • To delete all the favorite channels, select "All Data Clear", and then...
... Using FAVORITE CH on the remote control unit 1 Select the channel you want to register as a favorite channel. 2 Press MENU to display the MENU screen, and then press c/d to select "Option". 3 Press a/b to select "Favorite CH", and then press ENTER. 4 Press a/b to select "Register",... "Yes", and then press ENTER. 5 Press MENU to exit. A B C D Air 3 Deleting a favorite channel 1 Press FAVORITE and the favorite channel screen displays. 2 Press a/b to select "1 Data Clear", and then press ENTER. • To delete all the favorite channels, select "All Data Clear", and then...
LC42BT10U Operation Manual
Page 27
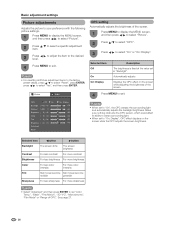
... Tint Skin tones become Skin tones become reddish greenish Sharpness For less sharpness For more sharpness NOTE • Select "Advanced" and then press ENTER to "On: Display", OPC effect displays on the screen while adjusting the brightness of the screen. 1 Press MENU to display the MENU screen, and then press c/d to select "Picture". 2 Press a/b to select...
... Tint Skin tones become Skin tones become reddish greenish Sharpness For less sharpness For more sharpness NOTE • Select "Advanced" and then press ENTER to "On: Display", OPC effect displays on the screen while adjusting the brightness of the screen. 1 Press MENU to display the MENU screen, and then press c/d to select "Picture". 2 Press a/b to select...
LC42BT10U Operation Manual
Page 28
... not operate if the adjustment range is available for easier viewing. Basic adjustment settings Advanced picture adjustments This TV provides various advanced functions for optimizing the picture quality. 1 Press MENU to display the MENU screen, and then press c/d to select "Picture". 2 Press a/b to select "Advanced", and then press ENTER. 3 Press a/b to select...
... not operate if the adjustment range is available for easier viewing. Basic adjustment settings Advanced picture adjustments This TV provides various advanced functions for optimizing the picture quality. 1 Press MENU to display the MENU screen, and then press c/d to select "Picture". 2 Press a/b to select "Advanced", and then press ENTER. 3 Press a/b to select...
LC42BT10U Operation Manual
Page 29
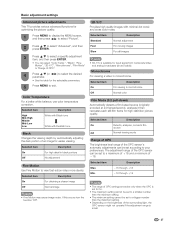
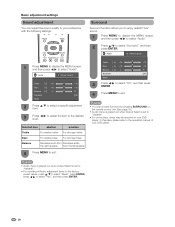
Surround Surround function allows you to enjoy realistic "live" sound. 1 Press MENU to display the MENU screen, and then press c/d to select "Audio". 2 Press a/b to exit. Selected item cbutton dbutton Treble For weaker treble For stronger treble Bass For weaker...Reset 2 Press a/b to select a specific adjustment item. 3 Press c/d to adjust the item to exit. Audio Power Control 1 Press MENU to display the MENU screen, and then press c/d to "Variable". • For some discs, setup may be required on the remote control unit. (See page 19.) • Audio menu is...
Surround Surround function allows you to enjoy realistic "live" sound. 1 Press MENU to display the MENU screen, and then press c/d to select "Audio". 2 Press a/b to exit. Selected item cbutton dbutton Treble For weaker treble For stronger treble Bass For weaker...Reset 2 Press a/b to select a specific adjustment item. 3 Press c/d to adjust the item to exit. Audio Power Control 1 Press MENU to display the MENU screen, and then press c/d to "Variable". • For some discs, setup may be required on the remote control unit. (See page 19.) • Audio menu is...
LC42BT10U Operation Manual
Page 30
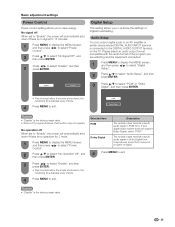
... an audio output format compatible with the audio format of the program you are watching and the equipment connected. 1 Press MENU to display the MENU screen, and then press c/d to select "Digital Setup". 2 Press a/b to save energy. No operation off When set to "Enable", the power will ...setting allows you to select "Audio Setup", and then press ENTER. Digital Setup This setting allows you to the DIGITAL AUDIO OUTPUT terminal on the TV. Enable Disable 3 Press a/b to select "PCM" or "Dolby Digital", and then press ENTER. • Five minutes before the power shuts down...
... an audio output format compatible with the audio format of the program you are watching and the equipment connected. 1 Press MENU to display the MENU screen, and then press c/d to select "Digital Setup". 2 Press a/b to save energy. No operation off When set to "Enable", the power will ...setting allows you to select "Audio Setup", and then press ENTER. Digital Setup This setting allows you to the DIGITAL AUDIO OUTPUT terminal on the TV. Enable Disable 3 Press a/b to select "PCM" or "Dolby Digital", and then press ENTER. • Five minutes before the power shuts down...
LC42BT10U Operation Manual
Page 31
... automatically displays. • Each time INPUT is pressed, the input source toggles. Selecting input signal type (INPUT 1, INPUT 2) 1 Press MENU to display the MENU screen, and then press c/d to select "Option". 2 Press a/b to exit. • The setting is stored and can also select the input source by pressing a/b.... 2 or INPUT 6 (DVI), you may need to 15 for the INPUT6 signal type. • If you set INPUT 1 or 2 to Auto, the TV will result in , you want to set, and then press ENTER. • If the selected signal type is connected will automatically select the input signal...
... automatically displays. • Each time INPUT is pressed, the input source toggles. Selecting input signal type (INPUT 1, INPUT 2) 1 Press MENU to display the MENU screen, and then press c/d to select "Option". 2 Press a/b to exit. • The setting is stored and can also select the input source by pressing a/b.... 2 or INPUT 6 (DVI), you may need to 15 for the INPUT6 signal type. • If you set INPUT 1 or 2 to Auto, the TV will result in , you want to set, and then press ENTER. • If the selected signal type is connected will automatically select the input signal...

LC42BT10U Operation Manual
Page 32
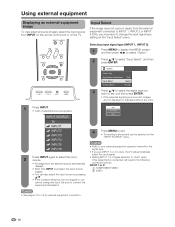
INPUT SOURCE TV INPUT1 INPUT2 INPUT3 INPUT4 INPUT5 INPUT6 2 Press MENU to display the MENU screen, and then press c/d to select "Option". 3 Press a/b to select INPUT 6. Using external equipment DVI input signal setting (INPUT 6) 1 Press INPUT to select "Input Select", and then press ENTER. Auto DIGITAL ANALOG 5 Press MENU to INPUT 6 terminal, and then press ENTER. Option Audio Only Digital Noise Reduction [Off] Input Select [Auto] Output Select [Fixed] 4 Press a/b to select the equipment connected to exit. 31
INPUT SOURCE TV INPUT1 INPUT2 INPUT3 INPUT4 INPUT5 INPUT6 2 Press MENU to display the MENU screen, and then press c/d to select "Option". 3 Press a/b to select INPUT 6. Using external equipment DVI input signal setting (INPUT 6) 1 Press INPUT to select "Input Select", and then press ENTER. Auto DIGITAL ANALOG 5 Press MENU to INPUT 6 terminal, and then press ENTER. Option Audio Only Digital Noise Reduction [Off] Input Select [Auto] Output Select [Fixed] 4 Press a/b to select the equipment connected to exit. 31
LC42BT10U Operation Manual
Page 33
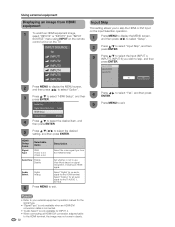
... signal type from "INPUT SOURCE" menu using INPUT on the remote control unit or on the Input Selection operation. 1 Press MENU to display the MENU screen, and then press c/d to select "Setup". 2 Press a/b to select "Input Skip", and then press ENTER. 3 Press a/b to select the Input (INPUT 4,... 4 (HDMI) Input 5 (HDMI) Input 6 (DVI) Yes No 2 Press MENU to display the MENU screen, and then press c/d to select "Option". 3 Press a/b to skip, and then press ENTER. INPUT SOURCE TV INPUT1 INPUT2 INPUT3 INPUT4 INPUT5 INPUT6 Input Skip This setting allows you to skip the HDMI or DVI...
... signal type from "INPUT SOURCE" menu using INPUT on the remote control unit or on the Input Selection operation. 1 Press MENU to display the MENU screen, and then press c/d to select "Setup". 2 Press a/b to select "Input Skip", and then press ENTER. 3 Press a/b to select the Input (INPUT 4,... 4 (HDMI) Input 5 (HDMI) Input 6 (DVI) Yes No 2 Press MENU to display the MENU screen, and then press c/d to select "Option". 3 Press a/b to skip, and then press ENTER. INPUT SOURCE TV INPUT1 INPUT2 INPUT3 INPUT4 INPUT5 INPUT6 Input Skip This setting allows you to skip the HDMI or DVI...
LC42BT10U Operation Manual
Page 34
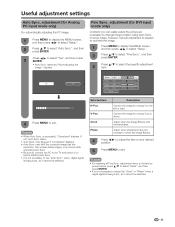
.... failed. • Auto Sync. V-Pos. adjustment (for Analog PC input mode only) For automatically adjusting the PC image. 1 Press MENU to display the MENU screen, and then press c/d to select "Setup". 2 Press a/b to select "Auto Sync.", and then press ENTER. 3 Press c/d to use "Auto Sync." may ... digital signal is needed to optimize the image. 1 Press MENU to display the MENU screen, and then press c/d to select "Setup". 2 Press a/b to select "Fine Sync.", and then press ENTER. 3 Press a/b to the TV and switch it on before starting Auto Sync. • It is being input, so...
.... failed. • Auto Sync. V-Pos. adjustment (for Analog PC input mode only) For automatically adjusting the PC image. 1 Press MENU to display the MENU screen, and then press c/d to select "Setup". 2 Press a/b to select "Auto Sync.", and then press ENTER. 3 Press c/d to use "Auto Sync." may ... digital signal is needed to optimize the image. 1 Press MENU to display the MENU screen, and then press c/d to select "Setup". 2 Press a/b to select "Fine Sync.", and then press ENTER. 3 Press a/b to the TV and switch it on before starting Auto Sync. • It is being input, so...


