LC-32D43U | LC-37D43U Operation Manual
Page 11
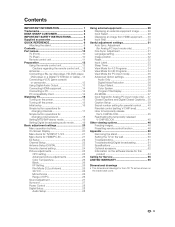
... INFORMATION 1 Trademarks 2 DEAR SHARP CUSTOMER 3 IMPORTANT SAFETY INSTRUCTIONS 3 Supplied accessories 6 QUICK REFERENCE 6 Attaching the stand 6 Contents 9 Part names 10 TV (Front 10 TV (Rear 10 Remote control unit... Input Skip 30 Useful adjustment settings 31 Auto Sync. Adjustment 31 Language setting 32 Image position 32 Reset 32 Input Label 33 Sleep Timer 33 View Mode for 4:3 Programs 34 View Mode... Service 55 LIMITED WARRANTY 55 Dimensional drawings • The dimensional drawings for the LCD TV set are shown on the power 15 Turning off the power 15 Initial setup...
... INFORMATION 1 Trademarks 2 DEAR SHARP CUSTOMER 3 IMPORTANT SAFETY INSTRUCTIONS 3 Supplied accessories 6 QUICK REFERENCE 6 Attaching the stand 6 Contents 9 Part names 10 TV (Front 10 TV (Rear 10 Remote control unit... Input Skip 30 Useful adjustment settings 31 Auto Sync. Adjustment 31 Language setting 32 Image position 32 Reset 32 Input Label 33 Sleep Timer 33 View Mode for 4:3 Programs 34 View Mode... Service 55 LIMITED WARRANTY 55 Dimensional drawings • The dimensional drawings for the LCD TV set are shown on the power 15 Turning off the power 15 Initial setup...
LC-32D43U | LC-37D43U Operation Manual
Page 23
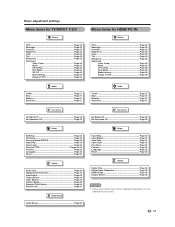
Basic adjustment settings Menu items for TV/INPUT 1/2/3 Picture OPC Page 25 Backlight Page 25 Contrast Page 25 Brightness Page 25 Color Page 25 Tint Page 25 Sharpness Page 25 Advanced Color Temp Page 26 Black Page 26 I/P Setting Page 26 Film Mode Page 26 3D-Y/C Page 26 Monochrome Page 26...Setup Page 22 Antenna Setup-DIGITAL Page 23 Input Skip Page 30 Input Label Page 33 Parental CTRL Pages 40-45 Position Page 32 Language Page 32 Reset Page 32 Option Audio Only Page 36 Digital Noise Reduction Page 36 Input Select Page 29 Output Select Page 36 Color System Page 36 Caption...
Basic adjustment settings Menu items for TV/INPUT 1/2/3 Picture OPC Page 25 Backlight Page 25 Contrast Page 25 Brightness Page 25 Color Page 25 Tint Page 25 Sharpness Page 25 Advanced Color Temp Page 26 Black Page 26 I/P Setting Page 26 Film Mode Page 26 3D-Y/C Page 26 Monochrome Page 26...Setup Page 22 Antenna Setup-DIGITAL Page 23 Input Skip Page 30 Input Label Page 33 Parental CTRL Pages 40-45 Position Page 32 Language Page 32 Reset Page 32 Option Audio Only Page 36 Digital Noise Reduction Page 36 Input Select Page 29 Output Select Page 36 Color System Page 36 Caption...

LC-32D43U | LC-37D43U Operation Manual
Page 27
...Picture Audio OPC Off On Backlight [b12] a16 Contrast [b30] 0 Brightness [ 0] a30 Color [ 0] a30 Tint [ 0] a30 Sharpness [ b2] a10 Advanced Reset On : Display b16 b40 b30 b30 b30 b10 OPC setting Automatically adjusts the brightness of the screen. 4 Press MENU to set in...brightness Color For less color intensity For more color intensity Tint Skin tones become Skin tones become purplish greenish Sharpness For less sharpness For more sharpness NOTE • Select "Advanced" and then press ENTER to exit. Basic adjustment settings Picture adjustments Adjusts ...
...Picture Audio OPC Off On Backlight [b12] a16 Contrast [b30] 0 Brightness [ 0] a30 Color [ 0] a30 Tint [ 0] a30 Sharpness [ b2] a10 Advanced Reset On : Display b16 b40 b30 b30 b30 b10 OPC setting Automatically adjusts the brightness of the screen. 4 Press MENU to set in...brightness Color For less color intensity For more color intensity Tint Skin tones become Skin tones become purplish greenish Sharpness For less sharpness For more sharpness NOTE • Select "Advanced" and then press ENTER to exit. Basic adjustment settings Picture adjustments Adjusts ...

LC-32D43U | LC-37D43U Operation Manual
Page 29
...; Audio menu is grayed out when Output Select is set to "Variable". • For resetting all Audio adjustment items to the factory preset values, press a/b to select "Reset", press ENTER, press c/d to your preference with the following settings. Surround Surround function allows you...and then press c/d to select "Audio". 2 Press a/b to exit. Treble [ 0] a15 b15 Bass [ 0] a15 b15 Balance [ 0] L R Surround [Off] Reset 3 Press c/d to select "On", and then press ENTER. 4 Press MENU to select "Audio". Audio Power Control 1 Press MENU to display the MENU screen, and ...
...; Audio menu is grayed out when Output Select is set to "Variable". • For resetting all Audio adjustment items to the factory preset values, press a/b to select "Reset", press ENTER, press c/d to your preference with the following settings. Surround Surround function allows you...and then press c/d to select "Audio". 2 Press a/b to exit. Treble [ 0] a15 b15 Bass [ 0] a15 b15 Balance [ 0] L R Surround [Off] Reset 3 Press c/d to select "On", and then press ENTER. 4 Press MENU to select "Audio". Audio Power Control 1 Press MENU to display the MENU screen, and ...

LC-32D43U | LC-37D43U Operation Manual
Page 33
... input, so it to select "Yes", and then press ENTER. • Auto Sync. Yes No H-Pos. [ 90] a b V-Pos. [ 39] a b Clock [ 90] a b Phase [ 20] a b Reset 30% 4 Press MENU to select the specific adjustment item. when a digital signal is successful, "Completed" displays. Centers the image by moving it cannot be... has low resolution, has unclear (black) edges, or is moved while executing Auto Sync. • Be sure to connect the PC to the TV and switch it up or down. Centers the image by moving it on before starting Auto Sync. • It is not necessary to exit. ...
... input, so it to select "Yes", and then press ENTER. • Auto Sync. Yes No H-Pos. [ 90] a b V-Pos. [ 39] a b Clock [ 90] a b Phase [ 20] a b Reset 30% 4 Press MENU to select the specific adjustment item. when a digital signal is successful, "Completed" displays. Centers the image by moving it cannot be... has low resolution, has unclear (black) edges, or is moved while executing Auto Sync. • Be sure to connect the PC to the TV and switch it up or down. Centers the image by moving it on before starting Auto Sync. • It is not necessary to exit. ...

LC-32D43U | LC-37D43U Operation Manual
Page 34
...the settings cannot be manually adjusted. • Adjustments are stored separately according to input source. 32 The screen will be automatically adjusted. H-Pos. [ 0] a10 b10 V-Pos. [ 0] a20 b20 Reset Selected item Description H-Pos. Centers the image by moving it up or down. 4 Press ... "Setup". 2 Press a/b to select "Position", and then press ENTER. 3 Press a/b to select "Yes", and then press ENTER. • "Now, TV will not be changed . See page 40 for setting a secret number. • "Return to the factory preset values" displays on the screen. 3 Press ...
...the settings cannot be manually adjusted. • Adjustments are stored separately according to input source. 32 The screen will be automatically adjusted. H-Pos. [ 0] a10 b10 V-Pos. [ 0] a20 b20 Reset Selected item Description H-Pos. Centers the image by moving it up or down. 4 Press ... "Setup". 2 Press a/b to select "Position", and then press ENTER. 3 Press a/b to select "Yes", and then press ENTER. • "Now, TV will not be changed . See page 40 for setting a secret number. • "Return to the factory preset values" displays on the screen. 3 Press ...

LC-32D43U | LC-37D43U Operation Manual
Page 41
...Style", 3 "Foreground Color", 4 "Foreground Opacity", 5 "Background Color", 6 "Background Opacity" and 7 "Character Edge". NOTE • For resetting adjustments to the factory preset values, press a/b to select the desired parameter. ABC 123 Caption Size Font Style Foreground Color Foreground Opacity Background Color Background... Opacity Character Edge Reset Default Default Default Default Default Default Default 4 Press c/d to select "Reset", and then press ENTER. • The default value depends on the ...
...Style", 3 "Foreground Color", 4 "Foreground Opacity", 5 "Background Color", 6 "Background Opacity" and 7 "Character Edge". NOTE • For resetting adjustments to the factory preset values, press a/b to select the desired parameter. ABC 123 Caption Size Font Style Foreground Color Foreground Opacity Background Color Background... Opacity Character Edge Reset Default Default Default Default Default Default Default 4 Press c/d to select "Reset", and then press ENTER. • The default value depends on the ...

LC-32D43U | LC-37D43U Operation Manual
Page 55
... number above, cut it from this manual, and keep it in a safe place. 53 Option aaaa 3 Press and hold both CHr and VOLk on the TV simultaneously until the message appears on the screen. Setup Secret No. The secret number is . CLEARING THE SECRET NUMBER If you forget the secret number... following procedure. 1 Press MENU to display the MENU screen, and then press c/d to select "Setup". 2 Press a/b to select "EZ Setup", "CH Setup", "Parental CTRL" or "Reset", and the Secret number input screen displays.
... number above, cut it from this manual, and keep it in a safe place. 53 Option aaaa 3 Press and hold both CHr and VOLk on the TV simultaneously until the message appears on the screen. Setup Secret No. The secret number is . CLEARING THE SECRET NUMBER If you forget the secret number... following procedure. 1 Press MENU to display the MENU screen, and then press c/d to select "Setup". 2 Press a/b to select "EZ Setup", "CH Setup", "Parental CTRL" or "Reset", and the Secret number input screen displays.


