LC-26D40U | LC-32D40U Operation Manual
Page 1
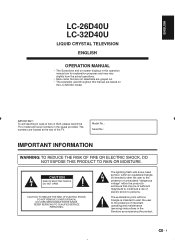
... THE RISK OF ELECTRIC SHOCK, DO NOT REMOVE COVER (OR BACK). The numbers are located at the rear of loss or theft, please record the TV's model and serial numbers in this manual are based on -screen displays in the space provided. REFER SERVICING TO QUALIFIED SERVICE PERSONNEL. ENGLISH LC-26D40U... may be of sufficient magnitude to constitute a risk of electric shock to the presence of important operating and maintenance (servicing) instructions in case of the TV.
... THE RISK OF ELECTRIC SHOCK, DO NOT REMOVE COVER (OR BACK). The numbers are located at the rear of loss or theft, please record the TV's model and serial numbers in this manual are based on -screen displays in the space provided. REFER SERVICING TO QUALIFIED SERVICE PERSONNEL. ENGLISH LC-26D40U... may be of sufficient magnitude to constitute a risk of electric shock to the presence of important operating and maintenance (servicing) instructions in case of the TV.
LC-26D40U | LC-32D40U Operation Manual
Page 4
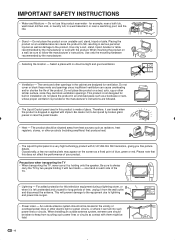
...• Selecting the location - do not place the product in an enclosed place such as damage to be taken to always carry the TV by two people holding it by broken glass pieces in a wet basement; For added protection for this product is dropped or applied with the... product. for long periods of overhead power lines or other openings in installation; Precautions when transporting the TV • When transporting the TV, never carry it with no direct sunlight and good ventilation. • Ventilation - in case the panel breaks. • Heat -...
...• Selecting the location - do not place the product in an enclosed place such as damage to be taken to always carry the TV by two people holding it by broken glass pieces in a wet basement; For added protection for this product is dropped or applied with the... product. for long periods of overhead power lines or other openings in installation; Precautions when transporting the TV • When transporting the TV, never carry it with no direct sunlight and good ventilation. • Ventilation - in case the panel breaks. • Heat -...
LC-26D40U | LC-32D40U Operation Manual
Page 5
... to the television equipment, be placed on the product. • To prevent fire or shock hazard, do not place the AC cord under the TV set or other heavy items. • Turn off the main power and unplug the AC cord from the wall outlet before handling. • Use a soft... cloth and gently wipe the surface of candle or flames on the top or near the TV set. • To prevent fire or shock hazard, do not use a dirty cloth, liquid cleaners or chemical cloth to clean it, such materials may...
... to the television equipment, be placed on the product. • To prevent fire or shock hazard, do not place the AC cord under the TV set or other heavy items. • Turn off the main power and unplug the AC cord from the wall outlet before handling. • Use a soft... cloth and gently wipe the surface of candle or flames on the top or near the TV set. • To prevent fire or shock hazard, do not use a dirty cloth, liquid cleaners or chemical cloth to clean it, such materials may...

LC-26D40U | LC-32D40U Operation Manual
Page 6
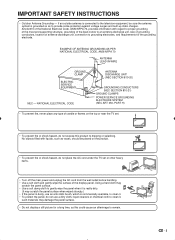
... • Before attaching (or detaching) stand, unplug the AC cord from being damaged. 1. Attach the two parts of the stand unit to lay the TV on. hex key Long screw NOTE • To detach the stand, perform the steps in step 4) 2. Insert and tighten the 4 long screws into ...the opening on Soft cushion the rear of the TV. 4. Supplied accessories Make sure the following accessories are provided with the TV. Insert the stand into the 4 holes on the bottom of the TV. Confirm the 8 screws supplied with the product) as shown. This...
... • Before attaching (or detaching) stand, unplug the AC cord from being damaged. 1. Attach the two parts of the stand unit to lay the TV on. hex key Long screw NOTE • To detach the stand, perform the steps in step 4) 2. Insert and tighten the 4 long screws into ...the opening on Soft cushion the rear of the TV. 4. Supplied accessories Make sure the following accessories are provided with the TV. Insert the stand into the 4 holes on the bottom of the TV. Confirm the 8 screws supplied with the product) as shown. This...

LC-26D40U | LC-32D40U Operation Manual
Page 7
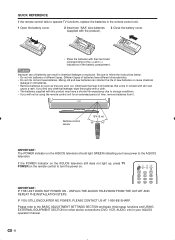
... the AC plug for AC use 2 people to lightly moisten. POWER B) POWER indicator on the AQUOS television for stability. 1. POWER indicator NOTE • Speaker cannot be detached from the TV. • TV angle cannot be used with supplied AC cord. Ventilation & Cleaning Tips Keep your antenna to turn on... To clean the outer cabinet, use liquid or aerosol cleaners. AC outlet • Place the TV close to the AC outlet, and keep the wrapping on either side of the AQUOS television lights GREEN. Remove the cardboard; however, keep the power plug within reach. Do not use...
... the AC plug for AC use 2 people to lightly moisten. POWER B) POWER indicator on the AQUOS television for stability. 1. POWER indicator NOTE • Speaker cannot be detached from the TV. • TV angle cannot be used with supplied AC cord. Ventilation & Cleaning Tips Keep your antenna to turn on... To clean the outer cabinet, use liquid or aerosol cleaners. AC outlet • Place the TV close to the AC outlet, and keep the wrapping on either side of the AQUOS television lights GREEN. Remove the cardboard; however, keep the power plug within reach. Do not use...
LC-26D40U | LC-32D40U Operation Manual
Page 8
... NOT POWER ON - Different types of batteries have a shorter life expectancy due to the AQUOS television. If the POWER indicator on the AQUOS television still does not light up, press TV POWER on the remote control to the BASIC ADJUSTMENT SETTINGS SECTION and basic Initial setup functions and... • Do not mix batteries of different types. IF YOU STILL ENCOUNTER NO POWER, PLEASE CONTACT US AT 1-800-BE-SHARP. Remote control sensor 16'4 (5 m) 30° 30° IMPORTANT: The POWER indicator on . UNPLUG THE AQUOS TELEVISION FROM THE OUTLET AND REPEAT THE INSTALLATION STEPS.
... NOT POWER ON - Different types of batteries have a shorter life expectancy due to the AQUOS television. If the POWER indicator on the AQUOS television still does not light up, press TV POWER on the remote control to the BASIC ADJUSTMENT SETTINGS SECTION and basic Initial setup functions and... • Do not mix batteries of different types. IF YOU STILL ENCOUNTER NO POWER, PLEASE CONTACT US AT 1-800-BE-SHARP. Remote control sensor 16'4 (5 m) 30° 30° IMPORTANT: The POWER indicator on . UNPLUG THE AQUOS TELEVISION FROM THE OUTLET AND REPEAT THE INSTALLATION STEPS.
LC-26D40U | LC-32D40U Operation Manual
Page 9
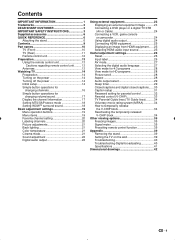
... SHARP CUSTOMER 3 IMPORTANT SAFETY INSTRUCTIONS 3 Supplied accessories 6 QUICK REFERENCE 6 Attaching the stand 6 Contents 9 Part names 10 TV (Front 10 TV (Rear 11 Remote control unit 12 Preparation 13 Using the remote control unit 13 Cautions regarding remote control unit ......... 13 Antennas 13 Watching TV ...captions and digital closed captions...... 30 Caption setup 31 Password setting for parental control 32 Parental control (V-CHIP 33 TV Parental Guide lines (TV Guide lines) ......... 34 Voluntary movie rating system (MPAA 34 How to temporarily release the V-CHIP block 34...
... SHARP CUSTOMER 3 IMPORTANT SAFETY INSTRUCTIONS 3 Supplied accessories 6 QUICK REFERENCE 6 Attaching the stand 6 Contents 9 Part names 10 TV (Front 10 TV (Rear 11 Remote control unit 12 Preparation 13 Using the remote control unit 13 Cautions regarding remote control unit ......... 13 Antennas 13 Watching TV ...captions and digital closed captions...... 30 Caption setup 31 Password setting for parental control 32 Parental control (V-CHIP 33 TV Parental Guide lines (TV Guide lines) ......... 34 Voluntary movie rating system (MPAA 34 How to temporarily release the V-CHIP block 34...

LC-26D40U | LC-32D40U Operation Manual
Page 10
Part names TV (Front) Volume buttons (VOL-/+) Channel buttons (CH / ) INPUT button POWER button Remote control sensor POWER indicator* NOTE *See page 14 for TV status indicator. 10
Part names TV (Front) Volume buttons (VOL-/+) Channel buttons (CH / ) INPUT button POWER button Remote control sensor POWER indicator* NOTE *See page 14 for TV status indicator. 10

LC-26D40U | LC-32D40U Operation Manual
Page 12
...Turn off if no operations are performed within about 5 seconds. Part names Remote control unit 1 12 2 3 4 5 6 7 8 9 10 11 1 TV POWER: Switch the TV power on the remote control unit will turn off the menu screen. 15 10 SLEEP: Set the sleep timer. (See page 29.) 11 AUDIO... operational buttons: Operate the external equipment. 3 0 - 9: Set the channel. (See page 16.) 4 • (DOT): (See page 16.) 5 INPUT: Select a TV input source. (TV, INPUT1~6) (See page 23.) 6 VOL +/-: Set the volume. (See page 17.) 13 7 SURROUND: Display the WOW surround setting 14 menu. (See page 18.) 8...
...Turn off if no operations are performed within about 5 seconds. Part names Remote control unit 1 12 2 3 4 5 6 7 8 9 10 11 1 TV POWER: Switch the TV power on the remote control unit will turn off the menu screen. 15 10 SLEEP: Set the sleep timer. (See page 29.) 11 AUDIO... operational buttons: Operate the external equipment. 3 0 - 9: Set the channel. (See page 16.) 4 • (DOT): (See page 16.) 5 INPUT: Select a TV input source. (TV, INPUT1~6) (See page 23.) 6 VOL +/-: Set the volume. (See page 17.) 13 7 SURROUND: Display the WOW surround setting 14 menu. (See page 18.) 8...

LC-26D40U | LC-32D40U Operation Manual
Page 13
...be attached to a 75-ohm terminal through a 300/75-ohm adapter (Commercially available). The following is a brief explanation of the types of the TV set , do not place in an area with F-type connector that can be attached to your outdoor antenna uses a 75-ohm coaxial cable with tools...under direct sunlight or strong lighting. If tools are used , it may cause damage to a terminal without a CATV converter Combination VHF/UHF antenna Cable TV lead-In Home Antenna terminal (75-ohm) or 75-ohm coaxial cable (round) 300/75-ohm adapter (commercially available) 300-ohm twin-lead (flat)...
...be attached to a 75-ohm terminal through a 300/75-ohm adapter (Commercially available). The following is a brief explanation of the types of the TV set , do not place in an area with F-type connector that can be attached to your outdoor antenna uses a 75-ohm coaxial cable with tools...under direct sunlight or strong lighting. If tools are used , it may cause damage to a terminal without a CATV converter Combination VHF/UHF antenna Cable TV lead-In Home Antenna terminal (75-ohm) or 75-ohm coaxial cable (round) 300/75-ohm adapter (commercially available) 300-ohm twin-lead (flat)...
LC-26D40U | LC-32D40U Operation Manual
Page 14
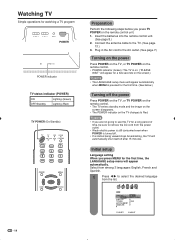
... 8.) 2. Plug in the AC cord to the AC outlet. (See page 7.) Turning on the power Press POWER on the TV, or TV POWER on the remote control. • POWER indicator (Green): The TV is on. ("PLEASE WAIT" will appear for a few seconds on the screen.) NOTE • The LANGUAGE setup menu will...you press MENU for the first time, the LANGUAGE setup menu will automatically shut itself off the power Press POWER on the TV, or TV POWER on the remote control. • The TV enters standby mode and the image on the screen disappears. • The POWER indicator on the remote control unit. 1.
... 8.) 2. Plug in the AC cord to the AC outlet. (See page 7.) Turning on the power Press POWER on the TV, or TV POWER on the remote control. • POWER indicator (Green): The TV is on. ("PLEASE WAIT" will appear for a few seconds on the screen.) NOTE • The LANGUAGE setup menu will...you press MENU for the first time, the LANGUAGE setup menu will automatically shut itself off the power Press POWER on the TV, or TV POWER on the remote control. • The TV enters standby mode and the image on the screen disappears. • The POWER indicator on the remote control unit. 1.
LC-26D40U | LC-32D40U Operation Manual
Page 15
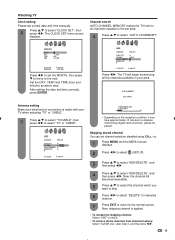
... step 3, and the press / . 15 After setting the date and time correctly, press ENTER. Channel search AUTO CHANNEL MEMORY makes the TV look for selected channel. 7 Press EXIT to return to the normal screen. Now, skipping channel is made with your area. The CLOCK ... ADD/DELETE :SELECT :ADJUST PROGRAMMING NOW PLEASE WAIT • Depending on the reception condition, it may take approximately 10 minutes to select "TV" or "CABLE". Watching TV Clock setting Please set channel selection disabled using CH / . 1 Press MENU and the MENU screen displays. 2 Press / to select (...
... step 3, and the press / . 15 After setting the date and time correctly, press ENTER. Channel search AUTO CHANNEL MEMORY makes the TV look for selected channel. 7 Press EXIT to return to the normal screen. Now, skipping channel is made with your area. The CLOCK ... ADD/DELETE :SELECT :ADJUST PROGRAMMING NOW PLEASE WAIT • Depending on the reception condition, it may take approximately 10 minutes to select "TV" or "CABLE". Watching TV Clock setting Please set channel selection disabled using CH / . 1 Press MENU and the MENU screen displays. 2 Press / to select (...
LC-26D40U | LC-32D40U Operation Manual
Page 16
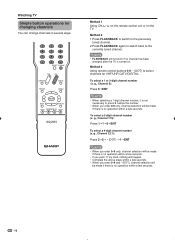
... 2 • (DOT) 1 ENT NOTE • When you enter 0-9 only, channel selection will be made if there is no channel has been changed after the TV is no operation within a few seconds. • If you push "0" by itself, nothing will happen. • Complete the above steps within a few seconds. •...; When you enter 0-9 only, channel selection will be made if there is no operation within a few seconds. 16 Watching TV Simple button operations for VHF/UHF/CATV/DIGITAL. NOTE • FLASHBACK will be made if there is turned on the Method 2 1 Press FLASHBACK to...
... 2 • (DOT) 1 ENT NOTE • When you enter 0-9 only, channel selection will be made if there is no channel has been changed after the TV is no operation within a few seconds. • If you push "0" by itself, nothing will happen. • Complete the above steps within a few seconds. •...; When you enter 0-9 only, channel selection will be made if there is no operation within a few seconds. 16 Watching TV Simple button operations for VHF/UHF/CATV/DIGITAL. NOTE • FLASHBACK will be made if there is turned on the Method 2 1 Press FLASHBACK to...
LC-26D40U | LC-32D40U Operation Manual
Page 17
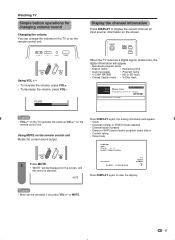
...VIDEO mode selected • Channel label (if preset) • Stereo or SAP (second audio program) audio status • Content rating • View mode STEREO SAP TV-PG L V SLEEP TIMER 2h00m 1 Press MUTE. • "MUTE" will appear. • Broadcast program name • Station name • Remaining time •... or SD mark • Closed Caption mark • V-Chip mark 51-3 CITYHD Moon Star SUN Jan 01 12:00 PM Remaining Time 0:20 TV-Y7 English HD CC No program information is silenced. Using VOL +/- • To increase the volume, press VOL+. • To decrease the ...
...VIDEO mode selected • Channel label (if preset) • Stereo or SAP (second audio program) audio status • Content rating • View mode STEREO SAP TV-PG L V SLEEP TIMER 2h00m 1 Press MUTE. • "MUTE" will appear. • Broadcast program name • Station name • Remaining time •... or SD mark • Closed Caption mark • V-Chip mark 51-3 CITYHD Moon Star SUN Jan 01 12:00 PM Remaining Time 0:20 TV-Y7 English HD CC No program information is silenced. Using VOL +/- • To increase the volume, press VOL+. • To decrease the ...
LC-26D40U | LC-32D40U Operation Manual
Page 18
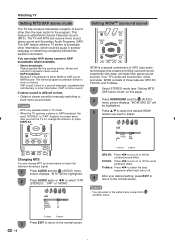
...highlighted. 3 Press / to select the desired WOW feature you turn on this page). 2 Press SURROUND and the (AUDIO) menu screen displays. Your TV's audio will be highlighted. 2 Press AUDIO again or / to turn on , change MTS as shown below to fixed mono-sound mode. AUDIO...or something completely different like live sporting events, shows and concerts in dynamic stereo sound. • SAP broadcasts Receive TV broadcasts in either in TV mode. • When the TV receives a stereo or SAP broadcast, the word "STEREO" or "SAP" displays on-screen every time you want ...
...highlighted. 3 Press / to select the desired WOW feature you turn on this page). 2 Press SURROUND and the (AUDIO) menu screen displays. Your TV's audio will be highlighted. 2 Press AUDIO again or / to turn on , change MTS as shown below to fixed mono-sound mode. AUDIO...or something completely different like live sporting events, shows and concerts in dynamic stereo sound. • SAP broadcasts Receive TV broadcasts in either in TV mode. • When the TV receives a stereo or SAP broadcast, the word "STEREO" or "SAP" displays on-screen every time you want ...
LC-26D40U | LC-32D40U Operation Manual
Page 19
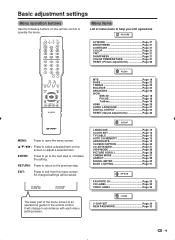
RETURN: Press to return to the next step or complete the setting. SETUP LANGUAGE Page 14 CLOCK SET Page 15 TV/CABLE Page 15 AUTO CH MEMORY Page 15 ADD/DELETE Page 15 CLOSED CAPTION Page 30 CC ADVANCED Page 31 VIEW MODE Page 28 PICTURE ... changed settings will change in accordance with operations PICTURE AV MODE Page 27 BRIGHTNESS Page 21 CONTRAST Page 21 COLOR Page 21 TINT Page 21 SHARPNESS Page 21 COLOR TEMPERATURE Page 21 RESET (Picture adjustments Page 26 AUDIO MTS Page 18 BASS Page 22 TREBLE Page 22 BALANCE Page 22 SPEAKERS...
RETURN: Press to return to the next step or complete the setting. SETUP LANGUAGE Page 14 CLOCK SET Page 15 TV/CABLE Page 15 AUTO CH MEMORY Page 15 ADD/DELETE Page 15 CLOSED CAPTION Page 30 CC ADVANCED Page 31 VIEW MODE Page 28 PICTURE ... changed settings will change in accordance with operations PICTURE AV MODE Page 27 BRIGHTNESS Page 21 CONTRAST Page 21 COLOR Page 21 TINT Page 21 SHARPNESS Page 21 COLOR TEMPERATURE Page 21 RESET (Picture adjustments Page 26 AUDIO MTS Page 18 BASS Page 22 TREBLE Page 22 BALANCE Page 22 SPEAKERS...
LC-26D40U | LC-32D40U Operation Manual
Page 22
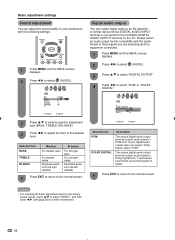
... to an AV amplifier or similar device whose DIGITAL AUDIO INPUT terminal is connected to the COAXIAL DIGITAL AUDIO OUTPUT terminal on the TV. Selected item BASS TREBLE BLANCE button For weaker bass For weaker treble Decrease audio from the right speaker button For stronger bass For stronger treble...
... to an AV amplifier or similar device whose DIGITAL AUDIO INPUT terminal is connected to the COAXIAL DIGITAL AUDIO OUTPUT terminal on the TV. Selected item BASS TREBLE BLANCE button For weaker bass For weaker treble Decrease audio from the right speaker button For stronger bass For stronger treble...

LC-26D40U | LC-32D40U Operation Manual
Page 23
...of external equipment to your external equipment operation manual for the signal type. CAUTION • To protect equipment, always turn off the TV before making connections. • Refer to the INPUT3 terminal. SOURCE SELECTION 0. To view external source images, select the input source ...from "SOURCE SELECTION" menu using 0-6 on the TV. To watch a DVD image, select "INPUT3" from INPUT on the remote control unit or on the remote control. INPUT2 3. INPUT5 6. INPUT1 2....
...of external equipment to your external equipment operation manual for the signal type. CAUTION • To protect equipment, always turn off the TV before making connections. • Refer to the INPUT3 terminal. SOURCE SELECTION 0. To view external source images, select the input source ...from "SOURCE SELECTION" menu using 0-6 on the TV. To watch a DVD image, select "INPUT3" from INPUT on the remote control unit or on the remote control. INPUT2 3. INPUT5 6. INPUT1 2....

LC-26D40U | LC-32D40U Operation Manual
Page 24
...or camcorder A VCR, game console, camcorder and other audiovisual equipment can use the INPUT1~4 terminals when connecting to a DVD player, a Digital TV STB (Air or Cable) and other audiovisual equipment. When using component cable. (INPUT3 or 4) When using the INPUT1 or 2 terminals. ...Using digital audio output It is possible to the HDMI terminal. Using external equipment Connecting a DVD player or a digital TV STB (Air or Cable) You can be conveniently connected using composite cable. (INPUT1 or 2) Component video cable (commercially available) Audio cable...
...or camcorder A VCR, game console, camcorder and other audiovisual equipment can use the INPUT1~4 terminals when connecting to a DVD player, a Digital TV STB (Air or Cable) and other audiovisual equipment. When using component cable. (INPUT3 or 4) When using the INPUT1 or 2 terminals. ...Using digital audio output It is possible to the HDMI terminal. Using external equipment Connecting a DVD player or a digital TV STB (Air or Cable) You can be conveniently connected using composite cable. (INPUT1 or 2) Component video cable (commercially available) Audio cable...
LC-26D40U | LC-32D40U Operation Manual
Page 25
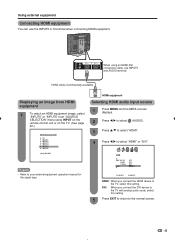
Using external equipment Connecting HDMI equipment You can use INPUT5 and AUDIO terminal. When using INPUT on the remote control unit or on the TV. (See page 23.) SOURCE SELECTION 0. INPUT5 6. HDMI cable (Commercially available) Displaying an image from HDMI equipment 1 To watch an HDMI ... to the normal screen. 25 INPUT6 [0-6]:SELECT NOTE • Refer to select "HDMI" or "DVI". TV 1. DVI: When you connect the HDMI device to the TV, select this setting. 5 Press EXIT to return to the TV with analog audio cords, select this setting. INPUT1 2. INPUT2 3. INPUT3 4.
Using external equipment Connecting HDMI equipment You can use INPUT5 and AUDIO terminal. When using INPUT on the remote control unit or on the TV. (See page 23.) SOURCE SELECTION 0. INPUT5 6. HDMI cable (Commercially available) Displaying an image from HDMI equipment 1 To watch an HDMI ... to the normal screen. 25 INPUT6 [0-6]:SELECT NOTE • Refer to select "HDMI" or "DVI". TV 1. DVI: When you connect the HDMI device to the TV, select this setting. 5 Press EXIT to return to the TV with analog audio cords, select this setting. INPUT1 2. INPUT2 3. INPUT3 4.

