
LC-40LE810UN | LC-46LE810UN | LC-52LE810UN | LC-60LE810UN Operation Manual
Page 43
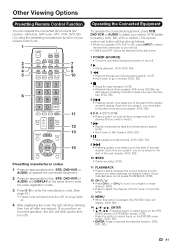
... MENU • When this button is finished once the LED no longer lights up. 4 After registering the code, the LED will stop blinking then turn off after one second. (If you perform an incorrect operation, the LED will blink quickly then turn off.) Operating the Connected Equipment To operate the ... operate the connected equipment. 2 Press an appropriate button (STB, DVD•VCR or AUDIO) and DISPLAY at the same time. 1 POWER (SOURCE) • Turns the connected equipment power on the DVD/BD menu screen. (DVD, BD) • ENTER: Press to activate the selected function. (STB, DVD, BD)...
... MENU • When this button is finished once the LED no longer lights up. 4 After registering the code, the LED will stop blinking then turn off after one second. (If you perform an incorrect operation, the LED will blink quickly then turn off.) Operating the Connected Equipment To operate the ... operate the connected equipment. 2 Press an appropriate button (STB, DVD•VCR or AUDIO) and DISPLAY at the same time. 1 POWER (SOURCE) • Turns the connected equipment power on the DVD/BD menu screen. (DVD, BD) • ENTER: Press to activate the selected function. (STB, DVD, BD)...
Service Manual
Page 36
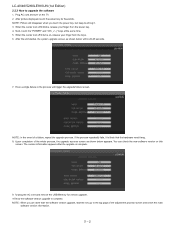
... version upgrade is complete. LC-40/46/52/60LE810UN (1st Edition) 2.2.3 How to the top page of the adjustment process screen and check the main software version information. 5 - 2 NOTE: Picture will trigger the upgrade failure screen. When the center icon LED blinks, release your finger form the keys. 6. Next, touch the "POWER" and "CH ( )" keys...
... version upgrade is complete. LC-40/46/52/60LE810UN (1st Edition) 2.2.3 How to the top page of the adjustment process screen and check the main software version information. 5 - 2 NOTE: Picture will trigger the upgrade failure screen. When the center icon LED blinks, release your finger form the keys. 6. Next, touch the "POWER" and "CH ( )" keys...
Service Manual
Page 37
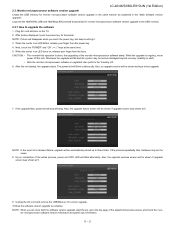
...damaged beyond recovery (inability to start the set, go to the top page of the whole process, power and OPC LED will stop blinking. If the upgrade fails, power led will blink alternately. Also, the upgrade failure screen will fail and the system may be shown if upgrade screen ... ). • After the monitor microprocessor software is complete. LE810UN 9. CAUTION: • The moment this operation is ongoing, never power off the unit. LC-40/46/52/60LE810UN (1st Edition) 2.3. When the center icon LED blinks, release your finger form the keys. NOTE: When you touch the...
...damaged beyond recovery (inability to start the set, go to the top page of the whole process, power and OPC LED will stop blinking. If the upgrade fails, power led will blink alternately. Also, the upgrade failure screen will fail and the system may be shown if upgrade screen ... ). • After the monitor microprocessor software is complete. LE810UN 9. CAUTION: • The moment this operation is ongoing, never power off the unit. LC-40/46/52/60LE810UN (1st Edition) 2.3. When the center icon LED blinks, release your finger form the keys. NOTE: When you touch the...
Service Manual
Page 38
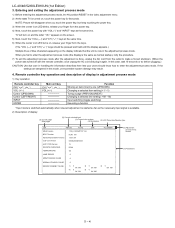
When you touch the power key, but keep touching the power key. 3) When the center icon LED blinks, release your finger from the outlet to enter the adjustment process mode. In this mode, unrecoverable system damage may result. 4. TV will... CAUSE ERROR STANDBY CAUSE 0 1) 0 0H 0M 4) 0 0H 0M 2) 0 0H 0M 5) 0 0H 0M 40_UNDER 3) 0 0H 0M (6) Adjustment process menu header (7) Parameters 5 - 4 LC-40/46/52/60LE810UN (1st Edition) 3. Entering and exiting the adjustment process mode 1) Before entering the adjustment process mode, the AV position RESET in adjustment process mode 1) Key...
When you touch the power key, but keep touching the power key. 3) When the center icon LED blinks, release your finger from the outlet to enter the adjustment process mode. In this mode, unrecoverable system damage may result. 4. TV will... CAUSE ERROR STANDBY CAUSE 0 1) 0 0H 0M 4) 0 0H 0M 2) 0 0H 0M 5) 0 0H 0M 40_UNDER 3) 0 0H 0M (6) Adjustment process menu header (7) Parameters 5 - 4 LC-40/46/52/60LE810UN (1st Edition) 3. Entering and exiting the adjustment process mode 1) Before entering the adjustment process mode, the AV position RESET in adjustment process mode 1) Key...
Service Manual
Page 49
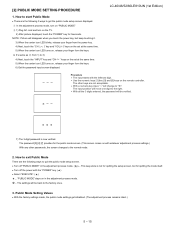
...setup screen, but keep touching it. 3) When the center icon LED blinks, release your finger from 1) to 3) 4) Next, touch the "INPUT" key and "CH " keys on the set at the same time. 5) When the center icon LED turns on with whatever adjustment process settings.) With any other keys... remote controller. ˴The other passwords, the screen changes to the factory ones. 3. LC-40/46/52/60LE810UN (1st Edition) Procedure ˴The input starts with the "POWER" key. ( ) • Select "EXECUTE". ( ) ... It's same as from the power key. 4) Next, touch the "CH ( )" key and "VOL (+)" keys on ...
...setup screen, but keep touching it. 3) When the center icon LED blinks, release your finger from 1) to 3) 4) Next, touch the "INPUT" key and "CH " keys on the set at the same time. 5) When the center icon LED turns on with whatever adjustment process settings.) With any other keys... remote controller. ˴The other passwords, the screen changes to the factory ones. 3. LC-40/46/52/60LE810UN (1st Edition) Procedure ˴The input starts with the "POWER" key. ( ) • Select "EXECUTE". ( ) ... It's same as from the power key. 4) Next, touch the "CH ( )" key and "VOL (+)" keys on ...


