LC-46D92U | LC-52D92U Operation Manual
Page 12
... Useful adjustment settings 34 Auto Sync. Contents IMPORTANT INFORMATION 1 Trademarks 2 DEAR SHARP CUSTOMER 3 IMPORTANT SAFETY INSTRUCTIONS 3 Supplied accessories 6 QUICK REFERENCE 6 Attaching the speaker unit 6 Attaching the... compatibility chart 16 Watching TV 17 Turning on the inside back cover. 10 adjustment (for DVI input mode only 34 Language setting 35 Image position 35 Reset 35 Input Label 36 ...for Service 59 LIMITED WARRANTY 59 Dimensional drawings • The dimensional drawings for the LCD TV set are shown on the power 17 Turning off the power 17 Initial setup ...
... Useful adjustment settings 34 Auto Sync. Contents IMPORTANT INFORMATION 1 Trademarks 2 DEAR SHARP CUSTOMER 3 IMPORTANT SAFETY INSTRUCTIONS 3 Supplied accessories 6 QUICK REFERENCE 6 Attaching the speaker unit 6 Attaching the... compatibility chart 16 Watching TV 17 Turning on the inside back cover. 10 adjustment (for DVI input mode only 34 Language setting 35 Image position 35 Reset 35 Input Label 36 ...for Service 59 LIMITED WARRANTY 59 Dimensional drawings • The dimensional drawings for the LCD TV set are shown on the power 17 Turning off the power 17 Initial setup ...

LC-46D92U | LC-52D92U Operation Manual
Page 25
...TV/INPUT 1/2/3 Picture OPC Page 27 Backlight Page 27 Contrast Page 27 Brightness Page 27 Color Page 27 Tint Page 27 Sharpness Page 27 Advanced Color Temp Page 28 Black Page 28 Fine Motion Advanced Page 28 3D-Y/C Page 28 Monochrome Page 28 Film Mode Page 28 Range of OPC Page 28 Reset... Page 27 Audio Treble Page 29 Bass Page 29 Balance Page 29 Surround Page 29 Reset... Language Page 35 Reset Page 35 Option ...
...TV/INPUT 1/2/3 Picture OPC Page 27 Backlight Page 27 Contrast Page 27 Brightness Page 27 Color Page 27 Tint Page 27 Sharpness Page 27 Advanced Color Temp Page 28 Black Page 28 Fine Motion Advanced Page 28 3D-Y/C Page 28 Monochrome Page 28 Film Mode Page 28 Range of OPC Page 28 Reset... Page 27 Audio Treble Page 29 Bass Page 29 Balance Page 29 Surround Page 29 Reset... Language Page 35 Reset Page 35 Option ...
LC-46D92U | LC-52D92U Operation Manual
Page 29
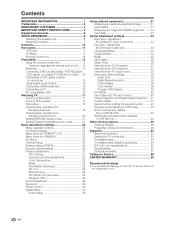
...select "Yes", and then press ENTER. OPC Off On Backlight [b12] a16 Contrast [b30] 0 Brightness [ 0] a30 Color [ 0] a30 Tint [ 0] a30 Sharpness [ b2] a10 Advanced Reset On : Display b16 b40 b30 b30 b30 b10 NOTE • When set in "Backlight". NOTE • For... brightness For more brightness Color For less color intensity For more color intensity Tint Skin tones become Skin tones become reddish greenish Sharpness For less sharpness For more sharpness NOTE • Select "Advanced" and then press ENTER to set to sense surrounding light. • When set "Color ...
...select "Yes", and then press ENTER. OPC Off On Backlight [b12] a16 Contrast [b30] 0 Brightness [ 0] a30 Color [ 0] a30 Tint [ 0] a30 Sharpness [ b2] a10 Advanced Reset On : Display b16 b40 b30 b30 b30 b10 NOTE • When set in "Backlight". NOTE • For... brightness For more brightness Color For less color intensity For more color intensity Tint Skin tones become Skin tones become reddish greenish Sharpness For less sharpness For more sharpness NOTE • Select "Advanced" and then press ENTER to set to sense surrounding light. • When set "Color ...
LC-46D92U | LC-52D92U Operation Manual
Page 31
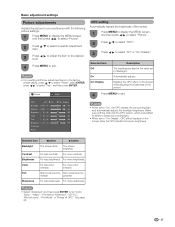
...the MENU screen, and then press c/d to select "Audio". 2 Press a/b to exit. Treble [ 0] a15 b15 Bass [ 0] a15 b15 Balance [ 0] L R Surround [Off] Reset 3 Press c/d to select "On", and then press ENTER. 4 Press MENU to select "Surround", and then press ENTER. NOTE • Audio menu is grayed out when... Output Select is set to "Variable". • For resetting all Audio adjustment items to the factory preset values, press a/b to select "Reset", press ENTER, press c/d to select "Yes", and then press ENTER. 29 In this case, please refer...
...the MENU screen, and then press c/d to select "Audio". 2 Press a/b to exit. Treble [ 0] a15 b15 Bass [ 0] a15 b15 Balance [ 0] L R Surround [Off] Reset 3 Press c/d to select "On", and then press ENTER. 4 Press MENU to select "Surround", and then press ENTER. NOTE • Audio menu is grayed out when... Output Select is set to "Variable". • For resetting all Audio adjustment items to the factory preset values, press a/b to select "Reset", press ENTER, press c/d to select "Yes", and then press ENTER. 29 In this case, please refer...
LC-46D92U | LC-52D92U Operation Manual
Page 36
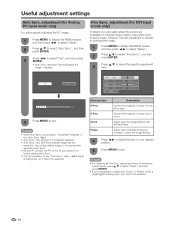
... signal is being input, so it cannot be selected. 34 Adjust when the image flickers with vertical stripes. NOTE • For resetting all Fine Sync. adjustment (for Analog PC input mode only) For automatically adjusting the PC image. 1 Press MENU to display the MENU ..., "Completed" displays. Yes No H-Pos. [ 90] a b V-Pos. [ 39] a b Clock [ 90] a b Phase [ 20] a b Reset 30% 4 Press MENU to exit. Clock Phase Description Centers the image by moving it to the TV and switch it up or down. Fine Sync. failed. • Auto Sync. Adjust when characters have low...
... signal is being input, so it cannot be selected. 34 Adjust when the image flickers with vertical stripes. NOTE • For resetting all Fine Sync. adjustment (for Analog PC input mode only) For automatically adjusting the PC image. 1 Press MENU to display the MENU ..., "Completed" displays. Yes No H-Pos. [ 90] a b V-Pos. [ 39] a b Clock [ 90] a b Phase [ 20] a b Reset 30% 4 Press MENU to exit. Clock Phase Description Centers the image by moving it to the TV and switch it up or down. Fine Sync. failed. • Auto Sync. Adjust when characters have low...

LC-46D92U | LC-52D92U Operation Manual
Page 37
Example Reset If complex adjustments are stored separately according to select "Yes", and then press ENTER. • "Now, TV will have returned to select "H-Pos." OK?" The screen will restart automatically. NOTE • The Channel Setup settings will not be changed...". 2 Press a/b to select "Position", and then press ENTER. 3 Press a/b to its original settings. displays on the screen and blinks. • After the reset has completed, the power shuts off and then comes back on the screen. 4 Press c/d to select "Yes", and then press ENTER. • "Now initializing..."...
Example Reset If complex adjustments are stored separately according to select "Yes", and then press ENTER. • "Now, TV will have returned to select "H-Pos." OK?" The screen will restart automatically. NOTE • The Channel Setup settings will not be changed...". 2 Press a/b to select "Position", and then press ENTER. 3 Press a/b to its original settings. displays on the screen and blinks. • After the reset has completed, the power shuts off and then comes back on the screen. 4 Press c/d to select "Yes", and then press ENTER. • "Now initializing..."...

LC-46D92U | LC-52D92U Operation Manual
Page 44
... "Foreground Opacity", 5 "Background Color", 6 "Background Opacity" and 7 "Character Edge". Type 3 Monospaced without serifs. NOTE • For resetting adjustments to the factory preset values, press a/b to select the desired parameter. ABC 123 Caption Size Font Style Foreground Color Foreground Opacity Background Color... Background Opacity Character Edge Reset Default Default Default Default Default Default Default 4 Press c/d to select "Reset", and then press ENTER. • The default value depends on the ...
... "Foreground Opacity", 5 "Background Color", 6 "Background Opacity" and 7 "Character Edge". Type 3 Monospaced without serifs. NOTE • For resetting adjustments to the factory preset values, press a/b to select the desired parameter. ABC 123 Caption Size Font Style Foreground Color Foreground Opacity Background Color... Background Opacity Character Edge Reset Default Default Default Default Default Default Default 4 Press c/d to select "Reset", and then press ENTER. • The default value depends on the ...

LC-46D92U | LC-52D92U Operation Manual
Page 60
..., and then press c/d to select "Setup". 2 Press a/b to select "EZ Setup", "CH Setup", "Parental CTRL" or "Reset", and the Secret number input screen displays. Option aaaa 3 Press and hold both CHr and VOLk on the TV simultaneously until the message appears on the screen. NOTE • As a precautionary measure, make a note of...
..., and then press c/d to select "Setup". 2 Press a/b to select "EZ Setup", "CH Setup", "Parental CTRL" or "Reset", and the Secret number input screen displays. Option aaaa 3 Press and hold both CHr and VOLk on the TV simultaneously until the message appears on the screen. NOTE • As a precautionary measure, make a note of...


