
LC-32D59U | LC42D69U Operation Manual
Page 3
... voltage"within a triangle presence of electric shock to constitute a risk of important operating and maintenance(servicing)instruction in the literature accompanying the product . 1 ENGLISH LC-32D59U LC-42D69U LIQUID CRYSTAL TELEVISION ENGLISH OPERATION MANUAL IMPORTANT: To aid reporting in case of the TV. The numbers are located at the rear of loss or...
... voltage"within a triangle presence of electric shock to constitute a risk of important operating and maintenance(servicing)instruction in the literature accompanying the product . 1 ENGLISH LC-32D59U LC-42D69U LIQUID CRYSTAL TELEVISION ENGLISH OPERATION MANUAL IMPORTANT: To aid reporting in case of the TV. The numbers are located at the rear of loss or...

LC-32D59U | LC42D69U Operation Manual
Page 4
... in a residential installation. Reorient or relocate the receiving antenna. - RESPONSIBLE PARTY: SHARP ELECTRONICS CORPORATION Sharp Plaza, Mahwah, New Jersey 07495-1163 TEL: 1-800-BE-SHARP For Business Customers: URL http://www.sharpusa.com INFORMATION: This equipment has been tested... Alliance:www.eiae.org,the lamp recycling organization: www.lamprecycle.org or Sharp at 1-800-BE-SHARP (For U.S.A only) DECLARATION OF CONFORMITY: SHARP LIQUID CRYSTAL TELEVISION, MODEL LC-32D59U/ LC-42D69U This device complies with electric appliances such as practical. Setting "Location" to...
... in a residential installation. Reorient or relocate the receiving antenna. - RESPONSIBLE PARTY: SHARP ELECTRONICS CORPORATION Sharp Plaza, Mahwah, New Jersey 07495-1163 TEL: 1-800-BE-SHARP For Business Customers: URL http://www.sharpusa.com INFORMATION: This equipment has been tested... Alliance:www.eiae.org,the lamp recycling organization: www.lamprecycle.org or Sharp at 1-800-BE-SHARP (For U.S.A only) DECLARATION OF CONFORMITY: SHARP LIQUID CRYSTAL TELEVISION, MODEL LC-32D59U/ LC-42D69U This device complies with electric appliances such as practical. Setting "Location" to...
LC-32D59U | LC42D69U Operation Manual
Page 5
... or moisture, does not operate normally, or has been dropped. For products intended to qualified service personnel. DEAR SHARP CUSTOMER Thank you are provided for your purchase of the Sharp Liquid Crystal Television. A grounding type plug has two blades and a third grounding prong. When a cart is used , use this product...
... or moisture, does not operate normally, or has been dropped. For products intended to qualified service personnel. DEAR SHARP CUSTOMER Thank you are provided for your purchase of the Sharp Liquid Crystal Television. A grounding type plug has two blades and a third grounding prong. When a cart is used , use this product...
LC-32D59U | LC42D69U Operation Manual
Page 6
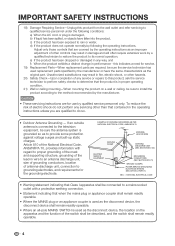
Unauthorized substitutions may result in damage and will often require extensive work by qualified service personnel only. To reduce the risk of any way, and f) When the product exhibits a distinct change in the operating instructions unless you are for the grounding electrode. EXAMPLE OF ANTENNA GROUNDING AS PER NATIONAL ELECTRICAL CODE, ANSI/NFPA 70 ANTENNA LEAD IN WIRE GROUND CLAMP ANTENNA DISCHARGE UNIT (NEC SECTION 810-20) ELECTRIC SERVICE EQUIPMENT GROUNDING CONDUCTORS (NEC SECTION 810-21) GROUND CLAMPS POWER SERVICE GROUNDING ELECTRODE SYSTEM (NEC ART 250, PART H) NEC ...
Unauthorized substitutions may result in damage and will often require extensive work by qualified service personnel only. To reduce the risk of any way, and f) When the product exhibits a distinct change in the operating instructions unless you are for the grounding electrode. EXAMPLE OF ANTENNA GROUNDING AS PER NATIONAL ELECTRICAL CODE, ANSI/NFPA 70 ANTENNA LEAD IN WIRE GROUND CLAMP ANTENNA DISCHARGE UNIT (NEC SECTION 810-20) ELECTRIC SERVICE EQUIPMENT GROUNDING CONDUCTORS (NEC SECTION 810-21) GROUND CLAMPS POWER SERVICE GROUNDING ELECTRODE SYSTEM (NEC ART 250, PART H) NEC ...
LC-32D59U | LC42D69U Operation Manual
Page 7
... cord under the TV set or other electric light or power circuits, or where it is dropped or applied with 1,049,088 pixels (LC-32D59U) / 2,073,600 pixels (LC-42D69U), giving you fine picture details. When mounting the product on a bed, sofa, rug or other products (including amplifiers) that this...
... cord under the TV set or other electric light or power circuits, or where it is dropped or applied with 1,049,088 pixels (LC-32D59U) / 2,073,600 pixels (LC-42D69U), giving you fine picture details. When mounting the product on a bed, sofa, rug or other products (including amplifiers) that this...
LC-32D59U | LC42D69U Operation Manual
Page 8
... inside the plastic may cause the cabinet to deform and cause the paint to peel off the main power and unplug the AC cord from Sharp in contact with a soft cloth (cotton, flannel, etc.). This may damage the surface of the display panel. • Wiping with a hard cloth or using..., to remain in single (00Z-LCD-CLOTH) or triple (00Z-LCDCLOTH-3) packs. Caring for ordering, or VISIT http://www.sharpusa.com/SharpDirect. 6 Call 1-800-BE-SHARP for the Liquid Crystal panel • Turn off .
... inside the plastic may cause the cabinet to deform and cause the paint to peel off the main power and unplug the AC cord from Sharp in contact with a soft cloth (cotton, flannel, etc.). This may damage the surface of the display panel. • Wiping with a hard cloth or using..., to remain in single (00Z-LCD-CLOTH) or triple (00Z-LCDCLOTH-3) packs. Caring for ordering, or VISIT http://www.sharpusa.com/SharpDirect. 6 Call 1-800-BE-SHARP for the Liquid Crystal panel • Turn off .
LC-32D59U | LC42D69U Operation Manual
Page 9
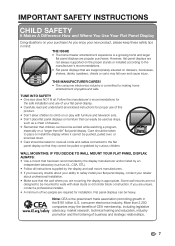
However, flat panel displays are not always supported on the proper stands or installed according to the manufacturer's recommendations. • Flat panel displays that the wall where you are unsure, contact a professional installer. • A minimum of two people are inappropriately situated on your purchase! THIS MANUFACTURER CARES! • The consumer electronics industry is appropriate. If you are mounting the display is committed to making home entertainment enjoyable and safe. IMPORTANT SAFETY INSTRUCTIONS CHILD SAFETY It Makes A Difference How and Where You Use ...
However, flat panel displays are not always supported on the proper stands or installed according to the manufacturer's recommendations. • Flat panel displays that the wall where you are unsure, contact a professional installer. • A minimum of two people are inappropriately situated on your purchase! THIS MANUFACTURER CARES! • The consumer electronics industry is appropriate. If you are mounting the display is committed to making home entertainment enjoyable and safe. IMPORTANT SAFETY INSTRUCTIONS CHILD SAFETY It Makes A Difference How and Where You Use ...
LC-32D59U | LC42D69U Operation Manual
Page 10
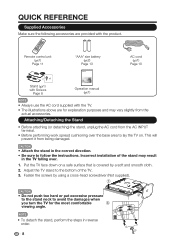
Remote control unit ( X1) Page 11 42" 32" Stand ( X1) with Screws Page 8 "AAA" size battery ( X2) Page 13 Operation manual ( X1) AC cord ( X1) Page 10 • Always use the AC cord supplied with the product. Fasten the screws by a soft and smooth cloth. 2. Attaching/Detaching the Stand • Before attaching (or detaching) the stand, unplug the AC cord from the actual accessories. CAUTION • Attach the stand in the TV falling over the base area to follow the instructions. Incorrect installation of the TV. 3. QUICK REFERENCE Supplied Accessories Make sure the ...
Remote control unit ( X1) Page 11 42" 32" Stand ( X1) with Screws Page 8 "AAA" size battery ( X2) Page 13 Operation manual ( X1) AC cord ( X1) Page 10 • Always use the AC cord supplied with the product. Fasten the screws by a soft and smooth cloth. 2. Attaching/Detaching the Stand • Before attaching (or detaching) the stand, unplug the AC cord from the actual accessories. CAUTION • Attach the stand in the TV falling over the base area to follow the instructions. Incorrect installation of the TV. 3. QUICK REFERENCE Supplied Accessories Make sure the ...

LC-32D59U | LC42D69U Operation Manual
Page 11
Loosen the 4 screws that secure the stand neck by using an optional wall mount bracket to mount it. 1. QUICK REFERENCE Detaching the stand neck for wall mounting CAUTION • Please use care when disassembling cabinet, stand, and pillar for wall mounting. • Detach the stand neck in the correct direction. • Do not remove the stand neck from the TV set. 32''/42'' Stand Cover • To attach the stand neck, perform the steps in reverse order. • Do not force or overtighten and do not install without stand covers. 9 Remove stand cover from the TV unless using a cross-...
Loosen the 4 screws that secure the stand neck by using an optional wall mount bracket to mount it. 1. QUICK REFERENCE Detaching the stand neck for wall mounting CAUTION • Please use care when disassembling cabinet, stand, and pillar for wall mounting. • Detach the stand neck in the correct direction. • Do not remove the stand neck from the TV set. 32''/42'' Stand Cover • To attach the stand neck, perform the steps in reverse order. • Do not force or overtighten and do not install without stand covers. 9 Remove stand cover from the TV unless using a cross-...
LC-32D59U | LC42D69U Operation Manual
Page 12
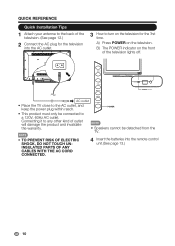
A) Press POWER on the front of the television lights off. B) The POWER indicator on the television. Connecting it to any other kind of outlet will damage the product and invalidate the warranty. • Speakers cannot be connected to a 120V, 60Hz AC outlet. CH + VOL MENU POWER indicator INPUT AC outlet POWER • Place the TV close to the AC outlet, and POWER keep the power plug within reach. • This product must only be detached from the TV. • TO PREVENT RISK OF ELECTRIC SHOCK, DO NOT TOUCH UNINSULATED PARTS OF ANY CABLES WITH THE AC CORD CONNECTED. 4 Insert ...
A) Press POWER on the front of the television lights off. B) The POWER indicator on the television. Connecting it to any other kind of outlet will damage the product and invalidate the warranty. • Speakers cannot be connected to a 120V, 60Hz AC outlet. CH + VOL MENU POWER indicator INPUT AC outlet POWER • Place the TV close to the AC outlet, and POWER keep the power plug within reach. • This product must only be detached from the TV. • TO PREVENT RISK OF ELECTRIC SHOCK, DO NOT TOUCH UNINSULATED PARTS OF ANY CABLES WITH THE AC CORD CONNECTED. 4 Insert ...
LC-32D59U | LC42D69U Operation Manual
Page 13
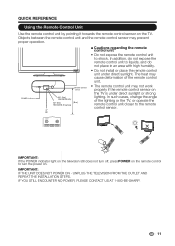
... liquids, and do not expose the remote control unit to shock. GJ221 11 IF YOU STILL ENCOUNLTCDTEV R NO POWER, PLEASE CONTACT US AT 1-800-BE-SHARP. In such cases, change the angle of the remote control unit. • The remote control unit may prevent proper operation. QUICK REFERENCE Using the Remote...
... liquids, and do not expose the remote control unit to shock. GJ221 11 IF YOU STILL ENCOUNLTCDTEV R NO POWER, PLEASE CONTACT US AT 1-800-BE-SHARP. In such cases, change the angle of the remote control unit. • The remote control unit may prevent proper operation. QUICK REFERENCE Using the Remote...

LC-32D59U | LC42D69U Operation Manual
Page 14
The following is a brief explanation of the types of the methods in the illustration as shown (2 , 3 , 4 or 5 ). 1 Cable without tools (Commercially available). 2. If tools are used , it into the antenna terminal at "twin-lead" cable that can be attached to a 75-ohm terminal through a 300/75-ohm adapter (Commercially available). Preparation Antennas To enjoy a clearer picture, use an outdoor antenna. F-type connector 75-ohm coaxial cable (round) 300-ohm twin-lead cable (flat ) 4 Separate VHF/UHF antenna VHF UHF ANTENNA ANTENNA 300-ohm twin-lead cable 300-ohm twin-...
The following is a brief explanation of the types of the methods in the illustration as shown (2 , 3 , 4 or 5 ). 1 Cable without tools (Commercially available). 2. If tools are used , it into the antenna terminal at "twin-lead" cable that can be attached to a 75-ohm terminal through a 300/75-ohm adapter (Commercially available). Preparation Antennas To enjoy a clearer picture, use an outdoor antenna. F-type connector 75-ohm coaxial cable (round) 300-ohm twin-lead cable (flat ) 4 Separate VHF/UHF antenna VHF UHF ANTENNA ANTENNA 300-ohm twin-lead cable 300-ohm twin-...

LC-32D59U | LC42D69U Operation Manual
Page 15
Mixing old and new batteries can result in chemical leakage or explosion. Chemicals that leak from it. • The batteries (batteries installed) shall not be using the remote control unit for an extended period of new batteries or cause chemical leakage in old batteries. • Remove batteries as soon as sunshine, fire or the like. 13 Different types of different types. Preparation Installing Batteries in the Remote Control Unit If the remote control fails to operate TV functions, replace the batteries in the remote control unit. 1 Open the battery cover. 3 Close the...
Mixing old and new batteries can result in chemical leakage or explosion. Chemicals that leak from it. • The batteries (batteries installed) shall not be using the remote control unit for an extended period of new batteries or cause chemical leakage in old batteries. • Remove batteries as soon as sunshine, fire or the like. 13 Different types of different types. Preparation Installing Batteries in the Remote Control Unit If the remote control fails to operate TV functions, replace the batteries in the remote control unit. 1 Open the battery cover. 3 Close the...
LC-32D59U | LC42D69U Operation Manual
Page 16
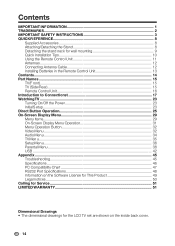
Contents IMPORTANT INFORMATION 1 TRADEMARKS ...2 IMPORTANT SAFETY INSTRUCTIONS 3 QUICKR EFERENCE...8 Supplied Accessories 8 Attaching/Detaching the Stand 8 Detaching the stand neck for wall mounting 9 Quick Installation Tips 10 Using the Remote Control Unit 11 Antennas ...12 Connecting Antenna Cable 12 Installing Batteries in the Remote Control Unit 13 Contents...14 Part Names ...15 TV(F ront)...15 TV (Side/Rear)...15 Remote Control Unit 16 Introduction to Connectionst 17 WatchingTV ...23 Turning On/Off the Power 23 InitialS etup...23 Direct Button Operation 25 On-Screen Display ...
Contents IMPORTANT INFORMATION 1 TRADEMARKS ...2 IMPORTANT SAFETY INSTRUCTIONS 3 QUICKR EFERENCE...8 Supplied Accessories 8 Attaching/Detaching the Stand 8 Detaching the stand neck for wall mounting 9 Quick Installation Tips 10 Using the Remote Control Unit 11 Antennas ...12 Connecting Antenna Cable 12 Installing Batteries in the Remote Control Unit 13 Contents...14 Part Names ...15 TV(F ront)...15 TV (Side/Rear)...15 Remote Control Unit 16 Introduction to Connectionst 17 WatchingTV ...23 Turning On/Off the Power 23 InitialS etup...23 Direct Button Operation 25 On-Screen Display ...
LC-32D59U | LC42D69U Operation Manual
Page 17
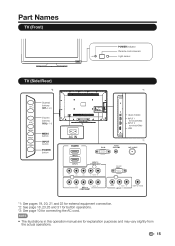
AUDIO -R RS-232C IOIOI VIDEO L- Part Names TV (Front) POWER indicator Remote control sensor Light sensor TV (Side/Rear) *2 Channel buttons CH (CH / ) + VOL MENU INPUT POWER Volume buttons (VOL+ / _) MENU button INPUT button POWER button *3 AC IN *1 HEAD PHONE HEAD PHONE INPUT 1 INPUT 1 INPUT 2 terminal (HDMI) INPUT 2 terminal (HDMI) USB USB *1 Y PB PR L- AUDIO -R Y PB PR L- AUDIO -R DIGITAL AUDIO *1: See pages 19, 20, 21 and 22 for external equipment connection. *2: See page 18 ,23,25 and 31 for button operations. *3: See page 10 for connecting the AC cord...
AUDIO -R RS-232C IOIOI VIDEO L- Part Names TV (Front) POWER indicator Remote control sensor Light sensor TV (Side/Rear) *2 Channel buttons CH (CH / ) + VOL MENU INPUT POWER Volume buttons (VOL+ / _) MENU button INPUT button POWER button *3 AC IN *1 HEAD PHONE HEAD PHONE INPUT 1 INPUT 1 INPUT 2 terminal (HDMI) INPUT 2 terminal (HDMI) USB USB *1 Y PB PR L- AUDIO -R Y PB PR L- AUDIO -R DIGITAL AUDIO *1: See pages 19, 20, 21 and 22 for external equipment connection. *2: See page 18 ,23,25 and 31 for button operations. *3: See page 10 for connecting the AC cord...
LC-32D59U | LC42D69U Operation Manual
Page 18
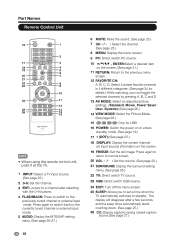
This display will disappear after selecting with the 0-9 buttons. 4 FLASHBACK: Press to switch to the previous menu screen. 12 FAVORITE CH: A, B, C, D: Select 4 preset favorite channels in 4 different categories. (See page 34 for details.) While watching, you to set a time when the TV automatically switches to standby. Press again to switch back to the currently tuned channel or external input mode. 5 AUDIO: Display the MTS/SAP setting menu. (See page 26-27.) = = 6 MUTE: Mute the sound. (See page 25.) 7 CH / : Select the channel. (See page 25.) 8 MENU: Display the menu screen. 9 PC: ...
This display will disappear after selecting with the 0-9 buttons. 4 FLASHBACK: Press to switch to the previous menu screen. 12 FAVORITE CH: A, B, C, D: Select 4 preset favorite channels in 4 different categories. (See page 34 for details.) While watching, you to set a time when the TV automatically switches to standby. Press again to switch back to the currently tuned channel or external input mode. 5 AUDIO: Display the MTS/SAP setting menu. (See page 26-27.) = = 6 MUTE: Mute the sound. (See page 25.) 7 CH / : Select the channel. (See page 25.) 8 MENU: Display the menu screen. 9 PC: ...
LC-32D59U | LC42D69U Operation Manual
Page 19
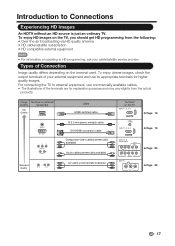
AUDIO -R Y PB PR L- AUDIO -R INPUT 7 VIDEO L- AUDIO -R Page 20 Page 20 17 For connecting the TV to external equipment, use its appropriate terminals for explanation purposes and may vary slightly from the following: • Over-the-air broadcasting via HD quality antenna • HD cable/satellite subscription • HD compatible external equipment • For information on updating to Connections Experiencing HD Images An HDTV without an HD source is just an ordinary TV. Image Terminal on external Quality equipment HD Quality AUDIO DVI OUT Standard Quality ...
AUDIO -R Y PB PR L- AUDIO -R INPUT 7 VIDEO L- AUDIO -R Page 20 Page 20 17 For connecting the TV to external equipment, use its appropriate terminals for explanation purposes and may vary slightly from the following: • Over-the-air broadcasting via HD quality antenna • HD cable/satellite subscription • HD compatible external equipment • For information on updating to Connections Experiencing HD Images An HDTV without an HD source is just an ordinary TV. Image Terminal on external Quality equipment HD Quality AUDIO DVI OUT Standard Quality ...
LC-32D59U | LC42D69U Operation Manual
Page 20
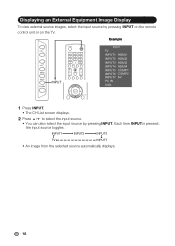
Displaying an External Equipment Image Display To view external source images, select the input source by pressing INPUT. INPUT1 INPUT2 INPUT3 TV INPUT7 • An image from the selected source automatically displays. 18 Example CH + VOL MENU INPUT POWER < < INPUT POWER INPUT 1 2 3 4 5 6 7 8 9 /0 ENT DIS P LAY F RE E Z E AUDIO FLASHBACK + `VOL MUTE SURROUND TV USB PC CH MENU EXIT ENTER RETURN Input TV INPUT1 HDMI1 INPUT2 HDMI2 INPUT3 HDMI3 INPUT4 HDMI4 INPUT5 COMP1 INPUT6 COMP2 INPUT7 AV PC IN USB 1 Press INPUT. • The CH List screen displays. 2 ...
Displaying an External Equipment Image Display To view external source images, select the input source by pressing INPUT. INPUT1 INPUT2 INPUT3 TV INPUT7 • An image from the selected source automatically displays. 18 Example CH + VOL MENU INPUT POWER < < INPUT POWER INPUT 1 2 3 4 5 6 7 8 9 /0 ENT DIS P LAY F RE E Z E AUDIO FLASHBACK + `VOL MUTE SURROUND TV USB PC CH MENU EXIT ENTER RETURN Input TV INPUT1 HDMI1 INPUT2 HDMI2 INPUT3 HDMI3 INPUT4 HDMI4 INPUT5 COMP1 INPUT6 COMP2 INPUT7 AV PC IN USB 1 Press INPUT. • The CH List screen displays. 2 ...
LC-32D59U | LC42D69U Operation Manual
Page 21
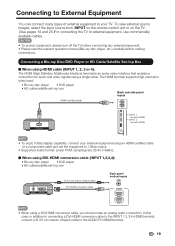
To view external source images, select the input source from INPUT on the remote control unit or on the TV. (See pages 18 and 25.)For connecting the TV to the AUDIO PC/HDMI t.erminal . 19 Connecting a Blu-ray Disc/DVD Player or HD Cable/Satellite Set-top Box When using HDMI cable (INPUT 1, 2, 3 or 4): The HDMI (High Definition Multimedia Interface) terminal is an audio-video interface that enables a connection for audio and video signals using a DVI-HDMI conversion cable, you should make an analog audio connection. Connecting to External Equipment You can connect many types of external...
To view external source images, select the input source from INPUT on the remote control unit or on the TV. (See pages 18 and 25.)For connecting the TV to the AUDIO PC/HDMI t.erminal . 19 Connecting a Blu-ray Disc/DVD Player or HD Cable/Satellite Set-top Box When using HDMI cable (INPUT 1, 2, 3 or 4): The HDMI (High Definition Multimedia Interface) terminal is an audio-video interface that enables a connection for audio and video signals using a DVI-HDMI conversion cable, you should make an analog audio connection. Connecting to External Equipment You can connect many types of external...
LC-32D59U | LC42D69U Operation Manual
Page 22
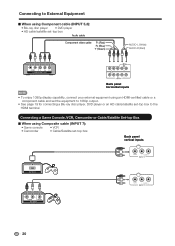
Connecting to the HDMI terminal. Connecting a Game Console, VCR, Camcorder or Cable/Satellite Set-top Box When using Component cable (INPUT 5,6): • Blu-ray disc player • DVD player • HD cable/satellite set -top box Back panel vertical inputs VIDEO L- AUDIO -R 20 AUDIO -R VIDEO L- AUDIO -R Y PB PR L- AUDIO -R Back panel horizontal inputs • To enjoy 1080p display capability, connect your external equipment using an HDMI-certified cable or a component cable and set the equipment to 1080p output. • See page 19 for connecting a Blu-ray ...
Connecting to the HDMI terminal. Connecting a Game Console, VCR, Camcorder or Cable/Satellite Set-top Box When using Component cable (INPUT 5,6): • Blu-ray disc player • DVD player • HD cable/satellite set -top box Back panel vertical inputs VIDEO L- AUDIO -R 20 AUDIO -R VIDEO L- AUDIO -R Y PB PR L- AUDIO -R Back panel horizontal inputs • To enjoy 1080p display capability, connect your external equipment using an HDMI-certified cable or a component cable and set the equipment to 1080p output. • See page 19 for connecting a Blu-ray ...