Operation Manual
Page 1
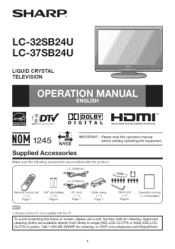
... Sharp in single (00Z-LCD-CLOTH) or triple (00Z-LCD- Approved cleaning cloths are provkJed with the TV. Ca 1-800-BE-SHARP for cleaning. CL©TH-3 packs. "AA" size battery (x2) Page 8 AC cord (xl) Page 7 Cableclamp (xl) Page 7 Stand unit (xl) Page6 Operation manual (x 3 languages) J = Abvaysusethe AC cord supplied with the product. ,f LC 32SB24U Lo37sB_g4u "'" '"' F--] Remote...
... Sharp in single (00Z-LCD-CLOTH) or triple (00Z-LCD- Approved cleaning cloths are provkJed with the TV. Ca 1-800-BE-SHARP for cleaning. CL©TH-3 packs. "AA" size battery (x2) Page 8 AC cord (xl) Page 7 Cableclamp (xl) Page 7 Stand unit (xl) Page6 Operation manual (x 3 languages) J = Abvaysusethe AC cord supplied with the product. ,f LC 32SB24U Lo37sB_g4u "'" '"' F--] Remote...
Operation Manual
Page 7
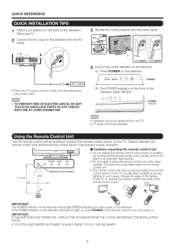
... STEPS UNPLUG THE TELEVISION FROM THE OUTLET AND REPEAT THE INSTALLATION IF YOU STILL ENCOUNTER NO POWER, PLEASE CONTACT US AT 1 800 BE SHARP QUICK REFERENCE o ,_ t= -= ± ok D 1 Attach your antenna to the back of the tebvision. (See page 8.) :3... Pr2q_R O SLE' OJ O_O _ /k Remote Control sensor _0° " sDcuoonnlntigrohtlt,iunnTsihtaell hoeraptlamceaythceaurseemodteefocrmonattriooln uonfitthuendreermdoitreect • The remote control unit may not work propedy if the remote control sensor on the television. • Place the TV close to the AC outlet, and keep the...
... STEPS UNPLUG THE TELEVISION FROM THE OUTLET AND REPEAT THE INSTALLATION IF YOU STILL ENCOUNTER NO POWER, PLEASE CONTACT US AT 1 800 BE SHARP QUICK REFERENCE o ,_ t= -= ± ok D 1 Attach your antenna to the back of the tebvision. (See page 8.) :3... Pr2q_R O SLE' OJ O_O _ /k Remote Control sensor _0° " sDcuoonnlntigrohtlt,iunnTsihtaell hoeraptlamceaythceaurseemodteefocrmonattriooln uonfitthuendreermdoitreect • The remote control unit may not work propedy if the remote control sensor on the television. • Place the TV close to the AC outlet, and keep the...
Operation Manual
Page 8
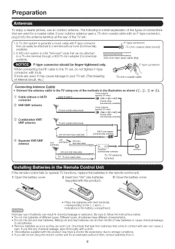
... the life of new batteries or cause chemical leakage in the remote control unit. % 3 Close the battery cover. in old batteries, Remove batteries as soon as shown (_,, '9, _ or _=). F type connector When connecting the RF came to the TV set . (The breaking 75-ohm coaxial cable _of internal circuit..., etc.) f Connecting Antenna Cable * Connect the antenna cable to the 33/using the remote control unit for a coaxial cable, if your TV set , do not tighten F type connector with the product). Be sure to follow the instructions below Do not mix...
... the life of new batteries or cause chemical leakage in the remote control unit. % 3 Close the battery cover. in old batteries, Remove batteries as soon as shown (_,, '9, _ or _=). F type connector When connecting the RF came to the TV set . (The breaking 75-ohm coaxial cable _of internal circuit..., etc.) f Connecting Antenna Cable * Connect the antenna cable to the 33/using the remote control unit for a coaxial cable, if your TV set , do not tighten F type connector with the product). Be sure to follow the instructions below Do not mix...
Operation Manual
Page 10
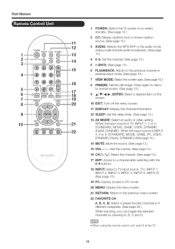
... selected channels by pressing A, B, C and D. • When us]ng the remote contlol unit, point it at the TV 10 Part Names 12 POWER @ _)_SPSLLAE,YE,WP_0DE 13 32 cc Auolo 14 iiii_ . _i¸i_ 1 POWER: Switch the TV power on the screen. 10 EXIT: Turn oh the menu screen. 11 DISPLAY.... (See page 13.) 16 CHA/V: Select the channel (See page 13.) 17 ENT: Jumps to a channel alter selecting with the 0-9 buttons. 18 INPUT: Sebct a TV input source. (TV, INPUT 1, INPUT 2, INPUT 3, INPUT 4, INPUT 5, INPUT 6) (See page 13.) 19 PC: Quickly access to PC mode. 20 MENU: Dispby the menu screen....
... selected channels by pressing A, B, C and D. • When us]ng the remote contlol unit, point it at the TV 10 Part Names 12 POWER @ _)_SPSLLAE,YE,WP_0DE 13 32 cc Auolo 14 iiii_ . _i¸i_ 1 POWER: Switch the TV power on the screen. 10 EXIT: Turn oh the menu screen. 11 DISPLAY.... (See page 13.) 16 CHA/V: Select the channel (See page 13.) 17 ENT: Jumps to a channel alter selecting with the 0-9 buttons. 18 INPUT: Sebct a TV input source. (TV, INPUT 1, INPUT 2, INPUT 3, INPUT 4, INPUT 5, INPUT 6) (See page 13.) 19 PC: Quickly access to PC mode. 20 MENU: Dispby the menu screen....
Operation Manual
Page 11
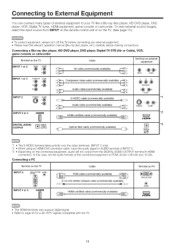
Connecting to External Equipment You can connect many types of the connected equipment to PCM, 32/44 1/48 kHz and 16 bits Connecting a PC Terminal on the TV Cable Terminal on the connected equipment, audio will not output from the DIGITAL AUDIO OUTPUT terminal in HDMI connection In this... compatible with the %/ To vbw external source images, select the input source from iNPUT on the remote control unit or on the TV. (See page 13.) * To protect equipment, a]ways turn off the TV before connecting any extema] equipment, o Please read the relevant operation manual (Blu-ray disc player,...
Connecting to External Equipment You can connect many types of the connected equipment to PCM, 32/44 1/48 kHz and 16 bits Connecting a PC Terminal on the TV Cable Terminal on the connected equipment, audio will not output from the DIGITAL AUDIO OUTPUT terminal in HDMI connection In this... compatible with the %/ To vbw external source images, select the input source from iNPUT on the remote control unit or on the TV. (See page 13.) * To protect equipment, a]ways turn off the TV before connecting any extema] equipment, o Please read the relevant operation manual (Blu-ray disc player,...
Operation Manual
Page 12
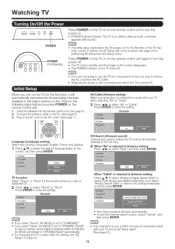
... , the E7 Setup will automatically memorize the broadcasting channels available in the AC cord to "DYNAMIC (Fixed)". Insertthe batteries intothe remote control unit (See page 8) 2, Connect the antenna cable to the TV (See page 8,) g, Plug in the region where you live. In case no channel is found, confirm the type of connection..., • if you select "Home", AV MODE is set to remove the AC cord from the Setup menu, POWER (On/Standby) Press POWER on the TV or on the remote control unit again power off When you turn the _DTJ If you press POWER on the screen disappears.
... , the E7 Setup will automatically memorize the broadcasting channels available in the AC cord to "DYNAMIC (Fixed)". Insertthe batteries intothe remote control unit (See page 8) 2, Connect the antenna cable to the TV (See page 8,) g, Plug in the region where you live. In case no channel is found, confirm the type of connection..., • if you select "Home", AV MODE is set to remove the AC cord from the Setup menu, POWER (On/Standby) Press POWER on the TV or on the remote control unit again power off When you turn the _DTJ If you press POWER on the screen disappears.
Operation Manual
Page 13
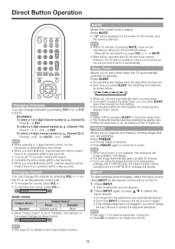
... available, "No displaying still image available," will display, The still image automatica]ly goes out after SOminutes have passed, However, the TV will not suddenly output a loud sound as shown below I a..2..o...l.. The remaining time displays when the sleep timer has been set , its indicator ...source automatically displays Each time _NPUT is no operation within a few seconds. o If you cannot change channels by using INPUT on the remote control unit or on the remote control unit. Press FREEZE. • A moving you enter 0-9 and * (DOT), channel selection will be made if there is...
... available, "No displaying still image available," will display, The still image automatica]ly goes out after SOminutes have passed, However, the TV will not suddenly output a loud sound as shown below I a..2..o...l.. The remaining time displays when the sleep timer has been set , its indicator ...source automatically displays Each time _NPUT is no operation within a few seconds. o If you cannot change channels by using INPUT on the remote control unit or on the remote control unit. Press FREEZE. • A moving you enter 0-9 and * (DOT), channel selection will be made if there is...
Operation Manual
Page 17
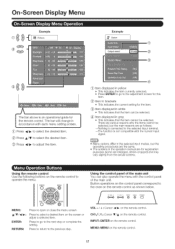
... as follows: Nothing is not compatible with the control panel of the main unit. "r Using the remote controm Use the following buttons on the remote control 17 Using the control panel of the main unit You can be selected _ Item displayed in gray This indicates that the item ...step or complete the setting, Press to letum to the p/evious step VOL-/+ : Cursor _/_ on the remote control CNV/A: Cursor T/A on the remote control INPUT: ENTER on the remote control MENU: MENU on the remote control to the selected input terminal. -The function is connected to operate the IT/eRIJ. There are ...
... as follows: Nothing is not compatible with the control panel of the main unit. "r Using the remote controm Use the following buttons on the remote control 17 Using the control panel of the main unit You can be selected _ Item displayed in gray This indicates that the item ...step or complete the setting, Press to letum to the p/evious step VOL-/+ : Cursor _/_ on the remote control CNV/A: Cursor T/A on the remote control INPUT: ENTER on the remote control MENU: MENU on the remote control to the selected input terminal. -The function is connected to operate the IT/eRIJ. There are ...
Operation Manual
Page 24
...TV and the remote control Off: No adjustment, RO Control Lock: All buttons on the remote control ale locked, Button Control Lock: All buttons on the TV, except POWER ale locked To unlock the buttons on the remote... contloL pleas MENU on the T_/, and then select "Otf" on the MENU screen, To unlock the buttons on the T_/, press MENU on the remote...music from the Parental CTRL to reactivate BLOCK. (See pages 22 and 23.) Switch oft the TV power Performing any of the three above will return to temporarily release the V-CHIP BLOCK When ...
...TV and the remote control Off: No adjustment, RO Control Lock: All buttons on the remote control ale locked, Button Control Lock: All buttons on the TV, except POWER ale locked To unlock the buttons on the remote... contloL pleas MENU on the T_/, and then select "Otf" on the MENU screen, To unlock the buttons on the T_/, press MENU on the remote...music from the Parental CTRL to reactivate BLOCK. (See pages 22 and 23.) Switch oft the TV power Performing any of the three above will return to temporarily release the V-CHIP BLOCK When ...
Operation Manual
Page 25
... favorite channel: Select "Register" and then press ENTER Press _k/_'/_/ _- No: "Program Info." on the remote control unit or VOL - / + on the TV. Ifyou have already set INPUT 1 to Auto, the TV will result in the following connection priority INPUT f: COMPONENT VIDEO _', VIDEO To watch an HDMI or PC-IN... equipment image, select "INPUT4" or "INPUT5" from "INPUT SOURCE" menu using INPUT on the remote control unit or on the %/ Sound via the...
... favorite channel: Select "Register" and then press ENTER Press _k/_'/_/ _- No: "Program Info." on the remote control unit or VOL - / + on the TV. Ifyou have already set INPUT 1 to Auto, the TV will result in the following connection priority INPUT f: COMPONENT VIDEO _', VIDEO To watch an HDMI or PC-IN... equipment image, select "INPUT4" or "INPUT5" from "INPUT SOURCE" menu using INPUT on the remote control unit or on the %/ Sound via the...
Operation Manual
Page 28
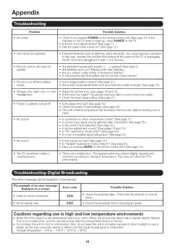
...with polarity ( J, ) aligned? (See page 8) Are batteries worn out? (Replace with new batteries.) Are you using it in after 1 or 2 minutes Remote control unit does not operate • Picture is cut off Is the sleep timer set? (See page 13) • Check the power contlol settings. (See... and contracts according to change in a low temperatu/e space (eg. Appendix Problem • NO power Possible Solution Check if you pressed MUTE on the remote contlol unit? (See page 13) • This is not a malfunction. The picture may look da/k in a room that the antenna is correctly setup...
...with polarity ( J, ) aligned? (See page 8) Are batteries worn out? (Replace with new batteries.) Are you using it in after 1 or 2 minutes Remote control unit does not operate • Picture is cut off Is the sleep timer set? (See page 13) • Check the power contlol settings. (See... and contracts according to change in a low temperatu/e space (eg. Appendix Problem • NO power Possible Solution Check if you pressed MUTE on the remote contlol unit? (See page 13) • This is not a malfunction. The picture may look da/k in a room that the antenna is correctly setup...


