Sharp LC-20VM2 Support and Manuals
Get Help and Manuals for this Sharp item

View All Support Options Below
Free Sharp LC-20VM2 manuals!
Problems with Sharp LC-20VM2?
Ask a Question
Free Sharp LC-20VM2 manuals!
Problems with Sharp LC-20VM2?
Ask a Question
Most Recent Sharp LC-20VM2 Questions

Where Can I Get Power Cord For Sharp Lc-20vm2 Monitor?
(Posted by Nydgonz 10 years ago)
Popular Sharp LC-20VM2 Manual Pages
Operation Manual - Page 4
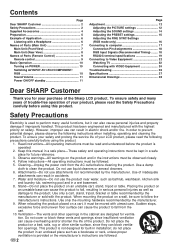
... many years of trouble-free operation of your LCD product, please read the following instructions when installing, operating and cleaning the product. Sudden stops, excessive force and uneven floor surface can also cause personal injuries and property damage if improperly handled. Contents
Page
Dear SHARP Customer 2 Safety Precautions 2 Supplied Accessories 4 Preparation 5 Example...
Operation Manual - Page 5
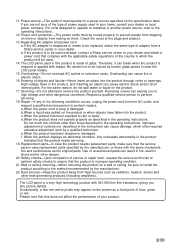
... a Sharp service center or your dealer or local power company. If you to be used .
14. Repair-If any of unauthorized parts can cause electric shock and/or short internal parts. d.When the product does not operate properly as the original parts. Any noticeable abnormality in the operating instructions. Use of the following conditions occurs, unplug the power cord from...
Operation Manual - Page 6
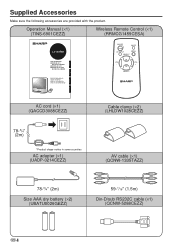
... Remote Control (×1) (RRMCG1459CESA)
LC-20VM2
LCD AV MONITOR MONITEUR AV À
CRISTAUX LIQUIDES MONITOR AV LCD MONITOR AV DE TELA
DE CRISTAL LÍQUIDO
OPERATION MANUAL MODE D'EMPLOI MANUAL DE MANEJO MANUAL DE OPERAÇÃO
ESPAÑOL
FRANÇAIS
ENGLISH
ON/OFF
MUTE
AV INPUT
MENU
SELECT
VOL -
VOL +
SELECT
PORTUGUÊS
AC cord (×1) (QACCD3088CEZZ)
78...
Operation Manual - Page 7
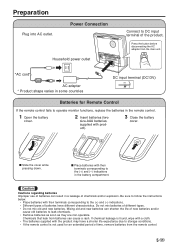
... • The batteries supplied with the product may have different characteristics. Power Connection
Household power outlet
Connect to DC ...AC cord
AC adapter * Product shape varies in some countries
DC input terminal (DC13V)
POWER ...instructions below.
• Place batteries with their terminals corresponding to operate monitor functions, replace the batteries in the battery compartment.
Operation Manual - Page 8
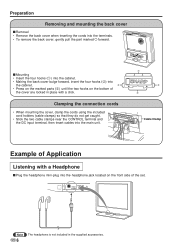
...into
the cabinet.
2
• Press on the marked parts (3) until the two hooks on the front side of Application
...set. MENU
-
s Mounting
• Insert the four hooks (1) into the cabinet.
• Making the back cover bulge forward, insert the four hooks (2) into the headphone jack located on the bottom of
the cover are locked in the supplied accessories.
Clamping the connection cords...
Operation Manual - Page 9
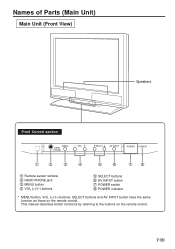
This manual describes button functions by referring to the buttons on the remote control. Names of Parts (Main Unit)
Main Unit (Front View)
Speakers
Front Control section
MENU HEAD PHONE
− VOL +
SELECT
AV INPUT
POWER POWER
1
2
3
4
5
6
78
1 Remote sensor window 2 HEAD PHONE jack 3 MENU button 4 VOL (+)/(-) buttons
5 SELECT buttons 6 AV INPUT button 7 POWER switch 8 POWER ...
Operation Manual - Page 11
...AV INPUT
MENU
SELECT
VOL - Front Control section
MENU HEAD PHONE
− VOL +
SELECT
AV INPUT
POWER POWER
ON/OFF
MUTE
AV INPUT
MENU
SELECT
VOL -
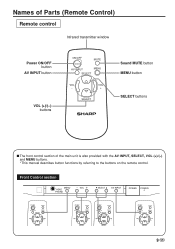
Names of the main unit is also provided with ...the AV INPUT, SELECT, VOL (+)/(-) and MENU buttons. * This manual describes button functions by referring to the buttons on the remote control.
VOL +
SELECT
Sound ...
Operation Manual - Page 14
...;]
TINT
[ ‰]
COLOR
[ ‰]
BLACK LEVEL [ ‰]
SHARPNESS
[ ‰]
RED
[ ‰]
BLUE
[ ‰]
COLOR SYSTEM [ AUTO]
RESET
SELECT: •
ENTER :( • ) EXIT: MENU
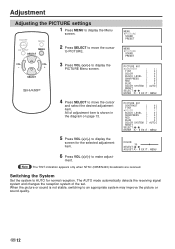
4 Press SELECT to move the cursor
to move the cursor
and select the desired adjustment item. Adjustment
Adjusting the PICTURE settings
1 Press MENU to display the
PICTURE Menu screen...
Operation Manual - Page 15
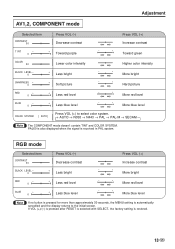
... purple
Press VOL (+)
Increase contrast
-
+
Toward green
COLOR 3‰
Lower color intensity
Higher color intensity
BLACK LEVEL - ‰
SHARPNESS - ‰
RED
-
‰
+ Less bright + Soft picture + Less red level
-
+
More bright
-
+
Hard ...approximately 30 seconds, the MENU setting is restored.
13 US PAL60 is also displayed when the signal is received in PAL system.
Operation Manual - Page 16
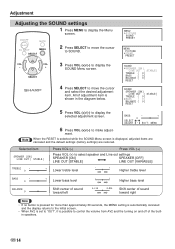
...8226; ) EXIT: MENU
6 Press VOL (+)/(-) to display the Menu
screen.
Adjustment
Adjusting the SOUND settings
1 Press MENU to make adjust- Selected item
SPEAKER [ON] LINE OUT [ STABLE]
SLC
Press VOL... (-)
Press VOL (+)
Press VOL (+) to select speaker and Line out settings
SPEAKER [ON]
SPEAKER [OFF]
LINE OUT [STABLE]
LINE OUT [VARIABLE]
TREBLE
-
‰
+ ...
Operation Manual - Page 21
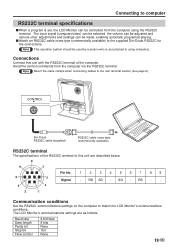
...the computer. RS -
-
5
4
2
1
Communication conditions
Set the RS232C communications settings on the computer to the supplied Din-D/sub RS232C for the connections. RD SD - The LCD Monitor's communications settings are described below.
8
9
7
Pin No.
1
2
34
5
67
89
6
3
Signal
- Connecting to computer
RS232C terminal specifications
s When a program is accustomed to using...
Operation Manual - Page 22

... format
Normal response
OK
Parameter 4-digits Return code (0DH)
Return code (0DH) Problem response (communication error or incorrect command)
ERR
Return code (0DH)
When more than a menu display command, it will execute the command without displaying the On-screen Display. If the LCD Monitor receives a command other than one code is verified. Connecting to computer
Communication procedure...
Operation Manual - Page 24

Note Refer to the manual how to connect these tuner to Video Equipment
Watching TV
s To view a TV broadcast on the LCD monitor, the set-top box must be used with a TV tuner, satellite tuner or VCR. Connecting to the room antenna terminal. Via TV
AUDIO
R
L
VIDEO
Via Satellite TV, Pay TV
AUDIO
R
L
VIDEO
To VIDEO/AUDIO input terminal
To VIDEO...
Operation Manual - Page 28
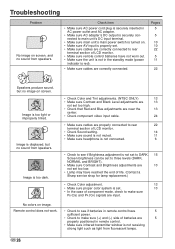
... to make sure (+) and (-) side of LCD monitor.
• Check Sound setting.
14
• Make sure sound is not muted.
11
• Make sure headphone is not connected.
6
• Check to see if batteries in remote control have reached the end of life. (Contact a
Sharp service shop for lamp replacement.)
• Check Color adjustment.
13
•...
Operation Manual - Page 29
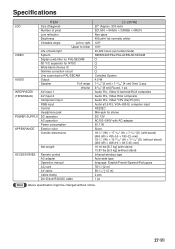
Specifications
LCD
VIDEO
AUDIO INTERFACES (TERMINALS) POWER SUPPLY APPEARANCE
ITEM
Size (Diagonal)
Number of ...
RGB input
Control
Headphone jack
DC operation
AC operation
Power consumption
Exterior color
Outside dimensions
Net weight
ACCESSORIES
Remote control AC adapter Operation manual AC cord AV cable Cable clamp Din-D/sub RS232C cable
LC-20VM2 20" (Approx. 500 mm) 921,600 = 640...
Sharp LC-20VM2 Reviews
We have not received any reviews for Sharp yet.